manuals.online logo
Brands
  1. Home
  2. •
  3. Brands
  4. •
  5. Vixen
  6. •
  7. Binoculars
  8. •
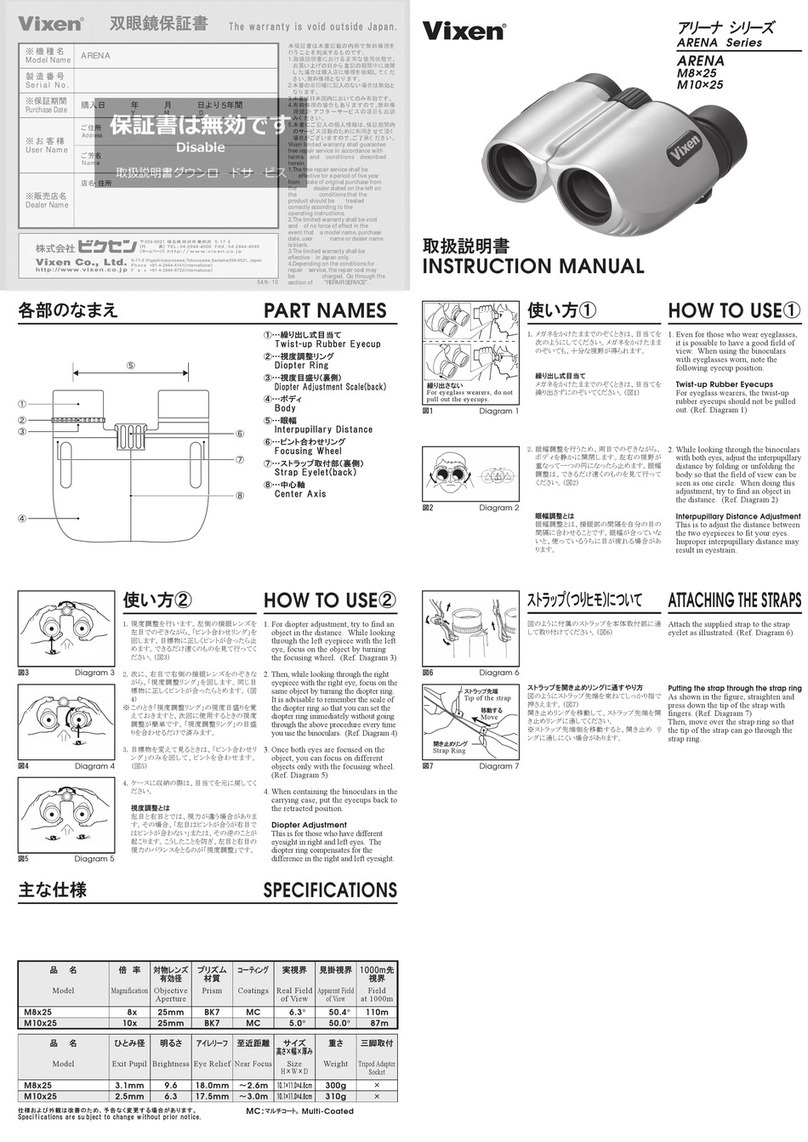
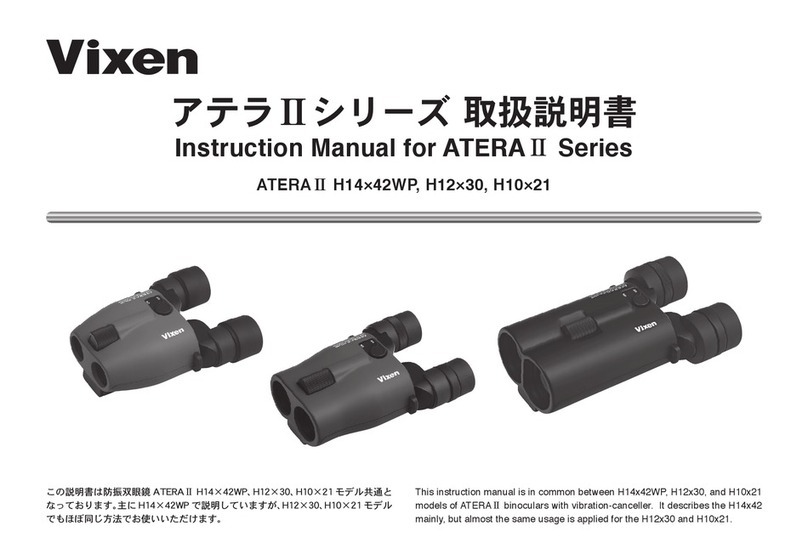
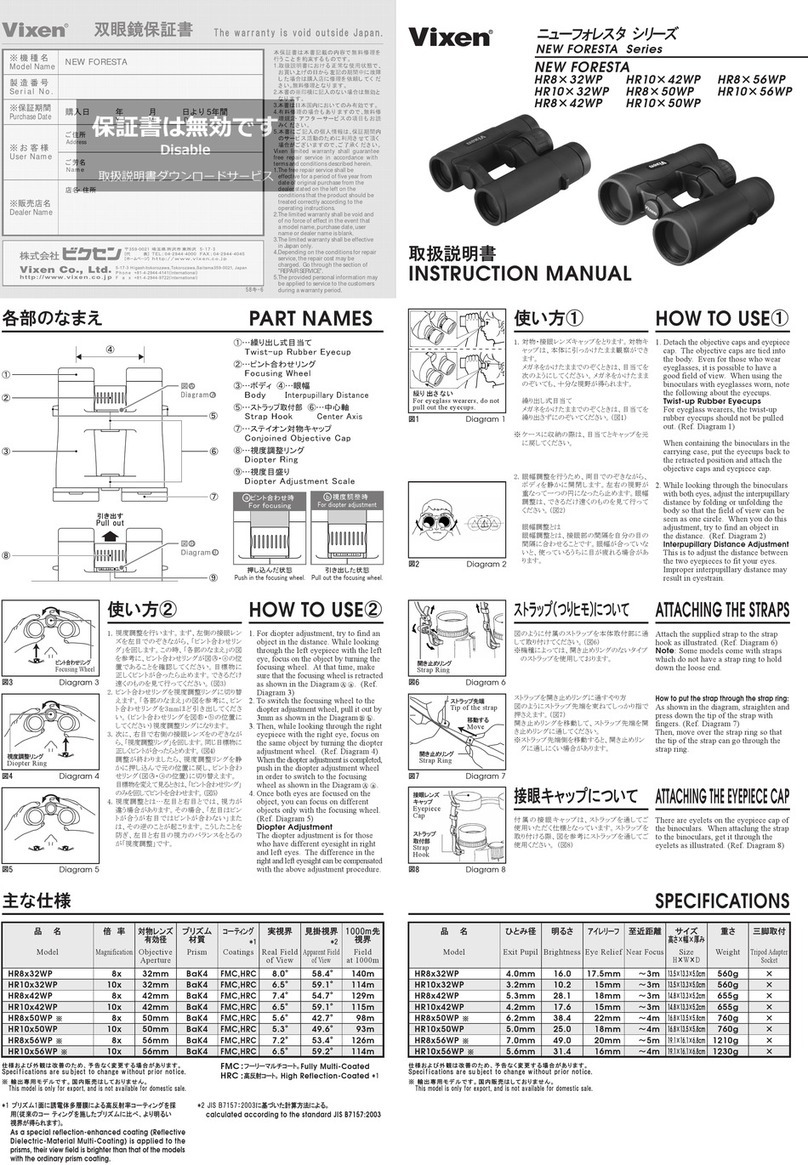
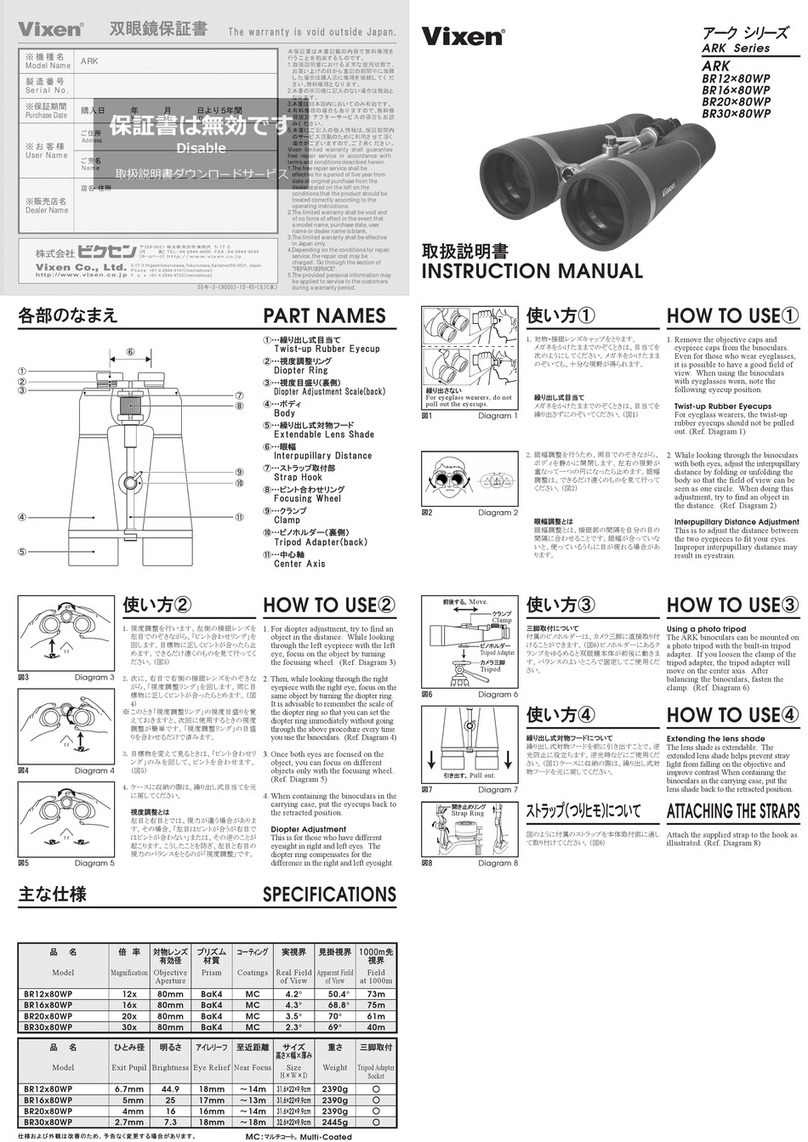
  9. Vixen ASCOT Series User manual

Vixen ASCOT Series User manual

繰り出さない
For eyeglass wearers, do not
pull out the eyecups.
図1        
Diagram 1
折り返す
Fold down the rubber eyecups.
図2        
Diagram 2
図3        
Diagram 3 図4        
Diagram 4
図6        
Diagram 6
図5        
Diagram 5
開き止めリング
Strap Ring
図7        
Diagram 7
図9        
Diagram 9
図8        
Diagram 8
ビノホルダーH
Tripod Adapter-H
カメラ三脚
Tripod
キャップ
Cap
[ズーム式]
Zoom Types
取扱説明書
INSTRUCTION MANUAL
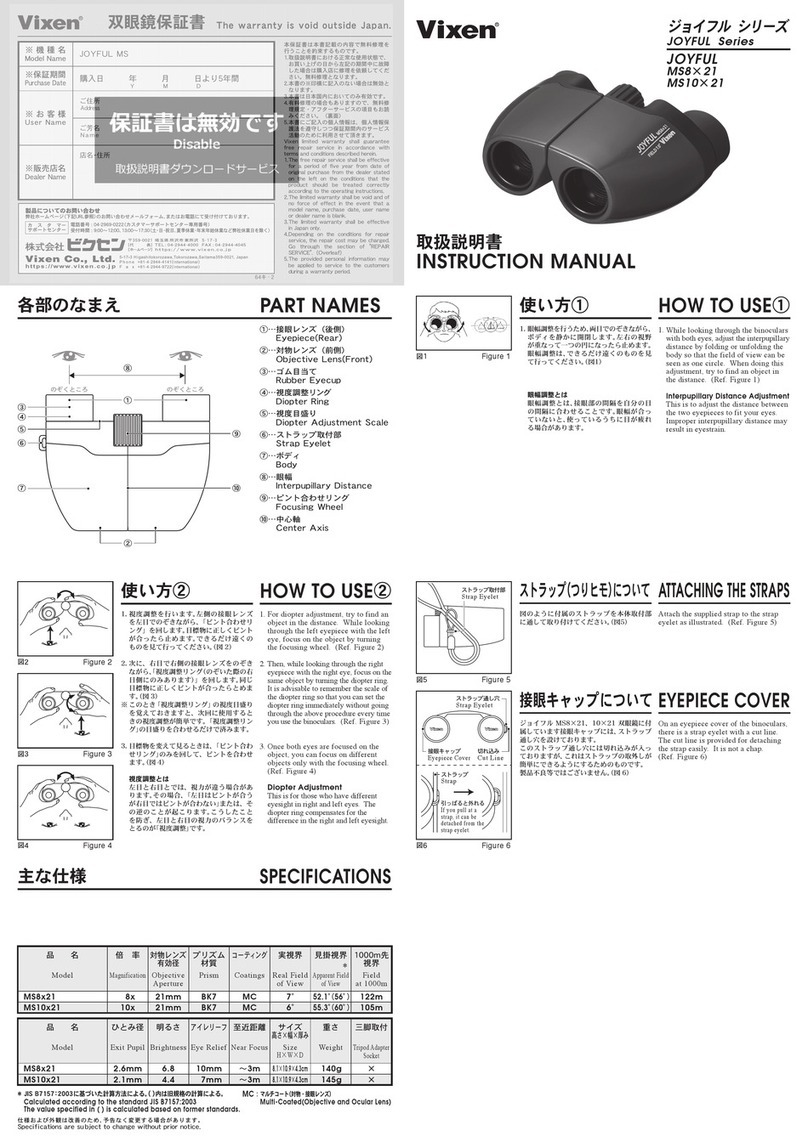
①…繰り出し式目当て
  Twist-up Rubber Eyecup
②…視度調整リング
  Diopter Ring
③…視度目盛り
(裏側)
  
Diopter Adjustment Scale(back)
④…ボディ
  Body
⑤…眼幅
  Interpupillary Distance
⑥…中心軸
  Center Axis
⑦…ストラップ取付部(裏側)
  Strap Eyelet(back)
⑧…ピント合わせリング
  Focusing Wheel
⑨…ゴム目当て
  Rubber Eyecup
⑩…ズームレバー
  Zoom Knob
For diopter adjustment, try to find an object
in the distance. While looking through
the left【right】eyepiece with the left【right】
eye, focus on the object by turning the
focusing wheel. (Ref. Diagram 4)
【For accurate diopter adjustment of zoom
type binoculars, make adjustment at
higher magnification.】 【 】=For zoom type
Then, while looking through the right
【left】eyepiece with the right【left】eye,
focus on the same object by turning
the diopter ring. It is advisable to
remember the scale of the diopter ring
so that you can set the diopter ring
immediately without going through the
above procedure every time you use the
binoculars. (Ref. Diagram 5)
【】=For zoom type
Once both eyes are focused on the object,
you can focus on different objects only with
the focusing wheel. (Ref. Diagram 6)
Diopter Adjustment
This is for those who have different
eyesight in right and left eyes. The
diopter ring compensates for the
difference in the right and left eyesight.
1.
2.
3.
視度調整を行います。左側【右側】の接眼
レンズを左目【右目】でのぞきながら、「ピ
ント合わせリング」を回します。目標物に
正しくピントが合ったら止めます。でき
るだけ遠くのものを見て行ってくださ
い。【ズーム式双眼鏡の場合、高倍率側で視
度調整を行うとより精度が上がります。】
(図 4)【】内はズーム式双眼鏡の場合
次に、右目【左目】で右側【左側】の接眼レ
ンズをのぞきながら、「視度調整リング」を
回します。同じ目標物に正しくピントが
合ったらとめます。(図 5)
このとき「視度調整リング」の視度目盛り
を覚えておきますと、次回に使用すると
きの視度調整が簡単です。「視度調整リン
グ」の目盛りを合わせるだけで済みます。
【】内はズーム式双眼鏡の場合
目標物を変えて見るときは、「ピント合わせリ
ング」のみを回してピントを合わせます。(図 6)
視度調整とは
左目と右目とでは、視力が違う場合があ
ります。その場合、「左目はピントが合う
が右目ではピントが合わない」または、そ
の逆のことが起こります。こうしたこと
を防ぎ、左目と右目の視力のバランスを
とるのが「視度調整」です。
1.
※
2.
※
※
3.
使い方③
HOW TO USE
③
各部のなまえ PART NAMES
主な仕様
SPECIFICATIONS
仕様および外観は改善のため、予告なく変更する場合があります。
Specifications are subject to change without prior notice.
8x 32mm BaK4 PFM 8.2°65.6°143m
8x 42mm BaK4 PFM 8.2°65.6°143m
7x 50mm BaK4 PFM 6.4°44.8°112m
8〜32x 50mm BaK4 PFM
33.6°〜64.0°
73〜35m
Magnification
倍 率
Model
品  名
Objective
Aperture
対物レンズ
有効径
Prism
プリズム
材質
Coatings
コーティング
Real Field
of View
実視界
Apparent Field
of View
見掛視界
Field
at 1000m
1000m先
視界
4.0mm 16.0 15mm 〜4.5m 830g ○
(HorMH)
11.3×17.7×5.8cm
5.3mm 28.1 18mm 〜6m
13.3×18.1×5.9cm
870g ○
(HorMH)
7.1mm 50.4 17mm 〜9m
17.0×18.8×6.3cm
1015g ○
(HorMH)
6.3〜1.6mm
ZR8x32WP(W)
ZR8x42WP(W)
ZR7x50WP
10x 50mm BaK4 PFM
4.2°〜2.0°
6.5°65.0°113mZR10x50WP(W)
ZR8〜32x50
ZR8x32WP(W)
ZR8x42WP(W)
ZR7x50WP
5.0mm 25.0 18mm 〜9m
17.0×18.8×6.3cm
1040g ○
(HorMH)
ZR10x50WP(W)
ZR8〜32x50
39.7〜2.6
14.0〜11.0mm
〜19.5m(8x)
19.4×18.8×6.3cm
1025g ○
(HorMH)
Exit Pupil
ひとみ径
Model
品  名
Brightness
明るさ
Eye Relief
アイレリーフ
Near Focus
至近距離
Size
H×W×D
サイズ
高さ×幅×厚み
Weight
重さ
Tripod Adapter
Socket
三脚取付
倍率の変換
ズーム式双眼鏡では、「ズームレバー」を回し
て倍率を変えることができます。レバーを右
(時計まわり)に回すと高倍率、左(反時計ま
わり)に回すと低倍率となります。(図 7)
HOW TO USE
④
Zooming
Rotating the zoom knob to the right
increases magnification, rotating to
the left decreases magnification. (Ref.
Diagram 7)
使い方④
Attach the supplied strap to the eyelet
as illustrated. (Ref. Diagram 9)
図のように付属のストラップを本体取付部
に通して取付けてください。(図 9)
ストラップ(つりヒモ)について
ATTACHING THE STRAPS
Using tripod
ASCOT series can be attached to a
tripod by using the optionally available
Tripod Adapter-H or Tripod Adapter-MH.
Shown here is Tripod Adapter-H.
Remove the cap on the end of the center
shaft to expose the tripod adapter socket.
Screw on the Tripod Adapter-H to the
tripod adapter socket and attach the tripod
adapter to a tripod. (Ref. Diagram 8)
三脚取付について
ビノホルダー H(別売)又はビノホルダー
MH(別売)を使用することにより、カメラ三
脚に取付けて使用できます。
この取扱説明書ではビノホルダー H にてご
説明いたします。
双眼鏡の三脚取付ネジ穴にビノホルダーHの
固定ネジをねじ込み固定します。ビノホルダー
H をカメラ三脚の雲台に取付けます。(図 8)
※ キャップを取外すとネジ穴があります。
使い方⑤
HOW TO USE
⑤
While looking through the binoculars
with both eyes, adjust the interpupillary
distance by folding or unfolding the
body so that the field of view can be
seen as one circle. When doing this
adjustment, try to find an object in
the distance. (Ref. Diagram 3)
Interpupillary Distance Adjustment
This is to adjust the distance between
the two eyepieces to fit your eyes.
Improper interpupillary distance may
result in eyestrain.
2.
眼幅調整を行うため、両目でのぞきなが
ら、ボディを静かに開閉します。左右の
視野が重なって一つの円になったら止め
ます。眼幅調整は、できるだけ遠くのも
のを見て行ってください。(図3)
眼幅調整とは
眼幅調整とは、接眼部の間隔を自分の目
の間隔に合わせることです。眼幅が合っ
ていないと、使っているうちに目が疲れ
る場合があります。
2.
使い方②
HOW TO USE
②
Remove the objective lens caps and
eyepiece caps from the binoculars.
Even for those who wear eyeglasses,
it is possible to have a good field of
view. When using the binoculars with
eyeglasses worn, note the following
eyecup position.
Twist-up Rubber Eyecups
For eyeglass wearers, the twist-up
rubber eyecups should not be pulled
out. Leave the eyecups unretracted
when looking through the binoculars
with your naked eyes or wearing
contact lens.(Ref. Diagram 1)
Rubber Eyecups
For eyeglass wearers, fold down the
rubber eyecups. Keep the eyecups
unfolded when looking through the
binoculars with your naked eyes or
wearing contact lens. (Ref. Diagram 2)
When containing the binoculars in the
carrying case, put the eyecups back to
the retracted position.
1.
対物・接眼レンズキャップをとります。
メガネをかけたままでのぞくときは、目
当てを次のようにしてください。メガネ
をかけたままのぞいても、十分な視野が
得られます。
繰り出し式目当ての場合
メガネをかけたままでのぞくときは、目
当てを繰り出さずにのぞいてください。
裸眼またはコンタクトレンズ使用でのぞ
くときは、目当てを繰り出してのぞいて
ください。(図 1)
ゴム目当ての場合
メガネをかけたままでのぞくときは、目当
てを外側に折り返してのぞいてください。
裸眼またはコンタクトレンズ使用でのぞ
くときは、目当てを折り返さずにそのまま
のぞいてください。(図 2)
ケースに収納の際は、目当てを元に戻し
てください。
1.
※
使い方①
HOW TO USE
①
⑤
②
③
④
⑧
①
⑦
⑥
②
③
⑨
⑩
60キ‐10
双眼鏡保証書
The warranty is void outside Japan.
※ 機 種 名
Model NameASCOT
※保証期間
Purchase Date
購入日   年   月   日より5年間
         Y     M     D
※ お 客 様
User Name
ご住所
Address
ご芳名
N a m e
※販売店名
Dealer Name
店名・住所
電話番号 : 04-2969-0222(カスタマーサポートセンター専用番号)
受付時間 : 9:00〜12:00、13:00〜17:30
(土・日・祝日、夏季休業・年末年始休業など弊社休業日を除く)
製品についてのお問い合わせ
弊社ホームページ(下記URL参照)のお問い合わせメールフォーム、またはお電話にて受け付けております。
カ ス タ マー
サポートセンター
本保証書は本書記載の内容で無料修理を
行うことを約束するものです。
1.
2.
3.
4.
5.
Vixen limited warranty shall guarantee
free repair service in accordance with
terms and conditions described herein.
1.
2.
3.
4.
5.
取扱説明書における正常な使用状態で、
お買い上げの日から左記の期間中に故障
した場合は購入店に修理を依頼してくだ
さい。無料修理となります。
本書の※印横に記入のない場合は無効と
なります。
本書は日本国内においてのみ有効です。
有料修理の場合もありますので、無料修
理規定・アフターサービスの項目もお読
みください。(裏面)
本書にご記入の個人情報は、個人情報保
護法を遵守しつつ保証期間内のサービス
活動のために利用させて頂きます。
The free repair service shall be effective
for a period of five year from date of
original purchase from the dealer stated
on the left on the conditions that the
product should be treated correctly
according to the operating instructions.
The limited warranty shall be void and of
no force of effect in the event that a
model name, purchase date, user name
or dealer name is blank.
The limited warranty shall be effective
in Japan only.
Depending on the conditions for repair
service, the repair cost may be charged.
Go through the section of "REPAIR
SERVICE". (Overleaf)
The provided personal information may
be applied to service to the customers
during a warranty period.
PFM
:パーフェクトフーリーマルチコート。
Perfect Fully Multi-Coated
To clean the body surface, dust it off
lightly and wipe it using a clean
cloth. After usage by seaside, wipe it
with a clean moist cloth to remove
the salt and then wipe it dry with a
dry cloth. Do not use benzene, paint
thinner, or a cleaner containing
alcohol. (Diagram 11)
Blow off all abrasive dirt and dust on
the lens surface with a camera cleaning
blower or a soft oil-free brush. With
the dust removed, use a lens cleaning
tissue moistened with a few drops of
a lens cleaning solution for fingerprints.
Wipe it out gently. (Figure 12)
The lens surface is very susceptible to
scratches. In cleaning much care
must be taken to avoid damaging the
lens surface. Read instructions for a
lens cleaning solution thoroughly if it
is used.
Use a brush to remove sands and dirts
from the rotating parts on the
focusing knob and the diopter ring.
(Diagram 13)
9.
10
.
11
.
本体のお手入れは、ゴミやホコリを軽く払い、
柔らかい清潔な布で軽く拭いてください。
とくに、海辺等で使った後は湿った柔らか
い清潔な布で塩分を拭き取り、次に乾いた
布で軽く拭いて乾かしてください。ベンジ
ンやシンナーなどの有機溶剤や、有機溶剤
を含むクリーナーなどを汚れ落としに使わ
ないでください。(図11)
レンズ面にゴミやホコリが付着しているときは、
キズが付きやすいのでカメラメンテナンス用
のブロアーでゴミやホコリを軽く吹き払う、
または油気のないやわらかいハケで軽く払う
程度にしてください。レンズ面に指紋がつい
てしまった場合は、ゴミやホコリを払った後、
市販のカメラレンズメンテナンス用のレンズ
ペーパーに市販のカメラレンズメンテナンス
用レンズクリーナーを少量湿らせ、軽く拭き
取ってください。(図12)レンズ面は非常にデ
リケートです。清掃作業の際はレンズ面にキ
ズをつけないように十分ご注意ください。また、
レンズクリーナーを使用する際は、レンズク
リーナーに付属の説明書もよくお読みください。
「ピント合わせリング」や「視度調整リング」
などの回転部分に入った砂・ゴミは、やわら
かいブラシなどでよく払ってください。(図13)
9.
10
.
11
.
使用上のご注意
③
OPERATION PRECAUTIONS
③
はじめに PREFACE
図11       Diagram 11
図13       Diagram 13
図12       Diagram 12
図3        
Diagram 3
-
CARE AND MAINTENANCE
-
-
手入れ・保守
-
Do not try to open or close the body
angle beyond its limit. Also, do not
try to turn the diopter ring, the center
focus ring, or the zoom ring beyond
their limits. (Diagram 7)
Do not subject the product to shocks.
If you accidentally hit or drop the
product and the image appears
abnomal, please consult Vixen
customer service. (Diagram 8)
The lens may fog up due to sudden
temperature change such as when
bringing the product into a warm
room from cold outdoors. Should
this occur, let the product dry
naturally at normal temperature.
Keep the product away from rain,
water splash, salt water, sand, and
mud. Waterproof product may be
used in rain or in wet environments,
but wipe them dry after use.
1.
2.
3.
4.
ボディを制限以上に開かないでください。
また、「視度調整リング」「ピント合わせリ
ング」を制限以上に回さないでください。
(図7)
この製品に衝撃を与えないでください。
誤って強い衝撃を与えてしまったり、地
面に落としたりして、見え方がおかしく
なったときは、当社にご相談ください。
(図8)
冷たい戸外から暖かい室内に入ったとき
など、急激な温度変化により一時的にレ
ンズ面が曇ることがあります。この場合は、
曇りが無くなるまで自然に乾かしてくだ
さい。
雨、水滴、海水、砂、泥などがかからないよ
うにしてください。防水製品の場合は、雨
や水滴で濡れても機能を損なうことはあ
りませんが、できるだけ早く拭き取るよ
うにしてください。
1.
2.
3.
4.
使用上のご注意
①
Before using the product for the first time, read
"HOW TO USE"and "OPERATION
PRECAUTIONS".
Keep this instruction manual at hand every time you
use the product for reference.
Some materials in "SAFETY PRECAUTIONS"and
"OPERATION PRECAUTION"may not apply to all
models.
This instruction manual indicates information on
matters for safety operation of the product to prevent
user or others from injury or property damage.
Before use, comprehend the operation of the product.
(The specifications and appearance are subject to
change without notice.)
1.
2.
3.
ご使用の前に、この取扱説明書の「安全上のご注意」「使用上
のご注意」「使い方」をよくお読みの上、正しくお使いくださ
い。
お読みになった後は製品のそばなどいつも手元に置いて、
ご使用ください。
この取扱説明書の「安全上のご注意」「使用上のご注意」「使
い方」に書かれている内容は、お客様が購入された製品には
含まれない項目も記載されています。
この取扱説明書には、あなたや他の人々への危害、財産への
損害を未然に防ぎ、本製品を安全にお使いいただくために
守っていただきたい事項を示しています。内容をよく理解
してから製品をご使用ください。
仕様及び外観は、改善のため予告なく変更することがあり
ます。
1.
2.
3.
※
OPERATION PRECAUTIONS
①
図7        
Diagram 7
図8        
Diagram 8
-
HANDING AND USAGE
-
-
取り扱い・操作
-
安全上のご注意
①
SAFETY PRECAUTIONS
①
図1        
Diagram 1
図2        
Diagram 2
Store the product in a dry, well-
ventilated place. Storage and use of
the product in humid environment
may cause the lens to fog up or fungus
to form. Let the product dry indoors
before storing it, especially after
using it at night or on a rainy day.
For a long-term storage, place the
product in a plastic bag or an airtight
container with a desiccant agent.
Take the product out from the case
occasionally for ventilation, if it is
not used for a long time. Replase the
desiccant with a new one at the time.
(Diagram 9)
Do not leave the product in a car on a
hot day or near a heater. The heat
may deform or damage the product.
(Diagram 10)
Retract the sliding type eyecups back
into place before storing the product in
a case. The eyepieces on the IF
(individual focus) binoculars should
also be retracted for storage.
5.
6.
7.
8.
湿気の多いところでの保管・使用は、レン
ズ面にカビや曇りが生じやすくなります。
風通しのよい、乾燥した場所に保管して
ください。とくに、雨の日や夜間に使用さ
れた後は、室内で充分乾かしてから保管
してください。
この製品を保管する場合は、プラスチッ
ク袋や機密性の高い容器に、乾燥剤と一
緒に保管してください。長期間使用しな
い場合は時々付属のケースから出して、
空気の入替えを行ってください。再び収
納する際は乾燥剤を新しいものに交換し
てください。(図9)
炎天下の自動車の中や、ヒーターなどの
高温度の発熱体のそばにこの製品を放置
しないでください。製品の変形、故障の原
因となります。(図10)
目当て部分が繰り出し式の機種の場合は、
ケースに収納する際、繰り出した目当て
をもとに戻してください。また、IF(単独
繰り出し式)双眼鏡の場合も、もとに戻し
て収納してください。繰り出したままでは、
正しく収納されない場合があります。
5.
6.
7.
8.
使用上のご注意
②
OPERATION PRECAUTIONS
②
図9        
Diagram 9
図10       Diagram 10
-
STORAGE
-
-
保管
-
無料修理規定・アフターサービス
REPAIR SERVICE
The repair service is free during the warranty period if the     
condition occurred during normal use and was used as described in the
operating instructions. (The loss of caps, case, straps and rubber eyecups
are out of warranty.)
The repair service fee will be charged for the following conditions  
even during the warranty period.
1. Damage or malfunction due to misuse, dropping, pressure, or a strong
 shock.
2. Malfunction due to fire, immersion in water, or a natural event   
 such as earthquake.
3. Scratch, peeling, corrosion, fogging, or condition due to improper storage.
4. Damage or malfunction due to modification, disassembly, or    
 cleaning done by a person or dealer not authorized by Vixen.
5. Missing warranty card.
6. Warranty card with missing purchase date, name, or the dealer   
 information.
Vixen reserves the right to replace the product with a new one due to
damage of part beyond repair.
Repair parts for warranty repair service are hold at Vixen for five years
after the purchased product is discontinued.
Shipping charge for the repair and transportation expenses at bringing in
the product is responsibility of the customer.
On-site repair service is not available.
If the dealer information is missing on product received as a gift, please
consult an authorized dealer.
Repair charges should be paid at the dealer stated on the warranty card.
For a service inquiry, please contact the dealer where the purchase was
made or send it directly to Vixen.
■
■
■
■
■
■
■
無料修理期間については表面をご参照ください。
取扱説明書における正常な使用状態で保証期間中に故障した場合は
無料修理となります。(キャップ、ケース、ストラップなどやゴム目当
ての紛失は保証対象外です)
次の場合は保証期間内でも有料修理となります。
1. ご使用上の誤り、落下、衝撃、圧迫による故障および損傷の場合。
2. 火災の場合、浸水、地震等による天災地変による故障の場合。
3. 傷、ハガレ、腐食、クモリ等や保存上の不備による場合。
4. 当社以外での改造、分解、掃除などによる故障及び損傷の場合。
5. 保証書の提示がない場合。
6. 保証書にお買上げ年月日、ご氏名、販売店名の記入がない場合。
故障箇所によっては製品の交換をもって修理とさせていただく場合
がありますのでご了承ください。
本製品の補修部品は、製造をやめてから5年間を目安として保有しま
す。原則として、補修部品を保有している期間が修理可能期間となり
ますのでご了承ください。
修理品の送料、お持込時の交通費等はお客様にてご負担願います。
出張修理はいたしません。
ご贈答品で本保証書に販売店名が記入されていない場合、ビクセン
カスタマーサポートセンターへご相談ください。
修理代金のお支払については、お買い上げの店でお支払いください。
また直接ビクセンへ修理をお申し込みの場合は、現金書留、銀行振込、
または代金引換発送にてお支払いください。なお、銀行振込や代金引
換発送における手数料につきましては、ご負担いただきますようお願
い申し上げます。振込先など詳しくはビクセンカスタマーサポート
センターにお問い合わせください。
お問い合わせは…
お買い上げのお店、またはビクセンカスタマーサポートセンター(表面
参照)まで。
■
■
■
■
■
■
■
■
■
  安全に関するご注意
 SAFETY PRECAUTIONS
  WARNING
This symbol indicates information that, if ignored or
applied incorrectly, creates
the possibility of death or serious personal injury.
  CAUTION
This symbol indicates information that, if ignored or
applied incorrectly, creates
the possibility of personal injury or property damage.
 
OPERATION PRECAUTION
These items indicate information that, if ignored or
applied incorrectly, may adversely affect the product
performance or reliability.
  警告
この表示を無視して誤った取り扱いをすると、人が死亡また
は重傷を負う可能性が想定される内容を示しています。
  注意
この表示を無視して誤った取り扱いをすると、人が傷害を負
う可能性が想定される内容及び物的損害の発生が想定される
内容を示しています。
  使用上のご注意
この項目にある表示を無視して誤った取り扱いをすると、製
品の性能・機能を阻害する損害の発生が想定される内容を示
しています。
Thank you for your purchase of the Vixen
products. For safety use, observe the following
precautions.
このたびは、ビクセン製品をお買い上げいただき、ありがとう
ございます。
安全にお使いいただくために必ず以下の諸注意事項をお守り
ください。
WARNING
Never look at sun through the product.
Instantaneous and irreversible
damage to your eyes will occur and
may result in total loss of eyesight.
(Diagram 1)
CAUTION
Do not use the product while walking.
It may result in a collision or a fall,
and could cause injury. (Diagram 2)
Do not leave the product in a
precarious place. It may tip over or
drop, resulting in injury or damage.
Do not swing the product by the strap.
It may hit someone and cause injury.
(Diagram 3)
The case, straps, and the rubber
material on the body may deteriorate
over a long period and may cause
stain on the clothing. Please check
the condition before use.
●
●
●
●
●
警告
太陽をのぞいてはいけません。失明の危
険があります。この製品で太陽をのぞくと、
目を傷めたり、失明する恐れがあります。
ご使用の際は、太陽を絶対にのぞかない
ようにしてください。(図1)
注意
製品を歩行中に使用しないでください。
衝突や転倒など、けがの原因となること
があります。(図2)
製品を不安定な場所に置かないでください。
倒れたり、落ちたりして故障やけがの原
因となることがあります。
ストラップ(つりヒモ)を持って振り回さ
ないでください。他人にあたり、けがの原
因となることがあります。(図3)
製品のケース、ストラップ、本体のゴム製
部分などは、長期間の使用・保管による劣
化から、衣類などを汚すことがあります。
ご使用になる前に点検し、異常のある場
合には当社へご相談ください。
●
●
●
●
●
図6        
Diagram 6
安全上のご注意
②
SAFETY PRECAUTIONS
②
図4        
Diagram 4
図5        
Diagram 5
CAUTION
Be careful not to pinch your fingers
when adjusting the eyepiece
separation or the focus. (Diagram 4)
Be careful that small children do not
swallow caps, desiccant agent or the
vinyl bag. (Diagram 5)
Do not take the product apart.
(Diagram 6)
When product are used continuously
over a sustained period, you may get
inflammation of skin around your eyes
coming in contact with rubber
eyepieces. If you experience this
symptom, please stop using it and
consult with a doctor immediately.
●
●
●
●
注意
眼幅調整や視度調整の際、指などをはさ
みけがをすることがあります。特に、お子
様の使用に際しては、ご注意ください。(図4)
キャップ、乾燥剤、包装用ポリ袋などを、
お子様が誤って飲むことがないようにし
てください。(図5)
製品を分解しないでください。(図6)
製品の長時間使用を繰り返しますと、ゴ
ム製の目当てにより、皮膚に炎症を起こ
すことがあります。疑わしい症状が現れ
ましたら使用を直ちに中止し、医師に相
談してください。
●
●
●
●
This manual suits for next models

5

Other Vixen Binoculars manuals

Vixen JOYFUL Series User manual

Vixen

Vixen JOYFUL Series User manual

Vixen Ascot SW 10x50 User manual

Vixen

Vixen Ascot SW 10x50 User manual

Vixen ATERA II Series User manual

Vixen

Vixen ATERA II Series User manual

Vixen ATERA Series User manual

Vixen

Vixen ATERA Series User manual

Vixen NEW APEX Series User manual

Vixen

Vixen NEW APEX Series User manual

Vixen Giant ARK User manual

Vixen

Vixen Giant ARK User manual

Vixen ARTES HR8.5X45WP User manual

Vixen

Vixen ARTES HR8.5X45WP User manual

Vixen New Foresta Series User manual

Vixen

Vixen New Foresta Series User manual

Vixen ARK BR12x80WP User manual

Vixen

Vixen ARK BR12x80WP User manual

Vixen COMPACT ZOOM MZ7 User manual

Vixen

Vixen COMPACT ZOOM MZ7 User manual

Vixen ARK Series User manual

Vixen

Vixen ARK Series User manual

Vixen ARENA Series User manual

Vixen

Vixen ARENA Series User manual

Popular Binoculars manuals by other brands

Vortex FURY HD 5000 product manual

Vortex

Vortex FURY HD 5000 product manual

LUNA OPTICS LN-DB60-HD instruction manual

LUNA OPTICS

LUNA OPTICS LN-DB60-HD instruction manual

Minox NV400 Product information

Minox

Minox NV400 Product information

Sony DEV-50 Specifications

Sony

Sony DEV-50 Specifications

Celestron Cavalry 71420 manual

Celestron

Celestron Cavalry 71420 manual

Bresser Night Vision 3.5x42 Digital instruction manual

Bresser

Bresser Night Vision 3.5x42 Digital instruction manual

Surplus Shed 1575 Catalog

Surplus Shed

Surplus Shed 1575 Catalog

Simmons CaptureView CV-4 owner's manual

Simmons

Simmons CaptureView CV-4 owner's manual

HIKE CREW HIKNVB100 user guide

HIKE CREW

HIKE CREW HIKNVB100 user guide

Bushnell 260650 instruction manual

Bushnell

Bushnell 260650 instruction manual

PNI Hunting BH800 user manual

PNI

PNI Hunting BH800 user manual

Minox Macroskop MS 8x25 manual 

Minox

Minox Macroskop MS 8x25 manual 

Vortex Viper Series user guide

Vortex

Vortex Viper Series user guide

Athlon ARES G2 UHD 15-45x65 User manual / care instructions

Athlon

Athlon ARES G2 UHD 15-45x65 User manual / care instructions

Leica NOCTIVID instructions

Leica

Leica NOCTIVID instructions

Minox BD 8x32 BR instructions

Minox

Minox BD 8x32 BR instructions

Targa Clairvoyance TB-320 user manual

Targa

Targa Clairvoyance TB-320 user manual

Celestron GRANITE instruction manual

Celestron

Celestron GRANITE instruction manual

manuals.online logo
manuals.online logoBrands
  • About & Mission
  • Contact us
  • Privacy Policy
  • Terms and Conditions

Copyright 2025 Manuals.Online. All Rights Reserved.