VMI Artesia DP-10e User manual

DP-10e
Virgin Musical Instruments
Owner s Manual

Thank you for choosing the Artesia DP-10e
Your Piano is not only an excellent piano but is also a traditional

1
3
4
7
9
14
21
24
26
28
29
30
34
35
Panel Control
Setup
Basic Operation
The Connector Box
Voice/
Set Up
Accompaniment
Song Recording
Factory Reset
Appendix
Specifications
............................................................................
......................................................................................
.......................................................................
...................................................................
...........................................................................
..................................................................................
......................................................................
.......................................................................
Learning Function ......................................................................
MIDI Function .........................................................................
..........................................................................
................................................................................
..........................................................................
Warranty ................................................................................
Effect
1
Panel Control
1
2
345678 9 10 11
13
19 20 21 22
MIN MAX
VOLUME
DEMO
BANK A
BANK B ACCOMP TRACK 1 TRACK 2 PLAY
RECOR D
SYNC IN TRO ENDI NG/ FILL IN VARIATIO N START STOP/ CHORD
METR ONOME SPL IT
TEMPO
SETU P
DATA WHEEL
VOICE
RHYT HM LAYER REVERB CHORUS
EQ R&B SWI NG BALLA D POP
PIANO E.PIANO ORGAN STRINGS
DP -10 e
DUET
/YES /N O
SYNC INTRO ENDING/ FILL IN VARIATION START STOP/ CHORD TEMPO
DEMO
BANK A
BANK B ACCOMP TRACK 1 TRACK 2 PLAY
RECORD METRONOME SETUP
EQ
12
14
SPLIT
VOICE
RHYTHM LAYER REVERB
R&B SWING BALLAD POP
PIANO E.PIANO ORGAN STRINGS
/YES /NO CHORUS DUET
15 16 17 18 23
2
Rear Panel
PEDAL
PEDAL DC 12V
DC 12V
24 25
Headphones
MIDI
Out
1
2
USB
to Host
Aux In
Line Out
Input
Level
Connections Panel
26 27
29 30
28
31
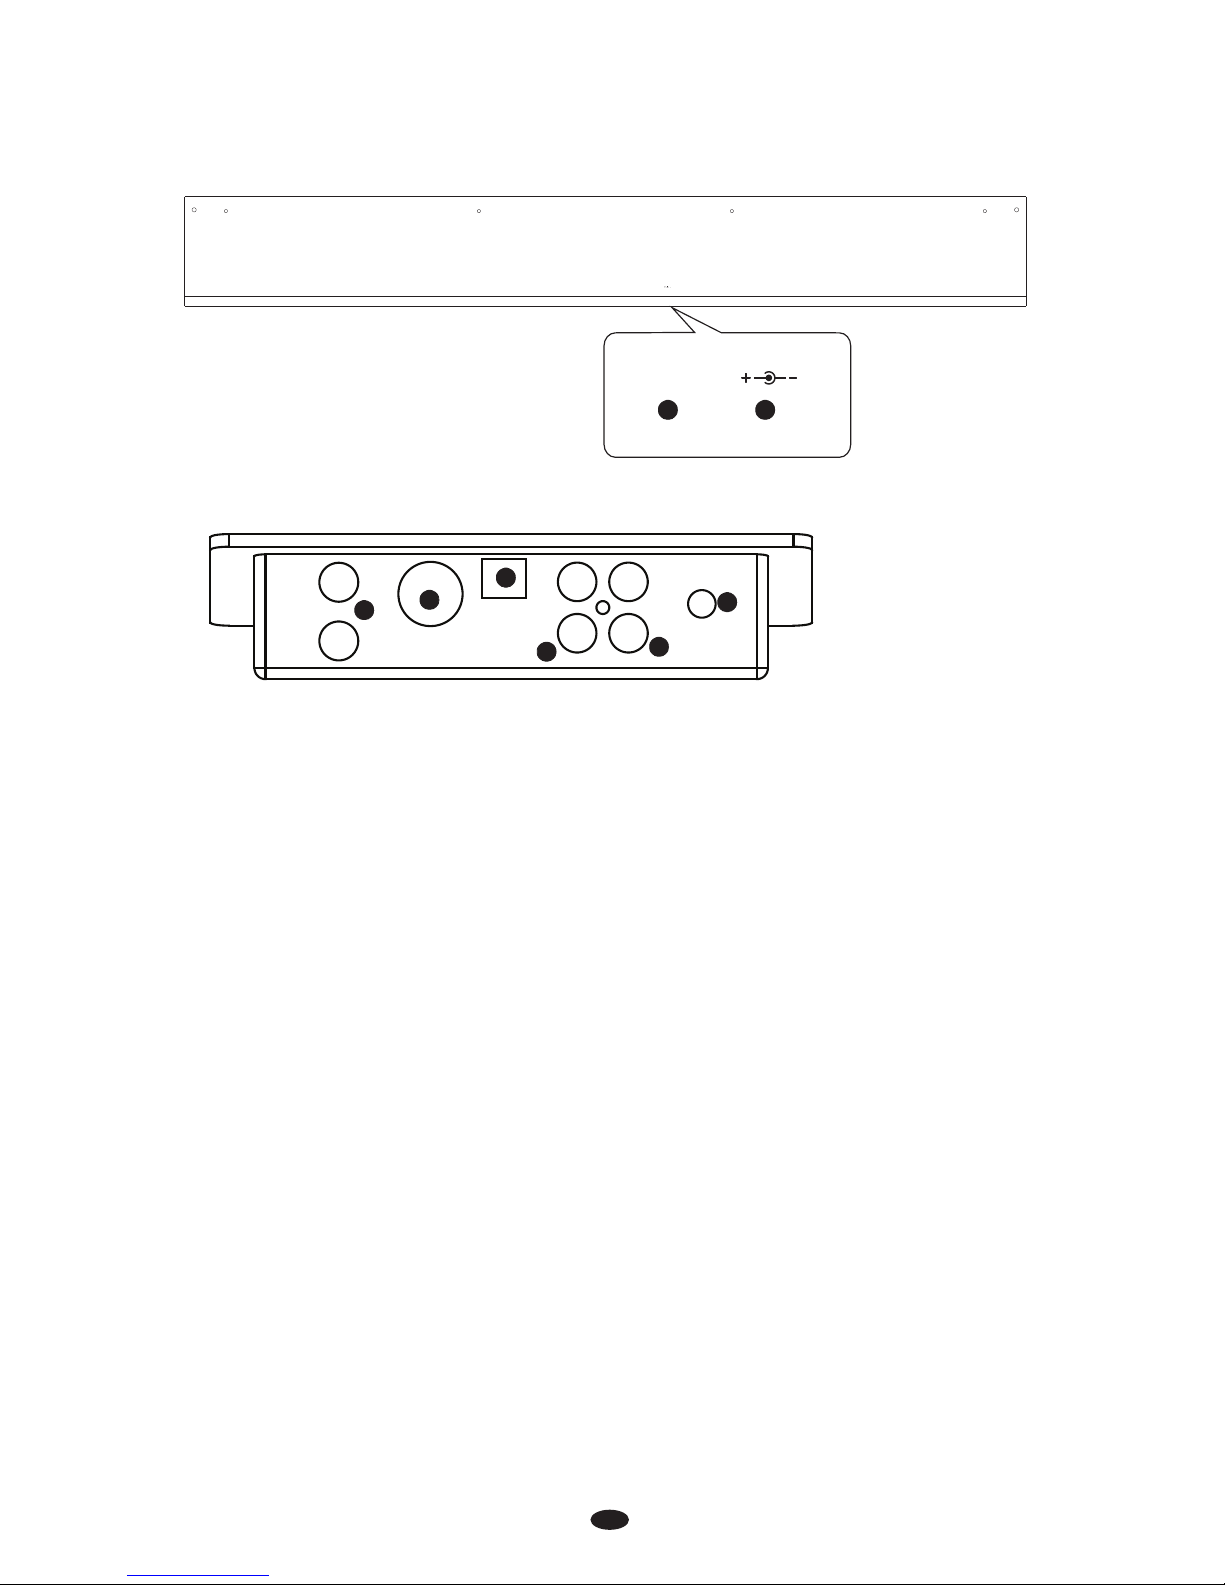
24. Pedal Connector
25. Power Connector (DC 12V)
26.Headphones 1 / 2
27.MIDI Out
28.USB to Host Connector
29. Aux Line In
30. Line Out
31. Aux Input Level
Rear Panel
Connections Panel
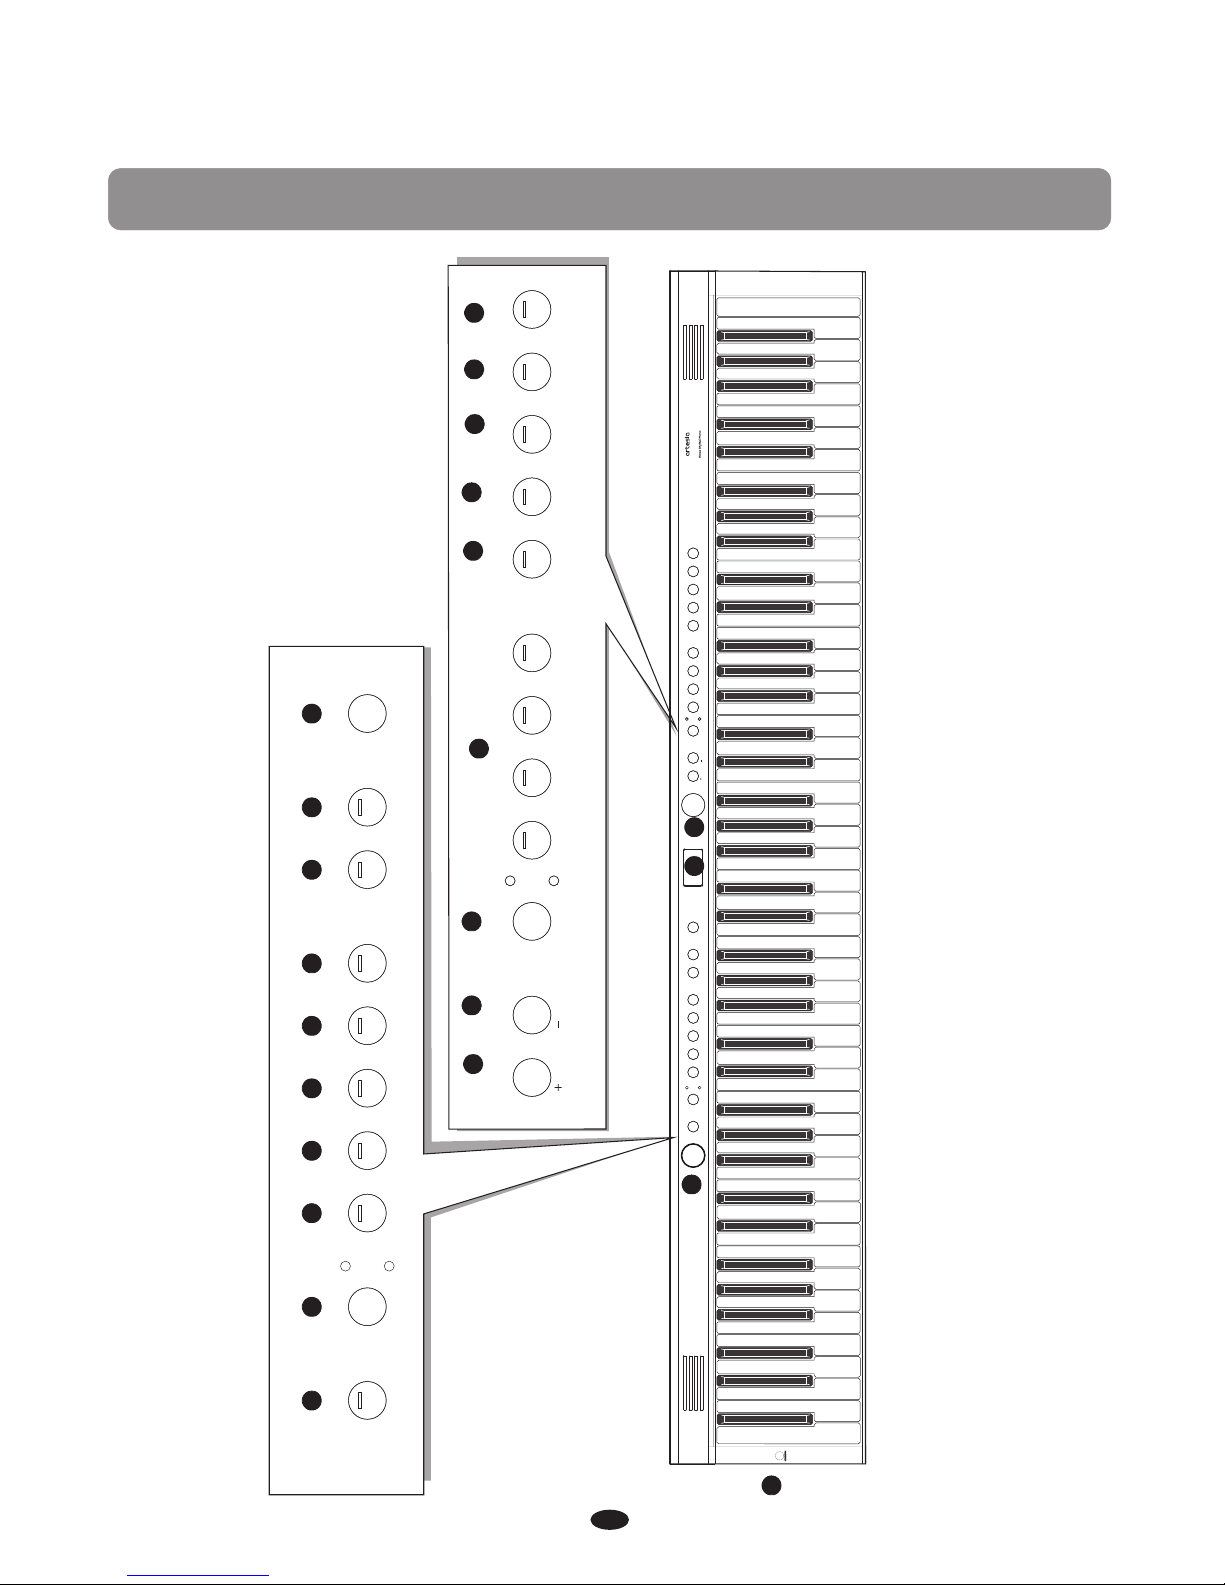
Front Panel
1. STANDBY /ON button
2. VOLUME Data Control knob
3. DEMO button
4. BANK A / BANK B button
5. SYNC/RECORD button
6. INTRO/ENDING / ACCOMP button
7. FILLIN/TRACK 1 button
8. VARATION/TRACK 2 button
9. START / STOP / PLAY button
10. CHORD/EQ button
11. TEMPO/METRONOME button
12. SETUP button
13. LCD display
14. DATA WHEEL knob button
15. +/YES button
16. -/NO button
17. VOICE/RHYTHM button
18. VOICE/RHYTHM select buttons
19. LAYER button
20. SPLIT button
21. REVERB button
22. CHORUS button
23. DUET button
Setup
3
You are no doubt eager to play your new piano instrument, but first please
make sure you have completed the following setup steps:
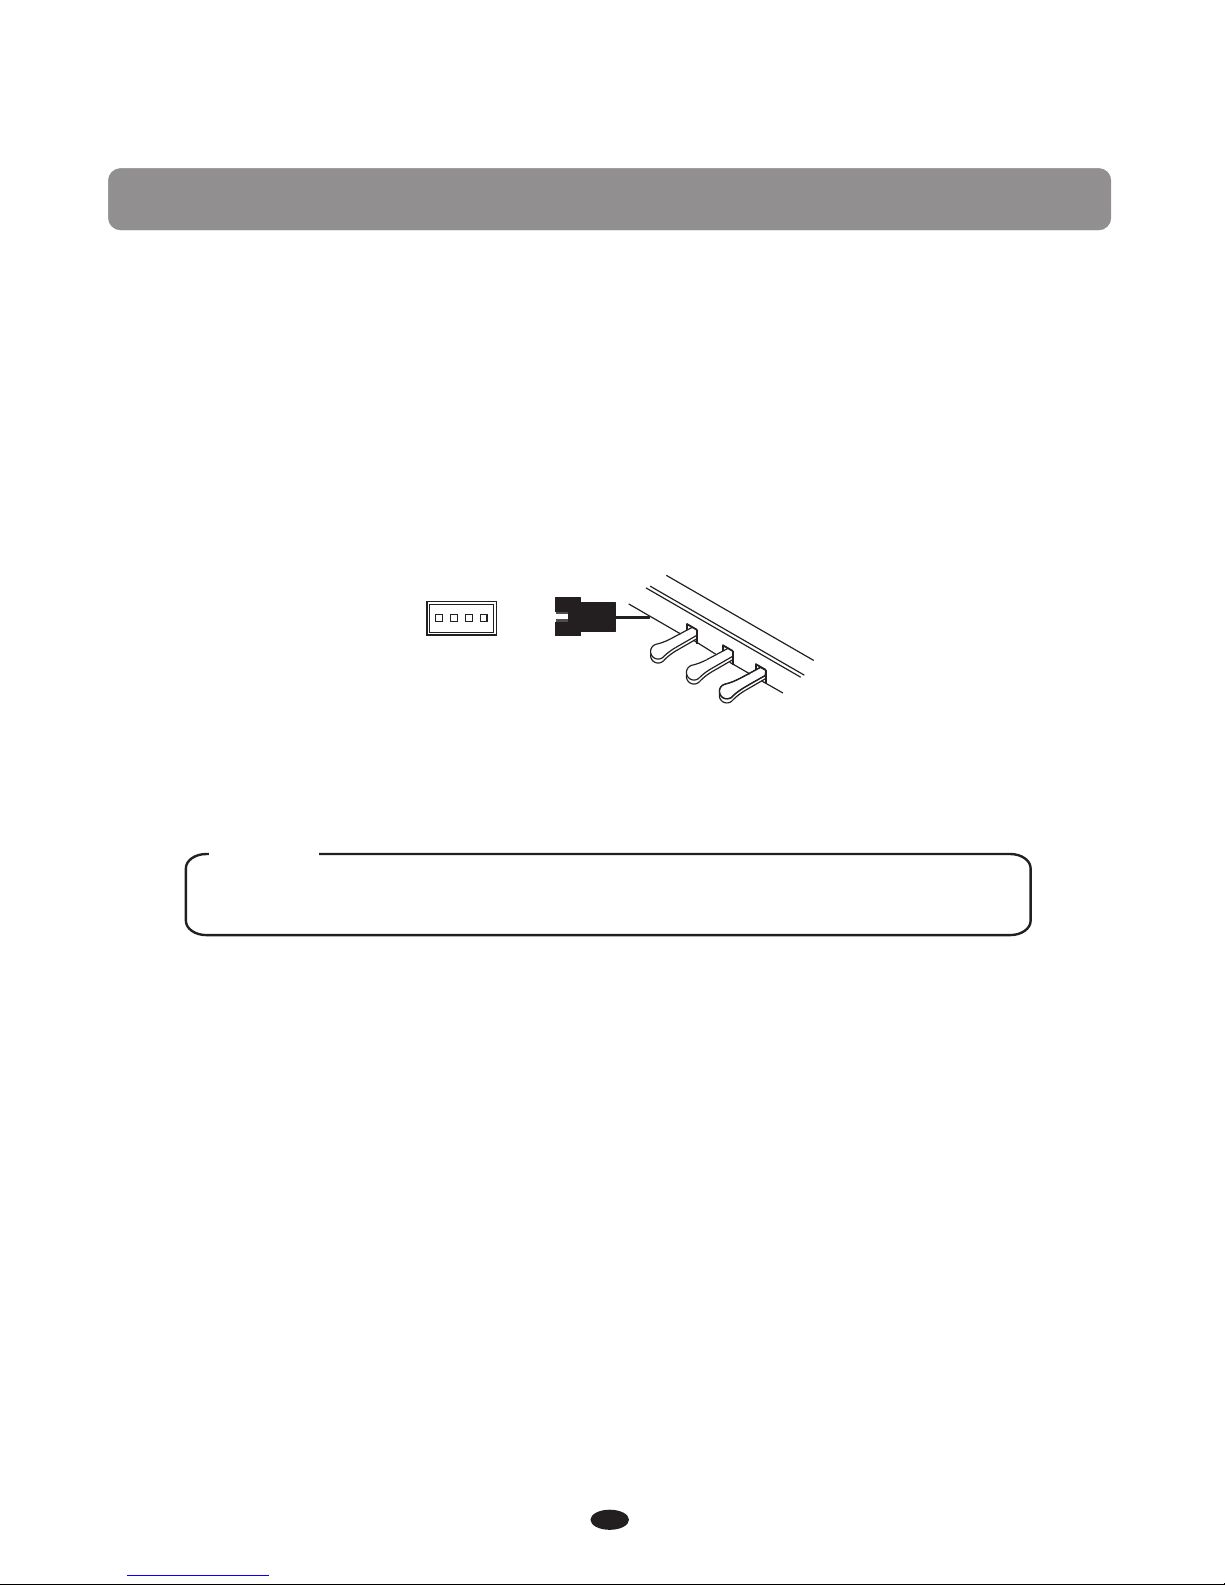
1) See the assembly guide
2) Once the piano is securely assembled, connect the plug of the foot pedal
unit into the pedal jack located on the bottom rear panel.
3) Plug the other end of the power cable into the power outlet.
NOTE
1. Ensure the piano is turned off before connecting and disconnecting the power.
2. Turn the volume knob to its minimum level before turning on the power.

SUSTAIN
4
Basic Operation
Adjusting Volume & Starting to Play
The speaker system in your piano is very powerful and can be overpowering
in some rooms. Adjust the [VOLUME] control to a 12 o'clock position as a safe
starting point. You can adjust the volume at any time even while you are playing.
Now play the keyboard. You should hear the rich tone of the default Grand Piano
sound.
Piano Pedals
Just like a regular grand piano, your piano features 3 foot pedals:
Damper Pedal (Right)
The damper pedal performs the same function as the damper
pedal on an actual acoustic piano, letting you sustain the sound
of the notes being played after releasing your fingers from the keys.
Standby/On
Press the [STANDBY/ON] button to turn on the power and the LCD display will
illuminate.
STANDBY/ON
Auto Standby
Your piano will switch off automatically after 30 minutes of inactivity.
In this case, press the [STANDBY/ON] button to turn on the power.
Deactivate Auto Standby Function
To deactivate the Auto Power Standby Function: hold the
first white key and first black key from the left
side of the keyboard at the same time and then press
the [STANDBY/ON] button.
MIN MAX
VOLUME
L
R 1 2
USB DISK
SONG

SOSTENUTO
5
Sostenuto Pedal (Center)
The sostenuto pedal also allows you to sustain notes, but it works a little
different than the damper pedal. If you play a note or chord on the keyboard
and press the sostenuto pedal while the notes are held, those notes will be
sustained as long as the pedal is held. All subsequently played notes will not be
sustained.
SOFT
Soft Pedal (Left)
The soft pedal on an acoustic piano changes the character of the sound, making
it softer and quieter. The soft pedal on your piano does exactly the same.
Press the soft pedal when you need to play passages that require extreme pianissimo.
Playing Demo Songs
■Listen to the Demo Songs
There are 10 demo songs for you to play individually. Here's how to select and
play the demo songs.
Press the [DEMO] button to enter the Demo Mode.
The display will show “DemoSong,” after 5 seconds
se the [+/YES] / [-/NO] buttons or [DATA
WHEEL] knob to select the song you want to play.
then the demo songs will
play in sequence. You can u
L
R 1 2
USB DISK
SONG
DEMO
DEMO

6
[+ / YES] & [- / NO]
These buttons are used to adjust or select the
parameters of specific functions.
Press the [DEMO] button again to stop playing the Demo Song.
7
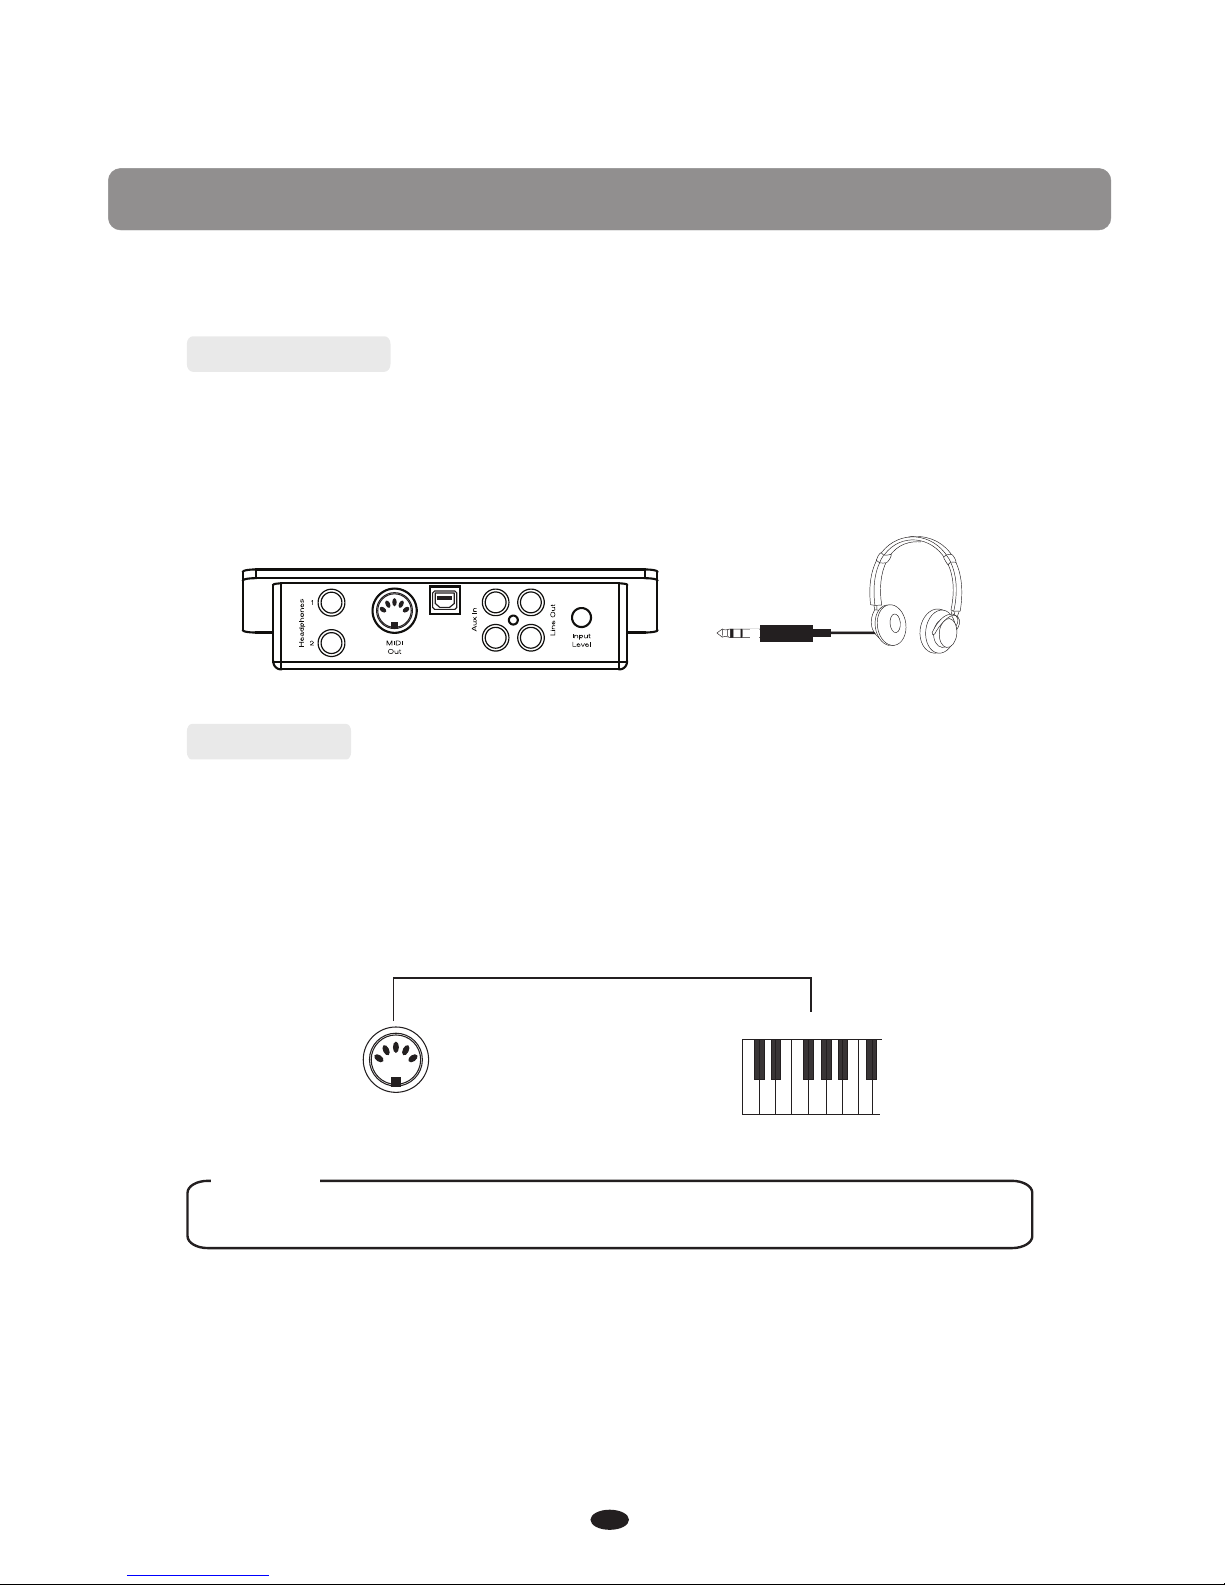
The Connector Box
Headphones
This piano is equipped with two sets of standard stereo headphone jacks to
accommodate private practice or late-night playing. The internal speaker system
is automatically shut off when a pair of headphones is plugged into the 1. Headphone jack.
MIDI Out
MIDI (Musical Instrument Digital Interface) is a world-standard communication
interface which allows electronic musical instruments to communicate with each
other, by sending and receiving compatible notes, program changes and other types
of MIDI data. You should only plug the MIDI out in to another device featuring a
MIDI input.
NOTE
The MIDI OUT jack transmits MIDI data to another MIDI device.
MIDI OUT
MIDI IN
USB
to Host

8
Line Out
The piano's stereo RCA line output can be used to deliver the output of the
piano to a keyboard amplifier, stereo sound system, mixing console or powered speaker
monitors. The piano's internal sound system will remain on unless headphones are
plugged in to the #1. Headphone jack.
Aux In
The Aux In stereo RCA connectors allow you to play an external sound source
(such as a output) through the piano's built-in
speakers or headphone outputs.
Laptop, Tablet or Smartphone
The Aux In signal level can be adjusted using the Input Level knob.
USB
to Host
USB
to Host
USB
to Host
USB
to Host
this instrument,
and enjoy it on this instrument or use it for accompany
Using USB-MIDI/USB Audio
This product allows the transfer of MIDI information over USB to a laptop, tablet
or smartphone.As complicated as this might sound, it's actually pretty straight
forward. This piano is USB Class Compliant; therefore there is no need to install
a driver to enable it to work with a computer. Simply just plug it in and the computer's
operating system will do the rest. The piano will work with all standard MIDI based
computer software.
USB AUDIO interface is a digital audio interface. By USB cable, you can digitally
transfer intact audio signals from a Laptop, Tablet or Smartphone to
when you play this instrument;
likewise,you can transfer intact audio signals of the instrument to Laptop's, Tablet's or
Smartphone's to record and edit music.

9
Voice/Effect
This piano has 137 voices. See page 31 for a complete list of all voices.
The DP-10e has 4 direct-selecting voice buttons.
When pressing a voice button, the assigned voice number is shown on the
display and the button will light.
You can change the instrument voice by pressing one of the other instrument voice
buttons or use the [+/YES]/[-/NO] button or turn the [DATA WHEEL] to select the
desired voice.
Selecting a Voice
When the upper LED indicator of the [VOICE/RHYTHM] button is lit, you can select the
desired voice by pressing the appropriate VOICE button.
Layer Button
In Layer mode two voices may be played simultaneously, each at selected
volumes. Press the [LAYER] button and when the indicator LED is flashing press a
voice button to select the second voice.
LAYER
VOICE
RHYTHM R&B SWING BALLAD POP
PIANO E.PIANO ORGAN STRINGS
L
R 21
USB DISK
SONG
If you do not choose the layer voice within 5 seconds after entering the Layer
mode, it will quit this menu selection automatically.
If the Layer indicator is not flashing, then pressing a voice select button will change
the primary voice.
Set Layer Voice Volume
Reference: Dual Voice Volume(P.17).
Exit Layer Voice mode
To turn off layer mode: press the [LAYER] button again.

10
Split Button
Press the [SPLIT] button to activate the split mode, your keyboard will be split into
two sections that play different voices on the left and right sides of the keyboard. To
activate the Split mode: press the [SPLIT] button, then when the Split indicator will
flash, next press a voice select button to select the left voice.
If you do not choose the left voice within 5 seconds after entering the split mode, it
will quit this menu selection automatically.
When the Split indicator is not flashing, then pressing a voice select button will
change the primary voice.
To turn off split mode: press the [SPLIT] button again.
SPLIT
The [REVERB] button selects a number of digital reverb effects that you can
use for extra depth and expressive power.
Pressing the [REVERB] button will turn on or turn off the reverb effect.
The default reverb type is room 3 .
buttons
When the reverb mode is turned on, you can use the
or [DATA WHEEL] knob to select a different reverb
type.
“ ”
[+/YES] and [-/NO]
Reverb
REVERB
L
R 1 2
USB DISK
SONG
L
R 1 2
USB DISK
SONG
Adjusting Split Voice Volume
Reference : Split Voice Volume(P ). .17
Changing the Split Point
The Split Point is where the Left and Right part of the keyboard have different
instrument voices. When you exit the split mode, hold down the [SPLIT] button,
the indicator will flash , you can play any one of the keys to set the split point
value:1-88 Keys. (Default:35 Key).
11
01 02 03 04 05 06 07 08
Hall1 1 Stage2 Plate Hall2 Room1 Room2 Room3 Stage
00
Off
The reverb types in the list below can be selected from the reverb display.
off Chorus1 Chorus2 Chorus3 Chorus4 Feedback Flanger1 ShortDelay
Shimmering, broadening effect that is added to your selected instrument voice.
Press the [CHORUS] button can turn on or turn off the chorus effect.(Default:00)
buttons
When the chorus mode is turned on, you can press the or
use the [DATA WHEEL] knob to select chorus type.
The chorus types in the list below can be selected from the chorus display.
[+/YES] and [-/NO]
ShortDe-
layFb
Chorus
CHORUS
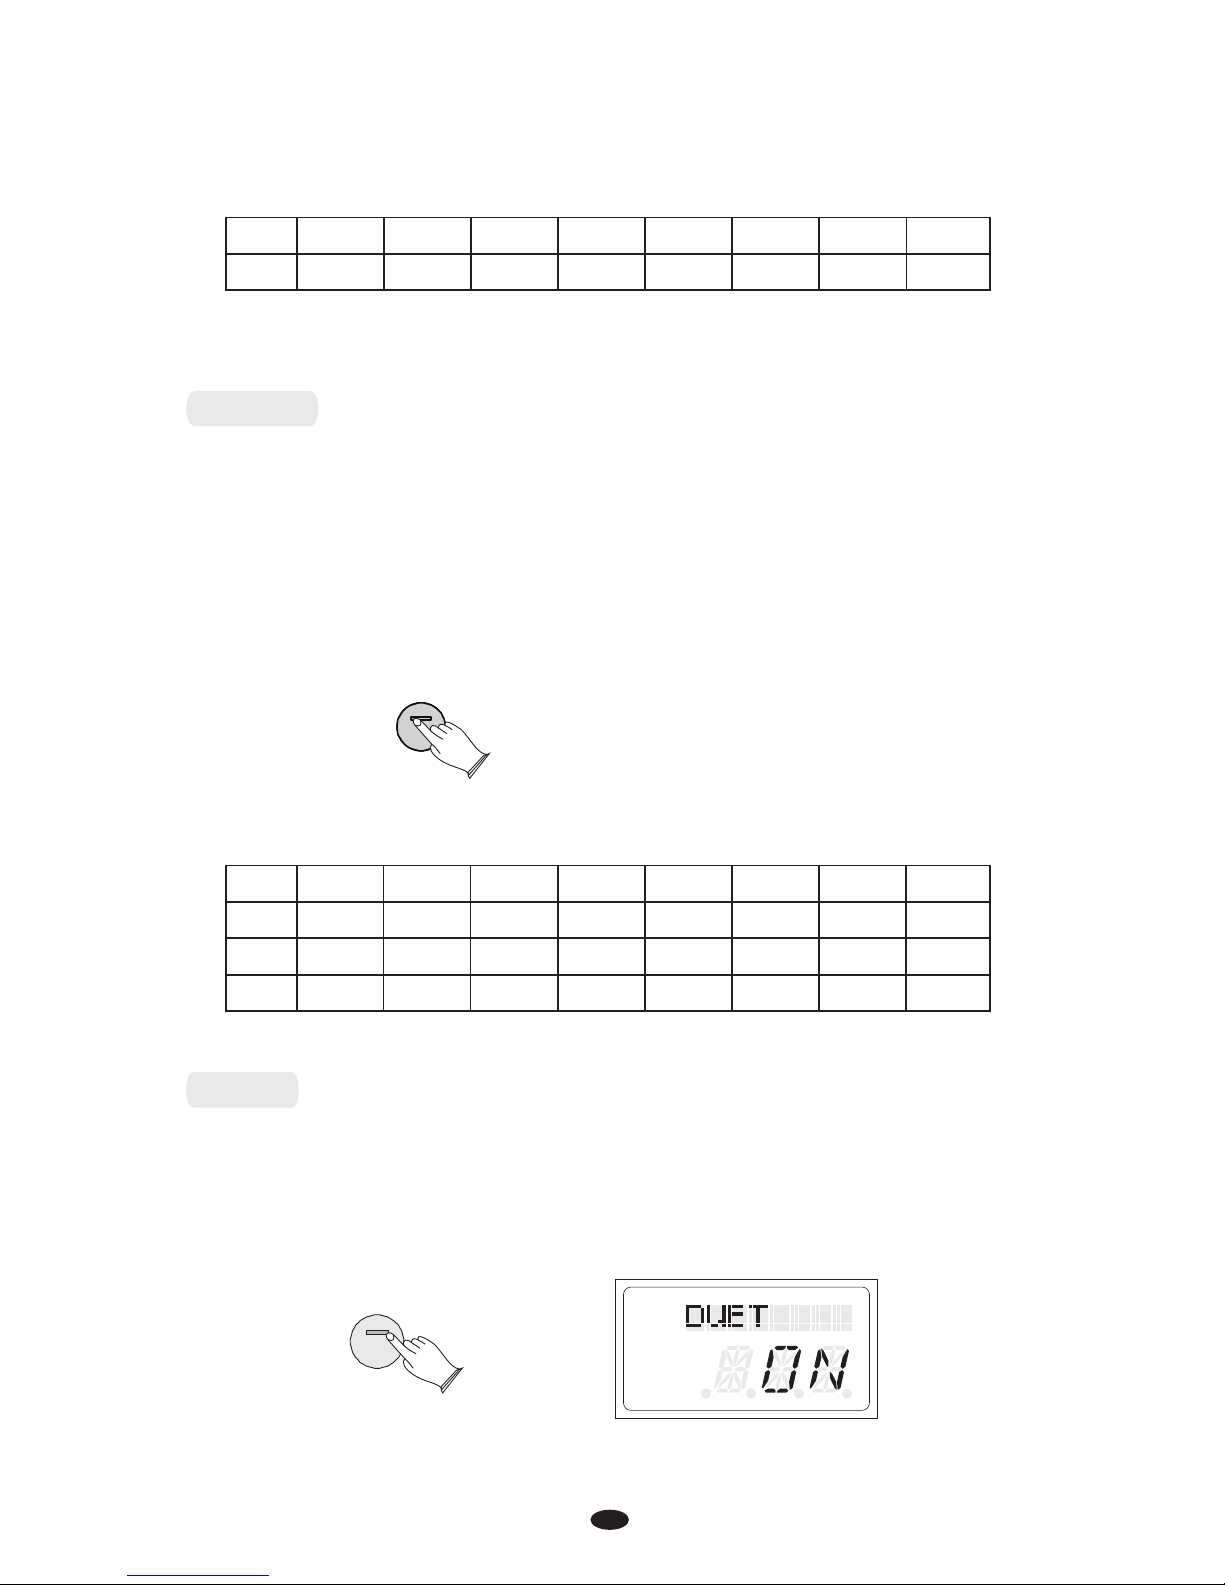
DUET
Press the [ ] button to select mode. In this mode, the keyboard will be
split into two separate playing areas for
teacher and student.
Right: from C#3 to C7
Left: from A-1 to C3
DUET DUET
DUET
To change the Chorus Level see page 16.
To change the reverb level: see page 15.
01 02 03 04 05 06 07 08
00
Flanger2 Flanger3 Celeste1 Celeste 2 Celeste 3
10
9 11 12 13
L
R 1 2
USB DISK
SONG

12
This will be very helpful when the instrument is used by two players at the same
time as they will be able to play the same piano sound in the same octave.
Press [ ] button again to exit the DUET mode.
While the feature is selected using the optional 3 lever pedal, the pedals
automatically switch in a different configuration where there are 2 Sustain pedals,
one for the left and one for the right part of the keyboard.
DUET
DUET
Metronome
Metronome is a convenient feature for practice, and it provides a solid rhythmic
guide when recording.
When the lower indicator of the [BANK A/BANK B] button is lit, press the
[METRONOME] button to turn the metronome off or on.
While holding down the METRONOME use the [+/YES] and [-/NO] buttons
or [DATA WHEEL] to change the time signature of the metronome.
Time signatures: 2/2, 1/4, 2/4, 3/4, 4/4, 5/4, 6/4, 3/8, 6/8, 7/8, 9/8, 12/8.
[ ] button
This function allows you to set the rhythm tempo.
When the upper indicator of the [BANK A/BANK B] button is lighted, press the
[ ] button to set Tempo value.
[ or the [DATA WHEEL] knob to change the tempo
value range from 20 to 280 BPM (beats per minute).
TEMPO
Use the + / YES] / [- / NO] button
Touch
+ / YES - / NO
●Adjusting the Metronome Tempo
●Time signature
L
R 1 2
USB DISK
SONG
CHORD
METRONOME
TEMPO
EQ
BANK A
BANK B
L
R 1 2
USB DISK
SONG
It adjusted the piano keys touch sensitivity levels.
Reference: Touch P.18.
CHORD
METRONOME
TEMPO
EQ

13
EQ
EQ
CHORD
repeatedly
When the lower indicator of the [BANK A/BANK B] button is lit, press the
[ ] button to select the EQ Bass or EQ Treble function. EQ
Press the [CHORD/EQ] button repeatedly , then press
the [+/YES] and [-/NO] buttons or [DATA WHEEL] to set the value:-12~12.
(Default:00).
Press the [CHORD/EQ] button repeatedly , then press
the [+/YES] and [-/NO] buttons or [DATA WHEEL] to set the value:-12~12.
(Default:00).
to select the EQ Bass
to select the EQ treble
L
R 1 2
USB DISK
SONG
EQ
CHORD L
R 1 2
USB DISK
SONG
14
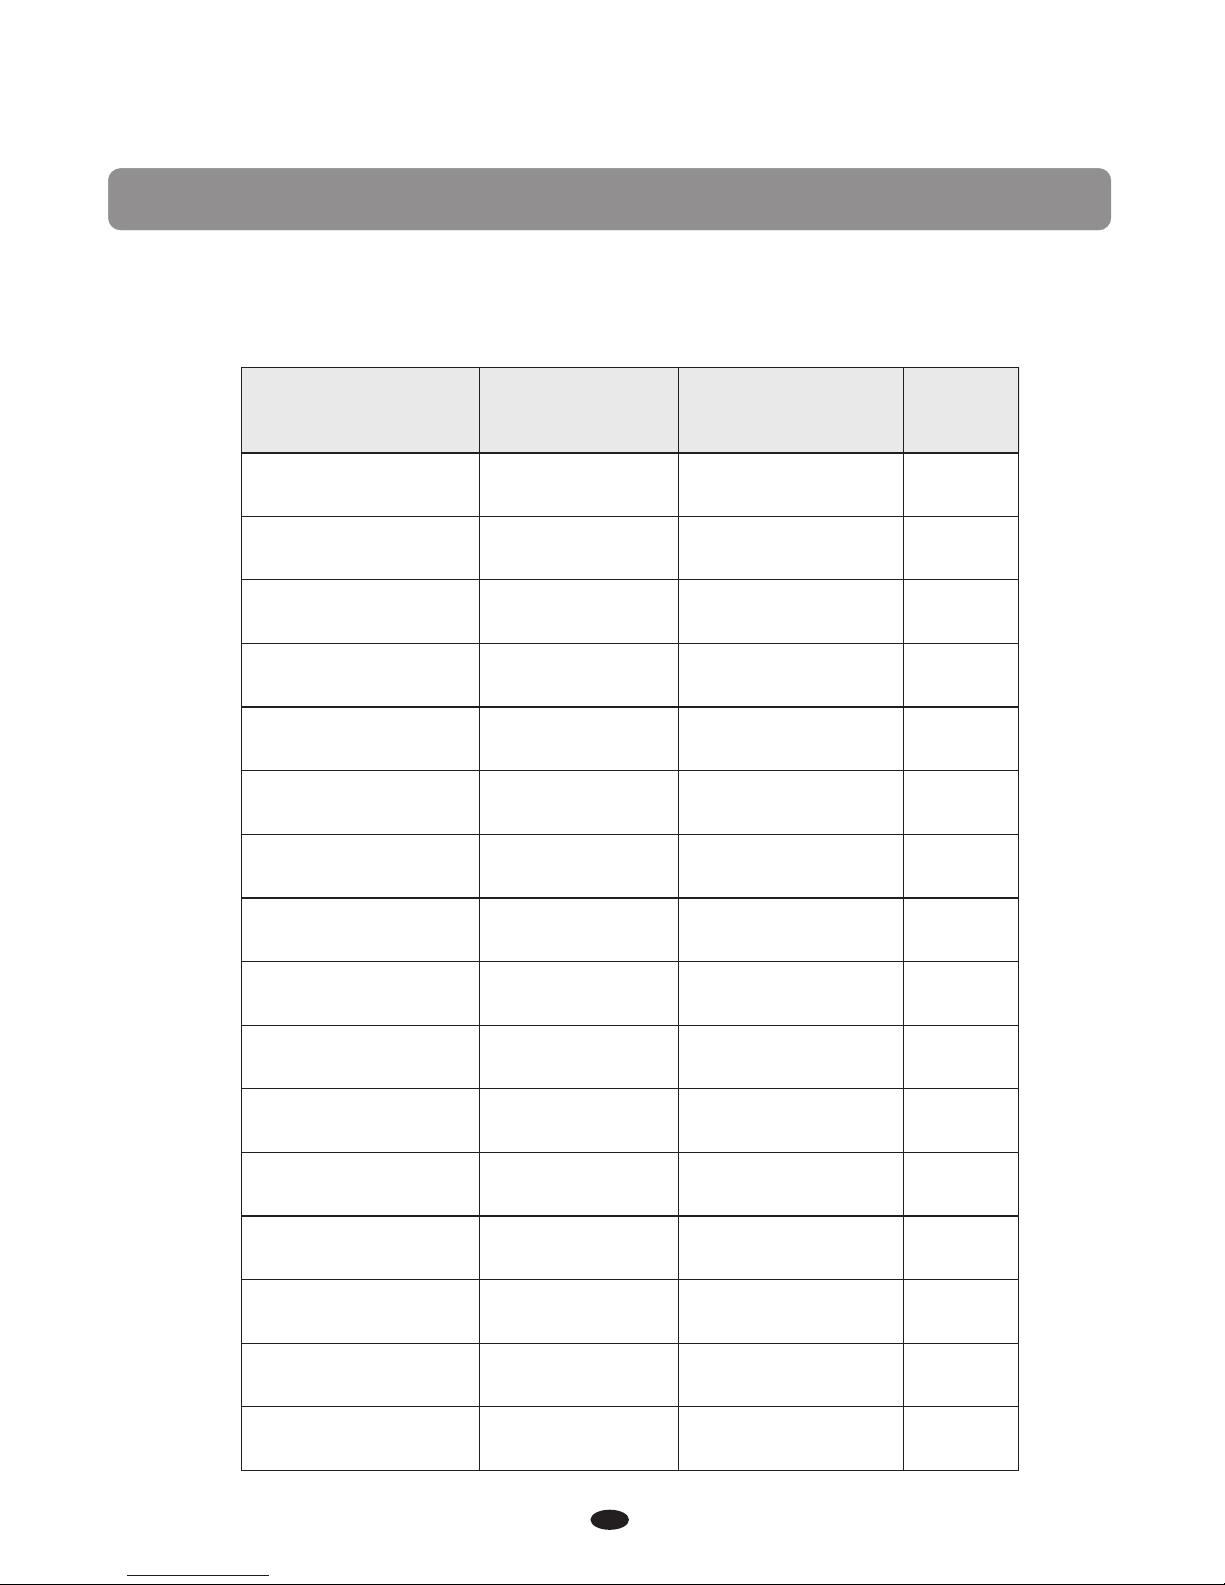
Set Up
Press the [SET UP] button repeatedly or turn the [DATA WHEEL] to select the
function that you desire, see the table below:
Function LCD Display Range Default
Reverb Type
Chorus Type
Reverb Level
Chorus Level
Metronome Type
Metronome Volume
Main Voice Volume
Split Voice Volume
Layer Voice Volume
AccompanimentVolume
Touch Sensitivity
Tune
Transpose
Song Grading
Local
Reset
05
00
18
18
4/4
100
115
100
75
19
02
00
00
ON
ON
00-08
00-13
00-63
00-63
2/2-8/12
00-127
00-127
00-127
00-127
00-31
00-06
-64-63
-12-12
On/Off
On/Off
REVERB
CHORUS
REV LVL
CHR LVL
MET TYPE
MET VOL
MAIN VOL
SPLITVOL
LAY VOL
ACC VOL
TOUCH
TUNE
TRANSPOS
GRADING
LOCAL
RESET

or turn the [DATA WHEEL]
“ ”
Press the [SETUP] button repeatedly to select “REVERB” ,
then press the [+/Yes] button to confirm the selection, then use the [+/Yes] and
[-/No] buttons or [DATA WHEEL] knob to select the desired Reverb Type.
Range: 00 - 08. (Default: 05)
No reverb effect is produced when you select the reverb type 00 .
SETUP + / YES - / NO
● Reverb Type
L
R 1 2
USB DISK
SONG
● Chorus Type
SETUP + / YES - / NO
or turn the [DATA WHEEL]
“ ”
Press the [SETUP] button repeatedly to select “CHORUS” ,
then press the [+/Yes] button to confirm the selection, then use the [+/Yes] and
[-/No] buttons or [DATA WHEEL] knob to select the desired Chorus Type.
Range: 00-13. (Default:00)
No chorus is produced when you select the chorus type 00 .
L
R 1 2
USB DISK
SONG
This function allows you to adjust the reverb depth for the voice section.
or turn the [DATA WHEEL]
Press the [SETUP] button repeatedly to select “REV LVL” ,
then press the [+/Yes] button to confirm the selection, then use the [+/Yes] and
[-/No] buttons or [DATA WHEEL] knob to adjust the value. : 00 - 63Range .
(Default: 18)
● Reverb Level
SETUP + / YES - / NO
L
R 1 2
USB DISK
SONG
15
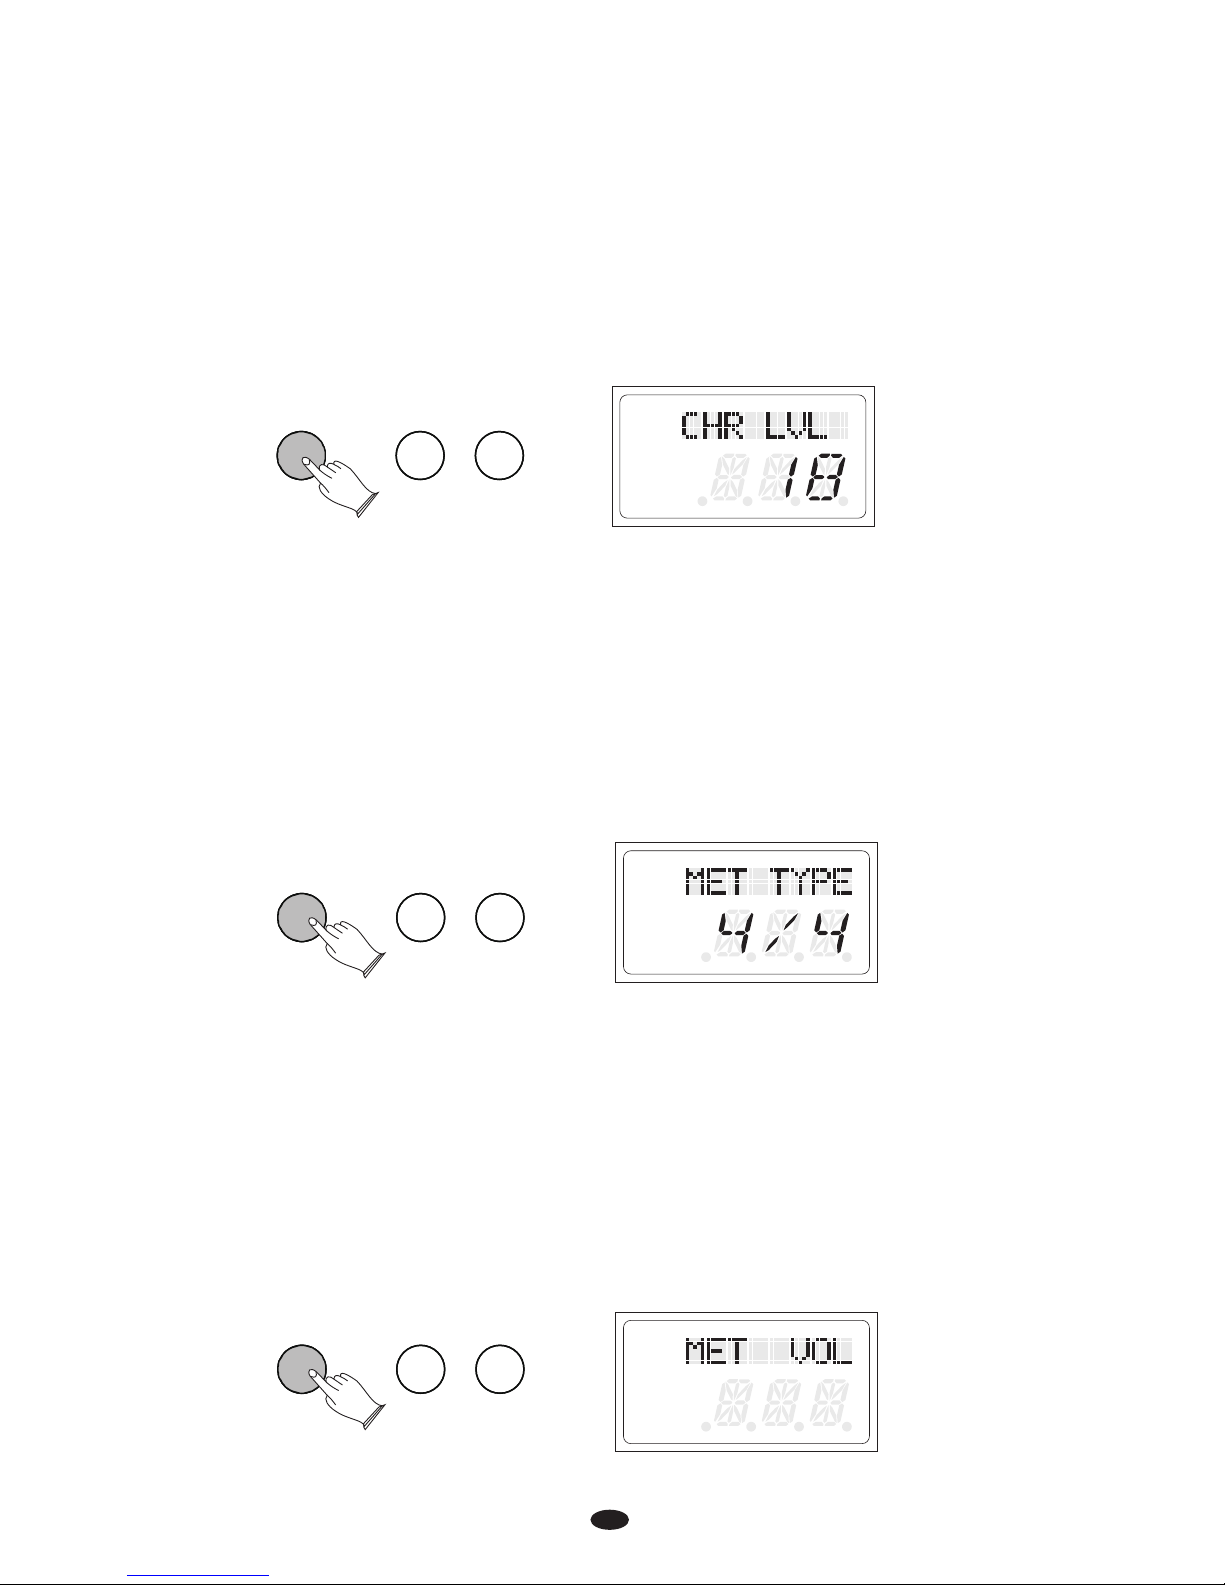
This function allows you to adjust the chorus depth for the voice section.
Press the [SETUP] button repeatedly to select “CHR LVL” ,
then press the [+/Yes] button to confirm the selection, then use the [+/Yes] and
[-/No] buttons or [DATA WHEEL] to adjust the value. : 00 - 63
or turn the [DATA WHEEL]
Range .
(Default:18)
● Chorus Level
SETUP + / YES - / NO
L
R 1 2
USB DISK
SONG
● Metronome Type
In this function you can set the .
Press the [SETUP] button repeatedly or turn the [DATA WHEEL] to select
MET TYPE , then press the [+/Yes] button to confirm
time signature of the metronome
“ ” the selection, then use
the [+/Yes] and[-/No] buttons or [DATA WHEEL] to adjust Time
signatures: 2/2, 1/4, 2/4, 3/4, 4/4, 5/4, 6/4, 3/8, 6/8, 7/8, 9/8, 12/8.
the value.
(Default:4/4)
SETUP + / YES - / NO
● Metronome Volume
In this function you can set the Metronome Volume.
Press the [SETUP] button repeatedly to select“MET VOL”, then press the [+/Yes]
button to confirm the selection, then use the [+/Yes] and[-/No] buttons or [DATA
WHEEL] to Range: 00 - 127.
increase or decrease the value. (Default:100)
SETUP + / YES - / NO
L
R 1 2
USB DISK
SONG
L
R 1 2
USB DISK
SONG
16
Table of contents
Other VMI Musical Instrument manuals


