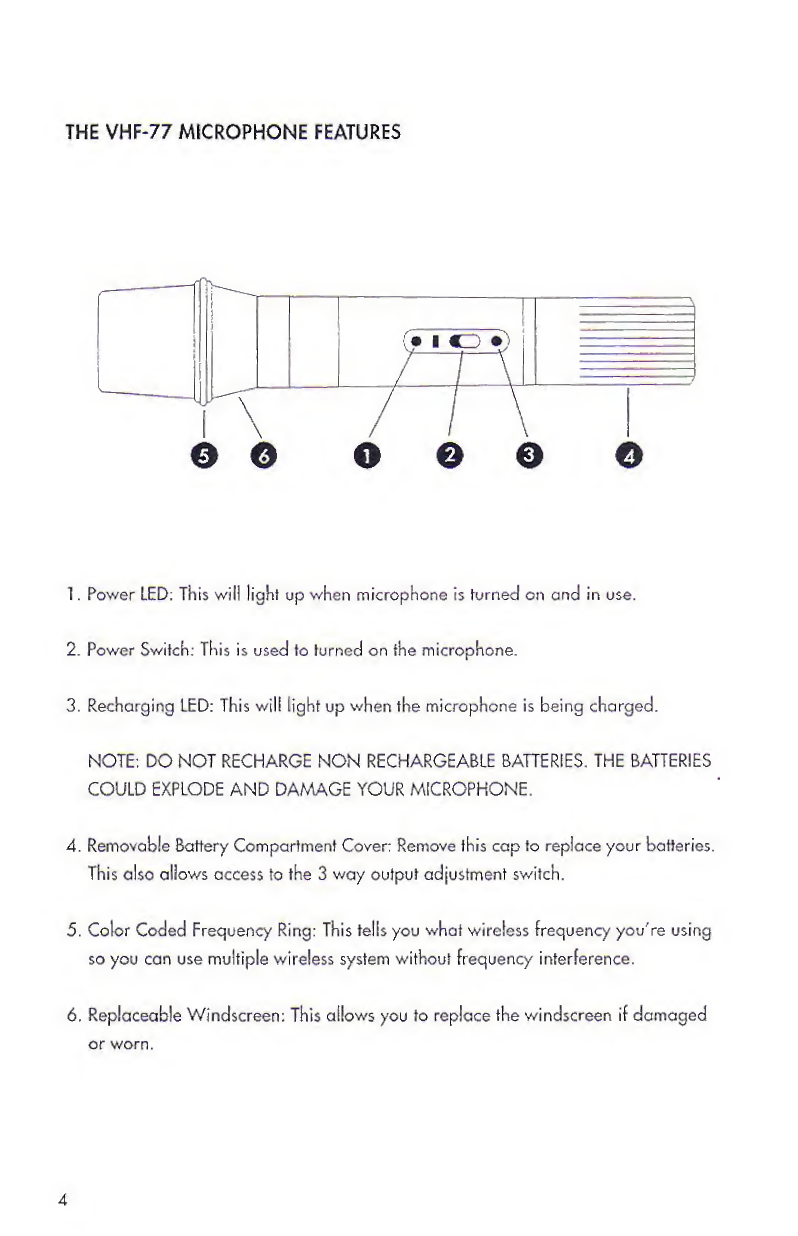
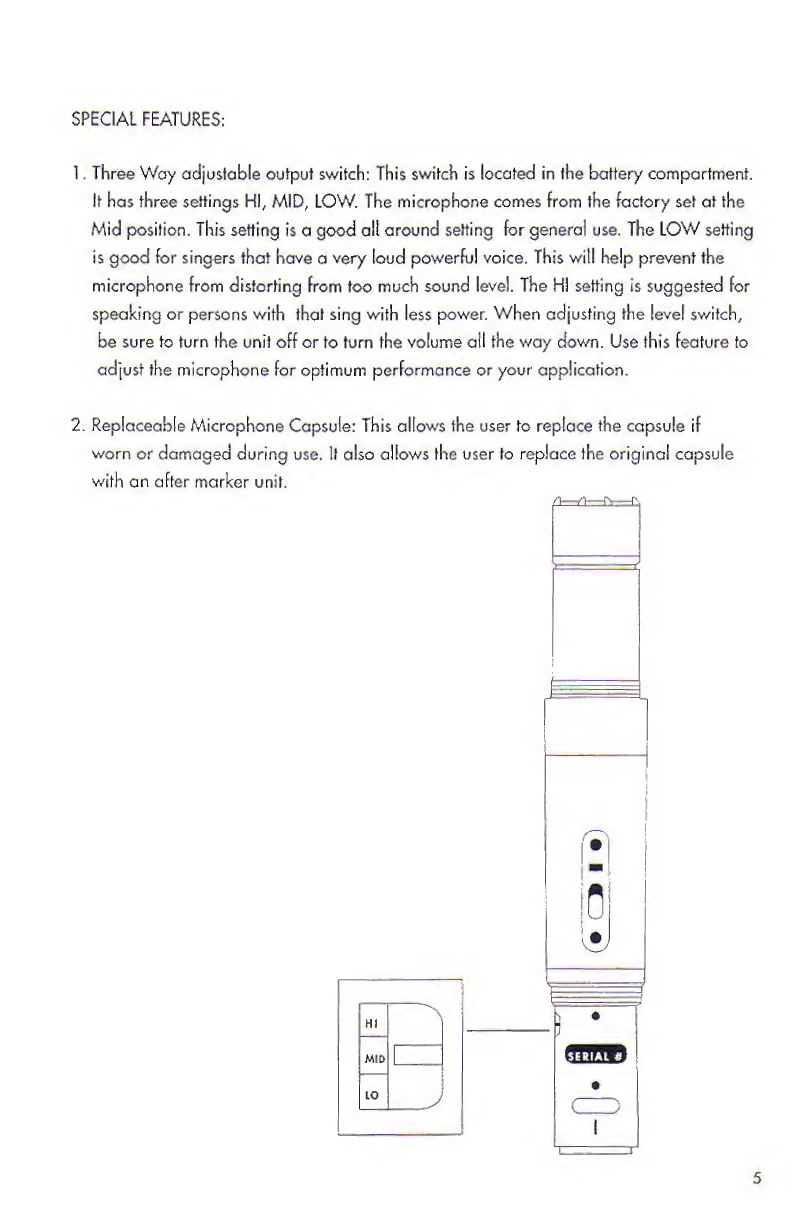
VocoPro VHF-77 User manual

OWNER'S
MANUAL
VHF-77
DUAL
RECHARGEABLE
WIRELESS
MICROPHONES
EXCELLENT
FEATURES:
-
BUILT
IN
RECHARGEABLE
BASE
ON
THE
RECEIVER
-
AUDIO
MUTE
CIRCUITRY
PROVIDES
NOISELESS
ON/OFF
SWITCHING
■
TONE
SQUELCH
CODING
ELIMINATES
RADIO
FREQUENCY
NOISE
BURSTS

1.
Check
all
the
accessories
from
the
list.
1.2
Microphone
/
Transmitters
2.
Receiver
/
Charger
unit
3.
AC
Adapter
4
.
4
Rechargeable
Batteries
5.
1
/
4
”
Cable
2.
Turn
the
microphones
power
switch
to
the
off
position
and
insert
the
rechargeable
battery
into
the
microphone
by
turning
the
bottom
of
the
unit.
Be
sure
to
install
the
battery
correctly,
MOTE:
This
microphone
wiil
operate
with
regular
non
chargeable
battery,
but
make
sure
you
do
not
place
the
microphone
on
the
receiver
/
charger
stand
(even
receiver
power
is
off]
CHARGING
A
REGULAR
NON
CHARGEABLE
BATTER
MAY
CAUSE
THE
BATTERY
TO
EXPLODE.
3.
Plug
in
the
AC
Adapter
into
the
receiver/charger
and
turn
on
the
power.
4.
Using
a
1
/4"
cable
to
connect
the
output
of
the
receiver
into
the
input
of
the
system.
5.
Turn
down
your
system
and
power
up
your
system
and
the
receiver.
You
should
see
a
green
light
on
the
receiver
once
it's
powered
up.
Gradually
turn
up
the
level
until
you
receive
the
desired
volume.
6.
After
performing,
remember
to
turn
off
the
power
on
both
the
microphone
and
receiver/charger.
To
charge
the
rechargeable
batteries
place
the
microphone
in
the
Recharging
Stand,
Make
sure
that
the
charging
LED
light
is
on.
To
maintain
a
long
rechargeable
life
DO
NOT
charge
the
unit
for
more
than
8
hours
at
a
time.
To
stop
recharging
just
turn
the
microphone
m
the
stand
so
the
Recharging
Light
goes
off.
1

IMPORTANT
FEATURES
1.
Rechargeable
Receptacle
/
Stand
2.
Receiver
Antenna
3.
Charging
Terminal
This
terminal
is
For
charging
the
microphone
when
not
in
use.
Insert
the
mic.
into
the
termina
so
the
indicator
lights
up.
After
the
mic.
is
fully
charged
turn
the
mic
around
to
prevent
ove
charging
which
will
damage
your
rechargeable
batteries.
When
fully
charge
the
indicator
light
will
go
off.
4.
AC
Power
Plug
the
AC
Adapter
jack
into
the
jack
to
get
power.
Be
sure
to
only
use
the
supplied
adapter.
NOTE:
The
second
jack
is
designed
for
the
optional
body
pack.
DO
NOT
plug
anything
else
into
this
jack.
It
could
damage
your
system,
5.
Microphone
Signal
Output
Jack:
This
jack
is
for
connecting
the
unit
to
your
mixer.
6/7,
Output
Volume
Controls:
This
controls
the
volume
of
the
unit.
It's
a
good
idea
to
keep
it
at
a
lower
volume
to
preven
audio
feedback.
8.
Receiver
ON/OFF
Switch:
This
is
the
power
switch
for
the
receiver.
This
will
NOT
effect
the
charging
function.
9.
Signal
Indicator
Light:
When
the
microphone
is
in
use
this
light
will
turn
green
to
show
that
the
unit
is
receiving
the
signal.
10.
P
ower
Indicator
Light:
This
will
light
green
when
the
battery
is
at
a
good
charge
and
will
light
red
when
the
battery
is
weak
and
needs
to
be
charged
or
replaced.
11
.
Microphone
ON/OFF
Switch:
Turns
on
the
power
for
the
microphone.
12.
Charging
Indicator
Light:
This
will
light
RED
when
battery
is
weak,
yellow
when
the
microphone
is
charging
and
Green
when
the
microphone
is
charged.
13.
Frequency
Weak
/
Down
Switch
2

OPERATION
TIPS
1.
F
or
Optimum
performance
place
the
receiver
at
least
3
Feet
above
the
ground
and
at
least
a
couple
feet
from
concrete
walls
or
metal
surfaces
to
prevent
any
reflections.
The
microphone
should
also
be
at
least
3
feet
away
from
the
receiver's
antenna.
2.
B
efore
powering
up
the
units
turn
the
volume
down
of
all
the
gear.
Power
up
and
gradually
bring
up
the
volume
to
the
desired
setting.
You
should
see
the
green
light
to
show
that
the
unit
is
receiving
the
signal.
NOTE:
WHEN
THE
MICROPHONE
IS
OFF
BUT
THE
SIGNAL
INDICATOR
STILL
LIGHTS
UP
THE
UNIT
IS
RECEIVING
INTERFERENCE.
CHECK
FOR
THE
SOURCE
OF
INTERFERENCE
OR
CHANGE
THE
location
OF
THE
RECEIVER.
IF
THE
INTERFERENCE
STILL
EXISTS
IT
MEANS
THE
CHANNEL
IS
STRONGLY
INTERFERED,
EXCHANGING
THE
SYSTEM
WITH
ONE
WITH
A
DIFFERENT
FREQUENCY
IS
THE
BEST
SOLUTION.
3.
F
or
a
good
balance
turn
the
volume
control
on
the
receiver
to
the
half
way
position,
and
then
adjust
input
of
your
mixer
or
equipment
to
get
the
desired
volume.
NOTE:
IF
THE
RECEIVER
OUTPUT
IS
SET
TO
HIGH
OR
THE
MIXER
IS
SET
TO
LOW,
IT
WILL
CAUSE
FEEDBACK
AND
OR
NOISE
FROM
THE
MIXER
OUTPUT.
IF
THE
SETUPS
ARE
REVERSED,
THE
SIGNAL
TO
NOISE
RATIO
WILL
BECOME
WORSE.
3

THE
VHF-77
MICROPHONE
FEATURES
o
o
o
o
o
o
1.
Power
LED:
This
will
light
up
when
microphone
h
turned
on
and
in
use.
2.
Power
Switch:
This
is
used
to
turned
on
the
microphone.
3.
Recharging
LED:
This
will
light
up
when
the
microphone
is
being
charged.
NOTE:
DO
NOT
RECHARGE
NON
RECHARGEABLE
BATTERIES.
THE
BATTER]ES
COULD
EXPLODE
AND
DAMAGE
YOUR
MICROPHONE.
4.
Removable
Battery
Compartment
Cover:
Remove
this
cap
to
replace
your
batteries.
This
also
allows
access
to
the
3
way
output
adjustment
switch.
5
.
Color
Coded
Frequency
Ring:
This
tells
you
what
wireless
frequency
you're
using
so
you
can
use
multiple
wireless
system
without
frequency
interference.
6.
Replaceable
Windscreen:
This
allows
you
to
replace
the
windscreen
if
damaged
or
worn.
4

SPECIAL
FEATURES:
1.
Three
Way
adjustable
output
switch:
This
switch
is
located
in
the
battery
compartment.
It
has
three
settings
HI,
MID,
LOW.
The
microphone
comes
from
the
factory
set
at
the
Mid
position.
This
setting
is
a
good
all
around
setting
for
general
use.
The
LOW
setting
is
good
for
singers
that
have
a
very
loud
powerful
voice.
This
will
help
prevent
the
microphone
from
distorting
from
too
much
sound
level.
The
HI
setting
is
suggested
for
speaking
or
persons
with
that
sing
with
less
power.
When
adjusting
the
level
switch,
be
sure
to
turn
the
unit
off
or
to
turn
the
volume
all
the
way
down.
Use
this
feature
to
adjust
the
microphone
for
optimum
performance
or
your
application.
2.
Replaceable
Microphone
Capsule:
This
allows
the
user
to
replace
the
capsule
if
worn
or
damaged
during
use.
U
also
allows
the
user
to
replace
the
original
capsule
with
an
after
marker
unit.
5

TROUBLESHOOTING
SYMPTOM:
BATTERY
RUNNING
LOW
EVEN
WHEN
JUST
CHARGED
CAUSE
REMEDY
The
microphone
ts
not
connecting
to
the
charging
base
correctly
when
charging.
Battery
is
not
fully
charged.
Check
the
battery
charging
indicator
light
when
charging
when
the
microphone
is
being
charged.
Charge
the
battery
for
a
full
eight
hours
before
use.
REMEDY
SYMPTOM:
NO
SOUND
CAUSE
Microphone
or
receiver
is
not
turned
on.
Output
Level
setting
is
to
low.
Input
volume
of
your
system
not
turned
on.
RED
Lamp
is
lit
because
battery
ts
low,
SYMPTOM:
Noise
when
the
microphone
is
operating.
Turn
both
units
on,
check
signal
indicator
to
make
sure
you're
getting
signal.
Turn
up
the
output
level
on
the
back
of
the
receiver.
Check
the
input
volume
on
your
system.
Charge
battery
for
S
hours
if
it's
a
rechargeable
one.
If
not
replace
battery.
NEVER
RECHARGE
NON
RECHARGEABLE
BATTERIES!
Check
the
battery
indicator
light
recharge
the
battery.
6

SYMPTOM:
NOISE
WHEN
THE
MICROPHONE
[5
OPERATING
CAUSE
REMEDY
Battery
is
low.
Check
the
battery
indicator
tight
recharge
the
battery.
Antenna
is
not
fully
extended.
Extend
the
antenna
to
full
extension.
SYMPTOM:
NOISE
WHEN
THE
MICROPHONE
IS
OPERATING
CAUSE
REMEDY
The
microphone
is
out
of
range.
Place
the
receiver
closer
to
the
microphone's
operating
range.
SYMPTOM:
BATTERY
RUNNING
LOW
EVEN
AFTER
RECHARGING
CAUSE
REMEDY
Rechargeable
battery
is
worn
out
(
Rechargeable
batteries
have
a
life
about
500
hours
of
charging
and
discharging)
Replace
the
battery
with
the
same
type
of
rechargeable
battery
(1.2V
x
2
Rechargeable
battery]
NOTE:
DO
NOT
RECHARGE
NON
RECHARGEABLE
BATTERIES.
THE
BATTERY
MAY
EXPLODE.
7
Table of contents
Other VocoPro Microphone manuals