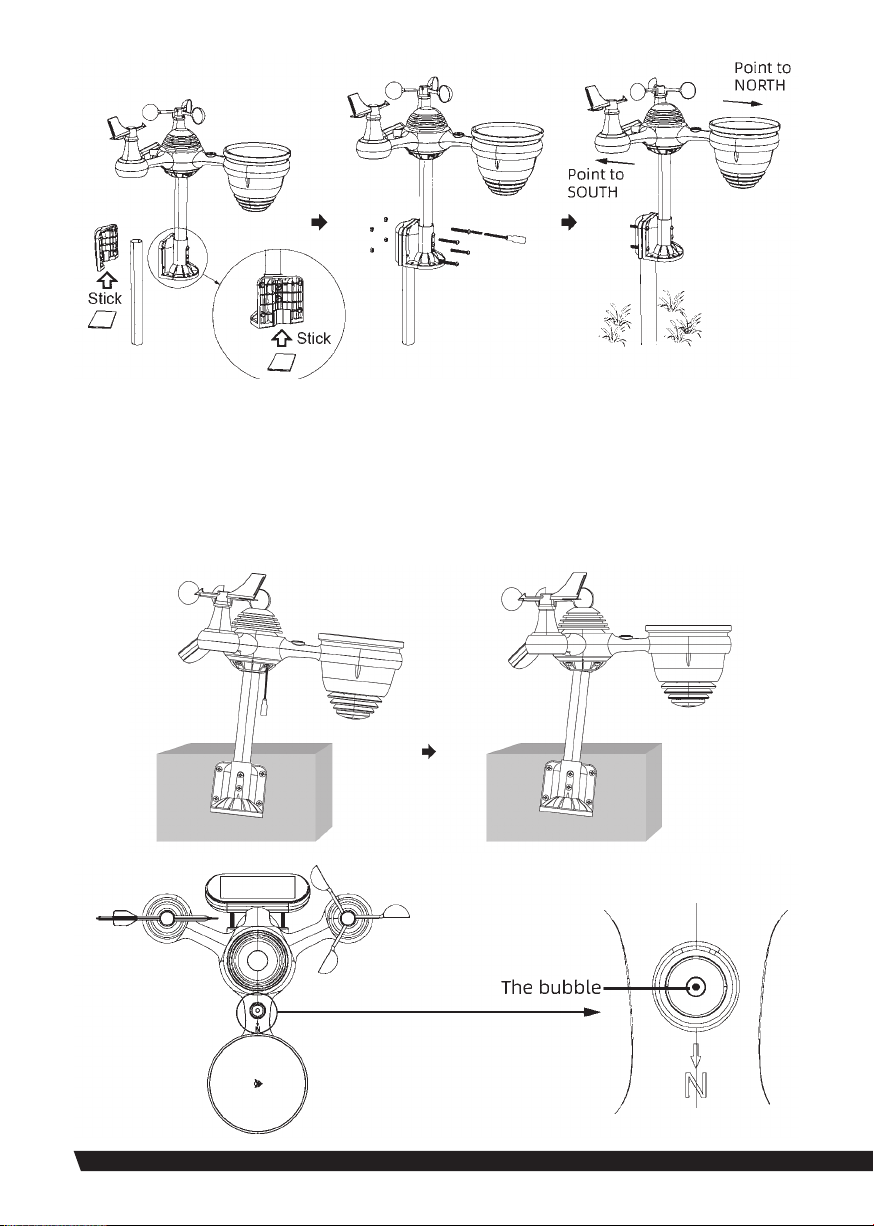
Vorsprung 20160 User manual

Item No.: 20160
7-IN-1 SMART WIFI WEATHER STATION
User Manual

2
SAFETY PRECAUTIONS
IMPORTANT
NOTICE
Prior to operating this appliance, carefully review all safety precautions,
operating guidelines, and maintenance/care instructions provided in this
manual. Retain this document for future reference.
• This product is intended for adult use
only and is not a toy. Keep out of reach of
children.
• The primary function of this product is to
provide weather information for residen-
tial use only. It is not designed for medical
applications or public dissemination of
information.
• Refrain from cleaning the unit with abrasive
or corrosive materials.
• Do not position the appliance near open
ames or heat sources, as this may result
in re, electric shock, product damage, or
personal injury.
• Ensure that only fresh, new batteries are
installed in the product, and avoid mixing
new and old batteries.
• Do not attempt to disassemble, modify, or
alter the product in any way.
• Utilize only manufacturer-approved attach-
ments and accessories with this product.
• To prevent damage, do not immerse the
unit in water. If exposed to liquid, gently
wipe the product with a soft cloth.
• Protect the unit from excessive force,
impact, dust, extreme temperatures, and
humidity.
• Ensure that ventilation holes remain unob-
structed by objects.
• The product’s console is designed for indoor
use only.
• Avoid positioning the indoor sensor in
direct sunlight, rain, snow, or other adverse
weather conditions.
PACKAGE CONENT
1
4
9
7
2
5
10
8
3
6
11

3
PRODUCT OVERVIEW
■Weather Console Overview
1. Indoor receiver
2. USB A to DC cable
3. Wireless 7 in 1 outdoor sensor
4. Funnel
5. Wind direction vane with 1 screw
6. Wind speed cups with 1 screw
7. Mounting pole with 4 screws
8. Mounting brackets with 6 screws
9. Rubber pads X 2
10. Screwdriver
11. User guide
1. 8 touch keys
2. LIGHT/SNOOZE key
3. SET key
4. TEMP/ALARM key
5. RAIN key
6. WIND/+ key
7. BARO/-/WIFI key
8. ALERT key
9. MAX/MIN key
10. CHANNEL key
11. Battery door
12. Mounting hole
13. Holder

4
■Console LCD Display Overview
■Wireless 7 in 1 Outdoor Sensor Overview
1. Outdoor temperature & humidity,
weather index
2. Wind direction & speed
3. Indoor temperature & humidity (CH),
comfort index
4. Weather forecast
5. light intensity (SUN)
6. UV index
7. Time & date, moon phase, alarm
8. Barometer
9. Rain

5
SETTING UP THE WIRELESS
7-IN-1 OUTDOOR SENSOR
The wireless 7-in-1 outdoor sensor measures wind speed, wind direction, rainfall, UV,
light intensity, temperature, and humidity.
■Installing the Mounting Pole and Bracket
Secure the sensor onto a mounting pole and bracket (included) using the screws (included).
1. Solar panel
2. Wind direction vane
3. UV/light sensor
4. Bubble level gradienter
5. Rain collector
6. Wind speed cups
7. Mounting pole
8. Mounting brackets
9. Hygro-thermo sensor
10. LED: Flashes when the unit
transmits a reading
11. RESET button
12. Battery door

6
■Installing Wind Speed Cups and Wind Direction Vane
– Align the screw holes in the wind speed cups with the at, vertical side of the metal rod.
– Insert the wind speed cups in the metal rod and screw on tight to lock it in place.
– Align the screw holes in the wind direction vane with the at, vertical side of the metal rod.
– Insert the wind direction vane in the metal rod and screw on tight to lock it in place.
Wind Speed Cups Installation
Wind Direction Vane Installation
■Setting Up Rain Collector
– Align the notches on the funnel with the lock grooves inside the rain collector.
– Insert the funnel in the rain collector and screw on tight to lock it in place.

7
■Installing the Batteries
– Slide the switch to unlock the battery compartment at the bottom of the solar panel.
– Insert three AA batteries (not included) according to the +/- polarity labeled in the compartment.
– Lock the battery compartment back onto the compartment.
■Mounting the Wireless 7-in-1 Outdoor Sensor
– Select an unobstructed location for the 7-in-1 outdoor sensor to ensure optimal performance.
– Secure the mounting brackets to a surface or wall using the four included tapping screws, or
afx the mounting pole to a pre-existing mounting pole using ϕ5 Bolts and M5 Nuts assembly.
– Attach rubber pads to the mounting bracket prior to fastening it onto the sensor, for added
stability and protection.
– Before tightening the screws, ensure that the rain collector is oriented towards the north and
the solar panel faces south for maximum efciency.
– It is crucial to rmly secure the sensor to prevent movement during windy conditions, as this
may result in inaccurate rainfall data due to transmitter vibrations.
Slide the switch to unlock
Close the battery compartment
and slide the switch to lock
Open the battery compartment
Insert three AA batteries

8
■Adjusting the 7-in-1 Wireless Sensor Level
– Utilize the bubble level indicator to ensure that the wireless outdoor sensor is perfectly level.
An unlevel sensor may result in inaccurate readings for the gain gauge, UV, and light intensity
measurements.
– To adjust the level of the wireless outdoor sensor, loosen the screws on the mounting pole.
Carefully reposition the sensor so that the bubble is centered within the bubble level indicator
– Once the sensor is properly leveled, securely tighten the screws on the mounting pole to
maintain its position.

9
KEY CONFIGURATION
MAIN FEATURES
• Real Time Clock with calendar
• Alarm with snooze function.
• Time zone setting and Daylight Saving Time
(DST) function.
• Wi-Fi connected to time server and weather
servers.
• Automatically sync with internet time
server.
• 8 Languages (EN/ DE/ FR/ ES/ IT/ NL/ RU/
DU)
• Moon Phases
• Indoor & outdoor temperature and humidity
displays with trend.
• Hourly, daily, weekly, monthly, total rainfall
and rainfall rate in past hour.
• Average wind speed, gust wind speed and
wind direction
• Absolute and relative barometric pressure
displays with trend.
• Solar radiation intensity display
• UV index display.
• Weather index display: Feel likes, Wind Chill,
Heat index, Dew point
• Weather Forecasting.
• Weather alert settings - Outdoor temper-
ature Hi/Lo alert, Outdoor humidity Hi/Lo
alert, Indoor temperature Hi/Lo alert, In-
door humidity Hi/Lo alert, average Hi wind
speed, Hi Gust speed, UV index Hi alert,
Light intensity Hi alert, Pressure drop alert,
High rain rate alert, Hourly rainfall alert.
• 3- level brightness of backlight.
• Low battery indications for outdoor sensor
and receiver.
• Upload weather data to Weather Under-
ground and/or Weathercloud via Wi-Fi
router.
Set Button:
• Press the Set button to toggle between
normal clock mode and alarm mode.
• In normal mode, press and hold the Set
button for 3 seconds to enter manual time
setting mode.
• In alarm mode, press and hold the Set
button for 3 seconds to enter alarm setting
mode.
Temp/Alarm Button:
• In normal mode, press the Temp/Alarm
button to cycle through outdoor temper-
ature, “feels like” temperature, wind chill,
heat index, and dew point.
• In alarm mode, press the Temp/Alarm
button to turn the alarm on or off.
Rain Button:
• Press the Rain button to cycle through rain
rate (in/hr), rain event, rain day, rain week,
rain month, and rain total.
• Press and hold the Rain button for 2 sec-
onds to reset the rain total.
Wind/+ Button:
• Press the Wind/+ button to cycle through
average wind speed, wind gust, and wind
direction.
• In setting mode, press the Wind/+ button
to increase the value. Press and hold the
Wind/+ button for 2 seconds to increase the
value rapidly.
Baro/-/Wi Button:
• Press the Baro/-/Wi button to toggle be-
tween relative pressure and average relative
pressure.
• In setting mode, press the Baro/-/Wi but-
ton to decrease the value. Press and hold
the button for 2 seconds to decrease the
value rapidly.
Alert Button:
• Press the Alert button to toggle between
viewing high and low alarms.
Max/Min Button:
• Press the Max/Min button to toggle be-
tween minimum and maximum values.
• When displaying maximum data, press and
hold the Max/Min button for 2 seconds to
clear the max value.
• When displaying minimum data, repeat the
process for Maximum to clear the value.
Channel Button:
Press and hold the Channel button for 2 sec-
onds to register sensors.

10
SETTING UP INSTRUCTIONS
■Setting Up Wi-Fi Connection
Note: The weather station operates on a 2.4GHz signal. If your router supports
dual-band (2.4GHz and 5GHz), ensure that the 2.4GHz band is enabled.
Power up the console and press and hold
the BARO/-/WIFI button for four (4) seconds.
The console’s LCD display will show the letters
“AP” and an icon, indicating that it has entered
Access Point (AP) mode. The console is now
ready for Wi-Fi conguration.
• The ashing “AP” characters
signify that the weather station
is in AP mode.
• On a PC, open your Wi-Fi network settings.
For Android or iOS devices, access the set-
tings menu and select Connections/WI-FI to
view the network settings.
• Locate the display console’s SSID from the
list, which should appear as WWS-XXXXXX
(where each X represents an integer). Tap on
the SSID to initiate the connection, which
may take several seconds to complete.
• Once connected to the weather station
via Wi-Fi, open the settings page at the IP
address (http://192.168.1.1) to congure the
Wi-Fi, Weather Underground, and Weather
Cloud settings.
■Wi-Fi Connection Status
The following icons on the LCD display screen show the Wi-Fi® status:
Flashing
The weather sta-
tion is attempting
to connect to your
wireless router.
Solid
The weather station
has been connected to
your wireless router.
Flashing
The weather station is
in AP mode.
■Setting Up Weather Server Connection
Upon successfully connecting to the display console via Wi-Fi and accessing the settings page at
http://192.168.1.1, please input the designated information into the web interface setup page. In
case you have opted not to utilize the services of Weather Underground or Weathercloud, kindly
ensure that the respective check boxes remain unselected.
Setting:
1. Web interface Logo
2. Select your Wi-Fi Router(SSID) from the list
3. Router’s password
4. Check to conrm upload to Weather underd-
ground server
5. Enter Your underdground ID
6. Enter Your underdground Key/Password
7. Check to conrm upload to Weathercloud.net
8. Enter Your Weathercloud ID
9. Enter Your Weathercloud Key/Password
10. Time Zone Settings
11. DST on/off
12. Internet time sever
13. Press Save to conrm the settings
Note:
1. In AP mode, hold BARO/-/WIFI for 4 seconds
to exit the AP mode. The display will simply
restore the previous AP setting.
2. Time server URL: nist.time.gov

11
■Setting The Time Zone
To ensure that the time display is automatically synced to your specic time zone, navigate to the
Time Server Setup section on the SETUP page and adjust the time zone accordingly (e.g. +0:00 for
London). The default time zone is set to ‘0:00’.
CREATE AND SYNC YOUR
WEATHER SERVER ACCOUNT
The weather station is capable of uploading weather data to Weather Underground and/or Weath-
er Cloud through your Wi-Fi Router.
■Create Weather Underground Account
Note: VORSPRUNG does not own Weather Underground or Weathercloud. As a result,
the instructions provided here may be subject to change without notice due to updates
on either website.
1. Visit the Weather Underground website at https://www.wunderground.com and click on the
JOIN link. Follow the on-screen instructions to create an account.
Important: Use a valid email address when registering your account.
Once your account has been created and the email validation process is complete, return to
the Weather Underground website. Click on the dropdown link at the top of the site labeled
My Prole, and then select My Devices from the dropdown menu. Click on “Add New Device”
to add your weather station.

12
■Create Your Weather Cloud Account
1. Please visit the Weather Cloud website at https://www.weathercloud.net, and provide the
necessary information in the “Join Us Today” section. Follow the instructions to create an
account.
Note: Please use a valid email address to register your account.
2. After successfully creating your account, please sign in and click on “+New” to add a new
device.
3. Proceed to ll in the requested information on the “Create New Device” page.
3. Kindly document or capture a screenshot of your Station ID and Station Key/Password for
future reference and to successfully complete the setup process.
2. Follow the on-screen instructions to input your weather station information. In Step 2, you will
be prompted to enter a name for your weather station (feel free to be creative, but remember
the name you chose!) and select your station hardware (choose “other”). After completing
this section, click NEXT to generate your unique Station ID and key. When the status displays
“online,” this indicates that your device has been successfully added.

13
4. Provide your station’s details, and then click on “Create.”
Note: Fields marked with a red asterisk (*) are mandatory.
Note: You may choose any model number and link type in the provided elds
5. It is recommended to document or capture a screenshot of your Weathercloud ID and Station
Key/Password for future reference and to successfully complete the setup process.

14
VIEW YOUR WEATHER DATA
■In Weather Underground
To view your weather station data, live via PC or mobile web browser, visit http://www.wunder-
ground.com, and then enter the Station ID you were provided during account setup in the search
box. Your weather data will show up on the next page. Alternately, you can log in to your Weather
Underground account to view and download the recorded data from your weather station.
■In Weathercloud
1. To view your weather station data, live via PC or mobile web browser, visit http://www.weath-
ercloud.net and sign into the account which you created.
2. Click on the tab at the top of the page titled Devices.
3. Click on the Settings menu at the top right of the page, and select the option, View.
4. Click on either Current, Wind, Evolution, or Inside to view your weather station’s data.
OPERATING INSTRUCTIONS
■Power Up the Weather Station
When providing power to the weather station, the LCD will display the current version number,
Version (US/EU) and the frequency. Then, it will turn on all LCD for 2s and enter to the normal
mode and will automatically entering pairing mode.
■Pairing the Wireless 7-in-1 Sensor and Indoor Sensor(s)
(indoor sensors are not included with all of our products, so this section
may not apply to you)
– The outdoor weather stations console should automatically search for and connect to the
additional wireless sensor, if both are powered on within 10 minutes of each other.
– If the outdoor weather station does not connect within 10 minutes, unplug it and plug in the
power again in order to re-enter pairing mode. Or press and hold CHANNEL 2s to start the
manual pairing process.
– During the pairing process, an icon of antenna should be ashing on the Additional Sensors’
CH/Outdoor temperature & humidity section of the display.
– Once the pairing process completes, the antenna icon will appear as solid, and the outdoor
temperature, humidity, wind speed, wind direction, UV, light intensity and rainfall will appear
in their designated sections of the LCD display.
■Re-Pairing Sensors
If the connection fails, press and hold CHANNEL to enter pairing mode, the weather station will
re-register all the sensors that have already been registered to it before. (i.e., the weather station
will not lose the connection of the sensors that you have paired up before).
■Pairing Additional Wireless Sensors
Press and hold CHANNEL to enter pairing mode and register new sensor(s) to pair to weather
station.

15
■Setting Time
– In normal clock mode, press and hold SET 2s to enter the setting mode.
– To exit the set mode at any time, press the LIGHT/SNOOZE button.
– Press WIND/+ or BARO/-/WIFI to adjust the value up or down.
– Press Set key to conrm and jump to next setting.
– Setting procedure is following.
Beep On/Off NTP On/Off Language Time Zone DST On/Off Date Format
Year Month Date 12/24 hr Hour Minute Temp Unit Pressure Unit
Relative Pressure Calibration Light Unit Rain Unit Wind Unit Hemisphere
End of Set (return to normal mode).
NTP: Get internet time from NTP server of NIST.
■Moon Phase
The weather station calculates the moon phase according to your time, data and time zone.
The table below explains the corresponding phases and their icons for both Northern and South-
ern hemispheres.
■Alarm Mode
– In normal clock mode, press SET toggle to alarm mode.
– Press TEMP/ALARM to turn on/off alarm function. If alarm is set as on, the alarm bell icon will
show on the display.
– In alarm mode, if no key is pressed for 10 seconds, it will auto switch to normal mode.
■Alarm Time Setting
– In alarm mode, press and hold SET 2s to enter the alarm setting mode. To exit the alarm set-
ting mode at any time, press the LIGHT/SNOOZE button.
– Setting procedure is following:
– Alarm hour Alarm minute end of alarm setting mode (return to alarm mode)
– Press WIND/+ or BARO/-/WIFI to adjust the value up or down.
– Press Set key to conrm and jump to next setting.
Nothern Hemisphere Icons Moon Phase Southern Hemisphere Icons
New Moon
Waxing Crescent Moon
First Quarter Moon
Waxing Gibbous Moon
Full Moon
Waning Gibbous Moon
Third Quarter Moon
Waning Crescent Moon

16
■Hi/Lo Alert Setting
– In normal mode, press and hold ALERT 2s to enter the alert setting mode. To exit the alert
setting mode at any time, press the LIGHT/SNOOZE button.
– Press WIND/+ or BARO/-/WIFI to adjust the value up or down.
– Press ALERT to turn on/off the alert.
– Press ALERT to conrm and jump to next setting.
– Setting procedure is following:
**Indoor Hi Temp alert **Indoor Low Temp alert **Indoor Hi Humidity alert
**Indoor Low Humidity alert Outdoor Hi Temp alert Outdoor Low Temp alert
Outdoor Hi Humidity alert Outdoor Low Humidity alert High Wind Speed alert
High Wind Gust alert Pressure Drop Alert High Rain Rate alert High Daily Rain
alert UV index High Alert Light Intensity High Alert end of alert setting.
Alert Setting Setting Range Display Section Default
Indoor current Channel
Temp Hi Alert -9.9°C – 50°C
(14.18°F – 122°F)
Indoor CH temperature &
Humidity
50°C (122°F)
Indoor current Temp
Lo Alert -9.9°C (14.1°F)
Indoor current Humidity
Hi Alert
1% – 99%
80%
Indoor current Humidity
Lo Alert 40%
Outdoor Temp Hi Alert -40°C – 70°C
(-40°F – 158°F)
Outdoor temperature
& Humidity
40°C (104°F)
Outdoor Temp Lo Alert 0°C (32°F)
Outdoor Humidity
Hi Alert
1% – 99%
80%
Outdoor Humidity
Lo Alert 40%
High Wind Speed Alert
0 – 50m/s
2– 180 km/h
1 – 111mph
1 – 97 knots
0~60BFT
Wind Speed
17m/s
62km/h
38mph
33knots
20BFT
High Wind Gust alert
0 – 50m/s
2 – 180 km/h
1 – 111mph
1 – 97 knots
0~60BFT
Wind Speed
17m/s
62km/h
38mph
33knots
20BFT
Pressure Drop Alert
1 hpa – 10hpa
0.03~0.3 inHg
0.7~7.5mmHg
Barometer drop
3hpa
0.09inHg
2.2mmHg
High Rain Rate alert 1mm/hr – 1000mm/hr
(0.03in/hr – 39.37 in/hr) Rainfall Rate 101mm/hr
(4 in/hr)
High Daily Rain alert 1mm – 1000mm
(0.03 in – 39.37 in) Rainfall Rate 101mm
(4 in)
UV index High Alert 1 - 15 UV Index 10
Light Intensity High Alert
1Klux – 200.0 Klux
7~1580 W/M2
0~185 KFC
Light Intensity
100 Klux
790 W/M2
92 FC

17
■Weather Index
In normal mode, press TEMP/ALARM to switch different weather indexes in the following order:
Feels Like Heat Index Wind Chill Dew point Outdoor temperature
Feels Like
The “Feels Like” temperature index represents the perceived outdoor temperature, taking into
account contributing factors such as wind chill and heat index.
Wind Chill
Wind Chill is determined by a combination of the wireless weather sensor’s temperature and
wind.
NOTE: Only when the temperature is below 50°F(10°C) and the wind speed is over
4.8km/h (3mph), will display the wind chill value, otherwise it will display “--.-“.
Heat Index
The Heat Index is determined by the wireless weather sensor’s temperature and humidity read-
ings.
Dew Point
– The Dew Point refers to the specic temperature at which water vapor present in the air, under
constant barometric pressure, transitions into a liquid state at an equal rate of evaporation.
This process results in the formation of dew on solid surfaces.
– The Dew Point temperature is determined from the temperature and humidity data collected
from the wireless weather sensor.
■Rain
In normal mode, press RAIN to switch among
Rain Rate (in/hr) Hour Rain Daily rain Week rain Month rain
Total rain Event
In normal mode, press and hold RAIN 2s.
Resetting the weekly rain also resets the daily rain
Resetting the monthly rain also resets the daily and weekly rain.
Resetting the total rain also resets the monthly, weekly and daily rain.
■Pressure
In normal mode, press BARO/-/WIFI to review absolute and relative pressure.

18
■Max/Min
– In normal mode, press MAX/MIN switching between maximum and minimum value.
– To clear the max value, press and hold MAX/MIN 2s while max values are displayed.
– To clear the min value, press and hold MAX/MIN 2s while min values are displayed.
– If no key is pressed for 10 seconds, it will auto switch to normal mode
■Indoor Comfort Index
The indoor comfort displays a pictural representation based on the indoor air temperature and
humidity levels to determine the approximate comfort level.
Comfort Dry Wet No Display
When temperature in
20 ~ 28°C, humidity 40
~ 70%, it displays the
comfortable Icon.
When temperature
in any value, humid-
ity less than 40%, it
displays Dry icon.
When temperature in
any value, humidity
is higher than 70%, it
displays Wet icon.
When temperature
out of 20 ~ 28°C, hu-
midity in 40 ~ 70%, no
icon is displayed.
■Weather Forecast
– The built-in barometer notices atmospheric pressure changes, can predict the weather condi-
tions in the forthcoming 12-24 hours, based on all the data it has collected.
– There are 6 weather icons – Sunny, Partly Cloudy, Cloudy, Rainy, Stormy and Snowy.
Sunny
Rainy
Partly Cloudy
Stormy
Cloudy
Snowy
■Freezing Alert
When temperature received by outdoor sensor is lower than 1°C/33.8°F (excluding 1°C/33.8°F),
the freezing symbol is displayed.

19
■Tendency Arrow
Tendency arrows allow you to quickly determine if the temperature, humidity has been rising or
falling in the last one-hour update period (TBD). This is updated every hour.
Tendency
Indicators Condition Temp Change per 1 hours Humidity Change per 1 hours
Rising Rising > 3% Rising > 1°C/2°F
Steady Change ≤ ±3% Change ≤ ±1°C/2°F
Falling Falling > 3% Falling >1°C/2°F
Tendency
Indicators Condition Temp Change per 1 hours
Rising Rising > 2hpa/0.06inHg
Steady Change ≤ ±2hpa/0.06inHg
Falling Falling > 2hpa/0.06inHg
■Backlight
1. With AC Adaptor (not always included – dependent on product model)
– The backlight can only be continuously on when the AC adaptor is permanently on. When the
AC adaptor is disconnected, the backlight can be temporarily turned on.
– Press LIGHT/SNOOZE to adjust the backlight brightness, High, Low and Off.
2. With battery only
– Press LIGHT/SNOOZE temporarily turn on the backlight for 15 seconds.
– To reduce power consumption, the weather station will automatically enter sleep mode, when
only battery power, and will NOT send data to the Internet whilst in this mode.
– Wi-Fi can’t be connected if battery power only.

20
SPECIFICATION
General Specication
Receiver Dimensions (W x H x D) 191.6x127x28.8mm (7.54” x 5” x 1.13”)
Transmitter Dimensions (W x H x D): 408x350x 367mm (16.06” x 13.78” x 14.45”)
Weight approx. 1180g (2.60LBS)
Power supply
Receiver 1.5M USB Cable, 3 x AAA batteries (backup power, not included)
Transmitter 3 x AA battery (not included), Solar power (backup power)
Indoor operation temp -9.9°C – 50°C (14.18°F – 122°F)
Wireless Sensor Communication Specications
RF frequency 868MHz
Modulation method FSK
RF transmission range 150m (open area)
Time Function Specications
Time display HH: MM
Hour format 12 hour or 24 hour
Date display DD/MM or MM/DD
Time synchronization method Synchronizes with UTC clock via internet time server
Weekday languages EN / DE / FR / ES / IT / NL / RU / DU
Time zones GMT +12 ~ GMT -12
DST AUTO/ OFF
Barometer Display & Function Specications
Barometer units hPa, inHg and mmHg
Measuring range 600 – 1100 hPa (relative setting range 930 – 1050hPa)
Accuracy 600 –1100 hPa ± 5 hPa
17.7inHg~32.48inHg± 0.15 inHg
450 – 825 mmHg ± 3.8 mmHg
Typical at 25°C (77°F)
Resolution 1hPa/ 0.01inHg/ 0.1mmHg
Weather forecast Sunny, Partly Cloudy, Cloudy, Rainy, Stormy and Snowy
Display mode Current
Memory mode Daily Max/ Min
Alert Pressure change alert
Table of contents
Popular Weather Station manuals by other brands

AWS
AWS WeatherBug user manual

WAREMA
WAREMA Omnexo Weather station pro Operating and installation instructions

Oregon Scientific
Oregon Scientific RMR203HG user manual

Oregon Scientific
Oregon Scientific BAR321 user manual

Bresser
Bresser ClimaTrend Life instruction manual

Oregon Scientific
Oregon Scientific CW101 quick start guide

BEARWARE
BEARWARE 303717 manual

Nielsen-Kellerman
Nielsen-Kellerman KestrelMet 6000 instruction manual

La Crosse Technology
La Crosse Technology WS-9711U-IT instruction manual

ProWeatherStation
ProWeatherStation TP3000WC Operation manual

HoMedics
HoMedics EnviraStation DWS-320 Instruction manual and warranty information

IROX
IROX JKT-3R operating instructions