VOSS.PET fenci M03 User manual

DE UK SE NL FR
VOSS.PET fenci
M03 M05 M09
Elektrozaungerät
Energiser
Elstängselaggregat
Schrikdraadapparat
Électricateur de clôture

DE UK SE NL FR
DE Originalbetriebsanleitung
Elektrozaungerät
EN Operating Instructions
Energiser
SE Bruksanvisning
Elstängselaggregat
NL Gebruiksaanwijzing
Schrikdraadapparat
FR Mode d‘emploi
Électricateur de clôture
VOSS.PET fenci
41205 fenci M03
41210 fenci M05
41215 fenci M09
Item no. VOSS.PET Input /
Joules
Max.
Output /
Joules
Max.
at
500 Ω Grounding
rod
41205 fenci M03 0,3 J 0,2 J 750 V 1 6 km 2 km 0,5 km
41210 fenci M05 0,4 J 0,3 J 2500 V 1 12 km 5 km 3 km
41215 fenci M09 0,8 J 0,6 J 3000 V 121 km 7 km 5 km
1 Mains plug, 230 volts
2 Indicator LED
- Energiser working = blue light
- Check fence = less than 3000 volts = red led (M09 only!)
3 On / o switch
4 Ground connection (terminal nut, black)
5 Fence connection (terminal nut, red)
Operating Instructions
VOSS.PET fenci – M03 – M05 – M09
1. YOUR NEW VOSS.PET fenci
2. HOW DOES AN ELECTRIC FENCE WORK?
3. MOUNTING AND CONNECTION
4. GROUNDING
5. THE IDEAL FENCE
6. INITIAL SETUP
7. MAINTENANCE AND CLEANING
8. SAFETY TIPS
9. DISPOSAL
1
2
3
4 5

DE UK SE NL FR
1. YOUR NEW VOSS.PET fenci
Thank you for choosing the VOSS.PET fenci. You have purchased a top quality energiser
for building a secure electric fence. This energiser is specically intended for use with
pets and small animals. It is perfect for securing property, homes, ponds, aviaries and
stables against animals such as martens, herons, raccoons and foxes. The VOSS.PET
fenci is also the ideal solution for pet fencing if you want to keep your dog or cat safe
within a certain area. The high-quality workmanship and development has been carried
out in line with the latest standards and safety regulations to guarantee safe operation.
Please read through this instruction manual carefully before using the VOSS.PET fenci.
These instructions contain important safety information. You will also learn how to
ensure that your electric fence functions reliably and is in top working condition when
using the VOSS.PET fenci.
2. HOW DOES AN ELECTRIC FENCE WORK?
The VOSS.PET fenci is the heart of your fence. It generates electrical pulses at regular
intervals. The unit connected to the ground (“grounding”) and the conducting material
of your fence. If a connection is made between the ground and the fence (short circuit)
– e.g. by an animals making contact – then the circuit is completed. The electric shock
felt by the animal is completely safe, yet very unpleasant, and scares the animal away.
The electrical circuit is completed through the
ground. It is not necessary to created a closed
fence system. The fence can end at any point.
3. ASSEMBLY AND CONNECTION:
Install the energiser vertically on a wall. You can use the included screws for this.
A practical clip-mount bracket is also available as a separate accessory,
Item no. 41150. This lets you install the energiser on a conventional
DIN rail.
The VOSS.PET fenci can withstand all weather conditions such as rain, splash water,
direct sun, high temperatures or frost.
We recommend placing the VOSS.PET fenci somewhere that oers protection against
the weather, e.g. house wall, (roof) shelter, stable, box or in an enclosed space such as a
garage, summer house, carport, shed or workshop.
TIP: Before connecting the VOSS.PET fenci to your fence, you can ensure that it is work-
ing properly.
Unscrew both terminal nuts (4 and 5), insert the plug (1) into a socket and turn on the
energiser (3). The indicator LED (2) ashes in time with the electrical pulses. For further
testing, hold a screwdriver with the non-insulated part on one of the connectors as
you approach the other connector with the tip of the screwdriver. Just before the point
touches the connection, you will see a small and safe spark. If the indicator LED (2) does
not ash, or you do not see a spark, please check the mains voltage and connection.
If there is a problem, the energiser must be inspected by a specialist.
NOTE: A normal electrical voltmeter is not suitable for checking the voltage.
Special fence testers exist for this purpose.
63 mm

DE UK SE NL FR
If your energiser is working properly, turn it o, unplug it, then proceed to connect your
fence system. Connect the ground connection (4, ground symbol, black terminal nut)
with your grounding post. We recommend using cables with M8 connection eyelets.
The grounding posts should be at least 50 cm long. The better the grounding, the
more eective the electrical pulse will be.
Connect the fence connection (5, lightning symbol, red connection nut) to the fence via
a fence connection cable. When assembling the ground and fence connections, make
sure to tighten the connection nuts by hand as much as possible.
NOTE: To avoid lightning damage, we recommend installing a residual current device
(A) and lightning protection equipment (B), e.g. item numbers 44880 and 48015.
B
A
4. GROUNDING:
It is extremely important that the fence is properly grounded! This is essential for
the proper functioning of your energiser and to ensure maximum performance. The
grounding should be installed in a damp area with vegetation. Use galvanised metal
posts for the grounding posts. They must have a minimum length of 50 cm (e.g. item
no. 44214 or 44219). Dry soil and long fences require additional grounding posts at
intervals of about 2–3 m to improve the connection with the ground. We recommend
using the cable with item no. 33615 for connecting the grounding posts. With optimal
grounding, the VOSS.PET fenci can operate at its maximum capacity and ensure your
fence provides the best possible security.
TIP: Where soil conditions are poor with low conductivity, we recommend using an
additional 2 or 3 grounding posts spaced about 2–3 m apart. If the soil is very dry
or stony, this will reduce its conductivity.
NOTE: Please choose a suitable location for your grounding system. Your grounding
system must be:
• at least 10 m away from other grounding systems, e.g. ground connections of
homes, telephone or power lines.
• away from animals or pathways as animals or people may damage the grounding.
• accessible to you at any time for maintenance purposes.
If you run any connection cables through the inside of buildings, then you must
always use insulated high-voltage cables.
5. THE IDEAL FENCE
Regardless of the types of conducting material used in your fence, there are a few
things to keep in mind in order to ensure good conductivity.
• Keep your electric fence system free from vegetation. Do not run your fence through
hedges and avoid having any branches or bushes complete the circuit. This will
reduce the voltage on your fence and the shock strength of the electrical pulse
may no longer be powerful enough.
• Ensure that the conducting material in your fence does not touch the ground, e.g.
by sagging.
• Only use fence posts with insulators so as to insulate the conducting material from
the post and the ground. This will prevent any loss of voltage and ensure the desired
current ows through the conducting material of the fence.
Suitable accessories are available for using metal posts and industrial fences.

DE UK SE NL FR
NOTE: It is a legal requirement to place warning signs on the fence in publically
accessible areas, e.g. item no. 44735.
6. ACTIVATION:
NOTE: The following steps will help you activate the energiser. Your fence will
then be live. Make sure that there are no people or animals near the fence.
As previously described, your fence system is now connected to the VOSS.PET fenci.
Insert the plug (1) into a socket and press the on/o switch (3). The indicator LED (2)
will blink in time with the electrical pulses – your VOSS.PET fenci is working properly.
DUAL INDICATOR LIGHT ON THE VOSS.PET fenci M09: The indicator light ashes blue
to show that the energiser is working and that the fence voltage is above 3000 volts.
If the indicator light is ashing red, then the fence voltage is below 3000 volts. Please
check your fence for any problems.
TIP: If you are operating a boundary fence (e.g. for pets) we recommend that you stay
near the fence when you activate it for the rst time. Bring your animal to the fence so
that it can learn to respect it. Training may take several days and you may need to make
some small adjustments to the fence.
We recommend the following conductor spacing:
85 cm
50 cm
25 cm
50 cm
25 cm
10 cm
45 cm
30 cm
15 cm
Large dogs Small dogs
Rabbits
50 cm
25 cm
10 cm
Cats
7. MAINTENANCE AND CLEANING
Always turn o the VOSS.PET fenci and unplug it from the mains when performing
maintenance and cleaning work. The unit does not require regularly maintenance,
but you should inspect it visually on a regular basis. Check all cables and lines for
damage. Contact a specialist immediately to replace any broken parts or cables.
Do not operate the energiser if there is any damage. Keep the energiser clean by
wiping it with a slightly damp cloth.
8. SAFETY TIPS
Carefully read and observe the following before using the energiser:
This device may not be used by persons (including children) with physical, sensory
or mental impairments. Further, it may not be used by persons without sucient
experience and specialist knowledge unless supervised or under guidance by
another person who is responsible for their safety. Children must always be
supervised to ensure that they do not play with the device. Electric fences must
be installed and operated such that there is no danger to people, animals and
their surroundings.
Observe the following to ensure safe operation:
• Use only as much pulse energy (joules) as required and not the maximum possible.
Shorts fences without vegetation can be operated with around 0.2 to 0.5 joules for
a distance of up to 10 km. Medium-length fences with a medium amount of vegeta-
tion can operate with max. 2 to 3 joules for up to 20 km.
• Only use weaker energisers or outputs with limited pulse energy (1 joule) in areas
where children are present and on electric fences with alternating polarity (posi-
tive/negative fences).
NOTE: Do not touch electric fence wires! Do not climb over, through or under fences
with several wires.
• Avoid using electric fences with alternating polarity in places where people may
be able to get between two wires of diering polarity. If you must use such a fence,
then use a weaker energiser (e.g. with a 1 joule limit) – even with non-electried,
grounded wire.

DE UK SE NL FR
• Provide people with access through the fence to public paths using insulated gates,
gate handles or insulated crossing points (stiles) at all points where access is intended.
• Always use a gate or access point that is specically intended for that purpose.
Access points along public paths and any other place where there are people should
be tted with warning signs about every 100 m.
• Keep a minimum distance of 2.5 m between the electric fence and grounded, metallic
objects (e.g. water pipes, troughs), especially if it is an area where people may be
present.
• If there is a danger of ooding around the electric fence, stop using the energiser.
• If the pulse interval is less than 1 second, shut down the energiser immediately and
have it repaired if necessary. A pulse interval of over 1.6 seconds means that the
energiser is no longer providing sucient security and requires inspection.
This device meets the requirements of EC directive 2004/108/EC “Electromagnetic
Compatibility” (CE mark) and European safety standard EN 60335-2-76 (Electric Fence
Energisers).
Prevent misuse of the energiser by:
• Paying attention to markings on the device
• Securing it against unauthorised access (e.g. anti-theft protection, child protection)
if necessary in the installed location.
• Special applications of electric fences in zoos or wildlife enclosures: Installation
of such systems may only be carried out qualied electricians. A non-electric fence
must be present to separate visitors from the electric fence.
• If the mains connection lines to the energiser are damaged, then these must be
replaced by the manufacturer, the manufacturer’s customer services or another
similarly qualied person in order to avoid injury.
• Servicing and repairs may only be carried out by authorised specialists.
Only replacement parts authorised by the manufacturer may be used.
OPERATING PRINCIPLE AND LIMITS OF ELECTRIC FENCES FOR ANIMALS
An electric fence consists of an energiser and an insulated fence. The energiser
supplies the fence with short electrical pulses. The electric fence presents a
“physical” and “psychological” barrier to animals. The short high-voltage pulses
are very unpleasant and animals will quickly learn to respect the electric fence.
A properly installed electric fence can provide a high level of safety and has many
advantages compared to a purely mechanical fence. As a psychological barrier, the
electric shock discourages animals from trying to get over the fence. Less work and
fewer materials are required, alterations are easily made, it is suitable for a very
wide range of animals and oers a great deal of protection against injury.
OPERATING PRINCIPLE OF THE ELECTRIC FENCE ENERGISER
The electric fence energiser emits an electrical pulse through the fence about once
every second. The pulse gives the animal a short, sharp, yet harmless shock. This is
in no way dangerous for the animal, but is enough that it will remember to avoid
the fence in future.
PRACTICAL TIPS:
Check regulations for your local area before building a fence. You may require
permission to do so.
Regularly check the energiser to ensure that it still functioning properly by looking
at the ashing indicator LED.
Check the fence system regularly. Remove any fallen branches, weeds or bushes as
these may cause a short circuit and reduce the eectiveness of the fence.
All animals will need time to learn to respect the fence. Training may take several days
and you may need to make some small adjustments to the fence.
Animals that can jump may be dicult to fence in. You may need to increase the height
of the fence in order to ensure maximum eectiveness.
Make sure to use high-quality insulators. Cheap or cracked insulators and plastic tubes
are not recommended as these can cause short circuits.

DE UK SE NL FR
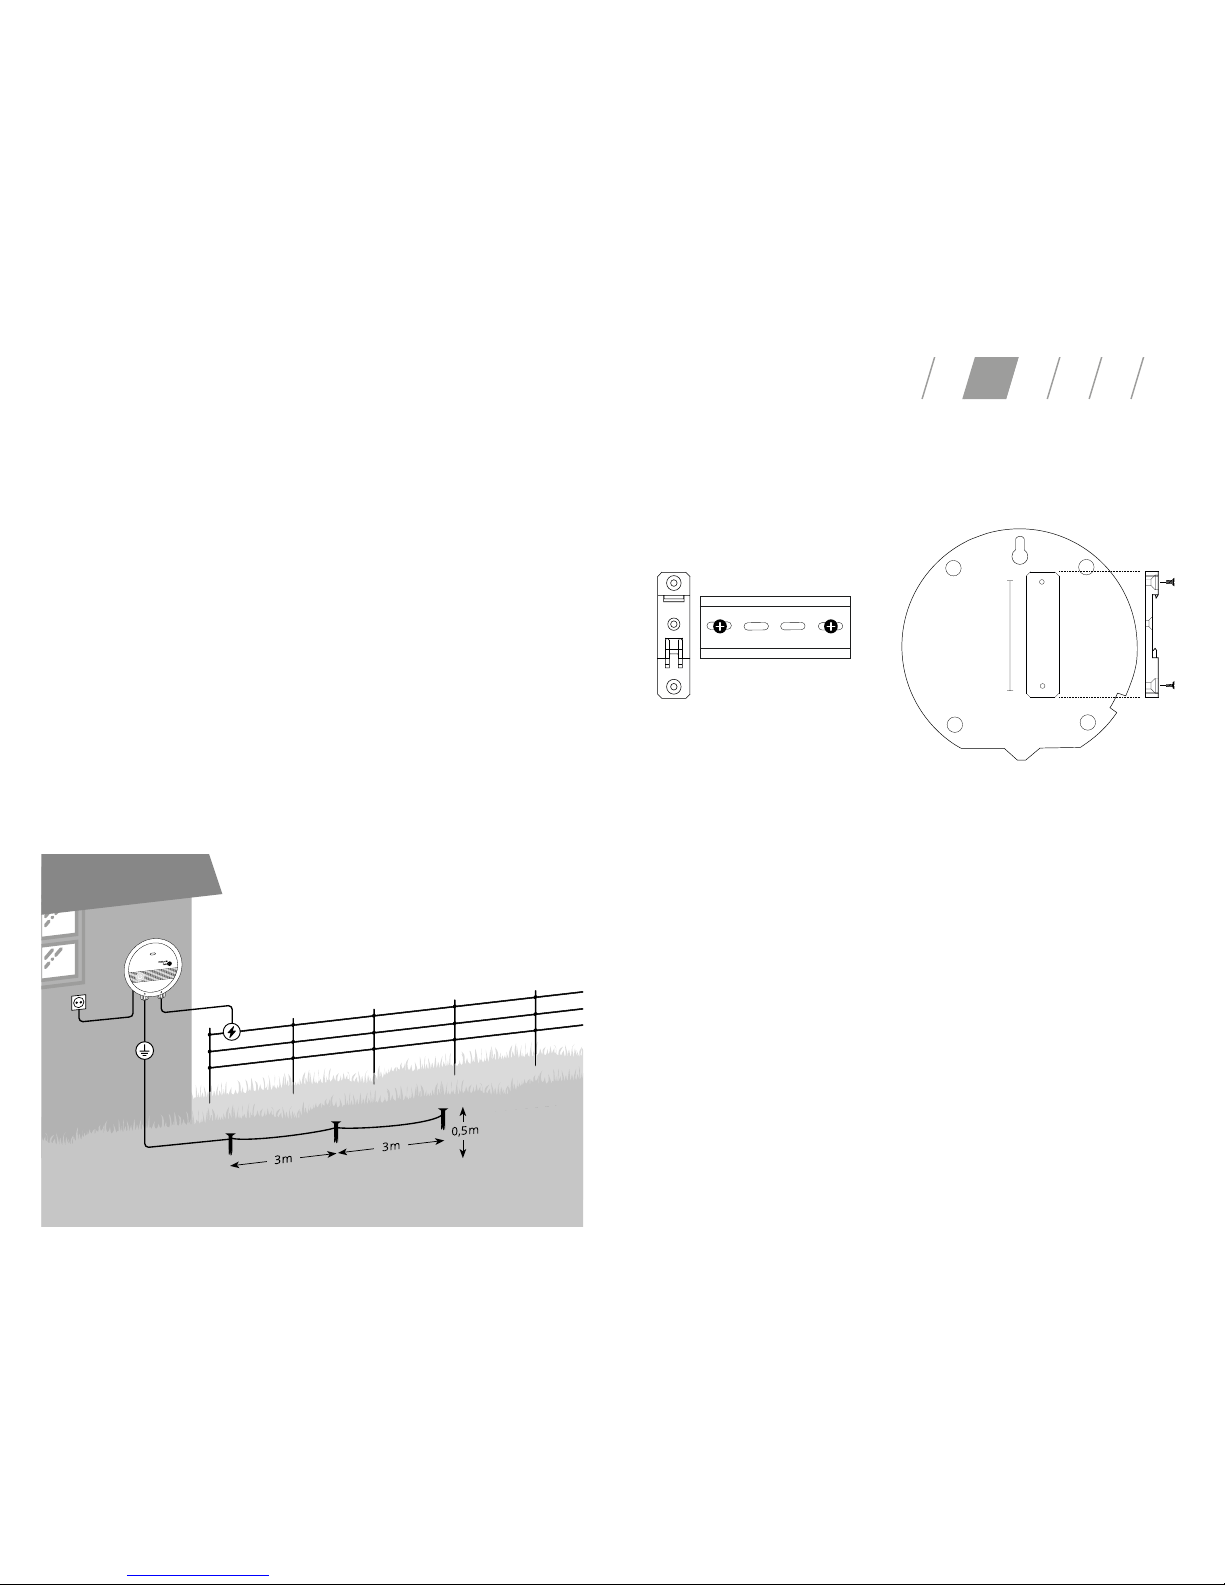
Use connecting bolts for all steel wire connections to ensure a good circuit is made.
To ensure correct functionality, ground the energiser using grounding posts made of
galvanised metal.
Use double-insulated cable inside buildings, under driveways and in places where any
galvanised wires lying on the ground may become corroded, Never use household
electrical cables as these are designed to carry 600 volts at most and a loss of current
may occur.
ELECTRIC FENCE REQUIREMENTS
Electric fences and associated equipment must be constructed and operated and main-
tained such that there is no danger to people, animals and their surroundings. Electric
fences in which people or animals can get caught must be avoided. An electric fence
may not be supplied by two separate energisers or by independent fence circuits from
the same energiser.
Where there are two separate electric fences, each supplied by a separate energiser,
the distance between the wires of the fences must be at least 2.5 m. If this gap between
the fences must be closed o, then this must be done using non-conducting materials
or an insulated metal barrier. Barbed wire or sharp edged wire may not be electried
by an energiser.
Observe the manufacturer’s recommendations for grounding the energiser.
A distance of at least 10 m must be kept between the grounding electrode for the en-
ergiser and any other components connected to a grounding systems (e.g. the ground
connections for power supply systems or telecommunications systems). Connecting
cables that run through buildings must be eectively isolated from grounded parts of
the building. This can be achieved using insulated high-voltage cables.
If connection cables and wires that are part of the electric fence must run near to
high-voltage cables, then they may not be installed more than 3 m above the ground.
This height applies to each side of a right-angled projection from the outer conductor
of the high-voltage cable on the area for a distance of
• 2 m for high-voltage lines that operate at a rated voltage of up to 1000 V;
• 15 m for high-voltage lines that operate at a rated voltage over 1000 V.
Electric fences intended for scaring o birds, for keeping pets or training animals,
e.g. cows (cow trainer), should only be supplied by an energiser at low power (which
still has a sucient and secure eect). Where an electric fence is intended to prevent
birds from nesting on buildings, no wire of the electric fence may be grounded if the
fence wires are not connected to metal parts. If a wire is connected to a metal part
(e.g. gutter) or a metal structure in the building, then this metal part must be
grounded. A warning sign must be attached at all points where people are able
to freely access the conductors.
Where an electric fence crosses a public footpath, a non-electried gate or stile must
be present. Each of these stiles must be tted with warning signs indicating that the
fence is an electric fence. Each part of an electric fence that runs along public streets
or other rights of way must have warning signs securely attached to fence posts or
the wires at regular intervals.
Connecting wires that run below the ground must be placed inside protective
insulated pipes or use insulated high-voltage cables. It is important to ensure that
connecting cables cannot be damaged by external inuences (e.g. animals hooves,
tractor wheels, etc.) that make indentations in the soil. Connecting lines may not be
installed in the same protective pipes as mains and supply cables, communication
or data lines. Connecting cables and wires belonging to electric fences may be laid
above high-voltage or communications cables. Crossing high-voltage cables should
be avoided. If crossing over a high-voltage cable cannot be avoided, then the
connection must be laid below the high-voltage cable and be as close to a right-
angle with it as possible.
Warning signs must be at least 100 x 200 mm in size. The background colour on both
sides of the warning sign must be yellow. The text on the warning sign must be black.
The text must read “Warning: Electric Fence”. The text on the warning sign must be
printed in a durable way and be at least 25 mm in height. Ensure that all mains-
powered supporting equipment connected to the electric fence circuit has a degree
of insulation between the fence circuit and mains supply corresponding to the energiser.
9. DISPOSAL
If you wish to dispose of the energiser, please contact a local disposal company or
recycling centre. Alternatively, you may contact VOSS GmbH. All consumers are legally
required to properly dispose of old electronic devices. Please do not dispose of the
energiser with your normal household waste. This helps make a valuable contribution
to protecting our environment.

DE UK SE NL FR
CE-CONFORMITY DECLARATION
VOSS GmbH & Co. KG hereby declares that the product / device described in these
instructions complies with the fundamental requirementsand other relevant stipu-
lations and regulations. The CE mark conrms compliance with the Directives of the
European Union.
The declaration of conformity can be viewed by visiting:
http://voss-group.eu/#/certicate
DE Originalbetriebsanleitung
Elektrozaungerät
EN Operating Instructions
Energiser
SE Bruksanvisning
Elstängselaggregat
NL Gebruiksaanwijzing
Schrikdraadapparat
FR Mode d‘emploi
Électricateur de clôture
VOSS.PET fenci
41205 fenci M03
41210 fenci M05
41215 fenci M09
Art .- nr. VOSS.PET Input /
Joules
max.
Output /
Joules
max.
vid
500 Ω
Jord-
påle
41205 fenci M03 0,3 J 0,2 J 750 V 1 6 km 2 km 0,5 km
41210 fenci M05 0,4 J 0,3 J 2500 V 1 12 km 5 km 3 km
41215 fenci M09 0,8 J 0,6 J 3000 V 121 km 7 km 5 km

VOSS GmbH & Co. KG |Ohrstedt-Bhf Nord 5 |D – 25885 Wester-Ohrstedt
This manual suits for next models
2
Table of contents