VOSS VOSS.miniPet,DOG C200 User manual

1
User guide
VOSS.miniPet, DOG C200
Electronic training collar
VOSS.miniPet, DOG C900
Electronic training collar

2
Declaration of Conformity
We:
VNT Electronics s.r.o.
Smetanovo namesti 104
570 01, Litomysl
IČO: 64793826
declare under own responsibility that the product:
Electronic training collar
VOSS.miniPet, DOG C200, DOG C900
is in compliance with essential requirements and other relevant provisions of
Directive 1999/5/EC from 9. 3. 1999
meets requirements of General Licence of The Czech Telecommunication Oce
according to general licence no. VO-R/10/05.2014-3, and corresponds to the following standards:
ETSI EN 301 489-1 V1.9.2
ETSI EN 301 489-3 V1.6.1
ETSI EN 300 220-2 V.2.4.1
ETSI EN 60950-1:2006
The product is safe on condition of commonly used in conformity with instruction manual.
This declaration of Conformity is created in exclusive responsibility of producer.
Ing. Jan Horak
executive director
Tel.: +420 731 441 541
vnt@dogtrace.com
www.dogtrace.com

3
We ask you to read these instructions carefully before using this product and keep for future reference.
Hereby, VNT electronics s.r.o. , declares that DOG C200, DOG C900
are in compliance with the essential requirements and other
relevant provisions of Directive 1999/5/EG.
WARNING:
The person with a personal instrument to support heart activity (pacemaker, debrillator)
must respect the relevant recautionary measures.
VOSS.miniPet emits a certain stationary magnetic eld
(lower part of the remote controller and RF signals).
Frequency= 869, 52 MHz, maximum transmitted power = 25 mW (DOG C200) 500 mW (DOG C900).

4
Contents
Introduction 5
Package contents 5
Optional accessories 5
Product description 6
Battery insertion and replacement 7
Choosing the contact points 8
Switching ON/OFF 9
Programming (coding) the transmitter with the receiver 10
Transmitter - button functions 11
How to check that your training collar works correctly 13
Getting the best results 13
Using training collar in winter 15
Training tips 16
Caution 17
Maintenance 18
Troubleshooting 18
Technical specications 19
Warranty terms and conditions 20
Certicate of warranty 22

5
Introduction
The electronic training collar VOSS.miniPET, consisting of the transmitter and the receiver, is a modern,
safe, reliable, and eective training tool.With theVOSS.miniPET training collar you can make corrections
that are suited to your dog‘s temperament and the distraction level of the moment, at the proper time,
for maximum training eciency. However, correcting to stop unwanted behaviour is only a small part
of what you can do with the VOSS.miniPET. More importantly, the VOSS.miniPET is a powerful tool for
encouraging desired behaviour. It is possible to easily adjust the intensity of the stimulation. Thanks to
the ergonomic design and low weight of the receiver, it is suitable for all dog breeds and sizes.
Package contents
• Transmitter (remote control)
• Collar unit (receiver) with the strap
• Two pairs of contact points (short - 12 mm and long - 17 mm)
• Two lithium CR2 3V batteries
• User guide and certicate of warranty
• Test discharge lamp
Optional accessories
• Dummy receiver
• Spare contact points (12 mm, 17 mm, 21 mm)
• Spare screws
• various vowen collars
• Spare lithium CR2 3V batteries
• Spare rubber seal
• Silicone grease

6
1
4
1
2
1
4
5
6
7 7
DOGC200 DOGC900
3
4
5
88
1
2
3
6
4
5
6
7 7
2
3
6
8
3
2
Product description
TRANSMITTER RECEIVER
LCD
DISPLAY
TRANSMITTER: 1 - Antenna, 2- LCD display, 3- Booster, 4- Impulse correction, 5- Tone signal,
6- Adjustment of the level of the stimulation, 7- Dog selection button (dog 1, dog 2) and pulse length - short (N)
or long (C), 8- Eyelet for attaching the strap
RECEIVER: 1- Strap, 2- Contact points, 3- ON/OFF Switch, 4- magnetic switch for pairing
DISPLAY: 1- Indicator of the radio transmission, 2- Dog selection indicator (dog 1, dog 2), 3- Stimulation level
indicator, 4- Battery power indicator, 5–Short impulse (N) or continuous impulse (C)

7
Battery insertion and replacement
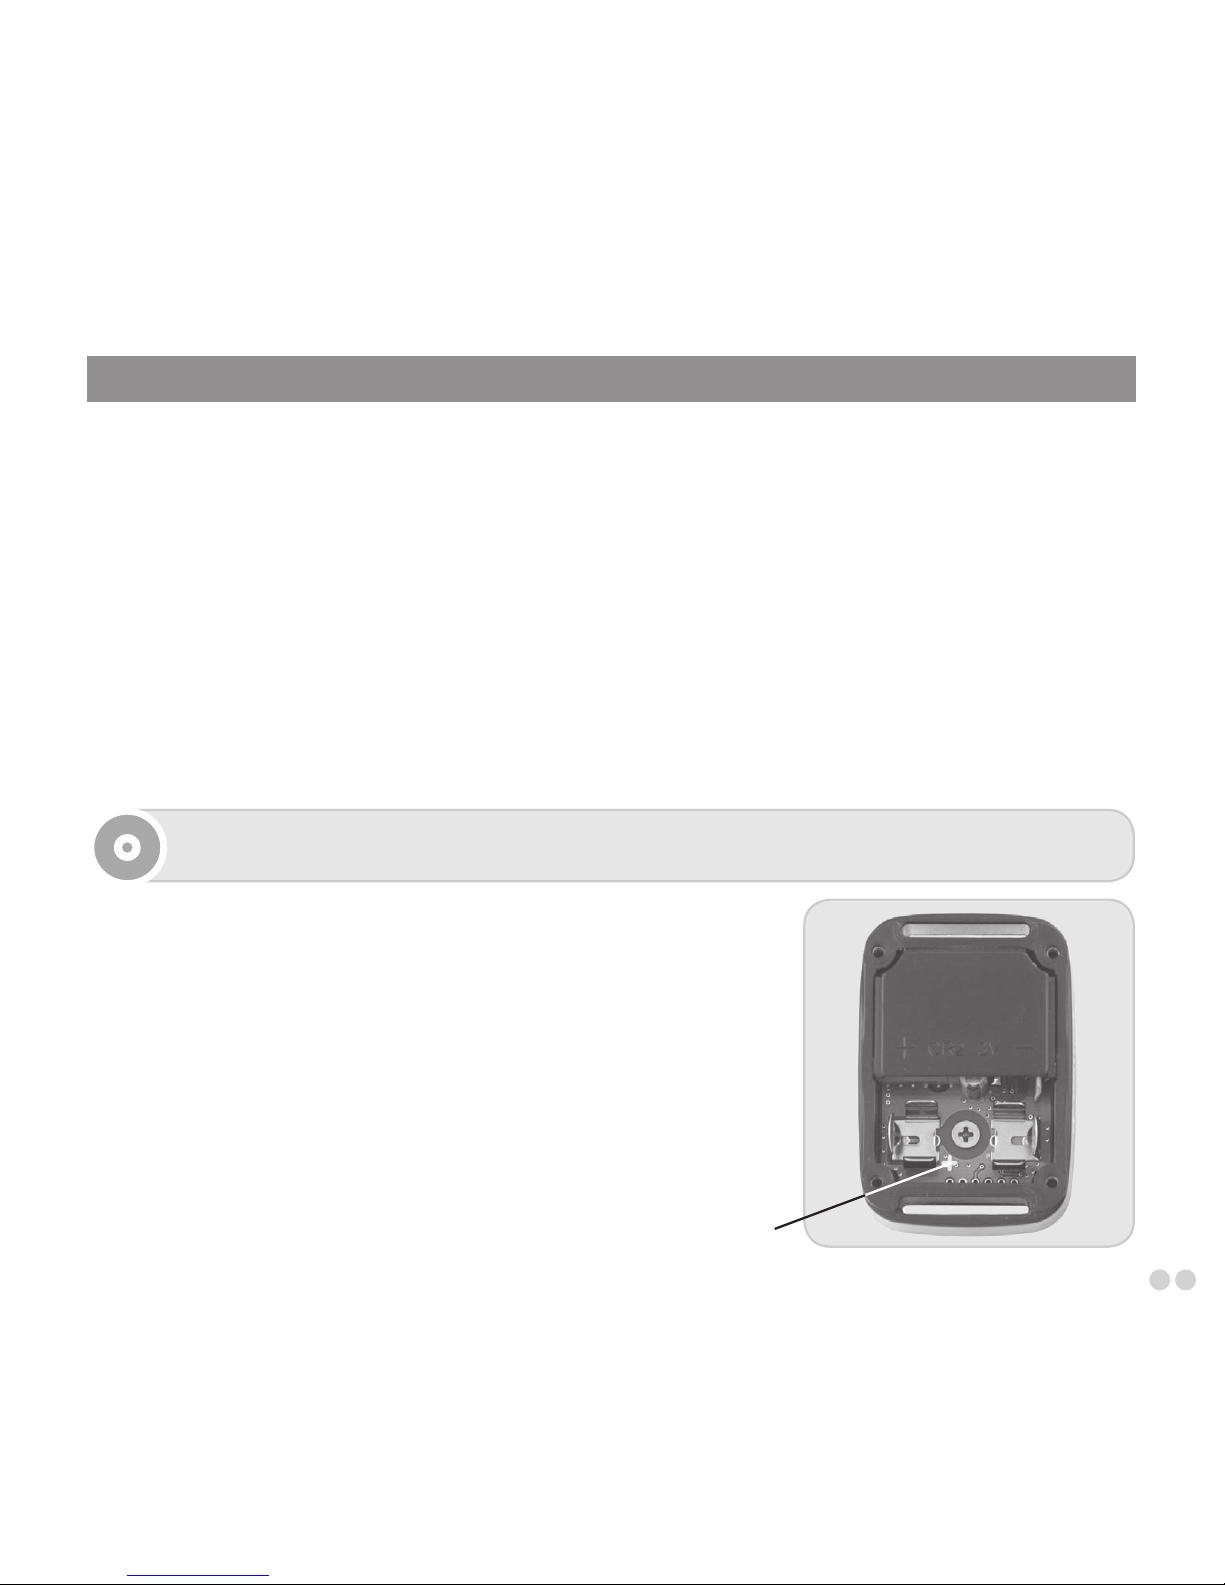
Insertion (replacement) of the battery in the receiver
• Unscrew the 4 screws of the top of the receiver using a cross-head screwdriver and remove the lid.
Insert the lithium CR2 3V battery into the battery compartment. Please check that and the battery
is installed with correct polarity ( see the picture). Wrong polarity may damage the unit.
• A beep sound is emitted indicating the correct installation of the battery.
• If the beep sound is not emitted after the battery is inserted, remove it immediately. Initialize the
system by using a metal tool (e.g. a screwdriver, scissors, etc.) and short-circuit (connect) both
contacts of the battery holder for about 2 seconds. Please check the correct polarity and try to
insert the battery again.
• Before putting the lid of the receiver back in place, make sure that the rubber seal is correctly
seated in its groove. Screw down the 4 screws of the top tightly (do not over tighten them).
TIP: To verify the correct operation of the receiver, turn on the transmitter and the receiver
and try to transmit an acoustic signal.
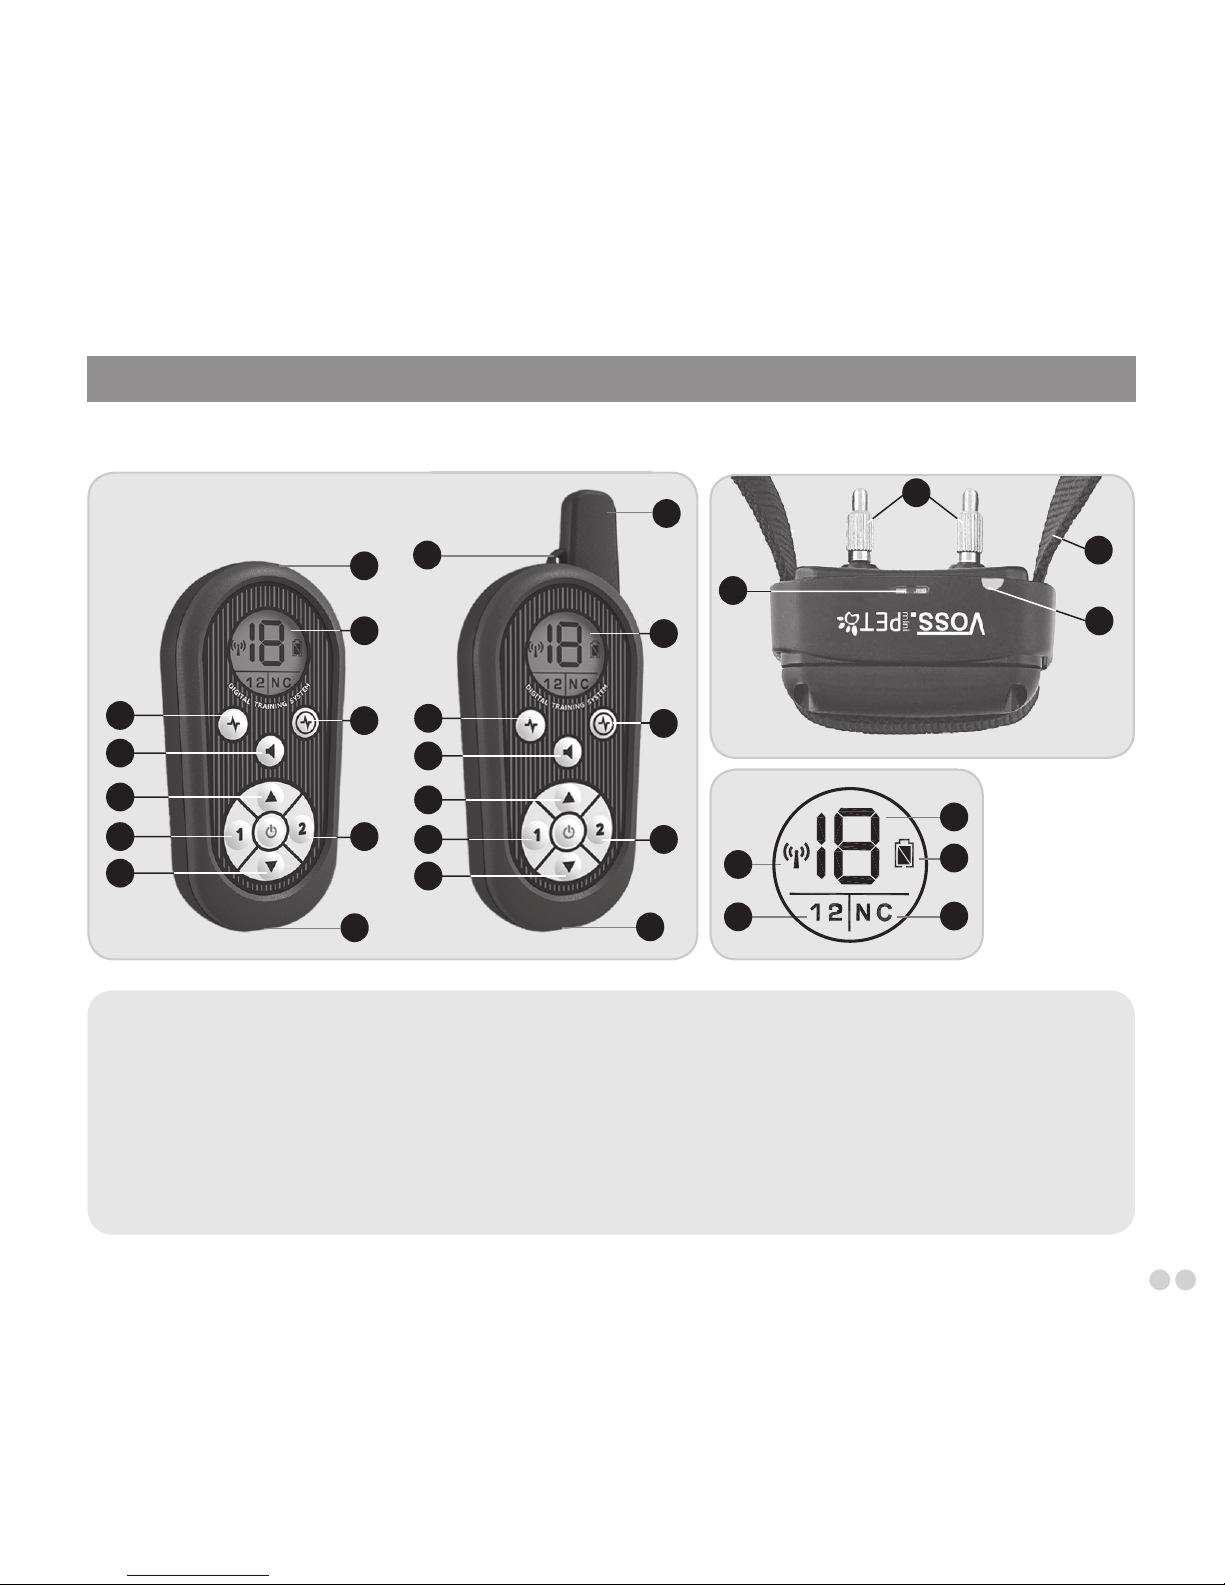
Checking the battery status
LED indicator on the receiver‘s front cover indicates the status of
the battery:
• Green ashing LED indicates the battery is fully charged.
• Red and green ashing LEDs together indicate low battery.
Prepare a spare lithium CR2 3V battery and follow the instructions
described in the section „Battery insertion and replacement“. Make
sure that the receiver works correctly.
Battery polarity

8
TIP
INSERTION (REPLACEMENT) OF THE BATTERY IN THE TRANSMITTER
Observe polarity when installing the battery. Reversing the battery
will damage the transmitter. Use only lithium CR2 3V batteries.
• Remove the transmitter battery cover using a screwdriver.
• If replacing the battery, remove the old battery and dispose
of it properly.
• Place the lithium CR2 3V battery in the holder and press
into place.
• Put the battery cover back into place and secure with screw.
The battery level is shown at the battery life status bar on the LCD display.
• Battery fully charged: full battery icon is shown on the LCD display.
• Low battery: battery empty icon is shown on the LCD display.
The stimulation is delivered through the receiver contact points. Two dierent series of contact points
are supplied. The length of the contact points must be sucient to have proper contact with the dog‘s
skin, enabling the device to operate correctly. If you have a short-haired dog use the short 12 mm con-
tact points, if you have a long-haired dog replace them with the longer 17 mm contact points supplied
with the kit. Carefully tighten them manually (do not use a key or pliers). It is possible to purchase the
21 mm long contact points.
Choosing the contact points
You can easily lift up the battery using the small at-head screwdriver.
Battery polarity

9
SWITCHING THE TRANSMITTER ON/OFF
• Switching ON:
Press down for 1 second the button
on the transmitter. The LCD display indicates
that the unit is active.
• Switching OFF:
Again, press down for 1 second the button on the transmitter.
SWITCHING THE RECEIVER ON/OFF
A magnet located at the lower part of the transmitter is used to activate or deactivate the magnetic
switch located in the receiver.
• Switching ON: positon the lower part of the transmitter where the magnet is located against the
white half circle near the LED indicator on the receiver (see the picture), hold for 1 second, the
receiver LED indicator will ash in green indicating the receiver is ON.
• Switching OFF: position the lower part of the transmitter where the
magnet is located against the white half circle near the LED indicator
on the receiver, hold for 1 second, the receiver LED indicator will ash
from green to red indicating the receiver is OFF.
To extend the battery life it is necessary to switch o both the receiver and
the transmitter after the training. If the battery will not be in use for a month
or longer, it is recommended that it is removed from the receiver.
Switching ON/OFF the transmitter/Programming the transmitter with the receiver.
Switching ON/OFF

10
Programming (coding) the transmitter with the receiver
Each transmitter has its own operational code. The programming of the transmitter with the receiver
enables the two units to work together. This operation will help you to program the receiver to work
with a new transmitter or to program a new receiver to work with your existing transmitter. Receiver can
be reprogrammed indenitely, either with the same transmitter or a new VOSS.miniPET transmitter. It is
possible to program an unlimited number of receivers to one transmitter.
• Switch on the transmitter. The receiver must be switched OFF.
• Select dog 1 using the button on the transmitter.
• Positon the lower part of the transmitter where the magnet is located against the white half circle
near the LED indicator on the receiver (see the picture on the page 9), hold for 5 second, the recei-
ver LED indicator will ash four times in green and red simultaneously indicating the receiver is in
programming mode.
• Remove your transmitter and press the tone signal button on the transmitter. A beep sound is
emitted from the receiver on the collar; the receiver is then synchronized with the transmitter.
• Select dog 2 using the button on the transmitter and proceed with the programming in the
same way as above (applicable when programming additional receiver for second dog, receiver
must be purchased separately).
IMPORTANT: Before the programming make sure no other person is using his VOSS.miniPET
or other products from the VNT electronics range close by: your receiver could accidentally
record the code of his transmitter. In case of such an occurrence, simply repeat the
programming process.

11
TIP
Transmitter - button functions
Transmitter can be paired with an unlimited number of receivers, thus simplifying training
of several dogs.
The VOSS.miniPET transmitter is designed to operate with two separate receivers (dog 1 and dog 2).
Button - Tone signal
The receiver emits a beeping noise when the „Tone button“ is pressed. You can warn your dog that he
should pay attention even from a distance. If the button is not released after 10 seconds, the tone will
automatically turn o. While pressing, an indicator of the radio transmission will appear on the LCD dis-
play of the transmitter; the indicator light on the receiver goes from ashing green to permanent green
for as long as the button is pressed.
Button - Short or Continuous impulse
Pressing the„Impulse button“ gives electric stimulation transmitted by the two contact points located
on the receiver. You can choose if you want to select a short impulse (N - less than 1 sec) or a continuous
impulse (C - up to but not more than 4 sec). If the button is not released after 4 seconds, the stimulation
will automatically turn o as a safety feature. The receiver will be ready to be reactivated once the but-
ton has been released. You can select the desired impulse type by pressing repeatedly button for
dog 1 and button for dog 2.

12
Button – Booster
Pressing the„Booster button“ gives an electric stimulation transmitted by the two contact points loca-
ted on the receiver as long as the button is pushed. If the button is not released after 4 seconds, the sti-
mulation will automatically turn o as a safety feature. You can set the level of the Booster stimulation
by 0-10 intensity levels higher than the level you are using on the Impulse button.
Programming the Booster button:
This button can be used to solve critical situations when your dog is not used to the selected correc-
tion pulse - e.g. when on a road with heavy trac. Please use the button only in an emergency. Press
and hold the button 1 or 2 for the selected dog until the number on the display starts to ash. Use the
buttons up and down to choose the impulse level of the Booster button. Please note that the number
of levels you are already using will be increased by this amount. Then conrm your choice by pressing
the button 1 or 2 again.
Up/Down control buttons
The control buttons are used for quick adjustment of the stimulation level of the receiver. The selected
intensity level is shown on the LCD display. There are 20 stimulation levels with 0 being the lowest and
19 being the highest.
Dog selection buttons
The control buttons 1 and 2 are used for quick dog selection when using the device for training two
dogs simultaneously. It is possible to set a dierent level of stimulation for each dog. Additionally,
these buttons are used to switch between the short (N) or continuous (C) correction impulse by
pressing them repeatedly.

13
How to check that your VOSS.miniPET works correctly?
You can check anytime that your VOSS.miniPET is ope-
rating correctly.
• Before doing so, make sure that the receiver is
switched o.
• Place the test discharge lamp in contact with each
of the contact points, as shown in the picture.
• Switch on the transmitter and receiver.
• Press the stimulation button and modify the level
of intensity of the stimulations: the test lamp will
light up with more or less intensity according to
the selected intensity level. Location of the test lamp attachment.
Getting the best results
The training commands are transmitted to the receiver by radio waves. The range of the C200 is
approximately 200 metres and for the C900 – 900 metres depending on the geographic conditions.
The transmitter range may vary depending on the way you use your transmitter.

14
TIP The transmission range will be better if you place the receiver on the side of the dog´s neck.
Follow these tips for best results:
• Hold the remote in your hand without covering the antenna,
since it is used to transmit the signal.
• To increase range, hold the remote in an outstretched arm.
• before each use, you should always check the batteries of the transmitter and the receiver and
change them if necessary
• At temperatures below 0 ° C, the battery capacity decreases slightly.
You can improve it by keeping the transmitter in your pocket and only taking it out when used.
FITTING THE COLLAR
The receiver needs to be very snug around the dog‘s neck to work properly. A loose t can allow the
receiver to move around on the dog‘s neck. The collar must be just tight enough to allow the contact
points to make good contact on your dog‘s skin. You may need to trim the hair in the area of the con-
tact points or switch to the longer contact points to ensure consistent contact. This can directly aect
the performance of the collar unit and whether or not the dog will receive the stimulation impulses. A
loose collar can also result in skin irritations. When used for a longer time, it is recommended to slightly
reposition the collar on the neck every few hours. The collar should be tight enough to t two ngers
between the collar and your dog‘s neck, but not so tight that it restricts your dog‘s breathing.

15
Using the VOSS.miniPET training collar in winter
When using the VOSS.miniPET in winter, please keep in mind:
• Low humidity – causes less skin conductivity. It is necessary to provide better conductivity bet-
ween the electrodes of the receiver and the dog‘s skin. This can be achieved by lubricating the
dog’s skin with Vaseline, baby oil, hand lotion, etc. where the contact points touch it.
• Heavier dog’s coat – it is necessary to tighten the collar so that the permanent contact with the
dog‘s skin is ensured. If the coat is too thick, it is recommended to choose a longer type of contact
points.
• Battery properties change – temperatures below 0 °C slow down chemical reactions in batteries.
To ensure the same performance of the stimulations (especially of higher levels), it is recommen-
ded to insert a new battery into the receiver for the winter time. During the training, observe
continuously dog‘s reactions and increase the stimulation level as needed.
Training tips
• The trainer’s elementary knowledge in dog training is the prerequisite for using the training
collar. Do not hesitate to contact a professional trainer for any further advice.
• You can start using the collar with dogs of 6 months of age who has undergone basic training
and are familiar with basic obedience commands including„sit“,„down“,„stay“ etc.
• Find proper intensity level for each dog before use. It is very important to set the correct intensity
level on your unit before beginning your training sessions to provide the appropriate level of
stimulation and avoid over-stimulating your dog.

16
• Eliminate one misbehaviour or teach one obedience command at a time.
• Be consistent. Give your dog a tone or stimulation with each misbehaviour. Always use the
warning tone and repeat the command. Only use the correction impulse if the dog does still not
react. This will motivate your dog and result in faster training success.
• After a command is successfully executed, you should always reward or encourage your dog.
• Your dog will have to get used to the collar; let the dog wear the collar for a few days,
but do not use it so that your pet does not discover the connection with its attachment and
eects.
• Armative and ecient training requires some time: don‘t hurry!
• Select a well-known environment your dog is used to.
• Choose the right moment to press the stimulation button, only use it when your dog has done
something wrong.
• We recommend not to use the electronic training collar with aggressive-tempered
dogs and with dogs with health problems, such as epilepsy, heart problems, etc.

17
Sound signal
By using the warning sound signal, you have the following options:
• As soon as your dog does something wrong, you can send a warning sound signal in order to
warn it.
• You can draw the dog’s attention to you.
• Combine the sound signal with the command“come”or “heel!” and reach your dog even at
longer distances. This way, the remote trainer replaces a dog whistle.
• First, always send the warning sound signal before sending the static impulse. This way, the dog
quickly learns the connection between wrong behaviour, the warning sound and the following
uncomfortable feeling caused by the electric impulse. The preceding warning signal is very
eective. However you must ensure that you always use it the same way in order not to irritate
your dog.
Correction impulse
If your dog reacts neither to your command nor to the warning sound signal, you can send it an
static impulse (rst select the suitable level) in order to draw its attention to you again. This impulse
is uncomfortable to your dog. It will learn very quickly to obey your commands in order to avoid the
correction impulse. The remote trainer is not intended to hurt the animal, only to be used as training
help to improve the communication between dog and human. The longer you train your dog, the
fewer electronic impulses will be required, as the dog learnes from the consequences of its undesired
behaviour. With time, the warning sound signals or even only your command are necessary.
• Decide for yourself whether you want to send a continuous impulse (press the button for up to
4 seconds) or a short impulse (press the button only for a short period, but at least one second).
• At the beginning of the training with the remote trainer, use a continuous impulse. The dog does
not yet know the device and muss perceive it clearly. However, do not set the intensity very high
in order not to frighten the dog and to oer it a possibility to realise what is happening.
• Use the short impulse if your dog has already become accustomed to the training with the
remote trainer and is already familiar with the continuous impulse. Now set the intensity a little
bit higher so that your dog can also feel the short impulse.

18
Booster
You can use this button to set the correction pulse at a higher intensity of about 0-10 levels. Use this
button to nd a solution in extreme situations when your dog does not react to the normal correcti-
on pulse. Use this booster button only in special cases (e.g. when your dog runs on the road etc.).
Using options of the remote trainer
The VOSS.miniPET remote trainer is very easy to use and it can help you teach your dog various
things:
• To walk safely without a leash.
• Reliable obedience to commands such as“come”or “Heel!”
• Interruption of undesirable activities through simple commands such as“fooey” or “no”.
• Cessation of undesirable behaviours: e.g. begging at the table, excessive barking or digging in
the garden.
• Precise training without a leash. Your dog behaves as if it was connected to you through a
very long leash (up to several hundreds of metres). Through training with the remote trainer,
it permanently adapts its behaviour to your commands and not only when it really feels the
dependency on a leash.
• Hunting wild animals and running away from the owner may hold many dangers and problems,
for animals and humans and often allow only walks on a short leas. With the VOSS.miniPET
remote trainer you can eciently enable your dog to give up hunting and to running away.
After a short training with the remote trainer, it may be possible for your dog to move freely
without a leash. Nevertheless, your dog is under your control and in dicult situations you can
easily intervene.
• Learning more complex commands in various elds of hunting, sport or service training.
• The VOSS.miniPET remote trainer oers many other options and elds of use that you can
quickly discover during regular training with your dog.

19
Caution
• Keep away from children.
• Do not leave the device in or around a high temperature heat source.
• Check the receiver for proper tightness of screws and seal before each use.
• Battery of the receiver needs to be replaced in every two years, check the battery power level
before each use.
• The transmitter is not waterproof, so use caution when operating your device in wet conditions,
water can cause irreversible damage to your device.
• Do not use the electronic training collar for dogs under 6 months of age.
• Do not use the electronic training collar for pregnant or nursing bitches.
• Do not use the electronic training collar for dogs with health problems particularly heart disease,
unless the use has been approved by veterinarian.
• Do not use the electronic training collar for dogs that cannot respond appropriately due to injury,
illness, senility or age.
• We recommend that your dog has a preventive medical check before using the electronic training
collar.
• We recommend not to use the electronic training collar with aggressive-tempered dogs.
• Check the contact area regularly for signs of neck irritations, to prevent neck irritations, the collar
should never be worn for more than 12 hours per day. If a rash or sore is found, do not use the
collar until the skin has healed.
• Never connect a leash to the electronic collar; this could cause excessive pressure on the contact
points. Always use a separate leash, do not put pressure on the electronic collar.

20
Maintenance
It is important to keep the device clean. Clean the contact points regularly, avoid using any detergent
that contains strong chemicals. To clean your VOSS.miniPET use a soft damp cloth using only water
and neutral detergent. The transmitter is not waterproof, so use caution when operating your device in
wet conditions, water can cause irreversible damage to your transmitter. The receiver is waterproof. The
receiver case is provided with a seal that forms a waterproof barrier between the lid and main housing
of the case. If the seal is loose, out of alignment or twisted, it will compromise the waterproof integrity of
the case. Lubricating the seal with a thin layer of silicone grease will increase its lifespan. We recommend
replacing the seal in the receiver every year. It is recommended to remove the battery from the receiver,
if the device will not be in use for a month or longer.
TIP While using the device, it is recommended to check periodically that screws in the receiver
lid are tightened correctly.
Troubleshooting
• If your device seems to operate improperly, read this manual again, check the receiver battery
and replace it if necessary.
• Try to initialize the receiver by removing the battery from the battery holder in the receiver,
then use a metal tool (e.g. a screwdriver, scissors, etc.
and short-circuit both contacts of battery holder by
touching both poles with the metal tool at the same
time for approximately two seconds, and then put
the battery back in its place observing the correct
polarity.
A beep sound is emitted indicating the correct
installation of the battery.
• If the problem still persists, try to program the trans-
mitter with receiver again according to the instruc-
tions in this manual.
If the problem still persists, contact the dealer.
This manual suits for next models
1
Table of contents