VOX electronics KG-160A-IM User manual

OPERATING INSTRUCTIONS CONTACT GRILL
MANUALE DELL`UTENTE GRIGLIA DI CONTATTO
BEDIENUNGSANLEITUNG
KONTAKTGRILL
ИНСТРУКЦИЯ ПО ЭКСПЛУАТАЦИИ
КОНТАКТНЫЙ ГРИЛЬ
UPUTSTVO ZA UPOTREBU KONTAKT GRIL
MANUAL DE USUARIO PARRILLA DE CONTACTO
MANUAL DO USUÁRIO
GRELHADOR DE CONTACTO
ЕГХЕIРIΔIO ХРНΣТН
ΓΚΡΙΛ ΕΠΑΦΗΣ
NAVODILA ZA UPORABO KONTAKTNI ŽAR
UPUTE ZA UPORABU KONTAKTNI GRIL
UPUTSTVO ZA UPOTREBU KONTAKT GRIL
УПАTСТВА ЗА РАКУВАЊЕ КОНТАКТЕН ГРИЛ
MANUALI I PERDORUESIT
SKARË ELEKTRIKE
KG-160A-IM
DEU
RUS
ITA
SRB
ESP
PRT
GRC
HRV
BIH
MKD
MNE
SVN
ALB
GBR

CONTACT GRILL
MANUAL INSTRUCTIONS
KG-160A - IM
Read the manual instruction carefully and keep it for future reference.
GBR

IMPORTANT SAFEGUARDS
•READ ALL INSTRUCTIONS
• Just use the corresponding Volt, 50 Hz& 60 Hz. Use only for household.
• Do not touch hot surfaces. Use handle or knobs.
• To protect against risk of electric shock, do not immerse the cord, plug or cooking unit in water or any other
liquid.
• Close supervision is necessary when the appliance is used by or near children.
•This appliance is not intended for use by persons (including children) with reduced physical, sensory or
mental capabilities, or lack of experience and knowledge, unless they have been given supervision or
instruction concerning use of the appliance by a person responsible for their safety.
• Unplug from outlet when not in use and before cleaning. Allow to cool before putting on or taking off parts,
and before cleaning the appliance.
• Do not operate the appliance with a damaged cord, if has malfunctioned or been damaged in any manner. In
order to avoid the risk of an electric shock, never try to repair the Grill Toaster yourself. Take it to an autho-
rized service station for examination and repair. An incorrect reassembly could present a risk of electric shock
when the Grill Toaster is used.
• The use of accessory attachments not recommended by the manufacturer may result in fire, electrical shock,
or risk of injury to persons.
• Do not use outdoors or for commercial purposes.
• Do not let power cord hang over the edge of the table or counter, or touch hot surfaces.
• Do not place on or near a hot gas or electric burner or heated oven.
• Unplug the unit when you have finished use.
• Do not use the appliance for other than intended use.
• Do not intend to operate by means of an external timer or separate remote-control system.
• Extreme caution must be exercised when moving an appliance containing hot oil or other hot liquids.
WARNING: TO REDUCE THE RISK OF FIRE OR ELECTRIC SHOCK, ONLY AUTHORIZED PERSONNEL
SHOULD DO REPAIRS.
SAVE THESE INSTRUCTIONS
FOR HOUSEHOLD USE ONLY
GROUNDED PLUG
To reduce the risk of electric shock this appliance has a grounded plug. If the plug does not fit fully into the
electrical outlet contact a qualified electrician. Do not modify the plug in any way or use an adaptor.
2

BEFORE FIRST USE
•Read all instructions carefully and keep them for any future reference.
•Remove all packaging.
•Clean the Cooking Plates by wiping with a sponge or cloth dampened in warm water.
DO NOT IMMERSE THE UNIT AND DO NOT RUN WATER DIRECTLY ONT THE COOKING SURFACES.
•Dry with a cloth or paper towel.
•For best results, lightly coat the cooking plates with a little cooking oil or cooking spray.
Notice: When your Grill Toaster is heated for the first time, it may emit slight smoke or odor. This is
normal with many heating appliances. This does not affect the safety of your appliance.
HOW TO USE
Before using the appliance for the first time, peel off any promotional materials and packaging materials and
check that the cooking plates are clean and free of dust. If necessary, wipe over with a damp cloth. For best
results, pour a teaspoon of vegetable oil on to the non-stick plates. Spread over with an absorbent kitchen
towel and wipe off any excess oil.
PREPARING YOUR GRILL TOASTER
•Close the Grill Toaster and plug it into the wall outlet. You will find the red power lights,indicating that the
Grill Toaster has begun Power. At this time, you can by the right Thermostat Knob set the temperature control to
your desired setting: “MIN”for light colored food and “MAX”for darker food. At first, try a setting in the
middle.;You will find the green ready lights 。indicating that the Grill Toaster has begun preheatin. You may
later adjust it lower or higher according to your preference,Different foods will also cook up differently.
•It will preheat approximately 3~5 minutes to reach baking temperature. Green ready light goes out; the Grill
Toaster is ready for use.
PARTS IDENTIFICATION
1
2
5
1. Left Lift lever
2. Cover
3. Right Lift lever
4. Lift lever Button
5. 180°Angle button
6. Bottom Housing
7. Grill Non-stick Plate
8. Ready Light
9. Power Light
10. Thermostat Knob
11. Handle
12. Oil Tray
3
7
6
98
4
10
11
12
3

COOKING
To Use as a Contact Grill
• Set the Grill Toaster Temperature Control to your desired setting. At first, try setting in the max.
You may later adjust it lower or higher according to your preference.
• Prepare the burgers, boneless pieces of meat and thin cuts of meat or other foods as directed and place it
onto the bottom cooking plate.
• Close the top cooking plate which has a floating hinge that is designed to evenly press down on the food. The
top plate must be fully lowered to achieve Grill marks on the selected foods.
• When the foods is cooked use the handle to open the lid. Remove the food with the help of a plastic spatula.
Never use metal tongs or a knife as these can cause damage to the non-stick coating of the cook plates.
•Use the Grill Toaster as a contact grill to cook burgers, boneless pieces of meat and thin cuts of meat and
vegetables.
•Use the Grill-Toaster as a contact grill , when you want to cook something in a short amount of time or when
you are looking for a healthy method of grilling.
When cooked on the contact grill, food will cook
quickly because you are grilling both sides of the
food at the same time. The ribs on the grill plates
combined with the grease spout at the corner of
the plate allow the grease to drip from the meat
and drain off the plates.
Using the Extendable Feet
•In cooking, if you want extra fat to go out better, you can open
the extendable feet at the bottom.
To Use as Press grill
•Set the Grill Toaster Temperature Control to your desired setting. At first, try setting in the “MAX".
You may later adjust it lower or higher according to your preference.
•Prepare the sandwiche as directed and place it onto the bottom cooking plate. Always place sandwiches
towards the rear of the bottom cooking plate.
•Close the top cooking plate which has a floating hinge that is designed to evenly press down on the
sandwich. The top plate must be fully lowered to cook sandwiches.
•Cook for about 3 to 6 minutes or until golden brown, adjusting the time to suit your own individual taste.
•When the sandwich is cooked use the handle to open the lid. Remove the sandwich with the help of a plastic
spatula. Never use metal tongs or a knife as these can cause damage to the non-stick coating of the cook
plates.
•Use the Grill Toaster as a Press grill to grill sandwiches, bread and quesadillas.
•The Grill Toaster is designed with a unique handle and hinge that allows the cover to adjust to the thickness
of the food. You can easily grill anything from a thinly-sliced potato to a thick sirloin steak with even results.
•When cooking more than one food item in the contact grill, it is important that the thickness of food items is
consistent so the cover will close evenly on the food.
Slant Device
4

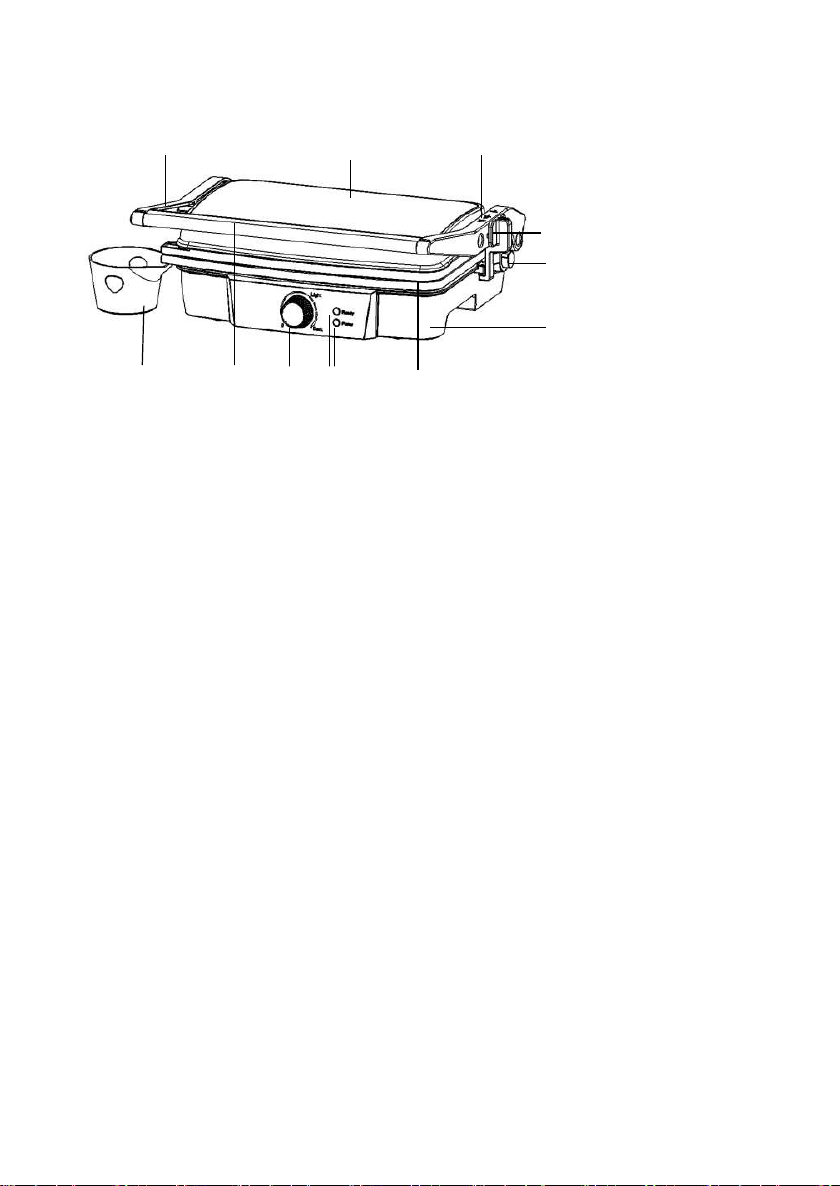
To Use as Open grill
•Place Grill Toaster on a clean flat surface where you intend to cook. The
Grill Toaster can be positioned in flat position.
•Upper plate/cover is level with lower plate/base. The upper and lower
plates line up to create one large cooking surface. To set the Grill Toaster
to this position, locate the hinge release lever on the right arm.
Angle button•With you left hand on the handle, use your right hand to
slide the lever toward you. Push the handle back until the cover rests flat
on the counter. The unit will stay in this position until you lift the handle and cover to return it to the closed
position.
•Use the Grill Toaster as an open grill to cook burgers, steak, poultry (we do not recommend cooking bone-in
chicken, since it does not cook evenly on an open grill), fish and vegetables.
•Cooking on the open grill is the most versatile method of using the Grill Toaster. In the open position, you
double the surface area for grill.
•You have the option of cooking different
types of foods separately without combining
their flavors, or cooking large amounts of the
same type of food. The open position also
accommodates different cuts of meat with
varying thicknesses, allowing you to cook
each piece to your liking.
CLEANING AND CARE
•Always unplug the Grill Toaster and allow it to cool before cleaning. The unit is easier to clean when slightly
warm. There is no need to disassemble Grill Toaster for cleaning. Never immerse the Grill Toaster in water or
place in dishwasher.
•The cooking plates can be cleaned in water or dishwasher.
•Wipe cooking plates with a soft cloth to remove food residue. For baked on food residue squeeze some
warm water mixed with detergent over the food residue then clean with a non-abrasive plastic scouring pad or
place wet kitchen paper over the grill to moisten the food residue.
•Do not use anything abrasive that can scratch or damage the non-stick coating.
•Do not use metal utensils to remove your foods, they can damage the non-stick surface.
•Wipe the outside of the grill toaster with a damp cloth only. Do not clean the outside with any abrasive
scouring pad or steel wool, as this will damage the finish. Do not immerse in water or any other liquid.
•Do not place in the dishwasher.
•Remove and empty the drip tray after each use and wash the tray in warm, soapy water. Avoid the use of
scouring pads or harsh detergents as they may damage the surface.
• Rinse and dry thoroughly with a clean, soft cloth and replace.
STORAGE
•Always unplug the Grill Toaster before storage.
•Always make sure the Grill Toaster is cool and dry before storing.
•The power cord can be wrapped around the bottom of base for storing.
Flat Position
Hinge Release
Lever
5

ENVIRONMENT FRIENDLY DISPOSAL
You can help protect the environment!
Please remember to respect the local regulations:
hand in the non-working electrical equipment to an
appropriate waste disposal centre.
6

GRIGLIA DI CONTATTO
MANUALE DI ISTRUZIONI
KG-160A - IM
Leggere attentamente le istruzioni prima dell’uso e salvare per
riferimenti futuri
ITA

AVVERTENZE DI SICUREZZA GENERALI
•LEGGERE TUTTE LE ISTRUZIONI
• Utilizzare sempre la frequenza corrispondente, 50 Hz e 60 Hz. Utilizzare solo per uso domestico.
•Non toccare le superfici calde. Usare sempre maniglie o manopole.
•Per proteggere dai rischi delle scosse elettriche, non immergere il cavo, la spina o l`apparecchio in acqua
o altri liquidi.
• Una stretta supervisione è necessaria quando l'apparecchio viene utilizzato da bambini o persone inferme.
•Questo apparecchio non è destinato all'uso da parte di persone (compresi i bambini) con ridotte capacità
fisiche, sensoriali o mentali, o senza la conoscenza ed esperienza, a meno che non siano stati
supervisionati o istruiti sull'uso degli apparecchi da una persona responsabile della loro sicurezza.
•Scollegare dalla presa quando non in uso e prima della pulizia. Lasciare raffreddare l'apparecchio prima
di montare o smontare parti e prima di pulirlo.
•Non utilizzare l'apparecchio con un cavo o una spina danneggiati o dopo il malfunzionamento
dell'apparecchio o se è stato danneggiato in alcun modo. Portare l'apparecchio al servizio autorizzato più
vicino per controllarlo, ripararlo o regolarlo. Qualsiasi montaggio errato può comportare il rischio di scosse
elettriche quando viene utilizzato l`apparecchio.
•L'uso di accessori non raccomandati dal produttore dell'apparecchio può provocare incendi, scosse
elettriche o lesioni alle persone.
•Non utilizzare l'apparecchio all'aperto o per scopi commerciali.
•Non lasciare che il cavo penda oltre il bordo di un tavolo o di un bancone o che tocchi una superficie calda.
•Non posizionare sopra o vicino a un bruciatore a gas o elettrico, o a un forno riscaldato.
•Scollegare l'apparecchio una volta finito di usare.
•Non utilizzare l'apparecchio per scopi diversi da quelli previsti.
•L'apparecchio non deve essere utilizzato da un timer esterno o da un sistema di controllo remoto.
•Prestare estrema attenzione quando si sposta l'apparecchio che contiene olio caldo o altri liquidi caldi.
AVVERTENZA: PER RIDURRE IL RISCHIO DI INCENDI O SCOSSE ELETTRICHE, SOLO
IL PERSONALE AUTORIZZATO DEVE FARE RIPARAZIONI.
SALVARE QUESTE ISTRUZIONI
SOLO PER USO DOMESTICO
SPINA DI MESSA A TERRA
Per ridurre il rischio di scosse elettriche, questo apparecchio ha una spina con messa a terra. Se la spina
non si inserisce completamente nella presa elettrica, contattare un elettricista qualificato. Non modificare
la spina in alcun modo o utilizzare un adattatore.
2

ELENCO COMPONENTI
PRIMA DEL PRIMO UTILIZZO
•Leggere attentamente tutte le istruzioni e conservarle per riferimento futuro.
•Rimuovere tutta la confezione
•Pulire le piastre di cottura strofinando con una spugna o un panno inumidito con acqua tiepida.
NON IMMERGERE L'UNITÀ E NON VERSARE ACQUA DIRETTAMENTE SULLE SUPERFICI DI
COTTURA.
• Asciugare con un panno o un tovagliolo di carta.
• Per risultati migliori, rivestire leggermente le piastre di cottura con un po 'di olio da cucina o con uno spray
da cucina.
Nota: Quando l'apparecchio viene riscaldato per la prima volta, potrebbe emettere un leggero fumo
o odore. Questo è normale con molti apparecchi di riscaldamento. Questo non influisce sulla
sicurezza del Suo apparecchio.
COME USARE L’APPARECCHIO
Prima di utilizzare l'apparecchio per la prima volta, rimuovere eventuali materiali promozionali e di
imballaggio e controllare se le piastre di cottura sono pulite e prive di polvere. Se necessario, pulire con un
panno umido. Per ottenere i migliori risultati, versare un cucchiaino di olio vegetale sulle piastre antiaderenti.
Stendere con un assorbente da cucina e rimuovere l'olio in eccesso.
PREPARARE IL TUO TOSTAPANE GRIGLIA
•Chiudere il tostapane griglia e collegarlo alla presa a muro. La spia di accensione rossa indicherà che il
tostapane griglia è stato avviato e che è possibile impostare la temperatura e la modalità desiderate con la
manopola del termostato, scegliendo tra le seguenti opzioni: "MIN" per cibo di colore chiaro e "MAX" per
cibo più scuro. Prima di tutto, provare a impostare al medio: si vedrà la spia verde pronta a indicare che il
tostapane griglia ha iniziato il preriscaldamento. È possibile regolarlo in seguito più in basso o più in alto
secondo proprie preferenze. Anche cibi diversi verranno cucinati diversamente.
•Occorrono circa 3 ~ 5 minuti di preriscaldamento per raggiungere la temperatura di cottura quando la
spia di prontezza verde si spegne e il tostapane griglia è pronto per l'uso.
1
2
5
1. Leva di sollevamento sinistra
2. Alloggio superiore
3. Leva di sollevamento destra
4. Pulsante per sollevare leva
5. Pulsante per angolo di 180°
6. Alloggio inferiore
7. Piastra griglia antiaderente
8. Spia di prontezza
9. Spia di accensione
10. Manopola di controllo
11. Maniglia
12. Vaschetta raccogligocce
3
7
6
98
4
10
11
12
3

COTTURA
Usare come Griglia di contatto
• Impostare il controllo della temperatura del tostapane sulla vostra impostazione desiderata. Innanzitutto,
prova a impostare al livello massimo. In seguito puoi regolarlo più o meno in base alle tue preferenze.
• Preparare gli hamburger, pezzi di carne senz'ossa e tagli sottili di carne o altri alimenti come indicato e
posizionarli sul piatto di cottura inferiore.
• Chiudere la piastra di cottura superiore dotata di una cerniera mobile progettata per essere pressata in
modo uniforme sul cibo. La piastra superiore deve essere completamente abbassata per fare segni di
grigliatura sugli alimenti selezionati.
• Quando il cibo è cotto, utilizzare la maniglia per aprire il coperchio. Rimuovere il cibo con una spatola di
plastica. Non utilizzare mai pinze metalliche o un coltello poiché possono danneggiare il rivestimento
antiaderente delle piastre di cottura.
•Utilizzare Tostapane griglia come griglia di contatto per preparare hamburger, pezzi di carne senz'ossa e
tagli sottili di carne e verdure.
•Utilizzare Tostapane griglia come griglia di contatto quando si desidera cuocere qualcosa in breve tempo
o quando si desidera un metodo di cottura alla
griglia sano. Una volta cotto sulla griglia di
contatto, il cibo sarà cotto rapidamente perché
entrambi i lati del cibo sono alla griglia nello stesso
tempo. Le costole sulle piastre del grill combinate
con il beccuccio di grasso all'angolo del piatto
consentono al grasso di sgocciolare dalla carne e
di scaricare i piatti.
Usare il piede estendibile
•Se si desidera che il grasso in eccesso esca meglio durante la cottura, è
possibile aprire i piedini estensibili nella parte inferiore.
Usare come Pressa
•Impostare il controllo della temperatura del tostapane sulla vostra impostazione desiderata. Innanzitutto,
prova a impostare su "MAX".
In seguito, può regolarlo più o meno in base alle Sue preferenze.
•Preparare i panini come indicato e posizionarli sulla piastra di cottura inferiore. Posizionare sempre i
panini verso la parte posteriore della piastra di cottura inferiore.
•Chiudere la piastra di cottura superiore dotata di una cerniera mobile progettata per essere pressata in
modo uniforme sul panino. La piastra superiore deve essere completamente abbassata per cuocere i panini.
•Cuocere per circa 3 o 6 minuti o fino a doratura, regolando l'ora in base al proprio gusto personale.
•Quando il panino è cotto, utilizzare la maniglia per aprire il coperchio. Rimuovere il panino con una spatola
di plastica. Non utilizzare mai pinze metalliche o un coltello poiché possono danneggiare il rivestimento
antiaderente delle piastre di cottura.
•Utilizzare Tostapane griglia come pressa per grigliare panini, pane e quesadillas.
•Il Tostapane grill è progettato con una maniglia e una cerniera uniche che consentono al coperchio di
adattarsi allo spessore del cibo. Puoi grigliare facilmente qualsiasi cosa, da una patata a fette sottili a una
bistecca di controfiletto con gli stessi buoni risultati.
•Quando si cuoce più di un pezzo di cibo nella griglia di contatto, è importante che lo spessore dei pezzi
sia coerente in modo che il coperchio possa chiudersi in modo uniforme sul cibo.
Dispositivo inclinato
4

Utilizzare come griglia aperta
•Collocare Tostapane griglia su una superficie piana pulita in cui si intende
cucinare. Il Tostapane griglia può essere posizionato in posizione piana.
•La piastra superiore / coperchio è a livello con piastra / base inferiore. Le
piastre superiore e inferiore si allineano per creare una grande superficie di
cottura. Per mettere il Tostapane griglia in questa posizione, individuare la
leva di rilascio sul braccio destro.
Pulsante Angolo •Con la mano sinistra sulla maniglia, utilizzare la mano
destra per far scorrere la leva verso di sé. Spingere la maniglia indietro fino a quando il coperchio si
appoggia piatto sul bancone. L'unità rimarrà in questa posizione finché non si solleverà la maniglia e il
coperchio per riportarlo nella posizione di chiusura.
•Utilizzare Tostapane griglia come griglia aperta per cucinare hamburger, bistecche, pollame (si sconsiglia
la cottura di pollo con osso, poiché non cuoce in modo uniforme su una griglia aperta), pesce e verdure.
•La cottura sulla griglia aperta è il metodo più versatile per utilizzare il Tostapane griglia. Nella posizione
aperta, ha una doppia superficie per la griglia.
•Hai la possibilità di cuocere diversi tipi di cibo
sui separé senza combinare i loro sapori, o
cucinare grandi quantità dello stesso tipo di
cibo. La posizione aperta ospita anche diversi
tagli di carne con spessori diversi, consentendo
di cucinare ogni pezzo a proprio piacimento.
PULIZIA E MANUTENZIONE
•Prima di pulire, scollegare l’apparecchio e lasciarlo raffreddare completamente. L'apparecchio è più facile
da pulire quando è leggermente caldo. Non è necessario smontare l'apparecchio per la pulizia. Non
immergere mai l'apparecchio nell'acqua o metterlo in lavastoviglie.
• Strofinare le piastre di cottura con un panno morbido per rimuovere i residui di cibo. Per rimuovere i residui
di cibo, spruzzare un po 'di acqua calda mescolata con detergente sui residui di cibo e quindi pulire con
una spugnetta di plastica non abrasiva o mettere carta da cucina bagnata sopra la griglia per inumidire i
residui di cibo.
• Non utilizzare oggetti abrasivi che possano graffiare o danneggiare il rivestimento antiaderente.
• Non utilizzare utensili di metallo per rimuovere i cibi poiché possono danneggiare la superficie
antiaderente.
• Pulire l'esterno dell’apparecchio con un panno umido. Non pulire l'esterno con pagliette abrasive o lana
d'acciaio, poiché ciò danneggerebbe l'apparecchio. Non immergere in acqua o altri liquidi.
• Non mettere l'apparecchio in lavastoviglie.
• Rimuovere e svuotare la vaschetta raccogligocce dopo ogni uso e lavare il vassoio con acqua calda e
sapone. Evitare l'uso di tamponi abrasivi o detersivi aggressivi poiché potrebbero danneggiare la superficie.
Risciacquare e asciugare accuratamente l'apparecchio con un panno pulito e morbido prima di riporlo.
CONSERVAZIONE
• Scollegare sempre l'apparecchio prima di riporlo.
• Accertarsi sempre che l'apparecchio sia raffredato e asciutto prima di riporlo.
• Il cavo di alimentazione può essere avvolto attorno alla base della base mentre è conservato.
Posizione piana
Gancio per
sollevare leva
5

SMALTIMENTO ECO - COMPATIBILE
Puoi aiutare a proteggere l'ambiente!
Ricordarsi di rispettare le normative locali:
consegnare le apparecchiature elettriche non
funzionanti ad un centro di smaltimento appropriato.
6

KONTAKTGRILL
BEDIENUNGSANLEITUNG
KG-160A - IM
Lesen Sie diese Bedienungsanleitung sorgfältig durch und bewahren Sie sie für die
weitere Nutzung auf
DEU

WICHTIGE SICHERHEITSHINWEISE
•LESEN SIE ALLE ANWEISUNGEN.
•Prüfen Sie vor dem Gebrauch immer, ob die Netzspannung der Steckdose der des Geräts
entspricht. 50 Hz& 60 Hz. Nur Haushaltsverwendung.
• Berühren Sie die heißen Teile des Grills nicht. Verwenden Sie Griffe oder Knöpfe.
•Tauchen Sie weder den Grill noch Netzkabel oder Netzstecker in Wasser oder andere
Flüssigkeiten., um die Gefahr von Feuer, Stromschlag und Verletzungen zu vermeiden.
•Lassen Sie den Grill nicht unbeaufsichtigt, wenn er von oder in der Nähe von Kindern
verwendet wird.
•Personen (einschließlich Kinder), die aufgrund ihrer physischen, sensorischen oder geistigen
Fähigkeiten oder ihrer Unerfahrenheit oder Unkenntnis nicht in der Lage sind, das Gerät
sicher zu bedienen, dürfen dieses Gerät nicht ohne Aufsicht oder Anweisung durch eine
verantwortliche Person benutzen.
•Ziehen Sie den Stecker aus der Steckdose, wenn Sie den Grill nicht benutzen und bevor Sie
ihn reinigen. Lassen Sie das Gerät abkühlen, bevor Sie Teile anbringen oder abnehmen und
reinigen.
•Betreiben Sie den Grill nicht, wenn er sichtbare Schäden aufweist oder das Netzkabel bzw.
der Netzstecker defekt ist. Versuchen Sie niemals, selber an dem Gerät Reparaturen
durchzuführen. Überlassen Sie die Reparatur Fachkräften. Um Gefährdungen zu vermeiden
dürfen Reparaturen am Gerät nur durch einen authorisierten Kundendienst vorgenommen
werden.
•Die Verwendung von Zubehörteilen, die nicht vom Hersteller des Geräts empfohlen werden,
kann zu Feuer, Stromschlag oder Verletzungen von Personen führen.
•Benutzen sie den Grill nicht im Freien. Dieses Gerät ist nicht für den gewerblichen Gebrauch
bestimmt.
•Lassen Sie das Kabel nicht über die Kante des Tisches oder der Theke hängen oder heiße
Oberflächen berühren.
•Stellen Sie den Grill nie auf oder in der Nähe von heißen Oberflächen ab (z.B. Herdplatten
etc.)
•. Trennen Sie den Grill vom Stromnetz, wenn Sie ihn nicht benutzen.
•Benutzen Sie das Gerät nur für den vorgesehenen Zweck.
•Der Grill darf nicht mit einer externen Zeitschaltuhr oder separatem Fernwirksystem
betrieben werden.
•Seien Sie äußerst vorsichtig, wenn Sie einen Ortswechsel mit dem Grill durchführen,wenn
heißes Öl oder andere heiße Flüssigkeiten sich in dem Grill befinden.
WARNUNG: Um Gefährdungen zu vermeiden dürfen Reparaturen am Gerät nur durch einen
authorisierten Kundendienst vorgenommen werden. Wartungs- und Reparaturarbeiten dürfen
nur von qualifizierten Fachleuten unter Verwendung von Original-Ersatz- und Zubehörteilen
ausgeführt werden. Versuchen Sie niemals, selber an dem Gerät Reparaturen durchzuführen.
BEWAHREN SIE DIESE ANWEISUNGEN AUF.
NUR HAUSHALTSVERWENDUNG
GEERDETER STECKER
Um das Risiko eines Stromschlags zu verringern, verfügt dieses Gerät über einen geerdeten
Stecker. Wenn der Stecker nicht vollständig in die Steckdose passt, wenden Sie sich an einen
qualifizierten Elektriker. Verändern Sie den Stecker nicht und verwenden Sie keinen Adapter.
2

LERNEN SIE IHREN NEUEN KONTAKTGRILL KENNEN
VOR DER ERSTEN INBETRIEBNAHME
•Lesen Sie alle Anweisungen sorgfältig durch und bewahren Sie sie für die weitere
Nutzung auf
• Entfernen Sie alle Verpackungsmaterialien.
• Wischen Sie die Grillflächen mit einem sauberen, leicht angefeuchteten Tuch ab.
TAUCHEN SIE GERÄT NICHT IN WASSER ODER ANDERE FLÜSSIGKEITEN; HALTEN
SIE ES NICHT UNTER FLIESSENDES WASSER.
• Wischen Sie die Grillflächen mit einem trockenen Tuch oder Papier nach.
• Fetten Sie die Grillflächen vor dem ersten Gebrauch einmalig leicht ein.
Anmerkung: Bedingt durch den Herstellungsprozess kann das Gerät einen leichten
Brandgeruch abgeben, wenn es das erste Mal eingeschaltet wird. Dies ist normal und
stellt keinen Defekt oder Gefahr dar.
BEDIENUNG
Entfernen Sie alle Verpackungsmaterialien und Werbeaufkleber. Prüfen Sie vor dem
Gebrauch, ob die Grillplatte sauber und von Staub frei ist. Wenn nötig, wischen Sie sie mit
einem feuchten Tuch ab. Es wird empfohlen, vor dem Erhitzen die Grillplatte mit etwas Speiseöl
einstreichen, um die Antihaftoberfläche zu schützen. Wischen Sie Ölreste mit einem Küchenpapier
ab.
DAS GERÄT VORBEREITEN
•Stecken Sie den Netzstecker in die Steckdose und klappen Sie den Kontaktgrill zu. Die
Bereitschaftsanzeige leuchtet rot und zeigt an,dass das Gerät angeschlossen ist. Drehen
1
2
5
1. linker Hebel
2. Gehäuse Oberteil
3. rechter Hebel
4. Einstellhebel der
verschiedenen
Bedienpositionen
5. Entriegelung für die „Tischgrill-
Postion“
6. Gehäuse Unterteil
7. Antihaft-Grillplatte
8. Bereitschaftsanzeige
9. Ein-/Ausschalter
10. Temperaturregler
11. Griff
12. Fettauffangschale
3
7
6
98
4
10
11
12
3

Sie den Temperaturregler, “Min” oder “Max” abhängig von der gewünschten
Bräunungsgrad. Wählen Sie am Anfang eine mittlere Temperatur, bis Sie die gewünschte
Abstufungen herausgefunden haben. Das grüne Licht leuchtet und zeigt an,dass das Gerät
aufheizt. Sie können die Temperatur auch während des Backens korrigieren. Verschiedene
Nahrungsmittel benötigen verschiedene Temperaturen.
•Normalerweise dauert es ungefähr 3-5 Minuten, um die voreingestellte Temperatur zu
erreichen. Wenn die voreingestellte Temperatur erreicht ist, erlischt die grüne Anzeige. Der
Kontaktgrill ist jetzt betriebsbereit.
GRILLEN
Als Kontaktgrill benutzen
Die gewünschte Temperatur einstellen. Stellen Sie den Temperaturregler zuerst auf Position
MAX. Später können Sie den Temperaturregler auf die gewünschte Temperatur stellen.
Legen Sie Hamburger, Fleisch ohne Knochen und dünne Schnitzel oder anderes Grillgut auf
die untere Grillplatte.
• Schließen Sie die obere Grillplatte langsam Die obere Grillplatte ist mit einem
Ausgleichsgelenk ausgestattet. Dieses ermöglicht den optimalen Kontakt der oberen
Grillplatte zum Grillgut. Die obere Grillfläche sollte nach dem Eingeben des Grillguts
gleichmäßig auf dem Grillgut aufliegen, um Grillabdrücke auf dem Grillgut zu machen.
• Hat Ihr Grillgut den gewünschten Zustand erreicht, benutzen Sie den Gerätegriff, um den
Kontaktgrill zu öffnen. Benutzen Sie Hilfsmittel aus Holz oder geeignetem Kunststoff, um die
Speisen vom Kontaktgrill zu entnehmen. Metallgegenstände können die antihaften
Oberflächen der Grillplatten beschädigen.
• Benutzen Sie das Gerät als Kontaktgrill zum Grillen von Fleischprodukten wie Hamburger,
Schnitzel und Gemüse.
•Benutzen Sie das Gerät als Kontaktgrill, wenn Sie in kurzer Zeit etwas zubereiten möchten
oder wenn Sie eine gesunde
Zubereitungsmethode wünschen. Beim
Grillen auf dem Kontaktgrill werden die
Lebensmittel schnell gegrillt, da beide Seiten
des Grillguts gleichzeitig gegrillt werden. Die
geriffelten Grillplatten Rippen und die
Fettauffangschale an der Seite der Platte
lassen das Fett vom Fleisch und von den
Platten abtropfen
Verwendung der ausziehbaren Füße
• Wenn Sie möchten, dass das überschüssige Fett während des
Grillens besser tropfen, können Sie die ausziehbaren Füße unten
öffnen.
Als Toaster benutzen
. Die gewünschte Temperatur einstellen. Stellen Sie den Temperaturregler zuerst auf Position
MAX. Später können Sie den Temperaturregler auf die gewünschte Temperatur stellen.
• Legen Sie Sandwiches auf die untere Grillplatte. Legen Sie die Sandwiches immer in der
Öffnungswinkel
4

Rückseite der unteren Grillplatte.
• Schließen Sie die obere Grillplatte langsam zu. Die obere Grillplatte ist mit einem
Ausgleichsgelenk ausgestattet. Dieses ermöglicht den optimalen Kontakt der oberen
Grillplatte zum Grillgut. Die obere Grillfläche sollte nach dem Eingeben des Grillguts
gleichmäßig auf den Sandwiches aufliegen, um Sandwiches zuzubereiten.
• Lassen Sie etwa 3 bis 6 Minuten oder bis sie goldbraun werden. Die Grillzeit hängt von Ihrem
Geschmack ab.
• Wenn das Sandwich fertig ist, öffnen Sie den Deckel mit dem Griff. Benutzen Sie Hilfsmittel
aus Holz oder geeignetem Kunststoff, um die Speisen vom Kontaktgrill zu entnehmen.
Metallgegenstände können die antihaften Oberflächen der Grillplatten beschädigen.
• Verwenden Sie den Grill Toaster als Pressgrill, um Sandwiches, Brot und Quesadillas zu
grillen.
• Der Grill Toaster verfügt über einen einzigartigen Griff und ein Scharnier, mit denen sich die
Abdeckung an die Dicke der Speisen anpassen lässt. Sie können leicht alles grillen, von einer
in dünne Scheiben geschnittenen Kartoffel bis zu einem dicken Steak mit gleich guten
Ergebnissen.
• Wenn Sie mehr als ein Lebensmittel auf dem Kontaktgrill grillen, ist es wichtig, dass die
Dicke der Lebensmittel gleichmäßig ist, damit sich der Deckel gleichmäßig auf dem
Lebensmittel schließen kann.
Als Tischgrill benutzen
• Legen Sie das Gerät auf eine saubere, ebene Fläche, auf der
Sie kochen möchten. Das Gerät muss flach aufgestellt werden.
• In dieser Position kann der Grill aufgeklappt werden und so
bilden die obere und untere Platte eine große Grillfläche. Um
den Grill in diese Position zu bringen, suchen Sie die Entriegelung
für die „Tischgrill-Postion“ an der rechten Seite.
Heben Sie mit dem Gerätegriff die obere Grillplatte an, stellen Sie sicher, dass die Arretierung
für die obere Grillplatte eingerastet ist. Ziehen Sie die Entriegelung nach oben und legen die
obere Grillplatte nach hinten ab.
• Verwenden Sie das Gerät als Tischgrill zum Grillen von Burgern, Steak, Geflügel (es wird
nicht empfohlen, Hähnchen mit Knochen zu grillen, da es auf einem offenen Grill nicht
gleichmäßig gegrillt wird), Fisch und Gemüse.
• In dieser Position bietet der Grill zwei große Grillbereiche.
• Sie haben die Möglichkeit, verschiedene Arten von Lebensmitteln getrennt zuzubereiten,
oder große Mengen einer Art von Lebensmitteln zuzubereiten. In der offenen Position können
auch verschiedene Fleischstücke unterschiedlicher Dicke zubereitet werden, sodass Sie
jedes Stück nach Ihrem Geschmack zubereiten können.
Tischgrill-Position
Hinge Release
Lever
5

REINIGUNG UND WARTUNG
•Trennen Sie den Grill vom Stromnetz und lassen Sie ihn abkühlen, bevor Sie mit der
Reinigung beginnen. Die Platten lassen sich besser reinigen, wenn sie noch etwas warm sind.
Geräteteile vor der Reinigung nicht abnehmen. Tauchen Sie das Gerät nicht in Wasser und
reinigen Sie es nie in der Geschirrspülmaschine.
•Beseitigen Sie Speiserückstände mit einem weichen Tuch oder einem Papiertuch. Um am
Grill haftende Speisen zu entfernen, die Grillplatten mit einem weichen Schwamm und
Seifenlauge abwaschen oder mit einem feuchten Papiertuch decken, um Speiserückstände
leichter zu entfernen.
•Benutzen Sie keine scharfen oder scheuernden Reinigungsmittel. damit die
Antihaftbeschichtung nicht beschädigt wird.
•Die Außenseite des Kontaktgrills nur mit einem angefeuchteten Tuch reinigen und mit einem
trockenen Tuch nachwischen. Benutzen Sie keine Drahtbürste oder andere scheuernde
Gegenstände. Diese können die Oberflächen beschädigen.Tauchen sie das Gerät nicht in
Wasser oder andere Flüßigkeiten.
•Geben Sie das Gerät keinesfalls in die Spülmaschine.
•Ziehen Sie nach jedem Gebrauch die Fettauffangschale heraus, entsorgen Sie den Inhalt.
Reinigen Sie die Fettauffangschale in einem warmen Spülbad. Bringen Sie den
Fettauffangbehälter wieder am Kontaktgrill an, wenn er trocken ist. Benutzen Sie keine
scharfen oder scheuernden Reinigungsmittel. Diese können die Oberflächen beschädigen.
Mit einem trockenen, weichen Tuch gründlich abtrocknen.
LAGERUNG
•Ziehen Sie vor der Lagerung immer den Netzstecker aus der Steckdose.
• Stellen Sie das Gerät nur im abgekühlten und sauberen Zustand weg.
• Das Netzkabel kann um die Kabelhalterung am Boden des Gerätes gewickelt werden.
UMWELTFREUNDLICHE ENTSORGUNG
Sie können dazu beitragen, die Umwelt zu
schützen! Gerät und Verpackung müssen
entsprechend den örtlichen
Bestimmungen zur Entsorgung von
Elektroschrott und Verpackungsmaterial
entsorgt werden. Informieren Sie sich
gegebenenfalls bei Ihrem örtlichen
Entsorgungsunternehmen.
6

КОНТАКТНЫЙ ГРИЛЬ
ИНСТРУКЦИЯ ПО ЭКСПЛУАТАЦИИ
KG-160A - IM
Внимательно прочитайте данную инструкцию и сохраните ее для
дальнейшего использования
RUS
Table of contents
Other VOX electronics Grill manuals
Popular Grill manuals by other brands

George Foreman
George Foreman GBZ0103B owner's manual

Weber
Weber CHARCOAL GRILLING CENTER owner's guide

Louisiana Grills
Louisiana Grills LG300SL owner's manual

Cookshack
Cookshack 105/6 SUPER SMOKER Setting up

Brinkmann
Brinkmann Gourmet Charcoal owner's manual

BackyardGrill
BackyardGrill GBC1103W owner's manual