VS Sassoon LITHIUM-PRO CERAMIC VSM7474A User manual

Model VSM7474A
LITHIUM-PRO CERAMIC

IMPORTANT SAFETY INSTRUCTIONS
When using electrical appliances, especially when children are
present, basic safety instructions should always be followed,
including the following:
Polythene bags over product or package may be dangerous.
To avoid danger of suffocation, keep this wrapper away from
babies and children. This bag is not a toy.
DANGER: When the unit is used in a bathroom, unplug it after
use since the proximity of water presents a hazard even when the
appliance is switched off.
WARNING: Do not use or leave the AC power adaptor in a
position where it can become wet or there is a danger of
it falling into a basin or other vessels containing water.
• Take care to avoid contact between the moving blades of the
unit and the skin, paying particular attention to the face, neck
and hands.
• This appliance is not intended for use by persons (including
children) with reduced physical, sensory or mental capabilities, or
lack of experience and knowledge, unless they have been given
supervision or instruction concerning use of the appliance by a
person responsible for their safety.
• Children should be supervised to ensure that they do not play
with the appliance.

IMPORTANT: Always unplug the appliance when not in use or before
cleaning. Do not leave unattended when plugged in or switched on.
Do not place on any heat sensitive surface.
• Do not use any attachments other than those supplied by Conair
Australia Pty Ltd.
• Use this appliance only for its intended use as described within
this instruction booklet.
• Always unplug the appliance when fully charged.
• This appliance is not intended for commercial use.
• Never drop or insert any object into an opening.
• Do not use the appliance with damaged or broken attachment combs
or with any teeth missing from the blades, as injury may occur.
• Do not place on any surface while it is operating.
• Do not use outdoors or operate where aerosol (spray) products
are being used or where oxygen is being administered.
• Keep the cord away from heated surfaces
• Do not use the appliance if it is damaged. In the event of damage,
discontinue use immediately and contact your dealer for instructions
on returning it for examination or exchange. If the supply cord is
damaged, it must be replaced by the manufacturer, its service agent
or similarly qualified person in order to avoid a hazard.
• Never twist or pull on the trimmer cord.
• After use do not wrap the cord around the appliance as in time
this may cause the cord to fracture. Coil cord loosely by the side
of the appliance in storage.
• Always ensure that the voltage to be used corresponds to the
voltage marked on the unit.
• For additional protection, the installation of a residual current
device (RCD) with a rated operating current not exceeding
30mA is advisable in the electrical current circuit supplying the
bathroom. Ask your installer for advice.

LITHIUM-PRO CERAMIC
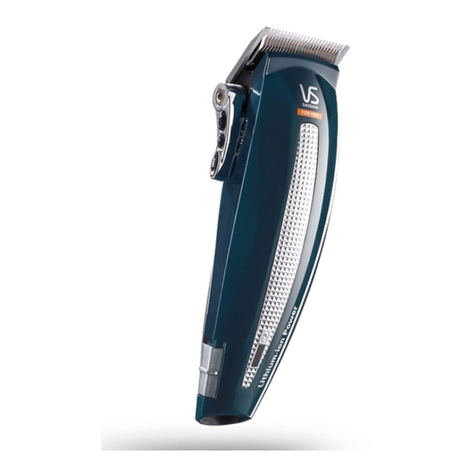
The VS For Men Lithium-Pro Ceramic Hair Clipper uses precision
engineered ceramic blades for an ultra sharp, ultra smooth cut on
any hair length or type. Lithium-ion technology provides sustained
power performance for reliable mains or cordless use. The clipper
includes 10 comb guides, 1-8 and left ear, right ear, for a variety of
lengths to choose from.
FEATURES
• Mains or cordless operational clipper - use corded for continuous
power whilst plugged into the mains or cordless for total flexibility
and control
• Lithium-ion technology provides sustained power performance;
even at lower charge levels
• Precision engineered ceramic cutting blades for smooth, effortless
cutting on any hair length or type
• Taper control for fine cut adjustment
• 3 hour full charge for approximately 75 minutes of use
• Rapid charging system - 20 minutes charge provides approximately
10 minutes of use
• Lightweight for easy handling during use
• 8 clipper guides, grades 1-8 for variety of lengths
• left and righ ear guides
• Barber comb
• Barber scissors
• Cleaning brush
• Oil
• Storage pouch
• 3 year warranty

INSTRUCTIONS FOR USE
Charging the Appliance
IMPORTANT! Only use the adaptor supplied with this appliance.
This clipper is so easy to use, but before you do anything you must
take your time to charge the unit for 3 hours before its first use.
Even if you want to use it plugged in straight from the mains, this
initial supercharge ensures optimum power performance to give
smooth fast cutting every time. Maximum battery capacity will only
be reached after 3 charging/discharging cycles. A full charge will
provide approximately 75 minutes use. A 20 minute quick charge will
provide approximately 10 minutes use. When the clipper is running
low on charge, the charging indicator light will flash, warning you
there is approximately only 3 minutes left of use remaining.
When charging the appliance, the red LED charging light will
appear and continuously stay on until the battery has fully charge.
A green light will then appear to indicate that the appliance has
finished charging.
Warning: If the charging light suddenly starts to flash rapidly then
the appliance is faulty. If this happens then please stop charging
and remove the adaptor from the mains and contact our Customer
Care Centre for further advise (see the ‘warranty section’ section of
the information booklet).
Mains Operation
• Ensure the appliance is switched off.
• Connect the adaptor to the base of the appliance and plug the
adaptor into a suitable mains socket.
• The red LED will appear when the adaptor is correctly inserted
into the appliance and connected to the mains.

• The appliance is now ready for use.
• NOTE: The appliance should not be used for longer than 20
minutes when operated from the mains.
Cordless Operation
• Insert the adaptor into the base of the appliance, plug into a
suitable mains socket and switch off. The red LED will appear
when the adaptor is correctly inserted into the appliance and
connected to the mains.
• Once the appliance in fully charged, the green light will appear.
Unplug the adaptor from the mains socket and appliance and
prepare for use.
Oiling Instructions
IMPORTANT! It is highly recommended before each use to oil
the blades with the oil provided. This ensures optimum cutting
performance.
For the first use you will need to use the oil supplied with the
product, unscrew the cap and cut off the very end of the plastic
tube with a pair of scissors to release the oil.
To oil the blades ensure the unit is switched on. Gently squeeze the
oil tube and apply 2 drops of oil onto the blades. Leave the unit on
for a further few seconds to allow the oil to thoroughly spread the
length of the blades. Switch off the unit and remove any excess oil
by gently dabbing with a cloth.

Preserving the batteries
In order to maintain the optimum capacity of the rechargeable
batteries, the appliance has to be fully discharged every 6 months
approximately. Then recharge the appliance to full capacity, again
for 3 hours.
Comb Guides
This appliance is supplied with 8 comb guides:
Cutting Length Grade
3mm #1
6mm #2
9.5mm #3
13mm #4
16mm #5
19mm #6
22mm #7
25mm #8
• To attach a comb guide, ensure the appliance is switched off. Slide
the cutting blades of the clipper under the slot in the rear of the
teeth of the comb guide and snap the clip on the bottom of the
guide over the bottom edge of the fixed clipper blade.
• To remove the comb guide, ensure the appliance is switched off.
Push the tab on the rear of the comb guide away from the head
and lift off.

The appliance is also supplied with a left and right ear taper guides
The taper guides can be used above the ear to get a clean line.
• Attach either the left or right guide depending on which ear you
are cutting above.
• Angle the clipper and gently stroke around the ear towards the
back of the neck.
Taper Control
The taper control lever enables fine cut adjustment for precision
clipping.
• To increase the cutting length, push the lever down.
• To reduce the cutting length, push the lever up.
Preparation for Use
• Always inspect the appliance before use to ensure the clipper
blades are free from hair, debris etc.
• For best performance, use on clean, dry hair that has been combed
until tangle-free.
• Ensure the appliance is sufficiently charged or plugged into the
mains.

Clipping
For an all over even cut:
• Attach a comb guide as required – your clipper is supplied with
10 comb guides (grades 1-8 and left /right ear). Each comb guide
is labelled.
• Switch the clipper on and the blades will start to move.
• Starting at the nape of the neck, hold the clipper with the teeth
of the clipper pointing upwards, ensuring that the comb guide is
resting flat against the head.
• Slowly move the clipper upwards and outwards through the hair
towards your crown, against the direction of the hair growth. The
comb guide will help to lift the hair and the blades will cut the
hair at the desired length.
• Once the desired length is achieved at the back of the hair, start
clipping the top and sides.
• Hold the clipper to the front of your hair with the teeth pointing
towards the back of your head, and move the clipper towards
your crown. Repeat as necessary, moving in rows from the front
and the sides of your head to the back.
• You should achieve an even length cut all over your head.
For a shorter back and sides, with length on the top:
• Attach the longer comb guide as required for the top of your hair
– your clipper is supplied with 10 comb guides (grades 1-8). Each
comb guide is labelled.
• Switch the clipper on and the blades will start to move.
• Hold the clipper to the front of your hair with the teeth pointing
towards the back of your head and move the clipper towards your
crown. Repeat as necessary, moving in rows from the front and
the sides of your head to the back.
• If you then wish to take the back and sides of your hair to a shorter
length, switch off the appliance and attach a shorter comb guide.

• Starting at the nape of the neck, with the comb guide flat against
the head, move the clipper upwards and outwards over the area
you want to take shorter.
• Repeat on the sides of the hair, starting with the teeth of the
clipper pointing upwards and comb guide flat against the area
above the ear, again moving the clipper upwards and outwards.
Outlining:
• To tidy up the edges around your cut e.g. neckline and sideburns,
detach the comb guides.
• Hold the appliance upside down, so the front of the clipper is
facing towards your head.
• Hold the clipper straight on your sideburns or neckline and move
the clipper downwards. This will give you a clean, smooth finish.

CLEANING AND MAINTENANCE
For easy cleaning, the blades on your VS For Men clipper are
removable. Regular cleaning will maintain their high performance
level.To clean proceed as follows:
• Switch the appliance off and unplug at the mains supply.
• Remove any comb guides. Rinse the comb guide under running
water and dry thoroughly before storage or use.
• Remove the blades carefully noting which way round they are
fitted. This will help with re-assembling.
• Remove the two screws from the large fixed blade and detach
this blade.
• Now brush away the hair and other debris from the interior of the
cutting head and blades.
• Re-assembly is simply the reverse of the above instructions.
• Finally, before fully tightening the two screws in the large blade,
to avoid injury ensure that the blades are correctly aligned. With
the taper control lever fully forward, the tips of the small blade
must be parallel with and 1mm below the tips of the large blade.
Also check that the extreme left hand tooth of the small blade is
inside the large blade. (Failure to do so could cause injury).
• Carefully tighten the two screws in the big blade, taking care not
to disturb the above correct position of the blades.
NOTE: Do not attempt to repair or replace the blades. In the event
that the blades become blunt or damaged, contact the Conair
CustomerCare Line (Conair Customer Service).

BATTERY DISPOSAL
To minimise hazards to health and the environment at the end of
this product’s life, dispose of this product at a suitable collection
facility where it will be sent for appropriate recycling. Please contact
your local authorities for more details on recycling and safe disposal
of these in your area.
Li-ion

LIMITED THREE YEAR WARRANTY
This product is subject to the express warranty given on the
warranty card included with the product, as may be amended by
reference to and in accordance with the terms of the warranty
cards displayed on VS For Men websitewww.vsformen.com.au
To make a warranty claim you must retain your proof of
purchase. Further details can be found at www.vsformen.com.
au and click on ‘customer service’.


®
Vidal Sassoon and related logos are trademarks of
The Procter & Gamble Company used under license by Conair
©2015
Conair Australia Pty. Ltd.
Suite 101, 18 Rodborough Rd
Frenchs Forest NSW, 2086
Australia
Customer Service Hotline (Australia): 1800 650 263
Customer Service e-mail: aus_info@conair.com
Conair New Zealand Limited, PO BOX 251159,
Pakuranga, Auckland
2140 New Zealand
Customer Service Hotline (New Zealand): 0800 266 247
Table of contents
Other VS Sassoon Hair Clipper manuals

VS Sassoon
VS Sassoon VSM795A User manual

VS Sassoon
VS Sassoon VSM743TA Assembly instructions

VS Sassoon
VS Sassoon VSM7118A User manual

VS Sassoon
VS Sassoon VS7920A User manual

VS Sassoon
VS Sassoon I-CLIP AUTOMATIC VS7930A User manual

VS Sassoon
VS Sassoon TURBO-PRO VS7702A User manual

VS Sassoon
VS Sassoon VSM7473A User manual

VS Sassoon
VS Sassoon Rugged Commander VSM423RA Assembly instructions

VS Sassoon
VS Sassoon Turbo Power Clipper VSM318DNA User manual

VS Sassoon
VS Sassoon X5 PRO User manual