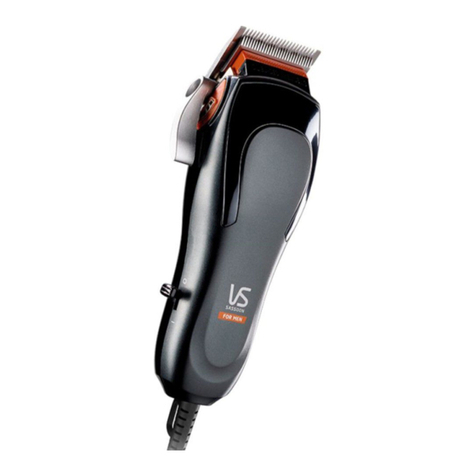
VS Sassoon Rugged Commander VSM423RA Assembly instructions

1
TOOL TIPS
for the full size, mains powered clipper
that’s built tough.
VSM423RA
RUGGED
COMMANDER
THE
Hair Clipper

2
HEY YOU!
TAKE A BOW FINE SIR.
THINGS ARE LOOKING UP
& YOU’VE JUST MADE A
QUALITY PURCHASE
WITH THIS NEW GROOMING TOOL.
WE KNOW YOU’VE GOT THIS, BUT BEFORE YOU JUMP INTO
USING YOUR NEW SIDE KICK, HERE’S A FEW TIPS & TRICKS
TO KNOW BEFORE LETTING YOUR CREATIVITY RUN LOOSE.
HIT UP VSFORMEN.COM.AU FOR MORE GROOMING & INSPIRATION.

THE RUGGED COMMANDER / TOOL TIPS
3

THE RUGGED COMMANDER / TOOL TIPS
4
IMPORTANT SAFETY
INSTRUCTIONS
When using electrical appliances, especially when children are present, basic
safety instructions should always be followed, including the following:
Polythene bags over product or package may be dangerous. To avoid danger of
suffocation, keep this wrapper away from babies and children. This bag is not
a toy.
DANGER: When the unit is used in a bathroom, unplug it after use
since the proximity of water presents a hazard even when the
appliance is switched off
WARNING: Do not use or leave the AC power adaptor in a position where it
can become wet or there is a danger of it falling into a basin or other vessels
containing water. Keep the appliance dry, unless it otherwise specified. Do
not use this appliance in or near bathtubs, showers, basins or other vessels
containing water.
- Do not immerse appliance in water or other liquids.
- Do not reach for an appliance that has fallen into water. Unplug immediately.
- Take care to avoid contact between the moving blades of the unit and the
skin, paying particular attention to the face, neck and hands.
- This appliance is not intended for use by persons (including children) with
reduced physical, sensory or mental capabilities, or lack of experience
and knowledge, unless they have been given supervision or instruction
concerning use of the appliance by a person responsible for their safety.
- Children should be supervised to ensure that they do not play with the
appliance.

THE RUGGED COMMANDER / TOOL TIPS
5
IMPORTANT: Always unplug the appliance when not in use or before cleaning.
Do not leave unattended when plugged in or switched on. Do not place on any
heat sensitive surface.
- Do not use any attachments other than those supplied by Conair Australia
Pty Ltd.
- Use this appliance only for its intended use as described within this
instruction booklet.
- Always unplug the appliance when fully charged.
- This appliance is not intended for commercial use.
- Never drop or insert any object into an opening.
- Do not use the appliance with damaged or broken attachment combs or with
any teeth missing from the blades, as injury may occur.
- Do not place on any surface while it is operating.
- Keep the cord away from heated surfaces
- Never twist or pull on the power cord.
- Do not use an extension cord with this appliance.
- After use do not wrap the cord around the appliance as in time this may cause
the cord to fracture. Coil cord loosely by the side of the appliance in storage.
- Do not use outdoors or operate where aerosol (spray) products are being
used or where oxygen is being administered.
- Do not use the appliance if it is damaged. In the event of damage, discontinue
use immediately and contact your dealer for instructions on returning it for
examination or exchange. The supply cord cannot be replaced. If the cord is
damaged the appliance should be scrapped.
- Always ensure that the voltage to be used corresponds to the voltage marked
on the unit.
- For additional protection, the installation of a residual current device
(RCD) with a rated operating current not exceeding 30mA is advisable in
the electrical current circuit supplying the bathroom. Ask your installer for
advice.
66
1. Full size, mains powered
2. Turbo power boost
3. Diamond sharpened stainless
steel blades
4. 5 position taper control
(at the back of the clipper)
5. 7x hair clipping comb guides
(3mm to 22mm) for cutting,
shaping and fading all
hair types
6. 2x left and right ear taper
comb guides
7. Real rubber grip
8. Drawstring storage pouch
9. Styling comb
10. Blade guard
11. Cleaning brush
12. Oil
THE RUGGED COMMANDER
BRAVO. YOU’VE MADE A QUALITY PURCHASE.
The Rugged Commander Hair Clipper is the full size, mains powered
clipper that’s built tough.
3
1
2
4
12
11
10
8
9
5
6
7
THE RUGGED COMMANDER / TOOL TIPS

THE RUGGED COMMANDER / TOOL TIPS
7
PREPPING YOUR
NEW TOOL
MAINS OPERATION
• Plug your new clipper into a suitable power outlet and switch the product on
by sliding the on/off switch to the ‘on’ position.
OILING THE BLADES
To get the sharpest, most precise cut, it is highly recommended to oil the blades
about once a month.
Using the oil supplied with your new tool, unscrew the cap & cut off the very end
of the plastic tube with a pair of scissors to release the oil.
Switch your tool on, gently squeeze the oil tube & apply 2 drops of oil onto the
blades. Leave the tool on for a further few seconds to allow the oil to thoroughly
spread across each of the blades. Switch off the tool & remove any excess oil by
gently dabbing with a cloth.

THE RUGGED COMMANDER / TOOL TIPS
8
HOW TO USE THE
RUGGED COMMANDER
BEFORE USING
• Always inspect the clipper blades for noticeable signs of damage.
• Always inspect the clipper blades before use to ensure they are free from
hair, debris etc.
• Ensure the clipper blades are well oiled before using.
• For best performance use on clean, dry hair that has been combed until
tangle-free.
• Always check that the tips of the two blades are parallel and aligned
correctly. Correctly aligned blades will provide best cutting performance.
Failure to do this can result in injury.

THE RUGGED COMMANDER / TOOL TIPS
9
USING THE 5 POSITION TAPER CONTROL
DEFINE YOUR LOOK!
The 5 position taper control (located on the rear of the handle) is ideal for
blending layers & a precise close trim, everytime. The taper control eliminates
the need in some situations for a comb attachment because it lets you gradually
adjust the closeness of the cut.
To use the taper control:
For the closest cut and shortest hair, slide the switch all the way up so that #5
is shown. To increase the cutting length, slide the switch down to #4, #3, #2 and
#1 as needed.
USING THE TURBO POWER BOOST
The Rugged Commander Hair Clipper features a turbo power boost button that
provides extra cutting power for easy clipping and trimming through thick or
coarse hair.
To use the turbo power boost:
1. Push the power switch to the ‘on’ position
2. Press the turbo boost button
3. Continue to press the turbo boost button for as long as you need the extra
power.
4. Release the turbo power button to return to normal power.

THE RUGGED COMMANDER / TOOL TIPS
10
EASY CLIPPING,
YOUR WAY
The Rugged Commander Hair Clipper features 7 cutting comb guides - grades
#1, #2, #3, #4, #5, #6 & #7 comb guides (3mm to 22mm) for cutting, shaping &
fading, PLUS left + right ear taper cutting comb guides for the finishing touches
around the ears.
The comb guides are marked with the following grade number:
Cutting Length Grade
3mm #1
6mm #2
9.5mm #3
13mm #4
16mm #5
19mm #6
22mm #7
Ear taper Left
Ear taper Right
• To attach a comb guide, ensure the appliance is switched off. Position the
comb guide over the front of the clipper blade and slide over the head. Push
and click the rear of the comb guide into position.
• To remove the comb guide, ensure the appliance is switched off. Push the tab
on the rear of the comb guide away from the head and lift off.
• To attach the ear comb guides, choose either the left or right guide depending
on which ear you are cutting above. Angle the clipper and gently stroke
around the ear towards the back of the neck.

THE RUGGED COMMANDER / TOOL TIPS
11
CLIPPING TIPS
Hit up www.vsformen.com.au for more grooming tips, inspiration & guidance on
how to get the best use of your clipper.
CREATING AN ALL-OVER EVEN CUT
1. Ensure the clipper is switched off.
2. Attach the desired cutting comb guide as required.
3. Switch the clipper on – the blades will start to move.
4. Start cutting at the nape of the neck, holding the clipper with the teeth of
the clipper pointing upwards, ensuring that the comb guide is resting flat
against the head.
5. Slowly move the clipper upwards and outwards through the hair towards your
crown, against the direction of the hair growth. The comb guide will help to
lift the hair and the blades will cut the hair to the length as shown on the
comb guide.
6. Once the desired length is achieved at the back of the hair, start clipping the
top and sides.
7. Hold the clipper to the front of your hair with the teeth pointing towards
the back of your head, and move the clipper towards your crown. Repeat as
necessary, moving in rows from the front and the sides of your head to the
back.
8. For finishing around the ears, attach the required ear taper comb guide and
trim down any longer hairs around the ears.

THE RUGGED COMMANDER / TOOL TIPS
12
CREATING A SHORT BACK & SIDES LOOK, WITH
LENGTH ON THE TOP
1. Ensure the clipper is switched off.
2. Attach the desired cutting comb guide as required.
3. Switch the clipper on – the blades will start to move.
4. Hold the clipper to the front of your hair with the teeth pointing towards
the back of your head and move the clipper towards your crown. Repeat as
necessary, moving in rows from the front and the sides of your head to the
back.
5. If you then wish to take the back and sides of your hair to a shorter length,
switch off the appliance and attach a shorter comb guide.
6. Start cutting at the nape of the neck, and with the comb guide flat against
the head, move the clipper upwards and outwards over the area you want to
take shorter.
7. Repeat on the sides of the hair, starting with the teeth of the clipper pointing
upwards and comb guide flat against the area above the ear, again moving
the clipper upwards and outwards.
OUTLINING
1. To tidy up the edges around your cut e.g. neckline and sideburns, detach the
comb guides.
2. Hold the clipper upside down, so the front of the clipper is facing towards
your head.
3. Hold the clipper straight on your sideburns or neckline and move the clipper
downwards. This will give you a clean, smooth finish.

THE RUGGED COMMANDER / TOOL TIPS
13
CLIPPER CLEANING &
MAINTENANCE
Because the clipper blades are precision made for a very special
use, they should always be handled with care. To ensure long-lasting
performance of your clipper, it is important to clean the blades + the
comb guides after every use.
After each use, clean the clipper blade set as follows:
TO REMOVE THE BLADES FOLLOW THESE STEPS:
1. Hold the front part of the clipper with your thumb pressing on the
blade and place another hand against the blade. (see fig. 1)
2. When pressing the blade forward, the blade is detached. (see fig. 2)
3. Using the cleaning brush, brush away any hair and other debris
that may have built up on the interior of the cutting head and
blades.
TO REPLACE BLADE:
1. Set the Taper Control Button to lowest position “1” (see fig. 3)
2. Place the blade onto the clipper body by inserting the “Blade
Tongue” down below the “Lock Tap”. (see fig. 4)
3. Snap the blade down into following position. The blade is now fixed
onto the clipper body. (see fig. 5)

THE RUGGED COMMANDER / TOOL TIPS
14
WORLDWIDE VOLTAGE
This appliance has a multi voltage feature for worldwide use. The voltage
automatically converts for ease of use from 100v - 240v. This appliance has
an automatic internal converter which will automatically convert the voltage
without the need of a switch. A suitable plug adaptor will be required, please
refer to the chart below.
Plug adaptor
required
Voltage and
plug adaptors
Country Voltage
setting
British plug:
240V
Ireland, Great Britain, Singapore, South America,
Hong Kong (parts only), Africa (parts only)
240V
European plug:
240V
Asia, Europe, Middle East Noumea, Scandinavia,
South America, Hong Kong (parts only)
240V
Australian and
New Zealand
plug: 240V
Australia, New Zealand 240V
American
plugs: 120V
North America, Japan, Canada
(parts of)
120V

THE RUGGED COMMANDER / TOOL TIPS
15
LIMITED TWO
YEAR WARRANTY
Our goods come with guarantees that cannot be excluded under the Australian Consumer
Law. You are entitled to a replacement or refund for a major failure and for compensation for
any other reasonably foreseeable loss or damage. You are also entitled to have the goods
repaired or replaced if the goods fail to be of acceptable quality and the failure does not
amount to a major failure. In New Zealand our goods come with a guarantee that cannot be
excluded under the Consumer Guarantee Act 1993.
Conair Australia Pty Ltd. will repair or replace (at our option) your appliance free of
charge for twenty-four months from the date of purchase if the appliance is defective in
workmanship or materials.
This warranty is an additional benefit and does not affect your legal rights. To obtain service
under this warranty, please retain this section of the instruction booklet with your receipt/
proof of purchase. You must present it to obtain replacement or service under the warranty.
The warranty may only be claimed where proof of original purchase is presented, i.e.
original purchase receipt or invoice. Attach a copy of your purchase receipt and store
in a safe place.
To make a warranty claim, call or email Conair Customer Service or you can return the
defective product back to the place it was purchased where it will be replaced (see Point 12
in Conditions).
Please provide the following details:
1. Date of purchase
2. Retailer Name & Location:
3. Product Name/Model Number:
4. Confirm you have your purchase receipt:
5. Detail the problem with your product:
TO MAKE A WARRANTY CLAIM YOU MUST
RETAIN YOUR PROOF OF PURCHASE.

THE RUGGED COMMANDER / TOOL TIPS
16
WARRANTY AGAINST DEFECTS
A. AUSTRALIAN CONSUMER LAW
1. Our goods come with guarantees that cannot be excluded under the Australian Consumer Law.
You are entitled to a replacement or refund for a major failure and compensation for any other
reasonably foreseeable loss or damage. You are also entitled to have the goods repaired or replaced
if the goods fail to be of acceptable quality and the failure does not amount to a major failure.
2. The guarantees under the Australian Consumer Law (“ACL”) are provided in sections
51 to 59 inclusive of the ACL (“Statutory Guarantees”) and the remedies are provided in sections 259
to 266 inclusive of the ACL (“StatutoryRemedies”).
B. VSFORMEN EXTENDED WARRANTY
1. In addition and subject to the Statutory Guarantees and Statutory Remedies, the following
express warranty (“Warranty”) commences from the date of purchase and continues for a period
of 24 months (“Warranty Period”) after which it expires. Subject to the conditions in Section
C below, Conair warrants to the original purchaser (“Purchaser”) of the VSforMen product
that is the subject of this warranty (“Product”) that if during the Warranty Period, the Product
suers from any defect caused by faults in materials or workmanship, Conair will a) replace
the Product, or b) exchange defective parts in the Product or c) repair the Product, as Conair
may choose in its discretion (“Warranty”). In this Warranty “Conair” means Conair Australia
Pty Limited (ABN 64 068 492 044) of The Equinox Centre, Suite 101, 18Rodborough Rd, Frenchs
Forest, NSW, 2086. in relation to Products purchased in Australia and Conair
New Zealand Ltd in relation to Products purchased in New Zealand.
2. To honour the Warranty, Conair must replace, or exchange parts in, or repair, the Product, as
Conair determines, in accordance with paragraph B1 above, subject always to the conditions in
Section C below.
3. If any of the conditions in Section C below are inconsistent with any provisions of the ACL or
regulations madethereunder, those provisions of the ACL or regulations shall prevail to the
extent of the inconsistency.
C.CONDITIONS
1. The Product must be used in accordance with manufacturer’s instructions. This Warranty does
not apply should the defectin or failure of the Product be attributable to misuse, abuse, accident,
act of God such as lightning, or nonobservance of manufacturer’s instructions on the part of the
user. This Warranty does not cover ordinary wear and tear in the Product or its parts.
2. Conair does not accept liability for a) any loss or damage however suered, caused by or arising
out of any failure to use the Product in accordance with the manufacturer’s instructions, and b)

THE RUGGED COMMANDER / TOOL TIPS
17
any indirect, consequential or economic loss or damage however caused.
3. This Warranty is immediately void if – a) any serial number or appliance plate is removed or
defaced, b) the Product has been serviced or otherwise repaired by a person not authorized to do
so by Conair or where non approved replacement parts are used.
4. The Product is designed for domestic use only. The Product must be connected to the electrical
voltage supply as specified in the ratings label located on the Product. This Warranty does not
cover defects arising from non-domestic use or incorrect voltage supply.
5. This Warranty may only be claimed against where proof of original purchase is presented, for
example, original receipt or invoice.
6. Any parts of the Product that need to be replaced, or if the whole Product needs to be replaced,
the replaced Product, become the property of Conair. The Warranty on any replacement Product
or parts will expire on the same date that the Warranty Period on the original Product expires.
7. The benefits provided by this Warranty are in addition to all other rights and remedies in respect
of the Product which the Purchaser has under the ACL, and applicable laws in New Zealand,
which rights and remedies by law may not be excluded. All other warranties and representations
express and implied are hereby excluded.
8. The defect must have occurred during the Warranty Period and Purchaser bears the onus of
proving that fact, and that the defect was not caused by any of the causes excluded from this
Warranty.
9. This Warranty does not cover Products purchased from any person who is not a retailer serviced
by Conair’s authorised distributors or purchased second hand.
10. The Purchaser is responsible for all postage and freight charges and any other expenses
incidental to claiming against this Warranty.
11. The Warranty excludes consumable items (such as blades or brushes) and normal wear and tear.
12. If you’re certain your product is defective, and the product is covered by the terms of this
warranty, you need to take the product back to the place you purchased it from, where the
retailer will replace the product for you on our behalf. In this event, per the terms of this
warranty you will need to present this portion of the warranty card and the purchase receipt as
proof of purchase so please make sure you keep both this card and your receipt on hand for the
duration of the warranty period.
SPARE PARTS
Replacement parts may be available for your product. Contact us on the phone or email address
provided for more details. Please provide your product name/model number details, date of
purchase and part you require.

THE RUGGED COMMANDER / TOOL TIPS
18

Vidal Sassoon and related logos are trademarks of
The Procter & Gamble Company used under license by Conair.
©2018 Conair Australia Pty. Ltd.
Suite 101, 18 Rodborough Rd
Frenchs Forest NSW 2086
Australia
Conair New Zealand Limited
PO BOX 251159
Pakuranga, Auckland 1706
New Zealand
CONTACT US
For advice & tips on your new VS product email us on:
aus_inf[email protected]
CUSTOMER SERVICE
Australia: 1800 650 263
New Zealand: 0800 266 247
Visit VSFORMEN.COM.AU for grooming tips & inspiration.

THE RUGGED COMMANDER / TOOL TIPS
20
YOU WERE
BORN TO
BE REAL,
NOT TO BE
PERFECT
IB-18/195
Table of contents
Other VS Sassoon Hair Clipper manuals

VS Sassoon
VS Sassoon Turbo Power Clipper VSM318DNA User manual

VS Sassoon
VS Sassoon I-CLIP AUTOMATIC VS7930A User manual

VS Sassoon
VS Sassoon VS7920A User manual

VS Sassoon
VS Sassoon X5 PRO User manual

VS Sassoon
VS Sassoon LITHIUM-PRO CERAMIC VSM7474A User manual

VS Sassoon
VS Sassoon VSM743TA Assembly instructions

VS Sassoon
VS Sassoon VSM7118A User manual

VS Sassoon
VS Sassoon VSM7473A User manual

VS Sassoon
VS Sassoon VSM795A User manual

VS Sassoon
VS Sassoon VSM7565A User manual