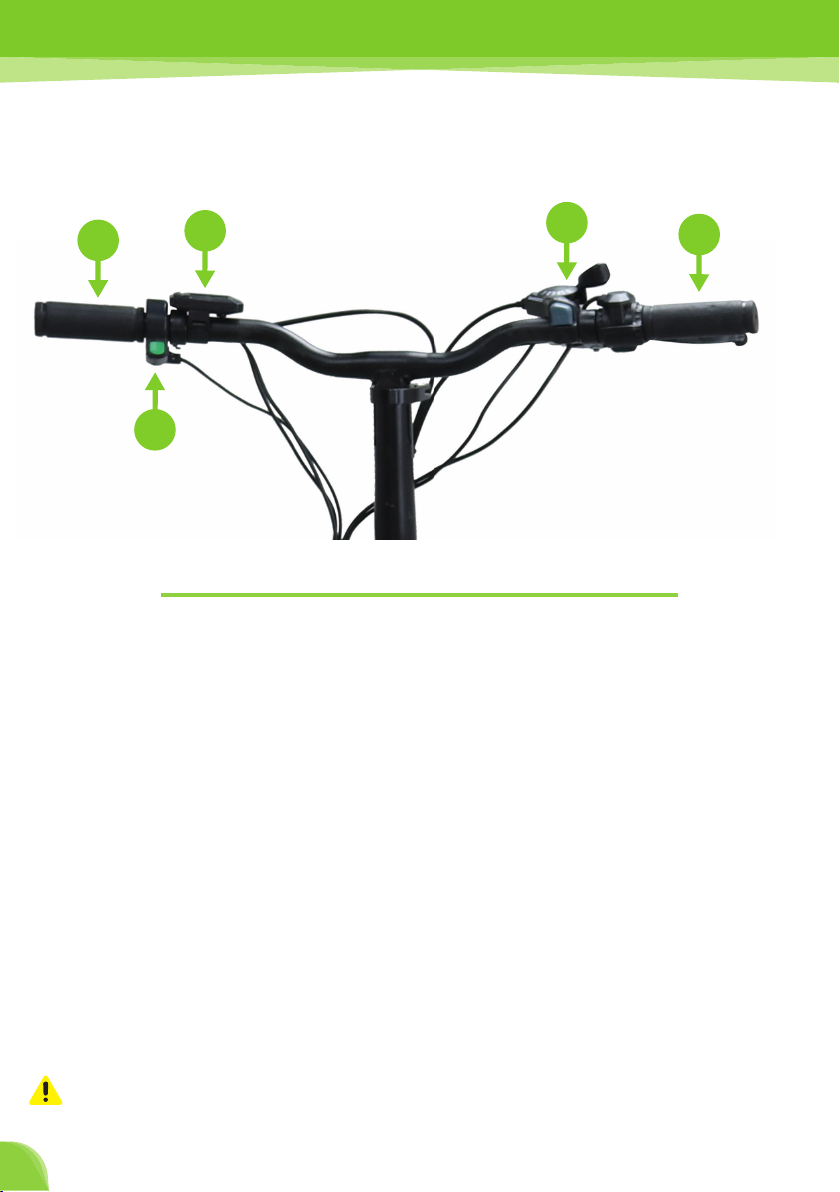
VTA VB1 User manual

www.VTAmobility.com
Read this user’s manual carefully before using your vehicle.
USER MANUAL
vB1

2
This product is designed as an environmentally friendly means of transportation. Throughout
the guide you will see the advantages and characteristics of the
vehicle. Its general specifications are as follows;
• High eciency brushless DC motor
• Electronic control unit (Controller) which protects from high and low voltage.
• Braking system with electric cut-o feature for safe driving.
• High-capacity lithium battery for longer range and high performance
• Electric bike equipments conforming to European standards
These headings are written to protect you from serious personal injury and mechanical damage.
These headings are written to protect you from serious personal injury or potential accident.
Drive
This vehicle is designed to carry a maximum of one person and load.
Road condition
This vehicle is designed for use on flat and asphalt roads.
Do not use the vehicle without reading the entire user manual.
Usage
It is obligatory to comply with the maintenance intervals written in the user manual. Otherwise
your vehicle will be out of warranty terms.
The maintenance intervals for your vehicle and the parts that need to be changed / checked
are in this user manual listed.
It is recommended that you read the “Warning, Caution, Note and Safety Precautions”
sections carefully.
After purchasing your vehicle, you should take it to the nearest authorized service center for
maintenance.
PREFACE
Important note
Caution
Warning

3
PREFACE
CONTENTS
SAFE DRIVING
GENERAL VIEW
ACTUATION AND USAGE
MAINTENANCE AND CONTROL
STORAGE CONDITIONS
TECHNICIAL SPECIFICATIONS
MANUFACTURER INFORMATION
GUARANTEE
WARRANTY CONDITIONS
NOTES
2
3
4
5
7
13
18
19
20
21
22
23
CONTENTS

4
SAFE DRIVING
Pre-Ride Instructions
• Check the condition of all the movable parts.
• Check all rotating parts and add oil if it is missing.
• Check whether the tires are intact.
• Check the tire pressures.
• Make sure that all nuts and bolts are tightened adequately.
• Check that the brake cable and other cables are not pinched and are working properly.
• Check all lighting systems.
Safe Driving Instructions
Follow the pre-ride instructions before starting to use.
• Grasp the grips with both hands while riding.
• Make sure you maintain a safe driving position.
• Practice often, primarily to gain experience.
• Obey the maximum loading conditions specified in the manual.
• Objects moving while driving will change the vehicle’s center of gravity and will endanger
the driving safety. Take the necessary measures to avoid this situation.
• Avoid acrobatic movements while driving your vehicle.
• Avoid high speeds when turning.
• Wet weather lengthens the braking distance and restricts maneuverability. In such cases
always maintain your low speed.
• Avoid excessive puddles that may occur in rainy weather.
• Never use under the influence of alcohol and drugs.
Ecient Driving Instructions
If the following ecient driving instructions are followed, your vehicle’s driving
range and eciency will increase;
• Take your vehicle to authorized service regularly. Observe the maximum load limits in
the manual.
• Take care to use it in suitable weather and road conditions.
• You have noticed that your tire pressures are appropriate.
• Pay attention to the maximum speed limits.

5
GENERAL VIEW
1. Braking Disc
2. Headlamp
3. Handlebar Folding Apparatus
4. Handlebar Adjusting Clamp
5. Handlebar
6. Frame Folding Apparatus
7. Saddle Adjusting Clamp
8. Saddle
9. Battery
10. Rear Carrier Platform
11. Stop Lamp
12. Electric Motor
13. Rear Derailleur
14. Crankset
All parts listed in the user manual are given as reference. The manufacturer can make changes without notice.
Warning
1
2
3
4
5
6
7
8
910
11
12
13
14

6
1. Front Brake Lever
2. Speedometer
3. Shifters
4. Rear Brake Lever
5. Lighting Switch
All parts listed in the user manual are given as reference. The manufacturer can make changes without notice.
Warning
GENERAL VIEW
1234
5

7
ACTUATION AND USAGE
Speedometer
The speedometer displays the bike’s control settings as well as function, speed, battery, error and
and also it is used to display values such as range.Press the up/down button simultaneously for three
seconds to open the display settings. Use the power button to change the code interface in the display
settings.
Battery Condition Power Assistance Level
Malfunction, Caution and Warning Tell-tales
Front
Lighting Cruise
Control
Controller
Error
Brake Throttle
Error
Motor Error Battery Error
Odometer Speedometer
ODO
TRIP
MILE
Km
MPH
KM/H
ASSIST
M
ECU
ASSIST
MPH
KM/H
ODO
TRIP
MILE
Km
M
ECU

8
ACTUATION AND USAGE
The above-mentioned values are measured in metric units (kilometers). When the unit of measurement is changed to miles, the
speed displayed on the panel value is automatically converted to the corresponding Impeial unit, however, the speed limit value in
the unit interface does not change accordingly.
Display Settings
CODE
P01:
P02:
P03:
P04:
P06:
P05:
P07:
P08:
P09:
P10:
P11:
P12:
P13:
P14:
P15:
P16:
P17:
DEFINITION
Backlight Brightness
Distance Unit
Voltage Class
Sleep Mode Duration
Rim Diameter
Assistance Mode
Number of Magnets for Speed
Test
Speed
Zero/ Non-Zero Initial Setting
Driving Mode Setting
Auxiliary Power Sensitivity
Auxiliary Power Density
Number of Magnets
Default Current Limit Value
Motor Engine Start Adjustment
Driving Function
Headlight Sync
FEATURE
1 : Low
2 : Medium
3 : High
0: Kilometers -KM
1 : Mile - Mph
24v - 36v - 48v
0 : No Sleep Mode
Other: 1 – 60 Min.
Lowest : 16 inches
Highest : 28 inches
3 Levels - 5 Levels - 9 Levels
Range : 1 - 100
Range : 1 – 25 km/h
0 : Start
1 : Non-Zero Start
0 : Power Drive*
1 : Electric Drive**
2 : Power + Electric Drive***
Range : 1 - 24
Range : 0 - 5
5 / 6 / 8 / 10 / 12 Pieces
Aralık : 1- 20 Ah
Range : 0 - 100
0 : O
1 : On
0 : O
1 : On
The specific gear of the assist drive decides the assist power value. In this status the throttle does not
work.
**The vehicle is driven by the throttle. In this status the power gear does not work.
***Electric drive does not work in zero-start status.
ODO Zero-Out: Long press the down button for 5 seconds, ODO will be reset.
Warning

9
5-10 mm
Actuation
Insert the key into the key slot on the battery and turn it to the open position. Then press
and hold the power on/o icon on the display for 3 seconds. Speedometer powered on, the
electric bike will be ready for riding.
• Avoid sudden and hard braking. Otherwise, your bike may slip and cause accidents.
• Be careful when braking on downhill descents.
• Do not continue to pedal while using the brakes. In this case, the electronic control unit and may cause motor failure.
• Brake pad, caliper and brake disc can reach high temperatures during braking. Contact with hot surfaces here can cause
serious injury. Make sure that these parts have cooled down during maintenance and repair.
• Disc brake system oers high braking performance. Therefore, practice the braking system on flat surfaces.
• Brake can be adjusted according to sensitivity. For safer deceleration, front and rear brakes should be used together.
• If the brakes are used for a long time, the brake kits get hot and their performance decreases. This can cause to decrease
braking distance.
• Brake pads should always be replaced with original products. Low quality parts to other parts of the vehicle may cause
damage. It also aects the performance of your vehicle.
• The braking system is vital for your safety. Regularly at the intervals given in the periodic maintenance table have the control
and adjustment procedures done by authorized services.
Warning
ACTUATION AND USAGE
Acceleration
The electric motor on the rear axle of the electric bike designed in such a way that will
support the ride as the pedal is pressed. From the moment the pedal is pressed, the motor
supports driving and it also stops supplying power after the pedal is depressed.
Braking
The brake lever has brake sensors. In this way, the brakes perform both mechanical braking
and also cuts the energy of the motor.
• Grasp the brake lever with your fingers and gently squeeze it towards you.
• Slowly loosen the brake lever to stop braking.
The braking system of your bike equipped with a front and rear mechanical disc brake
system.
For proper braking, the brake lever travel should be 5-10 mm. From this point then the
braking process should begin.
Warning
Always keep the bike in the o position when not in use.

10
Gear Shift
The electric bike is equipped with a gear set that enables gear change. By making appropriate
gear selections in the rear gear with the gear lever positioned on the right brake set can be
achieved optimal during riding. To change gear, push the gear lever to the desired gear
position.
ACTUATION AND USAGE
Warning
Warning
Be sure to keep turning the crankset while shifting gears..
Do not carry loads on surfaces that are not suitable for carrying loads on the bike. Otherwise, parts will be damaged and also
endanger driving safety.
Loading
The rear carrier platform and loading area should only be used for carrying loads. Please do
not exceed the permissible load limits. The allowable load for the rear carrier is 10 kg.
Electronic Control Unit
The electronic control unit (controller) functions as the brain of your bike. Thanks to its
software, it enables the motor to be activated for pedal support. It supports the driver up to
25 km/h speed. Due to the hardware and software of the vehicle, it could be gone beyond
over this speed with muscle power and this situation is controlled by the electronic control
unit. It also ensures that the orders you transmit through the indicator are executed.
Lighting System
Driving in the dark and in the daytime using the front and rear lighting system should be
turned on and visibility should be increased. Increasing visibility will raise the safety to the
next level. To activate the lighting system, press the up button on the indicator for 3 seconds.
This will open your lighting system. Press the same button again for 3 seconds to turn it o.
The electronic control unit is protected against dust and splashes. However, avoid deposits containing a lot of water.
Caution

11
Battery
The vehicle is equipped one rechargeable lithium-ion battery that can provide 36V 10Ah
energy. Since the use of the battery aects the life of the vehicle and environmental
conditions, it is necessary to pay maximum attention to the following points.
• Do not dispose of the battery with your household waste.
• Do not immerse the battery in any kind of liquid.
• Do not connect the positive and negative terminals of the lithium battery.
• Do not expose the battery to direct sunlight or high temperatures.
• Never disassemble the battery. Disassembling the battery voids the warranty.
• Do not charge the vehicle with any charger other than the one supplied with the vehicle.
• Do not store the battery in cold and humid environments. In case of storage for more
• than one month please charge it for two hours once a month.
• If the battery becomes waste or no longer used, it is recommended that submit to the
manufacturer or to the waste collection facilities.
ACTUATION AND USAGE
• Keep your electric bike away from the cold, if possible in your home or garage. So your battery lifespan will be extended.
• If you do not use your electric bike for a month or more, recharge the battery at least once a month by discharging it. This
applicaiton helps you maintain battery performance.
Warning
Make sure the battery is locked in its place. Battery in locked position prevents possible
separation and helps keep the battery in place. For this situation, insert the key into the key
slot on the battery and turn it to the lock position.
To remove the battery, press the key slightly in the o position and turn it to the lock position.
To remove the battery, pull the latch under the seat upwards and lift the seat up by holding
the back of the seat. In this case, the battery
removable.

12
Charge
Charge your electric vehicle with the charger delivered to you with the vehicle. Don’t forget
to charge it for 4.5-5 hours before its first drive. To charge the vehicle, please follow the
instructions below;
• Make sure your electric vehicle is turned o.
• First of all, plug the part of the charger indicated with “2” into the socket.
• Then, place the part of the charger indicated with “1” to the charging connector of your
vehicle.
• Arc/spark may occur while connecting the charger to the vehicle.
• Make sure that light indicating on the charger that the battery is charging.
• Wait until the light on the indicator turns green.
• After the charging is complete, unplug the socket from the charging port.
• Disconnect the charger from the socket.
• Disconnecting the charger from the socket will extend the life of the vehicle.
OPERATION AND USE
• Damaged chargers due to voltage dierences in your electrical installation may damage your vehicle. These types of faults
are not covered by the warranty.
• Plugging the charger into the socket first will protect your vehicle from possible high/low voltage situations.
• Charging at least once a month will extend the life of your battery.
• When the battery is fully charged, disconnect it from the charger.
Warning
• If the battery charge time exceeds the time specified in the manual, please contact the authorized services.
• During the winter, the performance of the battery and range of your vehicle may decrease.
Caution
1
2

13
Brake Maintenance
Brake pads wear out due to the working principle. It should be replaced when it reaches
certain safety levels. Inspection of this safety level and change of pads should be done by
authorized services. Unreplaced brake pads cause the brake system to work poorly, make
noise, and in some cases, break other parts. Brakes should be checked at every service
period.
MAINTENANCE AND CONTROL
• If the tyres does not have the correct air pressure, it will wear out more quickly and its life will be shortened as well as deflated
tyres may cause an accident as they decrease the roadholding.
• In case of very low air pressure, the tyre may come o the rim.
• Your tyres will wear out as you use them. You should change your tyre when your tread depth decreases. Depending on the
road, climate and usage conditions, your tyre life may be extended or shortened. Drivers should check tyre pressure and tread
depth regularly. Tyres with low tread depth will roadholding, especially on wet surfaces. Minimum tread depth is 1.5 mm for
front tyre, 2.0 mm for rear tyre.
Warning
• The pads and disc must be absolutely free of petroleum/grease based oils. In case of any contamination of the brake pads,
they should be replaced with new ones. The brake disc must be cleaned with detergent, rinsed and dried.
Caution
VB1
Tire Pressure Check
Check the pressure levels of your tyres daily. Tyre pressures above and below the norm will
aect the vehicle’s handling, acceleration, energy consumption and similar performances.
Check your tyres daily for punctures, cuts or any other unusual condition. Also on the rims;
crushing, scratching and inclination can cause pressure loss. This type of damage can cause
your vehicle to unbalance and vibration. In case of such situations, please visit the nearest
ocial service point and have the damage repaired.
Chain Maintenance
Chain maintenance should be carried out at regular intervals. In particular, any event of
deformation, fracture, crack or link separation should be contacted with authorized services.
Carrying out chain maintenance process increases the life of the product when it cleaned
with neutral cleaners and then properly lubricated. Use special bicycle chain oil for lubrication.
Furthermore, do not use alkali based rust solvents while cleaning the product. In this case
your chain may be damaged and cause undesired accidents.
SIZE TYRE PRESSURE
20 X 1.90 40-65 PSI

14
MAINTENANCE AND CONTROL
Controller / Motor Maintenance
Your vehicle’s electronic control unit (controller) is located under the battery. For this reason,
make sure that this area does not get water, the cables entering this area are not strained and
the protective plastic does not get impacted.
• Do not use the throttle lever and service brake system at the same time in order to
prevent deterioration of other parts.
• Slow down when the road surface is bad. Excessive vibrations may cause the cables in
the motor and controller to get damaged.
• Do not allow the water level to reach the level of the motor in rainy weather. Otherwise,
your motor will break down.
Rear Derailleur Maintenance
Make sure the gear system is working properly. If the rear gear is not working properly
perform the adjustment with the two screws on the rear derailleur. Clean the gears with
a damp cloth diluted with water and detergent. During cleaning, do not use thinners or
harsh solvents. This may damage the surfaces of the parts. Then check if the gear system is
working properly.
E-01
Malfunction Codes
Hall Sensor Error
Brake Error
Throttle Error
Low Voltage Error
ControllerError
Communication Error (Speedometer cannot receive data from
controller)
Communication Error (Controller cannot receive data from
accelerometer)
E-02
E-05
E-03
E-06
E-04
E-07
• Do not lubricate the chain with vehicle motor oil or similar oils. Otherwise, the chain and other parts connected to the chain
will be damaged.
• Be careful when dessambling and installing parts. Before using the bike again, make sure that the parts must be properly
installed.
CAUTION

15
• Please stay away from modifications to make your vehicle safe and long-lasting. Modified vehicles will endanger the
safety of you and the trac. Always use approved parts by the manufacturer.
• For your personal safety, turn o the motor before any maintenance.
• If the vehicle has not been used for 1 month or more, check the parts that are likely to corrode, such as tyres and
batteries, and start driving
WARNING
MAINTENANCE AND CONTROL
Cleaning
• It is recommended to clean your electric vehicle with a wet cloth.
• Never lubricate the brake system and tyres.
• Use oil to clean the metal parts of your vehicle.Always use standard cleaning
materials when cleaning painted plastic parts.
• Rinse with fabrics after cleaning.
First Maintenance
• 1st and 4th month maintenance is important for your vehicle. After the first use, the
motor parts get used to each other and it is recommended to check all the bolts
during the first maintenance.
• The reliability of your vehicle depends on the correct first use and first periodic
maintenance.
Maintenance Interval
• Even if your vehicle runs smoothly, it should be checked at regular intervals by
going to authorized services. These intervals are specified in detail on the next
pages of the user manual. Vehicles that have experienced problems or have had an
accident should be taken directly to the authorized service without waiting for the
maintenance interval. In such cases, repairs must be made with the original parts.
• Maintenance, repair, modification or any change that will increase the performance of
the vehicle other than the contracted service stations approved by the manufacturer
will cause the product to be out of warranty.
Gear Maintenance
• Maintenance of the crankset and the cassette will increase the life of the products.
For this, check for broken, cracked parts at regular intervals.
• Use pure alcohol for maintenance. Never use solvent-based products. Otherwise,
the cassette may be damaged and it may make gear shifts dicult.
• A possible break or crack in the crankset can cause serious injury.
• Never use very high pressure water while washing your electric vehicle, high pressure water may cause some parts to
absorb water. Parts that receive water may lose their performance and deteriorate.
CAUTION
CAUTION

16
Periodic Maintenance
• Periodic maintenance should be done at authorized technical service stations.
• Vehicles that are not regularly maintained (once every 4 months) will be evaluated out of warranty.
MAINTENANCE AND CONTROL
WARRANTY MAINTENANCE CARD
PERIODIC MAINTENANCE TABLE
STAMP
DATE
STAMP
DATE
STAMP
DATE
STAMP
DATE
STAMP
DATE
STAMP
DATE
STAMP
DATE
STAMP
DATE
STAMP
DATE
STAMP
DATE
STAMP
DATE
STAMP
DATE
MONTH MONTH MONTH MONTH MONTH MONTH

17
MAINTENANCE AND CONTROL
Check that the brake cables are not pinched
and work properly, adjust if necessary.
Replace the brake pads if necessary.
Check and adjust the brake lever clearances.
Check the operation of the brake sensors.
Make sure all nuts and bolts are adequately
tightened.
Check the hydraulic oil lever and any leaks.
Check the brake discs.
For vehicles with
hydraulic disc
brakes
FRONT AND
REAR BRAKE
Connectors
Measure battery voltage, fully charge or
replace if necessary.
Battery
Check tyre pressures, tyre damage and
tread depth.
Tyres
Check for runout or damage.Wheels
Check that there is no play in the hub and that
the wheels turn freely.
Wheel
Bearings
Check if the handlebar bearings are worn or
loose. Replace if necessary.
Handlebar
Bearings
Check the spreading. Check the inner tube of
the shock absorber for scratches, damage or
excessive lubrication.
Front
Suspension
Make sure that it does not make any annoying
noise while operating and there is no oil leakage.
Rear
Suspension
Check if the throttle lever is connected
and fucntional.
Throttle
Lever
Check operation and connections.
Charger and
Socket
Check tension and lubricate.
Chain
(if equipped)
PART/
SYSTEM NAME ACTION TO BE TAKEN
ELECTRIC VEHICLES MAINTENANCE TABLE
1.Month
CONTROL
4.Month
(2.000 KM)
8.Month
(4.000 KM)
12.Month
(6.000 KM)
24.Month
(12.000 KM)
16.Month
(8.000 KM)
20.Month
(10.000 KM)
Check the terminals are tight.
0380 731 25 25 0380 731 25 35

18
STORAGE AND HANDLING
Storage
• If you are not going to use your electric vehicle for a long time during periods such as
winter , you should take some precautions to protect your vehicle from malfunctions
and corrosions. It would be better to make some repairs before storage.
• Clean, rinse and dry your electric vehicle. Coating the painted surfaces with protective
oil will extend the life of your paint and ensure that it retains its first day’s shine.
• Bring the tire pressure of your electric vehicle to the ideal level.
• Put on your vehicle a cover which will be either plastic or non-rubber. Take care to
store in storage conditions where the air temperature does not change much. High
temperature change can cause fatigue, deterioration and cracking of many parts of
your vehicle.
Get In Use
• Remove the cover from the electric vehicle and clean.
• Start the vehicle after completely following the pre-starting instructions.
• Make the first use in a trac-free area. After making sure that all parts of your electric
vehicle are working correctly and at full performance, drive out to trac.
Assembly
The electric vehicle is delivered assembled.

19
TECHNICIAL SPECIFICATIONS
Parameters
Maximum Speed
Width
Charging Time
Motor Power
Battery Capacity
Weight
Range*
Size
Tyres
Motor Type
Battery Type
Height
Wheelbase
Transmission Type
Length
Charger Capacity
Maximum Carrying Capacity
Front Brake System
Rear Brake System
Tyre Pressure
Number of Seating Positions
*RANGE; may vary depending on road, weather conditions and power support level
25 Km/sa
600 mm
4,5-5 sa
250 W
36 V 8.8 Ah
22,5 kg
30-80 km
20 X 1.90
BLDC
Lithium-Ion
1080 mm
1080 mm
HUB Motor
1670 mm
36 V 2 Ah
110 kg
Mechanical Disc
Mechanical Disc
40-65 PSI
1
Warning

20
MANUFACTURER INFORMATION
VOLTA MOTOR SANAYİ VE TİCARET A.Ş.
Selamlar Köyü Selamlar Mevkii Gümüşova OSB 1.Sokak
Blok No:10
Gümüşova / DÜZCE / TÜRKİYE
Tel : 0850 222 28 65
VOLTA MOTOR TECHNOLOGY CO. LTD.
WUXI No. 36-37, Yougu Industrial Park, No:58 Jinghong
Road, Xibei Town, Xishan District,
Wuxi City JIANGSU/CHINA
VOLTA MOTOR GMBH
Handwerkerstraße 3, 15366
Hoppegarten, Almanya
VOLTA MOTOR SERBEST BÖLGE
Tübitak Teknoloji Serbest Bölgesi Tübitak MAM Teknoloji
Serbest Bölgesi Barış SB. Mh. 5001 Sk. No:3 A/B
Gebze / KOCAELİ / TÜRKİYE
Tel : 0850 222 28 65
The service life of your Volta brand vehicle is 10 years and the maximum repair period is
45 days. If you encounter any problems with your vehicle, you can visit our website at
www.volta.com.tr and access information about authorized services and spare parts.
You can access all authorized service station information from the Service Information
System created by the Ministry
Table of contents