VWR International UV-6300PC User manual

UV-6300PC Spectrophotometer
Instruction Manual
European Catalogue Number:
634-6041
Version: 1.0.2
Issued: 04 April 2014

Legal Address of Manufacturer
Europe
VWR International Europe bvba
Researchpark Haasrode 2020
Geldenaaksebaan 464
B 3001 Leuven
Tel.: +32 16 385 011
http://www.be.vwr.com
Made in China

1
Table of Contents
Part 1: Spectrophotometer
Safety Information............................................................................................... 3
Package Contents............................................................................................... 4
Unpacking ........................................................................................................... 4
Installation........................................................................................................... 4
Symbols and Conventions .................................................................................. 5
Specifications...................................................................................................... 5
Overview ............................................................................................................. 6
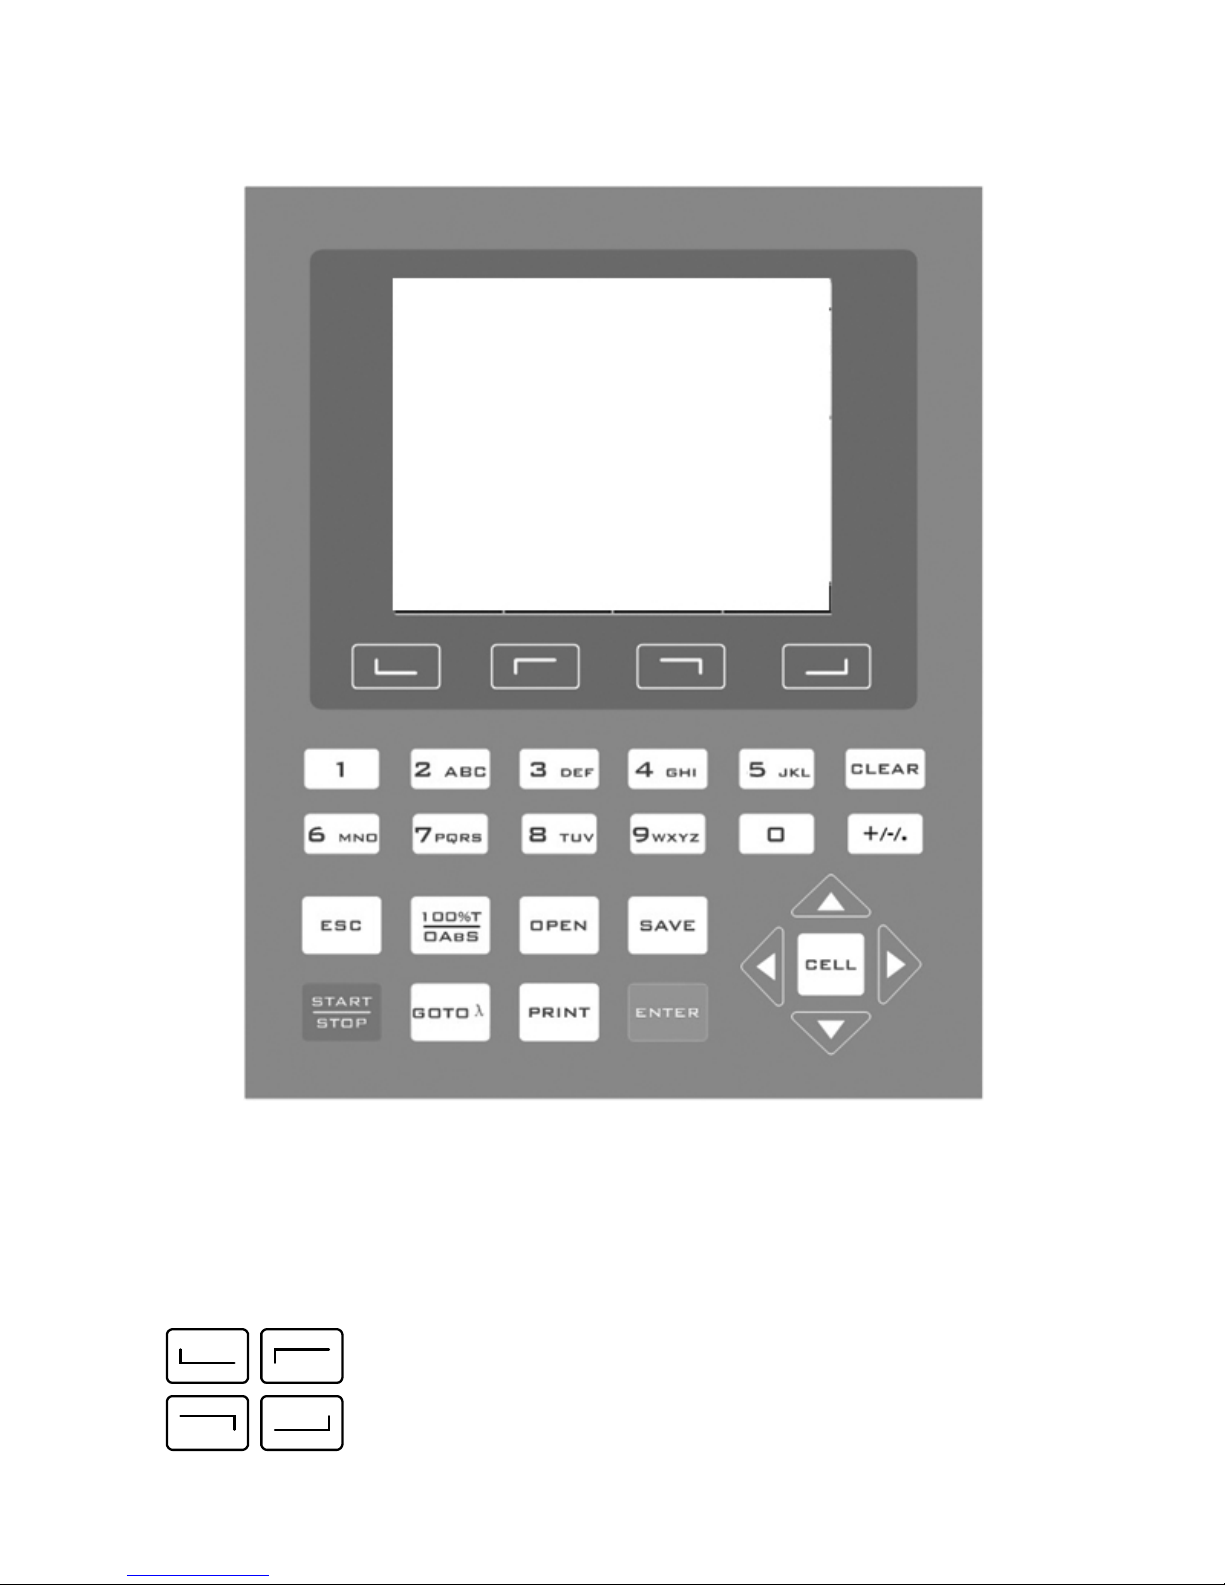
Description of Buttons and Switches................................................................... 6
Operational Keys................................................................................................. 7
Getting Started.................................................................................................... 9
Important Guidelines......................................................................................... 10
General Operating Instructions ......................................................................... 10
Operation .......................................................................................................... 11
Basic Mode.................................................................................................... 12
Quantitative Mode ......................................................................................... 13
Wavelength Scan .......................................................................................... 17
Kinetics.......................................................................................................... 19
DNA/Protein Mode......................................................................................... 22
Multi-Wavelength Mode................................................................................. 23
System Utility................................................................................................. 25
Troubleshooting ................................................................................................ 29
Repair and Maintenance................................................................................... 30
Daily maintenance......................................................................................... 30
Check lamp.................................................................................................... 31
Spare Parts Replacement ............................................................................. 31

2
Accessories and Spare Parts............................................................................ 35
Part 2: Software
Functions........................................................................................................... 37
Main Functions .............................................................................................. 37
Spectrum processing function ....................................................................... 38
System check and calibration function .......................................................... 38
Installation......................................................................................................... 39
Introduction ....................................................................................................... 42
Operation .......................................................................................................... 46
Single wavelength photometric measurement............................................... 46
Fixed point measurement.............................................................................. 47
Wavelength Scanning.................................................................................... 52
Time Scanning (Kinetic Analysis).................................................................. 64
DNA/Protein Measurement............................................................................ 66
Appendix 1 ........................................................................................................ 69
Technical service .............................................................................................. 70
Warranty............................................................................................................ 70
Equipment disposal ........................................................................................... 71

3
Part 1: Spectrophotometer
Safety Information
Please follow the guidelines below, and read this manual in its entirety to ensure safe operation of the unit.
VWR issues the following recommendations with regard to the use of the UV-6300PC Spectrophotometer.
Do not open the device.
Disconnect the device from the mains supply before carrying out maintenance work or
changing the fuses.
The inside of the device is a high-voltage area.
Do not use the device if it is damaged, especially if the main power cable is in any way
damaged or defective.
Repairs may only be carried out by the service technicians from your local VWR office
and authorized contractual partners.
The device must be connected to a power outlet that has a protective ground connection.
If the equipment is used in a manner not specified by the manufacturer, the protection
provided by the equipment may be impaired.
Do not allow any liquid to enter the device.
Do not operate the device in a hazardous location or potentially explosive environment.

4
Package Contents
Description Quantity
Spectrophotometer 1PC
Glass Cuvette 4PCS
Quartz Cuvette 2PCS
USB Disk 1PC
Power Cord (Euro Plug) 1PC
Power Cord (UK Plug) 1PC
Power Cord (CH Plug) 1PC
USB Cable 1PC
CD-ROM 1PC
Quick Manual 1PC
Instruction Manual 1PC
Dust Cover 1PC
Unpacking
Open the package and carefully check the enclosed items against the packing list. If any of the items are
missing or damaged please contact your local VWR office and authorized contractual partners.
Installation
Placement
Place the instrument carefully on a stable surface.
Install printer (optional)
Check to confirm instrument power switch is turned off, connect the printer’s data cable to the instrument’s
parallel port.
Link the power cord
Check to confirm the instrument power switch is turned off, and the power cord is plugged into two separate
power interfaces and the power supply socket apparatus.

5
Symbols and Conventions
The following chart is an illustrated glossary of the symbols that are used in this manual.
CAUTION This symbol indicates a potential risk and alerts you to
proceed with caution
CAUTION This symbol indicates the presence of high voltage and
alerts you to proceed with caution
CAUTION This symbol indicates risks associated with hot surfaces
Specifications
Optical System Double Beam
Wavelength Range 190–1100 nm
Band Width 1 nm
Stray Light ≤0.05%T @ 220 nm & 360 nm
Photometric Range 0 to 200%T,-0.3 to 3.0 A, 0 to 9999 C
Wavelength Accuracy ±0.3 nm
Photometric Accuracy ±0.3%T or ±0.002 A@1A
Baseline 0.001 A (200 to 1000 nm)
Stability 0.001 A/h @ 500 nm
Memory 32K (internal), Unlimited (USB disk)
Language English, French, German, Spanish
Display 320×240 Dots Matrix LCD
Interface USB, Parallel
Measuring Procedure Photometry, Quantitation, Wavelength Scan,
Kinetics, DNA/Protein, Multi-wavelength
Power Supply AC 110/220 V, 50/60 Hz
Dimension 590×420×260 mm
Weight 26 kg
Work Environment 15 to 35 ℃, 15 to 70% relative humidity
Store Environment -10 to 50 ℃, 15 to 70% relative humidity
This instrument is compliant to the European Directives on
Low Voltage Directive 2006/95/EC
Electromagnetic compatibility 2004/108/EC
Restriction on use of Hazardous Substances RoHS 2011/65/EU and their amendments.

6
Overview
UV-6300PC Spectrophotometer used in chemistry, pharmaceuticals, biochemical, metallurgy, light industry,
textile, material, environments, medical, education and some other fields for quality control laboratories.
Description of Buttons and Switches
Front View
Rear View

7
Operational Keys
Key Functions
Function keys: Functions on-screen prompts

8
… , Numeric keys: Enter numbers and letters
CLEAR key: Delete the input value or stored data
ESC key: Return to previous interface
100%T/0Abs key: Blank
OPEN key: Open files stored in internal memory
SAVE key: Save files to internal memory
START/STOP key: Start/Stop testing
GOTO ʎkey: Set wavelength
PRINT key: Print measuring result
ENTER key: Confirm operation
CELL key: Select/Deselect auto-cell holder
, RIGHT, LEFT keys: Search peak/valley and set X scale
,UP, DOWN keys: Scroll menu/data and set Y scale

9
Getting Started
The following chart describes the basic operation of the instrument.
Turn on and self-check
Switch on the power. The instrument begins to self-check and perform 15 minutes’ warm-up. Self-check
includes the following steps:
Turn on lamps →RAM Check →Start RTOS kernel→Initialize Comm. Port →Initialize Printer →Initialize
AD →System position →Warm up.
After warm-up, the instrument will ask the user to re-calibrate the system. The user can decide if they need to
re-calibrate the system or not. After this step, the instrument is ready to work normally.

10
Important Guidelines
Reagents and dilution buffers can cause cauterization and other damage to health.
Samples (nucleic acids, proteins, bacteria cultures) can be infectious and cause serious damage to
health.
During sample preparation, measuring procedures and maintenance and cleaning work, observe all
local laboratory safety precautions (e.g. wear protective clothing and gloves, use of disinfectant)
regarding the handling of sample material.
Dispose of measuring solutions and cleaning and disinfectant materials in accordance with the relevant
local laboratory regulations.
General Operating Instructions
Select application
Main menu, press numeric keys or use the ,keys to select the corresponding menu, then press
to enter.
Set wavelength
Press to set wavelength, use numeric keys to input the values, press to confirm and go to the
point you set, then carry out the blank automatically.
Set parameters
In different application, press function key to set parameters, press ,to choose or input the values by
numeric keys, press to enter into, press to return.
Set auto-cell holder
Press to activate the auto-cell holder and press the relevant numeric key (1–8) to make corresponding
cell position at the light path. Press again to deactivate the auto-cell holder.
Delete the input value
Press to delete a character, press to delete all the characters.
Delete the test results and stored data

11
Press to delete the test result or stored data. If the USB disk was installed, the data will be deleted
from the USB disk, otherwise the data will be deleted in the internal memory.
Blank
Put the reference in the main light path and reference light path, press to carry out the blank.
Measure samples
Put the sample in the main light path and reference in the reference light path, press to measure.
Print the test results
Press to print the test results.
Store the test results
Press to store the test results, input the file name using the numeric keys and press to save. If
the USB disk was installed, the data will save in the USB disk, otherwise the data will save in the internal
memory.
Load the stored file
In the test interface, press to go into the file selecting interface, press ,to select the file you
want, press to open. If the USB disk was installed, the data will open from the USB disk, otherwise the
data will open from the internal memory.
Operation
Self-check
Remove all the blocks in the light path and close the lid of the compartment. Switch on the power supply to
begin the self-test.
Warm-up
After self-test, the instrument goes into pre-ready state. For accurate test results, at least 30 minutes of
warm-up is required.
Check the cuvettes

12
The cuvettes must be clear with no remains of previous samples on the surface. Only silicon (quartz) cuvettes
are permitted to be used in the range of UV area.
Basic Mode
1. Enter into Basic Mode
Main menu, press numeric key or ,to select Basic Mode, then press to enter.
2. Set photometric mode
Press to set photometric mode. Press ,to select Abs., T% or Conc./Factor and press
to confirm. If you choose Abs. or T%, please go directly to step 5.
3. Set concentration unit
Press to set concentration unit. Press ,to choose unit, then press to confirm. You can
also choose Other to input the self-defined unit.
4. Set Factor or Standard
There are two possible methods:
Method 1:Input Factor F
Press to set F. Input the value of F using the numeric keypad, press to confirm. The F
value will then be displayed on the screen.
Method 2: Standards Mark
Put the reference sample in the light path and calibrate 100%T/0Abs; put the standard sample in the
light path, press to start the mark. Input the concentration value of the standard and press
to confirm; it will then be displayed on the screen.

13
5. Set wavelength
Press to set the wavelength, input the value by the numeric keypad, then press to confirm.
6. Measurement samples
Put the sample to be measured in the main light path and put reference in the reference light path; the result
is then displayed on the screen automatically.
7. Print the test results
Press to print the test results.
Quantitative Mode
1. Enter into Quantitative Mode
Main menu, press or press ,to select Quantitative Mode, then press to confirm.
2. Set unit
Press to set concentration unit, press ,to select and press to confirm.
3. Set up standard curve or load the stored curves

14
Press to enter the setup interface. Two methods are then available.
Set up standard curve:
Method 1: Input regression equation
1) Set Fit Curve method. Press to set Fit Curve method, use ,to choose the
method and press to confirm.
2) Set wavelength. Press to set wavelength. Use ,to choose measure method,
then press to confirm. Input the wavelength value required and press to confirm.
3) Input the factor of the regression equation. Press and input the factors, then press
to confirm.
Method 2: Use standard samples
1) Set fit method. Press to set fit method, press ,to choose fit method, then press
to confirm.
2) Set wavelength. Press to enter the wavelength setting interface, press ,to
select measure method and press to confirm. Input the value of the wavelength and
press to confirm.
3) Set up standard samples. Press to set up standard, input the concentrations of
corresponding standard samples according the indication and press to confirm. users

15
can use ,to select the value that they have just input and press to delete, then
input a new value and press to confirm. Press to cancel after all the values
have been input.
4) Calibrate standard samples. Put the corresponding standard samples in the main light path
and the reference in the reference light path as the screen indicates and press to
measure. The Abs value will then appear in the corresponding table.
Load the stored curves
In the Calibration Table interface, press to enter the selected file’s interface. Use ,to
select the curve required and press to load. Users can press to view the curve or press
to cancel.
4. Return the sample measurement interface

16
In the Calibration Table interface, press to return to the Quantitative Test interface.
5. Measure samples
Place the sample to be tested in the main light path and reference in the reference light path, then press
to measure. The test result will then be displayed in the data sheet. Repeat this step until all the
samples have been measured.
6. Print the test results
Press to print the test results.

17
Wavelength Scan
1. Enter the wavelength scan interface
Main menu, press numeric key or ,to select Wavelength Scan and press to enter.
2. Parameters setup
Press to set parameters, set scan from, scan to, scan step and scan speed, then press to
confirm.
3. Set photometric mode
Press to set photometric mode, choose T%, Abs. or E and press to confirm.
4. Scan samples
Put the sample to be measured in the main light path and put reference in the reference light path, press

18
to scan the sample, or press to cancel.
5. Search peaks
After scanning, press to go into peak search mode. Press to set peak height, input the peak
height and press to confirm. Press ,to display the value of every wavelength point. Press ,
to display the value of every peak.
6. Smooth the curve
After scanning, if there are many burrs visible, press to smooth the curve.
7. Print the test results
After scanning, press to print the test results.
Table of contents
Other VWR International Measuring Instrument manuals