Vysk EP1 User manual

Vysk EP1 Privacy
Charging Case
For iPhone 5/5s
PRODUCT MANUAL

2| EP1 PRIVACY CHARGING CASE PRODUCT MANUAL
Proprietary Rights Statement
Copyright © 2014 VYSK Communications, Inc. All Rights Reserved. This document may not be reproduced, modied, or distributed
in any form, in whole or in part, nor may any derivative work hereof be created, without the prior express written permission of
Vysk Communications, Inc.
Patent pending.
Vysk, the stylized “V” mark, and the EP1 mark are trademarks or registered trademarks of Vysk Communications, Inc.
iPhone is a trademark of Apple Inc., registered in the U.S.A. and other countries. Lightning is a trademark of Apple Inc. or Lightning
Research LLC. App Store is a service mark of Apple Inc. “Made for iPhone” means that an electronic accessory has been designed to
connect specically to an iPhone product and has been certied by the developer to meet applicable performance standards adopted
by Apple Inc. Apple Inc. is not responsible for the operation of this device or its compliance with applicable safety and/or regulatory
standards. Please note that the use of this accessory with an iPhone product may affect wireless performance.
DOCUMENTATION IS PROVIDED “AS IS” AND ALL EXPRESS OR IMPLIED CONDITIONS, REPRESENTATIONS AND WARRANTIES,
INCLUDING ANY IMPLIED WARRANTY OF MERCHANTABILITY, FITNESS FOR A PARTICULAR PURPOSE OR NON-INFRINGEMENT,
ARE DISCLAIMED, EXCEPT TO THE EXTENT THAT SUCH DISCLAIMERS ARE HELD TO BE LEGALLY INVALID.

EP1 PRIVACY CHARGING CASE PRODUCT MANUAL | 1
1. Getting Started
EP1 PRIVACY CHARGING CASE PRODUCT MANUAL | 1
1. Getting Started...............................................................................2
1.1 Case Overview Diagram...............................................................3
1.2 Hardware Walkthrough ................................................................4
1.3 To Use the Camera Shutters ........................................................4
1.4 To Charge Your EP1 Case.............................................................5
1.5 To Charge Your iPhone Using the EP1 Case ...............................5
1.6 To Check the Battery Level of Your EP1 Case .............................5
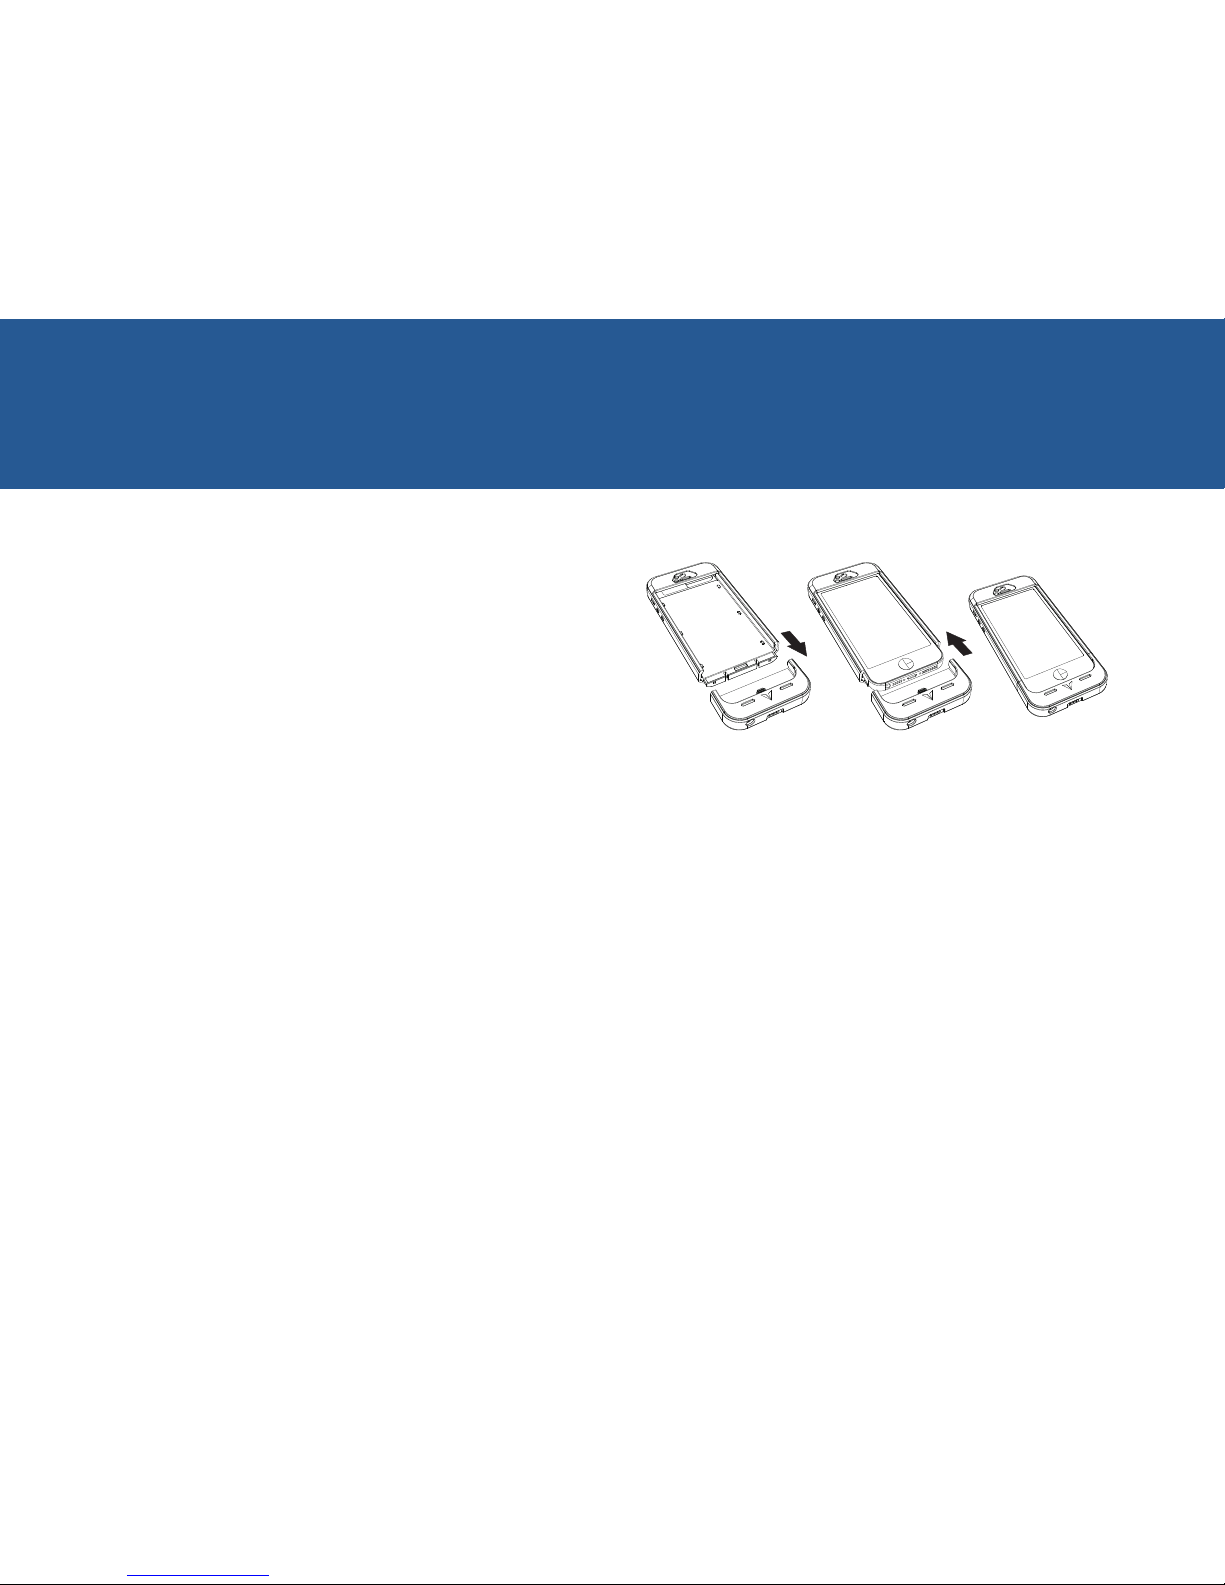
1.7 To Remove the EP1 Case from Your iPhone................................6
1.8 To Use the Headphone Jack........................................................6
1.9 To Register Your EP1 Case and Download the Vysk EP1 App....7
2. VYSK EP1 App ................................................................................9
2.1 How It Works.................................................................................9
2.2 Vysk EP1 App Functionality........................................................10
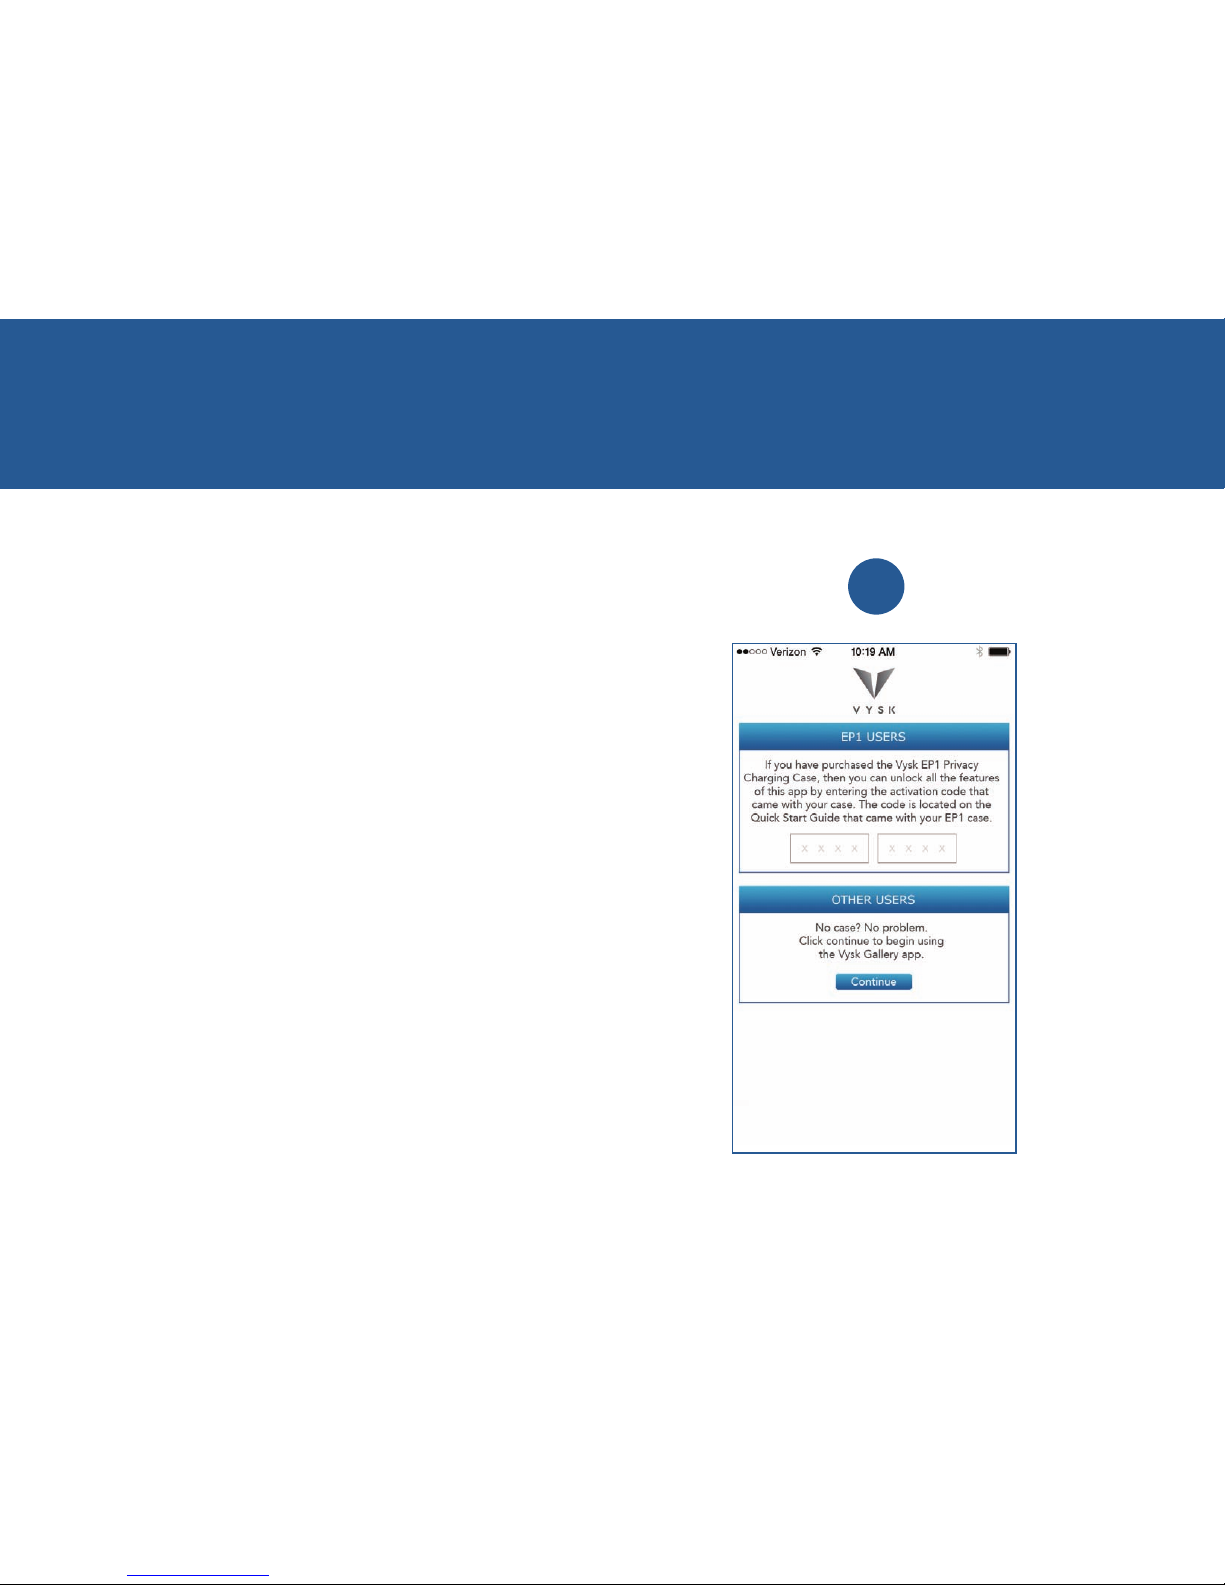
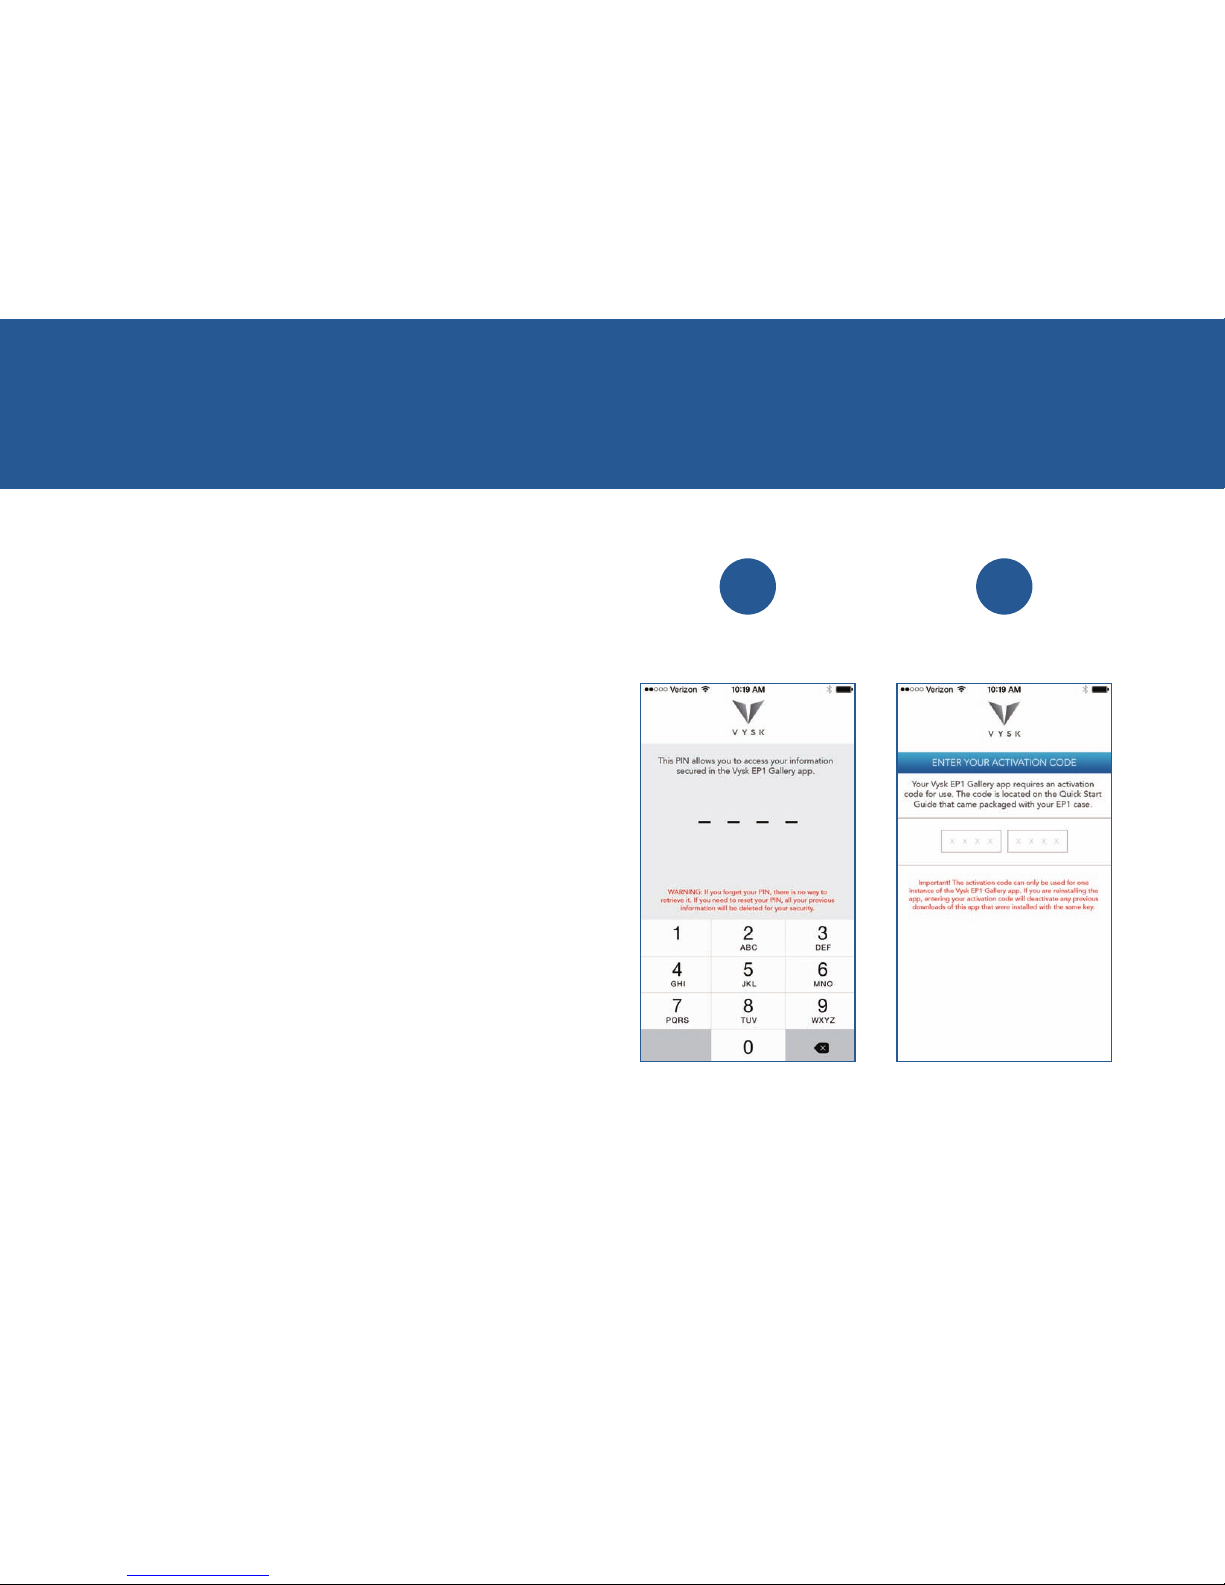
2.3 To Activate a Gallery ..................................................................12
2.4 To Navigate Between Galleries .................................................12
2.5 To Log in to the Vysk EP1 App as a Returning User..................13
2.6 To Set a Self-Destruct PIN (optional).........................................13
2.7 To Deactivate Self-Destruct Mode ............................................14
2.8 To Share Photos or Videos .........................................................14
2.9 To Delete Photos or Videos .......................................................14
2.10 To Import Photos or Videos ..................................................... 14
2.11 To Delete All Data .................................................................... 15
3. Vysk Private Text App...................................................................16
3.1 Getting Started with the Vysk Private Text App........................ 16
3.2 Sending Your First Encrypted Text Message.............................17
3.3 How to Add an Attachment ....................................................... 17
3.4 How to Delete a Thread from within a Conversation ............... 18
3.5 How to Invite a Friend................................................................ 18
3.6 Vysk Private Text Settings...........................................................18
4. Maintenance of Your EP1 Case.................................................... 19
5. Product Specifications..................................................................20
6. Customer Care .............................................................................21
7. Warnings ....................................................................................... 22
8. Frequently Asked Questions (FAQs) ...........................................23
9. Troubleshooting ...........................................................................25
10. Legal............................................................................................26
11. One Year Limited Warranty ........................................................27

EP1 PRIVACY CHARGING CASE PRODUCT MANUAL | 2
1. Getting Started
Vysk EP1 Privacy Charging Case
Welcome and thank you for purchasing the EP1 privacy charging
case. With your purchase, you have taken the rst step to reclaim-
ing your privacy. This guide is intended to give you an overview
of the installation, use, and maintenance of your EP1 case. The
purchase of your EP1 case includes premium access to the Vysk
EP1 app, which is available for download from the App Store. This
manual will provide step-by-step instructions about getting started
with the Vysk Private Gallery app and Vysk Private Text app.
In the Box:
• Vysk EP1 Privacy Charging Case
• Micro USB Cable
• Headphone Jack
• EP1 Case Quick Start Guide
IMPORTANT! Do not dispose of the EP1 Case Quickstart Guide.
The quick start guide contains an activation code needed to
register your EP1 case and activate the Vysk Private Gallery app.
Compatibility
This model of the EP1 case is made exclusively for the iPhone®
5/5s. Do not attempt to use the EP1 case with any other device.
The Vysk EP1 app and Vysk Private Text app are compatible with
iPhone 5/5s (iOS 7.0 and later).

EP1 PRIVACY CHARGING CASE PRODUCT MANUAL | 3
1. Getting Started
1.1 Case Overview Diagram
1. After taking the EP1 case out of the packaging, pull the top and
bottom portion of the case apart.
2. Slide the top piece of your EP1 case over the top of your iPhone.
3. Slide your phone into the bottom of the EP1 case, ensuring
your iPhone’s Lightning connector is securely inserted into
the bottom of the iPhone. The two pieces will snap together
when properly connected.
NOTE: The EP1 case has been built with extra tolerance for screen
protectors. However, if your phone has a screen protector, you
may experience more resistance that usual when installing
your EP1 case.
If the problem persists, please contact Vysk Customer Care.
Features
The EP1 case is more than a smartphone case—it’s a privacy
system that physically blocks remote access to your smartphone’s
cameras, while providing more battery life. The EP1 case is
equipped with the following convenient and secure features:
• A patent-pending camera shutter physically blocks your
iPhone’s cameras with a ick of a switch.
• A built-in 2200mAh lithium-polymer battery adds up to 120%
battery life (more than double) for when you need it.
• An impact resistant case material provides protection from
everyday wear and tear.
• A rugged non-slip texture provides extra grip.
• Exclusive access to the Vysk Private Gallery app, which stores
your photos and videos in an encrypted, password-protected
gallery and protects your photos and videos backed up to
iCloud. (Download available through the App StoreSM.)
• Access to the Vysk Private Text app, which encrypts your
text messages. (Download available through the App Store.)
• An LED battery life indicator displays the amount of power
available on your EP1 case.
• A headphone jack allows you to listen to audio through
the head phones you love.

EP1 PRIVACY CHARGING CASE PRODUCT MANUAL | 4
1. Getting Started
1.3 To Use the Camera Shutters
1. Locatethe power switch next to the battery life indicator on
the back of the EP1 case.
2. With the phone screen facing you, slide the camera shutter
switch to the right until it clicks. The camera shutter will block
both the front camera and rear camera of your iPhone.
3. When you’re ready to use the iPhone’s cameras, slide the EP1
case’s camera switch to the left until it clicks into place.
1.2 Hardware Walkthrough
Camera Shutter Switch: The shutter will cover both the
camera on the front of your phone, as well as the rear camera.
When you’re ready to use your camera, slide the switch in the
opposite direction to open the shutter. The shutter will click
into place again when the shutter is fully open.
Sleep/Wake Button: Press the Sleep/Wake button to lock
your iPhone.
Ring/Silent Switch: Use the Ring/Silent switch to toggle
between ring mode and silent mode.
Increase/Decrease Volume: Use to increase or decrease
your iPhone’s volume.
Battery Life Indicator: Displays how much battery life is
available on your EP1 case.
Status Button: Press the Status button to display how much
battery life is available on your EP1 case.
Case Power Switch: The power switch is used to enable Charging
Mode—when your phone is actively being charged by the EP1
case. Slide the switch to the left, where the “+” icon is shown to
turn the power on Slide the switch to the left to turn power off
when iPhone is fully charged to conserve power.
Micro USB Port: The USB port is used to charge the EP1 case.
Audio Jack: Insert headphone jack (included) to listen to music.

EP1 PRIVACY CHARGING CASE PRODUCT MANUAL | 5
1. Getting Started
1.4 To Charge Your EP1 Case
Connect the EP1 case to a power source using the micro USB
cable included in the EP1 case packaging. The micro USB cable
should only be used with recommended power sources, including
a “Made for iPhone” USB wall adapter.
Once you connect the EP1 case to a power source, the battery life
indicator’s LED lights will light up to reect the current battery
charge available on the EP1 case.
NOTE: Both the top and bottom portions must be connected
to charge your case.
Your EP1 case will come charged and ready to use out of the
packaging, but will need to be charged after its initial use.
The time it takes to charge the EP1 case will vary based on the
charging method. Generally, a completely drained EP1 case will
take less than 3 hours (using a wall outlet) to charge using the
micro USB cable included in the EP1 case packaging and a
USB power source.
1.5 To Charge Your iPhone Using the
EP1 Case
1. Locate the power switch next to the battery life indicator on
the back of the EP1 case.
2. Turn the case power switch to the left, so that the plus (+) sign
is visible to begin charging the iPhone via the EP1 case’s
built-in battery.
3. When the iPhone has been fully charged, turn the power switch
to the “off” position.
NOTE: It is normal for your EP1 case to feel warm while in use.
1.6 To Check the Battery Level of Your
EP1 Case
Press the status button on the back of your EP1 case. The LED
lights in the battery life indicator will light up to indicate the
battery power available on the case. Each letter of the VYSK LEDs
represents 25% battery power, as follows:
VYSK = 76-100%
VYS = 51-75%
VY = 26-50%
V = 0-25%

EP1 PRIVACY CHARGING CASE PRODUCT MANUAL | 6
1. Getting Started
1.7 To Remove the EP1 Case from
Your iPhone
1. Place your phone face down on a level surface.
2. Grip the sides of the case with both hands, and apply rm
pressure to the sides of the bottom portion of the case, just
below where the top and bottom portions connect.
3. Pull the bottom portion away from the top.
4. Slide the top portion off of your iPhone.
1.8 To Use the Headphone Jack
A headphone jack is included with the purchase of your EP1 case.
To use the headphone jack:
1. Locate the headset jack on your EP1 case.
2. Insert the 3.5mm male end of the headphone jack through the
audio jack on your EP1 case.
3. Connect any 3.5mm audio cable or headset to the other end
of the headphone jack.

EP1 PRIVACY CHARGING CASE PRODUCT MANUAL | 7
1. Getting Started
1.9 To Register Your EP1 Case and
Download the Vysk EP1 App
1. Download the Vysk EP1 app from the App Store.
2. Once the Vysk EP1 app download has been completed, tap the
Vysk EP1 app icon from your home screen to open.
NOTE: After opening the Vysk EP1 app for the rst time, a window
may open to ask if you would like to download the Vysk Private
Text app. See the chapter entitled “Vysk Private Text App” for
more information.
3. In the next screen, enter the activation code, which can be
found on your Quick Start Guide instructions.
NOTE: The EP1 activation code can only be used on a single
device. Installing the app using the same activation code will
deactivate the original device’s EP1 app.
3

EP1 PRIVACY CHARGING CASE PRODUCT MANUAL | 8
1. Getting Started
4. Next create a PIN. This 4-digit PIN number will allow users to
log into Gallery 1 of the Vysk EP1 app.
IMPORTANT! Choose a secure PIN you will be able to remember.
If you forget your PIN, there will be no way to retrieve it.
5. A pop-up window will appear to ask if you would like to select
images and videos from your existing photo gallery to import
into Vysk’s encrypted database. Tap Don’t allow to move on
without importing the contents of your gallery, or Allow to
import your photos and videos
6. Congratulations! You are ready to use the Vysk EP1 app.
Tap Continue to App to begin using the Vysk EP1 app.
4 5

EP1 PRIVACY CHARGING CASE PRODUCT MANUAL | 9
The Vysk EP1 app protects your photos and videos from the prying
eyes of hackers.
Features:
• An encrypted, password protected gallery stores photos
and videos
• Built-in camera interface takes photos and videos for
storage directly in the Vysk EP1 app
• A self-destruct feature allows users to completely delete
the entire contents of a gallery
2.1 How It Works
The EP1 app is a central, secure gallery for all of your photos
and videos. You can import the contents of your current iPhone
Gallery to the Vysk EP1 app, where it will be encrypted and
password protected.
You have the option to only use one gallery, or activate an
additional hidden, password-protected gallery. Each gallery has
a unique PIN code used to access it from the PIN screen. When
logged in to either gallery, the other gallery is invisible. For
example, you can store personal photos in one gallery, and
work photos in another.
2. VYSK EP1 App

EP1 PRIVACY CHARGING CASE PRODUCT MANUAL | 10
2.2 Vysk EP1 App Functionality
From the top navigation bar:
All: View all images and videos in the gallery
Photos: Filter gallery to only show photos
Videos: Filter gallery to only show videos
Settings: Represented by gear in the upper
right corner of the EP1 app screen, allows
you to activate a gallery or destroy all data
in an app.
From the bottom navigation
bar:
Select: Allows you to share or delete photos
and videos in your galleries.
Camera: Brings up the Camera interface to
allow you to take photos or videos using your
phone’s cameras.
Import: Enables you to import photos from
your phone’s Photos app.
2. VYSK EP1 App

EP1 PRIVACY CHARGING CASE PRODUCT MANUAL | 11
Camera Screen Functionality
Cancel Button: Closes the
camera screen and returns
to the main gallery screen
Flash Button: Turns camera
ash to on, off or auto
Rotate Camera Button:
Switches between the front
and back camera views
Shutter Button: Takes
photos or videos
Video Camera Button:
Tapping this button
will switch to the camera
into video mode. The
video camera uses the
iPhone’s internal camera
to create videos that are
stored directly in the
encrypted gallery.
Settings
The Settings menu allows
you to set PINs, activate
galleries, and delete all data.
2. VYSK EP1 App

EP1 PRIVACY CHARGING CASE PRODUCT MANUAL | 12
The EP1 app allows you to set 3
four-digit PINs:
Gallery 1 PIN: Protects
access to Gallery 1.
Gallery 2 PIN (optional):
Protects access to Gallery 2.
Users with access to Gallery
1 do not necessarily have
access to the second gallery.
Self-Destruct PIN: Deletes
all data in the EP1 app.
Enter PIN Screen
The Enter PIN screen allows
users to access one of their
encrypted, password-pro-
tected galleries or to delete
all data within the app.
2.3 To Activate a Gallery
1. From the home screen, tap the Settings icon.
2. The Settings window will open. Tap the gallery you wish
to activate.
3. Tap Activate Gallery.
4. Enter a 4-digit PIN using the keyboard.
NOTE: You must create a unique PIN that has not already
been used.
5. A success message will appear stating that you have activated
another gallery.
2.4 To Navigate Between Galleries
To switch between galleries, both galleries must be activated.
1. Tap the Vysk EP1 icon to open the app.
2. Input the PIN for the gallery you would like to open.
3. When you want to switch galleries, close the app and reopen
from your home screen.
4. Input the PIN for the other gallery you would like to open.
2. VYSK EP1 App

EP1 PRIVACY CHARGING CASE PRODUCT MANUAL | 13
2.5 To Log in to the Vysk EP1 App as a
Returning User
1. Tap the Vysk EP1 app icon to open
2. The Enter PIN window will open. Tap Enter PIN.
3. Input the following PINs:
• The PIN for Gallery 1 created during registration. See section
1.8 entitled “To Register Your EP1 Case and Download the
Vysk EP1 Gallery App” for more information.
• The optional PIN for Gallery 2.
5. Congratulations! You have logged in as a returning user.
2.6 To Set a Self-Destruct PIN (optional)
WARNING! Self-Destruct mode allows you to delete all data by
entering a PIN on the home screen. This is permanent and data
cannot be retrieved.
1. Navigate to the Settings menu in the upper right-hand corner.
2. The Settings tab will open. Tap Self-Destruct from the
menu options.
3. The Self-Destruct screen will appear. Tap Activate Self-Destruct
to continue, or Back to cancel.
4. Enter your PIN using the keypad once and then again to conrm.
2. VYSK EP1 App

EP1 PRIVACY CHARGING CASE PRODUCT MANUAL | 14
2.7 To Deactivate Self-Destruct Mode
1. Navigate to the Settings menu in the upper right-hand corner.
2. The Settings tab will open. Tap Self-Destruct from the
menu options.
3. The Self-Destruct screen will appear. Tap Deactivate
Self-Destruct to continue, or Back to cancel.
4. A warning pop-up will appear asking “Are you sure you want to
deactivate Self-Destruct?” Tap Yes or No.
5. If a user taps Yes, a pop-up will appear with the message
“Success! Self-destruct mode has been deactivated.”
2.8 To Share Photos or Videos
1. From the home screen, tap Select.
2. Select all photos or videos you would like to share.
3. A secondary menu will appear with the option to Share or
Delete photos. Tap Share.
4. Choose the desired method of sharing your photos, using either
the secure Vysk Private Text app or an unsecure method.
2.9 To Delete Photos or Videos
1. From the home screen, tap Select.
2. Select all of the photos or videos you would like to delete
and tap Delete.
3. A secondary menu will appear with the option to Share or
Delete photos. Tap Delete.
4. A window will open asking if you are sure you would like
to delete the photos. Tap Yes to continue, or Cancel.
2.10 To Import Photos or Videos
1. From the home screen, tap Import.
2. The EP1 app will access your iPhone Gallery photos and videos.
NOTE: You must give the EP1 app permissions to access your
photos and videos either through the registration process or by
going to Settings >Privacy >Photos and Videos and making
sure the permissions are set to “on” for the EP1 app.
3. Tap All to import all photos in an album or select individual
photos and tap Done.
2. VYSK EP1 App

EP1 PRIVACY CHARGING CASE PRODUCT MANUAL | 15
2.11 To Delete All Data
The Vysk EP1 app gives users the option to delete all data from
within the app. This can be accomplished by the following methods:
From the Enter PIN screen:
Input your Self-Destruct PIN, set using the steps in section 2.5,
“To Set a Self-Destruct PIN”
From the Settings menu:
1. Tap DELETE ALL DATA.
2. A pop up window will appear with the message “Warning! Are
you sure you want to delete all les? This action can not be
undone.” Tap No to cancel, or Yes to continue.
3. If you tap Yes, a success window will appear con rming the
deletion of all les.
IMPORTANT! All photos and videos are stored locally on your iPhone.
If your iPhone is reset to factory defaults at any time, this data will
be lost. To prevent the accidental loss of data, backup your iPhone
regularly to iTunes or iCloud. Your Vysk EP1 photos and videos
will still be encrypted in backup.
2. VYSK EP1 App

EP1 PRIVACY CHARGING CASE PRODUCT MANUAL | 16
The Vysk Private Text app is a powerful app designed to encrypt
your text communication, protecting it from hackers.
Features:
• Send and receive encrypted text messages
• Send and receive encrypted video or photo attachments
• Screenshot notications warn you when someone is
taking a screenshot.
3.1 Getting Started with the Vysk Private
Text App
1. Download the Vysk Private Text app from the App Store.
2. To connect with Vysk Private Text, you will be asked to input
your phone number and country. Select your country from the
menu and type your phone number, with country code rst,
into the interface. Press Send.
3. A window will appear conrming the phone number entered.
You may tap Edit to change the number if it is not correct, or
Continue to verify your phone number. The Verifying Numbers
screen will appear while SMS verication occurs. A one-time SMS
verication code will be sent to your phone. Type the verication
code into the Vysk Private Text interface and select Verify.
NOTE: Normal SMS carrier charges will apply.
4. Select alphanumeric or PIN-format for a password.
5. Enter your desired password.
6. Tap Next or Skip to move on without setting a passphrase.
7. You are now ready to send your rst Vysk text message.
3. Vysk Private Text App

EP1 PRIVACY CHARGING CASE PRODUCT MANUAL | 17
3.2 Sending Your First Encrypted
Text Message
1. Tap the Contacts icon from the bottom left corner of your screen
to begin a new message.
2. The Select Contacts screen will appear. Swipe in a downward
motion on the screen to load your contacts.
3. A message that says “Conrm Remote Sync. Your iOS address
book will now be synchronized with the Vysk Private Text server.
Do you want to continue?” will appear. Tap Cancel or OK
to continue.
4. Choose from the list of Vysk contacts from your list.
5. Tap the Message icon in the top right corner of the screen to
begin composing a message.
NOTE: Messages sent over the Vysk Privacy Network to another
Vysk user are encrypted end-to-end – meaning both sides of your
conversation are protected.
4. Using the keypad, type a message to your contact and press the
Send icon in the corner to send. Congratulations! You’ve sent
your rst secure Vysk Private Text message.
3.3 How to Add an Attachment
The Vysk Private Text app can send video or photo attachments
with encrypted text messages.
To add an attachment, open a conversation or create a new one
by doing the following:
• Tap the Address book icon, select a recipient, and tap the
compose message icon
• Tap an existing conversation from the home screen
• Tap the Camera icon in the lower left-hand corner. Choose
an attachment type from the following:
• Take a picture or video with your phone’s camera
• Choose a photo from the Photo library
• Tap Dismiss to cancel the attachment
• Tap the Send icon to send the attachment via text message.
3. Vysk Private Text App

EP1 PRIVACY CHARGING CASE PRODUCT MANUAL | 18
3.4 How to Delete a Thread from within a
Conversation
1. Swipe from right to left over right portion of the conversation
to bring up the Delete option.
2. Tap Delete.
3. Tap Yes when asked for conrmation that you want to
permanently delete this conversation. If you do not wish
to delete the conversation, tap No.
3.5 How to Invite a Friend
1. From the home screen, tap the Contacts icon in the bottom
left-hand corner.
2. Select “Everyone” in the top tab.
3. Scroll down until you nd the contact you would like to invite
to Vysk Private Text.
4. Tap on the contact you would like to select.
5. Select the method of contact via SMS or email.
6. Vysk Private Text will take you to the appropriate screen.
7. Hit Send or Cancel.
3.6 Vysk Private Text Settings
From the Settings menu in the top right-hand corner of the screen,
users can set the following features:
• Snoop Protection: Hides the Vysk Private Text screen in
the multitasking menu.
• Auto Reset Bad Sessions: Resets bad key exchanges
• Timeout Period: Sets the automatic screen lock period
• Auto-Fetch Timeout: Sets a certain amount of time to
pull messages from the server.
• DisplayContact Number: Displays contact number along
with the name.
• Reset Sign-in Password: Reset your password for the
password screen.
• Delete Account Data: Deletes all data within the app and
removes your information from the Vysk network.
• Sound: Turns notication sounds on or off.
• Vibration: Turns notication vibrations on or off.
• Reset Everything to Default: Deletes all data in app and
resets to default.
• Refresh APNS Device Token: Updates tokens for
Push notications.
3. Vysk Private Text App
Table of contents
Other Vysk Cell Phone Accessories manuals