Würth 0772 122 42 Quick guide

Art. 0772 122 42, 0772 122 44
Batteriestarthilfegerät
Battery Booster kit
Jumpstarter 12 V/24V/2 x 16 Ah
Jumpstarter 12 V/24V/4 x 16 Ah
Originalbetriebsanleitung
Translation of the original operating instructions
Traduzione delle istruzioni di funzionamento originali
Traduction des instructions de service d’origine
Traducción del manual de instrucciones de servicio original
Tradução do original do manual de funcionamento
Vertaling van de originele gebruiksaanwijzing
Oversættelse af den originale betjeningsvejledning
Original driftsinstruks i oversettelse
Alkuperäiskäyttöohjeen käännös
Översättning av bruksanvisningens original
Μετάφραση της γνήσιας οδηγίας λειτουργίας
Orijinal işletim kılavuzunun çevirisi
Tłumaczenie oryginalnej instrukcji eksploatacji
Az eredeti üzemeltetési útmutató fordítása
Překlad originálního návodu k obsluze
Preklad originálneho návodu na obsluhu
Traducerea instrucţiunilor de exploatare originale
Prevod originalnega Navodila za uporabo
Превод на оригиналното ръководство за експлоатация
Originaalkasutusjuhendi koopia
Originalo naudojimosi instrukcijos vertimas
Ekspluatācijas instrukcijas oriģināla kopija
Перевод оригинала руководства по эксплуатации

2
DE ........................ 4 – 8
GB ........................ 9 – 13
IT ........................ 14 – 18
FR ........................ 19 – 23
ES ........................ 24 – 28
PT ........................ 29 – 33
NL ........................ 34 – 38
DK ........................ 39 – 43
NO ........................ 44 – 48
FI ........................ 49 – 53
SE ........................ 54 – 58
GR ........................ 59 – 63
TR ........................ 64 – 68
PL ........................ 69 – 73
HU ........................ 74 – 78
CZ ........................ 79 – 83
SK ........................ 84 – 88
RO ........................ 89 – 93
SI ........................ 94 – 98
BG ........................ 99 – 103
EE ........................ 104– 108
LT ........................ 109– 113
LV ........................ 114– 118
RU ........................ 119– 123

11
9
12
3
2
4
5
1
7
6
I
8
10
3

4
Hinweis
Es ist verboten Veränderungen am
Gerät durchzuführen oder Zusatzge-
räte herzustellen. Solche Änderungen
können zu Personenschäden und
Fehlfunktionen führen.
■Reparaturen am Gerät dürfen nur von hierzu
beauftragten und geschulten Personen durch-
geführt werden. Hierbei stets die Originaler-
satzteile der Adolf Würth GmbH & Co. KG
verwenden. Damit wird sichergestellt, dass die
Sicherheit des Gerätes erhalten bleibt.
Das Gerät gehört nicht in Kinderhän-
de und ist nicht geeignet für Personen
mit geistiger oder körperlicher
Behinderung!
Gerät nur in gut belüfteten Räumen
stehend laden und stehend
betreiben!
Feuer, offenes Licht und Funkenbil-
dung vermeiden.
Schutzbrille tragen.
Gerät nicht abdecken und vor Nässe
schützen.
Säurespritzer auf der Haut oder
Kleidung sofort mit viel Wasser
entfernen! Gegebenfalls einen Arzt
aufsuchen.
Das Gerät darf nicht in Umgebung
von brennbaren Gasen und
Lösungsmitteln betrieben und
geladen werden.
■Polzangen niemals kurzschließen!
■Polzangen niemals während des Startvor-
gangs abklemmen!
■Wenn anzunehmen ist, dass ein gefahrloser
Betrieb nicht mehr möglich ist, das Gerät
unverzüglich außer Betrieb zu setzen und
gegen unbeabsichtigten Betrieb sichern. Ein
gefahrloser Betrieb ist nicht mehr anzunehmen
wenn das Gerät keine Funktion mehr zeigt,
sichtbare Beschädigungen aufweist und bei
Transportbeschädigungen.
■Bei Verpolung Kurzschluss!
■Nur Original Würth-Zubehör und
Ersatzteile verwenden.
Zu Ihrer Sicherheit
DE
Lesen Sie vor der ersten Benutzung
Ihres Gerätes diese Betriebsanleitung
und handeln Sie danach.
Bewahren Sie diese Betriebsanlei-
tung für den späteren Gebrauch
oder für Nachbesitzer auf.
WARNUNG - Vor erster Inbetrieb-
nahme Sicherheitshinweise
unbedingt lesen!
Bei Nichtbeachtung der Betriebsanleitung und
der Sicherheitshinweise können Schäden am
Gerät und Gefahren für den Bediener und andere
Personen entstehen.
Bei Transportschaden sofort Händler informieren.
Sicherheitshinweise

5
Bestimmungsgemäße
Verwendung
Das Gerät ist zum Starten von Fahrzeugen mit 12 V
oder 24 V Bordspannung zu verwenden, wenn die
im Fahrzeug eingebauten Batterien über zu wenig
Startleistung verfügen. Es dient weiterhin zum Ersatz
defekter 12und 24 VBordbatterien, um damit einen
Start des Motors durchzuführen!
Jeder darüber hinausgehende Gebrauch gilt als
nicht bestimmungsgemäß.
Für Schäden bei nicht bestimmungsgemä-
ßer Verwendung haftet der Benutzer.
Bedienung (Abb. I)
Anschluss und Inbetriebnahme
Hinweis
Gerät vor dem ersten Gebrauch
24Stunden laden!
Vorsicht
Der Verpolungsschutz ist nur bei einer
Batteriespannung > 4 V aktiv.
■Sicherstellen. dass das Gerät aus ist.
■Leitungen mit roter Polzange zuerst am Pluspol
anklemmen.
■Leitung mit schwarzer Polzange an den Mi-
nuspol anklemmen.
■Beim Anschließen auf guten Kontakt und festen
Sitz der Polzangen achten.
■Gerät einschalten.
LED Anzeige
Anzeige Status
Verpolungsanzeige
[11] leuchtet rot Polzangen abklemmen, Start-
vorgang abbrechen
Verpolungsanzeige
[11] leuchtet nicht Startkabel nicht angeschlossen
Spannung der Fahrzeugbatterie
< 4 V oder Fahrzeugbatterie
fehlt.
Verpolungsanzeige
[11] leuchtet Grün Startvorgang,
ON-Taste [1] betätigen
Ladezustand
LED [2] und [10]
leuchten Grün
Startvorgang
Ladezustand
LED [2] und [10]
leuchten Orange
Startvorgang mit verringerter
Startleistung
Ladezustand
LED [2] und [10]
leuchten rot
Batteriespannung zu gering
Automatische Starthilfe
diese Funktion ist bei Starts mit eingebauten Fahr-
zeugbatterien zu verwenden. Damit kann die extrem
hohe Startleistung des Starthilfegerätes so optimal
wie möglich genutzt werden.
■LED [8] kontrollieren, LED leuchtet nicht, auto-
matischer Start nicht möglich.
■Taste AUT [9] betätigen.
3LED [8] leuchtet grün, Gerät in Bereitschaft.
3Fahrzeugmotor kann gestartet werden, die Zu-
schaltung der Startspannung erfolgt automatisch.
3Liegt die Startspannung an den Zangen an,
leuchtet LED [4] oder [7] rot!
Hinweis
Bestehen Zweifel an der automatischen
Spannungswahl, ist die Bordspannung
zu prüfen und die Auswahl manuell
zu treffen. Dies kann jederzeit durch
Betätigen der Tasten 12 V [5] oder
24V [6] erfolgen.
3Nach 6 Sekunden beendet die Automatik den
Startvorgang.

6
Hinweis
Nach einer Wartezeit von ca. 10Se-
kunden kann der Startvorgang bis zu
5 mal wiederholt werden. Danach ist
das Fahrzeug zu überprüfen und die
Gerätebatterie nachzuladen.
Fahrzeugmotor läuft
■Nach ca. 2 Minuten das Gerät ausschalten.
■Polzangen abklemmen.
Manuelles Zuschalten der 12 V oder
24V Spannungen
■LED [8] kontrollieren.
■Taste MAN [3] betätigen.
Achtung
Spannung an den Polzangen!
Starthilfe
■Fahrzeugmotor starten.
Vorsicht
Gerät nach dem Starten nicht sofort
abklemmen oder ausschalten, da die
Bordelektronik und/oder die Licht-
maschine dadurch Schaden nehmen
können!
■Gerät nach ca. 2 Minuten ausschalten.
■Polzangen abklemmen.
Vorsicht
Läuft Motor nach 6 Sekunden nicht, so
ist der Startvorgang unverzüglich ab-
zubrechen, da ansonsten Beschädigen
am Starthilfegerät und am Fahrzeug
auftreten können.
Hinweis
Nach einer Wartezeit von ca. 10
Sekunden kann der Startvorgang bis
zu 5 mal wiederholt werden. Danach
ist das Fahrzeug zu überprüfen und die
Gerätebatterie nachzuladen.
Hinweis
Nach ca. 45 Minuten schaltet die
Elektronik die Spannung ab, um ein
unbeabsichtigtes Entladen der Geräte-
batterien zu vermeiden.
Starthilfe ohne Fahrzeugbatterie
Vorsicht
Gerät nicht abklemmen oder aus-
schalten! Die Bordelektronik und/oder
die Lichtmaschine können dadurch
Schaden nehmen!
■Anschluss der Polzangen direkt an Polklemmen
des Fahrzeuges.
■Einschalten (ON-Taste drücken [1]).
■Spannung auswählen ( 12V [5] oder 24V [6]).
■Taste MAN [3] betätigen (deutliches Klicken
zu hören; die Schütze haben eingeschaltet; nun
liegt Strom auf den Klemmen des Starthilfege-
rätes an).
■Motor starten (Bitte auf die Warnhinweise
hinsichtlich max. Startversuchszeit achten - siehe
Anleitung).
■Nach erfolgreichem Start des Motors das-
Starthilfegerät ausschalten (OFF-Taste drü-
cken[12]).
■Klemmen in umgedrehter Reihenfolge
abklemmen(zuerst schwarze Klemme (-) dann
rote Klemme(+)).
■Starthilfegerät an das mitgelieferte Ladegerät
anschließen und auaden.
Vorsicht
Gerät nicht abklemmen oder aus-
schalten! Die Bordelektronik und/oder
die Lichtmaschine können dadurch
Schaden nehmen!
Motor läuft
■Gerät ausschalten
■Polzangen abklemmen
Gerät laden
■Gerät vor dem Erstgebrauch 24 Stunden laden.
■Gerät ist nach jedem Startvorgang ans mitgelie-
ferte Ladegerät anzuschließen.
3Die weitere Verfügbarkeit des Gerätes ist
sichergestellt.
Hinweis
Gerät kann bedenkenlos ständig an
dem mitgelieferten Ladegerät ange-
schlossen bleiben.

7
Hinweise zur Fehlersuche
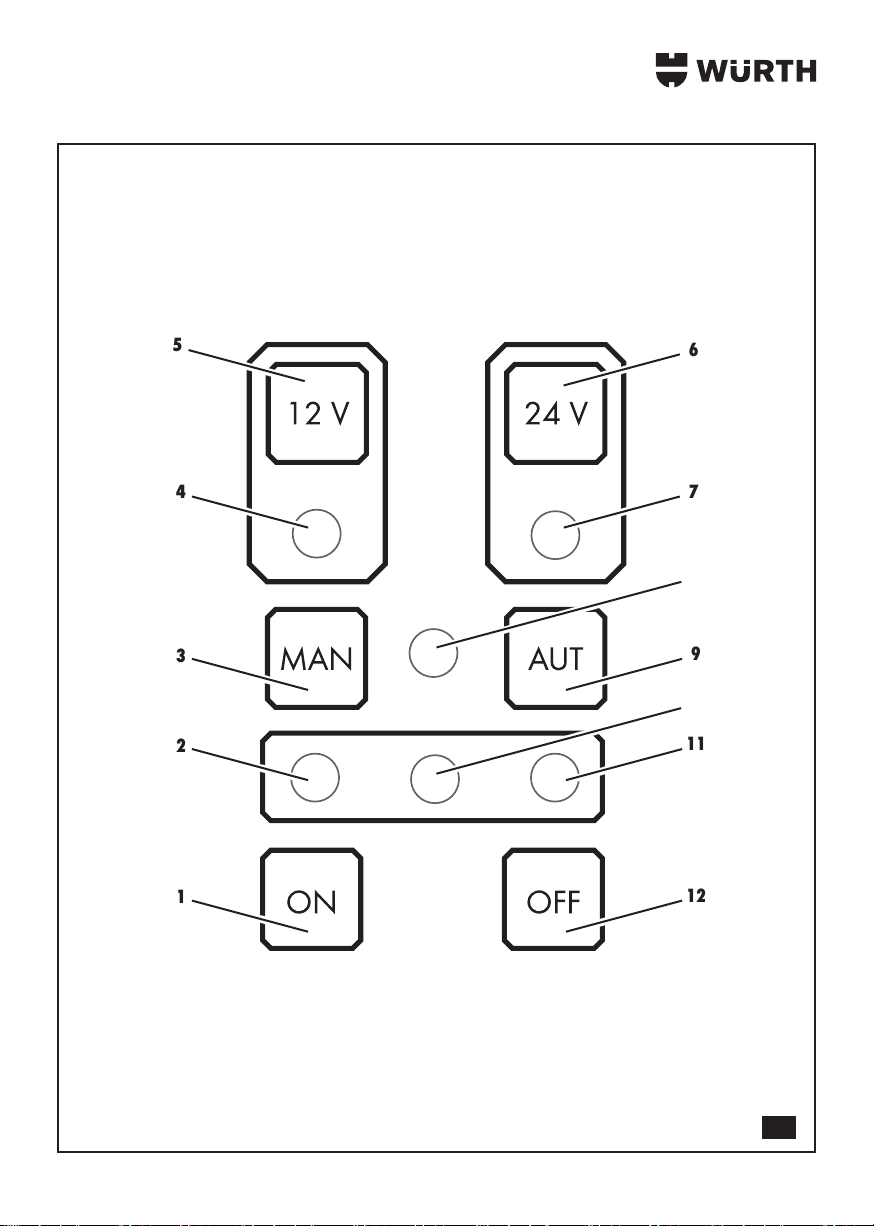
Störung Ursache
LED Verpolung [11] leuchtet nicht. – Polzangen nicht angeschlossen.
– Spannung der Fahrzeugbatterie < 4 V oder
Fahrzeugbatterie fehlt.
– Kurzschluss in einer Akkuzelle der Fahrzeugbatterie
LED Verpolung [11] leuchtet rot. – Polzangen falsch angeschlossen.
LED [2] und [10] leuchten rot. – Batterieladung der Startgerätebatterien zu gering,
Ladung nicht möglich.
LED [4] oder [7] leuchten rot. – Keine Spannung auf den Polzangen, Startvorgang
nicht möglich.
– Batterieladung der Startgerätebatterien zu gering.
– Geräteinterne Sicherung defekt.
Gerät schaltet sich nach dem Startversuch aus. – Fahrzeugbatterie verursacht Kurzschluss, defekte
Fahrzeugbatterie entfernen
Wartung und Reinigung
Achtung!
Reinigung des Gerätes nur bei gezoge-
nem Netzstecker.
Umwelthinweise
Werfen Sie das Gerät keinesfalls in
den normalen Hausmüll. Entsorgen
Sie das Gerät über einen zugelasse-
nen Entsorgungsbetrieb oder über
Ihre kommunale Entsorgungseinrich-
tung. Beachten Sie die aktuell
geltenden Vorschriften. Setzen Sie
sich im Zweifelsfall mit Ihrer Entsorgungseinrichtung
in Verbindung. Führen Sie alle Verpackungsmateria-
lien einer umweltgerechten Entsorgung zu.
Akkus/Batterien:
Werfen Sie Akkus/Batterien nicht in den Hausmüll,
ins Feuer oder ins Wasser. Akkus/Batterien sollen
gesammelt, recycelt oder auf umweltfreundliche
Weise entsorgt werden.
Gewährleistung
Für dieses Würth-Gerät bieten wir folgende
Garantieleistung:
– Starthilfegerät und Ladegerät: 24 Monate
– Akku im Starthilfegerät: 12 Monate
– Die Ladezangen und Sicherungen sind aufgrund
von Verschleiß ausgeschlossen.
Der Garantieanspruch ist gültig ab Kaufdatum
(Nachweis durch Rechnung oder Lieferschein).
Entstandene Schäden werden durch Ersatzlieferung
oder Reparatur beseitigt. Schäden, die auf unsach-
gemäße Behandlung zurückzuführen sind, sind von
der Gewährleistung ausgeschlossen.
Beanstandungen können nur anerkannt werden,
wenn das Gerät unzerlegt einer Würth Niederlas-
sung, Ihrem Würth Außendienstmitarbeiter oder
einer Würth autorisierten Kundendienststelle überge-
ben wird. Technische Änderungen vorbehalten.
Für Druckfehler übernehmen wir keine Haftung.
Zubehör und Ersatzteile
Sollte das Gerät trotz sorgfältiger Herstell- und
Prüfverfahren einmal ausfallen, ist die Reparatur von
einem Würth masterService ausführen zu lassen. In
Deutschland erreichen Sie den Würth masterService
kostenlos unter Tel. 0800-WMASTER
(0800-9 62 78 37). Bei allen Rückfragen und
Ersatzteilbestellungen bitte unbedingt die Artikelnum-
mer laut Typenschild des Gerätes angeben.

8
Technische Daten
Art. 0772 122 42 0772 122 44
Betriebsspannung/
Bordnetzspannung 12 V und 24 V DC 12 V und 24 V DC
Länge der Startkabel 1200 mm 1400 mm
Kabeldurchmesser 50 mm 50 mm
Startstrom/Kurzschlussstrom 12 V: 1,4 kA / 4,2 kA
24 V: 700 A / 1 kA 12 V: 2 kA / 5,7 kA
24 V: 1 kA / 2,85 kA
Gewicht 18 kg 38 kg
Abmessung (L x B x H) 430 x 200 x 230 mm 1000 x 470 x 400 mm
Sicherung geräteintern 2 Stück, 300 A 2 Stück, 300 A
Sicherung KFZ Buchse Thermosicherung,10 A Thermosicherung, 10 A
Ladung automatische 3-Stufen Hochfre-
quenz Ladung automatische 3-Stufen Hochfre-
quenz Ladung
Kapazität 12 V 32 Ah 12 V 64 Ah
24 V 16 Ah 24 V 32 Ah
CCA 12 V 440 12 V 880
24 V 220 24 V 440
Konformitätserklärung
Wir erklären in alleiniger Verantwortung, dass dieses Produkt mit den folgenden Normen oder normativen
Dokumenten übereinstimmt:
Normen
• EN 60 335 - 1 : 2012
• EN 60 335 - 2-29 : 2004/A2 : 2010
gemäß den Bestimmungen der Richtlinien:
EG-Richtlinie
• 2006/95/EG
Technische Unterlagen bei:
Adolf Würth GmbH & Co. KG, Abt. PFW
General Manager General Manager
Adolf Würth
GmbH & Co. KG
Künzelsau: 12.12.2017

9
Note
Modication of the device or manu-
facturing of attachments is not permit-
ted. Such modications can result in
personal injury or malfunctions.
■Only appointed and trained personnel may
carry out repairs to the device. For such
purposes, always use original spare parts
from Adolf Würth GmbH & Co. KG. This will
ensure the continuing safe operation of the
device.
Keep away from children. The device
must not be used by persons with
mental or physical disabilities!
Only charge and operate the device
when it is placed upright in a well
ventilated room!
Avoid re, naked lights and actions
likely to cause sparks.
Wear protective glasses.
Do not cover the device and keep it
dry.
Acid splashed on skin or clothing
should be removed immediately with
plenty of water! Seek medical
attention if required.
The device must not be charged or
operated in areas in which amma-
ble gases or solvents are kept or
present in the ambient atmosphere.
■Never short-circuit the booster cable clamps!
■Never remove the booster cable clamp during
start-up!
■If it can be assumed that safe operation is no
longer possible, the device must immediately
be put out of operation and secured against
inadvertent or unauthorised switching on. If
the device does not show any reaction, if it is
visibly damaged or has been damaged during
transport it can be assumed that operation of
the device is no longer safe.
■Reverse connection causes short circuit!
■Use only genuine Würth accessories
and spare parts.
For Your Safety
GB
Please read and comply with this
instruction manual prior to rst use of
your device.
Keep this instruction manual for
future reference or for subsequent
possessors.
WARNING - Prior to rst use
always read the Safety instruc-
tions!
Failure to observe the instruction manual and the
safety instructions could result in damage to the
device and danger for the operator and others.
In case of transport damage, inform your dealer
immediately.
Safety instructions

10
Intended use
The device is to be used for starting up vehicles
with an on-board voltage of 12V or 24V if the
start-up capacity of the vehicle batteries is insuf-
cient. In addition it can be used to replace defective
on-board 12V and 24V batteries in order to start
up the engine!
Any other use is considered an improper use.
The user is solely responsible for damage
resulting from improper use.
Operation (g.I)
Connection and start-up
Note
Charge the device for 24hours before
using it for the rst time!
Caution
Reverse connection protection is only
active when the battery voltage >4V.
■Make sure the device is switched off.
■First connect the cables with the red booster
cable clamp to the positive pole of the battery.
■Connect the cable with the black booster cable
clamp to the negative pole of the battery.
■When connecting the booster cable clamps
ensure good contact and secure t.
■Switch on the device.
LED indicator
Display Status
Reverse connec-
tion indicator [11]
shows red
Disconnect the booster cable
clamps, interrupt start-up
procedure
Reverse charge
indicator [11] not
illuminated
Booster cable is not connected.
Vehicle battery voltage is less
than 4V or vehicle battery is
missing altogether.
Reverse charge
indicator [11]
illuminated green
Start-up procedure, press the
ON button [1]
Charge level LEDs
[2] and [10] light
green
Start-up procedure
Charge level LEDs
[2] and [10] light
orange
Start-up procedure with
reduced start-up capacity
Charge level LEDs
[2] and [10] light
red
Battery voltage too low
Automatic jump start
Use this function for start-up with the vehicle batteries
in place. It helps to make best use of the extreme
start-up capacity of the battery booster kit.
■Check LED [8] ; if LED is not lit, automatic start is
not possible.
■Press the AUT button [9] .
3LED [8] is lit green; device is ready for opera-
tion.
3The engine can be started; the start-up voltage is
then switched on automatically.
3If the clamps are energised, the LED [4] or [7]
is lit red!
Note
If you are not sure about the automatic
voltage selection, check the on-board
voltage and choose the voltage
manually. This can be done anytime
by pressing the buttons 12V [5] or
24V [6] .
3After 6 seconds the start-up procedure is auto-
matically stopped.

11
Note
After a waiting time of approx.
10seconds the start-up procedure can
be repeated up to 5times. Then the ve-
hicle must be checked and the device
battery must be charged.
Engine is running
■Switch off the device after approx. 2 minutes.
■Remove booster cable clamps.
Switching on 12V or 24V voltage
manually
■Check LED [8] .
■Press the MAN button [3] .
Attention
Booster cable clamps are live!
Jump start
■Start engine of the vehicle.
Caution
Do not disconnect or switch off the de-
vice directly after start-up as otherwise
the on-board electronics and/or the
generator may be damaged!
■Switch off the device after approx. 2 minutes.
■Remove booster cable clamps.
Caution
If the engine is not running after 6sec-
onds, the start-up procedure must be
interrupted immediately as otherwise
the battery booster kit and the vehicle
may be damaged.
Note
After a waiting time of approx.
10seconds the start-up procedure can
be repeated up to 5times. Then the ve-
hicle must be checked and the device
battery must be charged.
Note
The electronic control switches off the
voltage after approx. 45minutes in
order to avoid unintentional discharge
of the device batteries.
Jumpstart without vehicle battery
Caution
Do not disconnect or switch off the
device! Otherwise the on-board elec-
tronics and/or the generator may be
damaged!
■Connect the booster cable clamps directly to the
vehicle's battery terminals.
■Switch on (press ON button [1]).
■Select the voltage (12V [5] or 24V [6]).
■Press the MAN button [3] (You should hear an
audible "click"; the contactors are switched on
and the terminals of the battery booster kit are
live).
■Start the engine (please pay attention to the
warnings with regard to the maximum allowed
start-up time - see instructions).
■After starting up the engine successfully, switch
the battery booster kit off (press the OFF
button[12]).
■Disconnect the terminals in reverse order (at rst
disconnect the black terminal (-) than the red
terminal (+)).
■Connect the battery booster kit to the supplied
charger and charge it.
Caution
Do not disconnect or switch off the
device! Otherwise the on-board elec-
tronics and/or the generator may be
damaged!
Engine is running
■Switch off the device
■Remove booster cable clamps
Charging the device
■Charge the device for 24hours before using it
for the rst time.
■Connect the device to the charger provided
after each start-up.
3This will ensure that the device remains ready
for use.
Note
The device can be permanently con-
nected to the charger provided without
any problem.

12
Troubleshooting Tips
Fault Cause
Reverse connection LED [11] not illuminated: – Booster cable clamps are not connected.
– Vehicle battery voltage is less than 4V or vehicle
battery is missing altogether.
– Short circuit in a vehicle battery cell
Reverse connection LED [11] shows red. – Booster cable clamps are connected incorrectly.
LEDs [2] and [10] light red. – Charge of booster kit too low; charging not
possible.
LED [4] or [7] lights red. – No voltage on booster cable clamps; start-up
procedure not possible.
– Charge level of booster kit battery too low.
– Fuse integrated into the device defective.
Device switches off after start-up attempt. – Vehicle causes a short circuit; remove defective
vehicle battery
Maintenance and cleaning
Attention!
Clean the device only when the mains
plug has been removed.
Environmental instructions
Do not throw the device away with
normal domestic waste. Dispose of
the device via an approved waste
disposal company or via your local
authority waste disposal facility.
Observe the currently valid regula-
tions. In case of doubt, contact your
waste disposal facility. Dispose of all packaging in
an environmentally compatible manner.
Batteries:
Do not dispose of batteries with domestic waste,
do not expose to re or water. Collect and recy-
cle batteries or dispose of with due care for the
environment.
Warranty
The following guarantees apply for this Würth
device:
– Battery booster kit and charger: 24months
– Battery in battery booster kit: 12months
– Cable clamps and fuses are excluded as they are
wear parts.
The warranty period starts with the date of purchase
(veried by invoice or delivery document).
Damage that has occurred will be corrected either
by replacement or by repair. Damage caused by
improper handling is not covered by the warranty.
Claims under warranty can only be accepted if
the device is returned fully assembled to a Würth
agency, your Würth sales representative or an
authorised Würth customer service workshop. Sub-
ject to technical changes without prior notice.
We accept no liability for printing errors.
Accessories and spare parts
If. in spite of careful manufacturing and testing
processes, the device becomes faulty, a repair by
Würth masterService should be arranged. With any
enquiries or spare parts orders, always quote the
article number as given on the device type plate.

13
Technical data
Art. 0772 122 42 0772 122 44
Operating voltage/
On-board voltage 12V and 24V DC 12V and 24V DC
Booster cable length 1200mm 1400mm
Cable diameter 50mm 50mm
Starting current/Short-circuit
current 12V: 1.4 kA / 4.2 kA
24 V: 700A / 1 kA 12V: 2 kA / 5.7 kA
24 V: 1 kA / 2.85 kA
Weight 18kg 38kg
Dimensions (L x W x H) 430 x 200 x 230mm 1000x 470x 400mm
Device internal fuse 2x; 300A 2x; 300A
Fuse of jack at rear side Thermal fuse, 10A Thermal fuse, 10A
Charging Automatic 3 level high frequency
charging Automatic 3 level high frequency
charging
Capacitance 12V 32 Ah 12V 64 Ah
24V 16 Ah 24V 32 Ah
CCA 12V 440 12V 880
24V 220 24V 440
Declaration of Conformity
We declare under our sole responsibility that this product conforms to the following standards and
directives:
Standards
• EN 60 335 - 1 : 2012
• EN 60 335 - 2-29 : 2004/A2 : 2010
in accordance with the regulations stipulated in the directives:
EC Directive
• 2006/95/EC
Technical documentation at:
Adolf Würth GmbH & Co. KG,Abt. PFW
General Manager General Manager
Adolf Würth
GmbH & Co. KG
Künzelsau: 12.12.2017

14
Nota
Èvietato apportare modiche all'ap-
parecchio o realizzare dispositivi
aggiuntivi! Tali modiche possono
portare a danni alle persone e ad
anomalie di funzionamento.
■Ilavori di riparazione sull'apparecchio pos-
sono essere eseguiti solo da personale inca-
ricato e con adeguata formazione. Per questi
lavori utilizzare sempre i pezzi di ricambio
originali della Adolf Würth GmbH & Co.
KG. In questo modo è garantita la sicurezza
dell'apparecchio.
Conservare il dispositivo lontano
dalla portata dei bambini, si
sconsiglia l'uso da parte di persone
con disabilità mentale o sica!
Utilizzare il dispositivo e lasciarlo in
carica soltanto in luogo ben
ventilato!
Tenere il dispositivo lontano da
fuoco, amme vive e scintille.
Indossare occhiali di protezione.
Non coprire il dispositivo e
proteggerlo dall'umidità.
Rimuovere immediatamente, con
abbondante acqua, gli schizzi di
acido dalla pelle o dagli indumenti!
Se necessario, consultare un medico.
Il dispositivo non può essere usato e
caricato in prossimità di gas
inammabili e solventi.
■Non cortocircuitare mai le pinze polari!
■Non scollegare mai le pinze durante l'avvia-
mento!
■Se il dispositivo non garantisce un uso in
sicurezza, metterlo immediatamente fuori
servizio e assicurarsi che non venga utilizzato
accidentalmente. L'uso in sicurezza non è
garantito quando il dispositivo non funziona
correttamente, quando sono presenti danni
visibili e nel caso di danni durante il trasporto.
■Corto circuito per inversione di polarità!
■Utilizzare solo accessori e pezzi di
ricambio originali Würth.
Informazioni per la sicurezza
IT
Prima di utilizzare l'apparecchio per
la prima volta, leggere e seguire
queste istruzioni per l'uso.
Conservare le presenti istruzioni per
una futura consultazione o per con-
segnarle ai successivi proprietari.
AVVERTENZA - Prima di mettere in
funzione l'apparecchio per la prima
volta leggere attentamente le
Avvertenze di sicurezza.
La mancata osservanza delle istruzioni d'uso
e delle norme di sicurezza può causare danni
all'apparecchio e presentare pericoli per l'utente e
le altre persone.
Eventuali danni di trasporto vanno comunicati
immediatamente al proprio rivenditore.
Avvertenze di sicurezza

15
Uso conforme
Il dispositivo deve essere utilizzato per avviare i
veicoli con tensione di 12V o di 24V, se le batterie
del veicolo dispongono di una potenza di avvia-
mento insufciente. Esso serve anche per sostituire
nell'avviamento del motore le batterie di 12 e 24V
difettose!
Qualunque utilizzo diverso da quelli indicati si
considera utilizzo non conforme.
La responsabilità per i danni dovuti a un
utilizzo non conforme alle norme è esclusi-
vamente dell'utente.
Comandi (Fig.I)
Collegamento e messa in funzione
Nota
Prima della messa in funzione iniziale
mettere sotto carica il dispositivo per
24 ore!
Attenzione
La protezione contro l'inversione di
polarità è attiva solo con una tensione
di >4V.
■Assicurarsi che l'apparecchio sia spento.
■Collegare al polo positivo i cavi con la pinza
rossa.
■Collegare il cavo con la pinza nera al polo
negativo.
■Durante il collegamento fare attenzione a che le
pinze siano collegate correttamente e stabil-
mente.
■Accendere l’apparecchio.
Indicatore LED
Visualizzazione Stato
L'indicatore di inver-
sione di polarità [11]
emette luce rossa ssa
Scollegare le pinze, inter-
rompere l'avviamento
L'indicatore di inversio-
ne di polarità [11] non
è acceso
Cavo di avviamento non
collegato
Tensione della batteria
del veicolo <4V o batte-
ria mancante.
L'indicatore di inver-
sione di polarità [11]
emette luce verde ssa
Avviamento, premere il
pulsante ON [1]
Stato di carica
ILED [2] e [10] emet-
tono luce verdi
Avviamento
Stato di carica
ILED [2] e [10] emet-
tono luce arancione
Processo di avviamento
con potenza ridotta
Stato di carica
ILED [2] e [10] emet-
tono luce rossa
Tensione della batteria
troppo bassa
Avviatore automatico di emergenza
Questa funzione va utilizzata nei casi di avviamento
tramite le batterie dell'auto. Le prestazioni estrema-
mente elevate del dispositivo per l'avviamento di
emergenza possono essere utilizzate al meglio.
■Controllare il LED [8] , esso non emette luce,
l'avviamento automatico non è possibile.
■Premere il tasto AUT [9] .
3Il LED [8] emette luce verde, dispositivo pronto
all'uso.
3Il motore del veicolo può essere avviato,
l'attivazione della corrente di avviamento è
automatica.
3Se la corrente di avviamento è presente nelle
pinze, i LED [4] o [7] emettono luce rossa!
Nota
Se ci sono dubbi sulla selezione
automatica della tensione, va vericata
la tensione di bordo ed effettuata la
selezione manuale. Questo è possibile
in qualsiasi momento premendo i t.asti
12V [5] o 24V [6]
3Dopo 6 secondi il processo di avviamento
termina automaticamente.

16
Nota
Dopo un tempo di attesa di circa
10secondi, l'avviamento può essere
ripetuto no a 5 volte. Successivamen-
te va controllato il veicolo e ricaricata
la batteria.
Il motore del veicolo è in funzione
■Spegnere il dispositivo dopo circa 2 minuti.
■Scollegare le pinze.
Collegamento manuale delle tensioni
a 12V o a 24V
■Controllare il LED [8] .
■Premere il tasto MAN [3] .
Avviso
Tensione nelle pinze!
Avviatore d'emergenza
■Avviare il motore.
Attenzione
Non scollegare o spegnere il dispositi-
vo subito dopo l'avviamento, in quanto
l'elettronica di bordo e/o l'alternatore
potrebbero subire danni!
■Spegnere il dispositivo dopo circa 2 minuti.
■Scollegare le pinze.
Attenzione
Se il motore non si avvia dopo
6secondi, l'avviamento deve essere
interrotto immediatamente, per evitare
danni al dispositivo per l'avviamento di
emergenza e al veicolo.
Nota
Dopo un tempo di attesa di circa
10secondi, l'avviamento può essere
ripetuto no a 5 volte. Successivamen-
te va controllato il veicolo e ricaricata
la batteria.
Nota
Dopo circa 45 minuti, l'elettronica
disattiva la tensione al ne di impedire
che le batterie portatili si scarichino
accidentalmente.
Avviatore d'emergenza senza batte-
ria del veicolo
Attenzione
Non scollegare né disattivare il dispo-
sitivo! L'elettronica di bordo e/o l'alter-
natore possono venire danneggiati!
■Collegamento delle pinze direttamente ai mor-
setti del veicolo.
■Accensione (premere il pulsante ON [1]).
■Regolare la tensione (12V [5] o 24V [6]).
■Azionare il tasto MAN [3] (Si sentirà chia-
ramente un "clic"; i giunti vengono attivati; la
corrente è presente sui terminali del dispositivo
per l'avviamento di emergenza).
■Avviare il motore (Prestare attenzione alle avver-
tenze relative al tempo di avviamento massimo
– consultare le istruzioni).
■Dopo l'avviamento corretto del motore, spe-
gnere l'avviatore di emergenze (premere il tasto
OFF[12]).
■Scollegare i morsetti in ordine inverso (prima il
terminale nero (-) poi il terminale rosso (+)).
■Collegare e caricare il dispositivo per l'av-
viamento di emergenza nel caricabatterie in
dotazione.
Attenzione
Non scollegare né disattivare il dispo-
sitivo! L'elettronica di bordo e/o l'alter-
natore possono venire danneggiati!
Il motore è avviato
■Spegnimento dell’apparecchio
■Scollegare le pinze
Carica dell'apparecchio
■Prima della messa in funzione iniziale mettere
sotto carica il dispositivo per 24 ore.
■Il dispositivo va collegato al caricatore in dota-
zione dopo ogni processo di avviamento.
3La disponibilità futura del dispositivo è garantita.
Nota
Il dispositivo può rimanere perma-
nentemente collegato al caricatore
in dotazione senza che questo causi
alcun problema

17
Guida alla localizzazione dei guasti
Anomalia Causa
Il LED dell'inversione di polarità [11] non è
acceso.
– Le pinze non sono collegate.
– Tensione della batteria del veicolo <4V o batteria
mancante.
– Corto circuito in una cella della batteria del veicolo
Il LED dell'inversione di polarità [11] emette luce
rossa ssa. – Le pinze sono collegate in maniera errata.
ILED [2] e [10] emettono luce rossa. – Carica insufciente delle batterie di avviamento
portatili, la carica non è possibile.
ILED [4] e [7] emettono luce rossa. – Nessuna tensione presente nelle pinze, l'avviamen-
to non è possibile.
– La carica delle batterie del dispositivo di avviamen-
to è insufciente.
– Fusibile interno danneggiato.
Il dispositivo si spegne dopo il tentativo di avvia-
mento. – La batteria del veicolo causa un cortocircuito,
rimuovere la batteria difettosa
Manutenzione e pulizia
Avviso!
Pulire il dispositivo esclusivamente con la
spina staccata dall'alimentazione.
Tutela dell'ambiente
Non gettare in nessun caso l'apparec-
chio nei riuti domestici. Lo smalti-
mento dell’apparecchio deve essere
afdato a un'azienda di smaltimento
autorizzata oppure agli enti pubblici
preposti. Rispettare le disposizioni di
legge attualmente in vigore. In caso
di dubbi contattare l'ente pubblico addetto allo
smaltimento. Smaltire i materiali d’imballaggio in base
alle normative in materia di tutela dell'ambiente.
Accumulatori/batterie:
Non gettare accumulatori/batterie tra i riuti dome-
stici, nel fuoco o in acqua. Accumulatori/batterie
devono essere correttamente raccolti, riciclati o smaltiti
nel rispetto dell'ambiente.
Garanzia
Per questo dispositivo Würth, offriamo la seguente
garanzia:
– Avviatore di emergenze e caricatore: 24 mesi
– Accumulatore nel dispositivo per l'avviamento di
emergenza: 12 mesi
– Le pinze e i fusibili sono esclusi a causa dell'usura.
La garanzia è valida dalla data di acquisto (da dimo-
strare con fattura o bolla di accompagnamento).
In caso di danni, il prodotto verrà sostituito o riparato.
Idanni riconducibili ad un uso improprio sono esclusi
dalla garanzia.
Le richieste potranno essere riconosciute soltanto se
l'apparecchio verrà consegnato integro ad una liale
Würth, ad un rappresentante Würth o al servizio di
assistenza clienti autorizzato da Würth. Con riserva di
modiche tecniche.
Il costruttore non si assume alcuna responsabilità per
eventuali refusi.
Accessori e pezzi di ricambio
Se nonostante la cura riposta nel processo di pro-
duzione e controllo l'apparecchio non dovesse
funzionare, afdare la riparazione a un centro Würth
masterService. Per qualsiasi domanda od ordinazione
di ricambi, indicare sempre la matricola dell'articolo
indicata sulla targhetta identicativa dell'apparecchio.

18
Dati tecnici
Art. 0772 122 42 0772 122 44
Tensione d'esercizio/
Tensione della rete di bordo 12V e 24V DC 12V e 24V DC
Lunghezza del cavo di avviamento 1200mm 1400mm
Diametro del cavo 50mm 50mm
Corrente di avviamento/Corrente di
corto circuito 12V: 1,4 kA / 4,2 kA
24 V: 700A / 1 kA 12V: 2 kA / 5,7 kA
24 V: 1 kA / 2,85 kA
Peso 18kg 38 kg
Dimensione (Lx Lx H) 430x 200x 230mm 1000x 470x 400mm
Fusibile all'interno del dispositivo 2 pezzi, 300A 2 pezzi, 300A
Fusibile della boccola dell'autovei-
colo Fusibile termico, 10A Fusibile termico, 10A
Carica Carica automatica a 3 stadi ad alta
frequenza Carica automatica a 3 stadi ad alta
frequenza
Capacità 12V 32 Ah 12V 64 Ah
24V 16Ah 24V 32 Ah
CCA 12V 440 12V 880
24V 220 24V 440
Dichiarazione di conformità
Dichiariamo, sotto nostra esclusiva responsabilità, che questo prodotto è conforme alle seguenti norme o
prescrizioni normative:
Norme
• EN 60 335 - 1: 2012
• EN 60 335 - 2-29: 2004/A2: 2010
secondo le disposizioni delle direttive:
Direttiva CE
• 2006/95/CE
Documentazione tecnica presso:
Adolf Würth GmbH & Co. KG, rep. PFW
General Manager General Manager
Adolf Würth
GmbH & Co. KG
Künzelsau: 12.12.2017

19
Remarque
Il est interdit de procéder à des
modications sur l’appareil ou de fa-
briquer tout équipement additionnel.
De telles modications pourraient
entraîner des dommages corporels
et être à l’origine de dysfonctionne-
ments.
■Les réparations sur l’appareil ne doivent être
effectuées que par des personnesmandatées
et formées. Veiller ce faisant à ce que les
pièces de rechange utilisées soient toutes
d'origine Adolf Würth GmbH & Co. KG. Ceci
permet de préserver la sécurité de l’appareil.
Maintenir l'appareil hors de la
portée des enfants et des personnes
atteintes de handicaps physiques ou
mentaux!
Charger et faire fonctionner
l'appareil uniquement en position
verticale et dans des pièces bien
aérées!
Éviter toute exposition au feu, à la
lumière du jour et toute formation
d'étincelles.
Porter des lunettes de protection.
Ne pas recouvrir l'appareil et le
protéger de l'humidité.
Éliminer immédiatement les
éclaboussures d'acide sur la peau ou
les vêtements avec abondamment
d'eau! Consulter un médecin si
nécessaire.
Ne pas charger et faire fonctionner
l'appareil à proximité de gaz et de
solvants inammables.
■Ne jamais court-circuiter les pinces polaires!
■Ne jamais déconnecter les pinces polaires
durant le démarrage!
■S'il est à supposer qu'un fonctionnement sans
risque n'est plus possible, mettre immédia-
tement l'appareil hors service et le sécuriser
contre toute remise enmarche involontaire. Un
fonctionnement sans risque est exclu lorsque
l'appareil présente des dommages visibles ou
a été endommagé lors du transport.
■Court-circuit en cas d'inversion des pôles!
■N'utiliser que des accessoires et
pièces de rechange d'origine Würth.
Pour votre sécurité
FR
Veuillez lire attentivement le présent
mode d’emploi et le respecter à la
lettre avant d’utiliser l’appareil pour
la première fois.
Conservez le présent mode d’emploi
en vue d’une utilisation ultérieure ou
de sa remise à ses éventuels futurs
propriétaires.
AVERTISSEMENT-Avant la
première mise en service, lire
impérativement les consignes de
sécurité!
Un non-respect de ce mode d’emploi et des
consignes de sécurité risque non seulement d’en-
dommager l’appareil, mais également de mettre
en danger l’opérateur et d’autres personnes.
En cas de dommages dus au transport, informer
immédiatement le revendeur.
Consignes de sécurité

20
Utilisation conforme
Utiliser l'appareil pour le démarrage des véhicules
disposant d'une tension de bord de 12V ou 24V
lorsque la puissance de démarrage des batteries
intégrées dans le véhicule est trop faible. Il sert éga-
lement à remplacer les batteries de bord 12 et 24V
défectueuses et démarrer ainsi le moteur!
Toute autre utilisation est considérée comme
nonconforme.
L’utilisateur est responsable des dom-
mages survenus en cas d’utilisation non
conforme.
Utilisation (g. I)
Raccordement et mise en service
Remarque
Charger l’appareil pendant 24heures
avant de l’utiliser pour la première
fois!
Prudence
La protection contre les inversions de
polarité est uniquement active lorsque
la tension de la batterie est >4V.
■S'assurer que l'appareil est éteint.
■Connecter d'abord la pince polaire rouge au
pôle positif.
■Connecter la pince polaire noire au pôle
négatif.
■Lors du raccordement, veiller à ce que les pinces
soient parfaitement xées et à ce que le contact
soit parfaitement établi.
■Démarrer l'appareil.
Affichage LED
Afchage Statut
La LED d'inversion des
pôles [11] est allumée
en rouge
Déconnecter les pinces
polaires, interrompre le
démarrage
La LED d'inversion de
polarité [11] est éteinte Le câble de démarrage n'est
pas raccordé.
La tension de la batterie du
véhicule est <4V ouman-
quante.
La LED d'inversion des
pôles [11] est allumée
en vert
Démarrage,
actionner la touche ON [1]
État de charge
Les LED [2] et [10] sont
allumées en vert
Démarrage
État de charge
Les LED [2] et [10] sont
allumées en orange
Démarrage avec une puis-
sance de démarrage réduite
État de charge
Les LED [2] et [10] sont
allumées en rouge
Tension de la batterie trop
faible
Aide au démarrage automatique
utiliser cette fonction en cas de démarrages avec des
batteries de véhicules intégrées. Ceci permet d'exploiter
la puissance de démarrage extrêmement élevée de
l'auxiliaire de démarrage demanière la plus optimale
possible.
■Contrôler la LED [8] , la LED ne s'allume pas, démar-
rage automatique impossible.
■Actionner la touche AUT [9] .
3La LED [8] est allumée en vert, l'appareil est prêt à
fonctionner.
3Le moteur du véhicule peut être démarré, la mise
en circuit de la tension de démarrage s'effectue
automatiquement.
3En présence de tension de démarrage au niveau des
pinces, la LED [4] ou [7] est allumée en rouge!
Remarque
En cas de doute concernant la sélection de
tension automatique, contrôler la tension
de bord puis effectuer la sélectionmanuel-
lement. Ceci est possible à tout moment
en actionnant les touches 12V [5] ou
24V[6] .
3Au terme de 6 secondes, l'automatique met terme au
processus de démarrage.
Other manuals for 0772 122 42
2
This manual suits for next models
1
Table of contents
Languages:
Other Würth Remote Starter manuals
Popular Remote Starter manuals by other brands

Carbine
Carbine 55CSR owner's manual

ADS
ADS HCX000A owner's manual

Bulldog Security
Bulldog Security Deluxe 22I Installation and owner's guide

Voxx
Voxx Pursuit PRO9556Z Quick installation guide

Automotive Data Solutions
Automotive Data Solutions TR2350ACT owner's manual

Digital Guard Dawg
Digital Guard Dawg 2GO KEYLESS iKEY RS Installation & user guide