6
Gefahrloses Arbeiten mit dem Gerät ist
nur möglich, wenn Sie die Bedienungs-
anleitung und die Sicherheitshinweise
vollständig lesen und die darin enthalte-
nen Anweisungen strikt befolgen.
Zusätzlich müssen die allgemeinen Sicherheitshin-
weise im beigelegten Heft befolgt werden. Lassen
Sie sich vor dem ersten Gebrauch praktisch einwei-
sen.
Das Gerät darf nicht feucht sein und auch
nicht in feuchter Umgebung betrieben
werden.
Hohe Lärmpegel können zu Gehörschä-
den führen. Schutzbrille und Gehörschutz
tragen.
Staubschutzmaske tragen.
Bei langen Haaren Haarschutz tragen.
Nur mit eng anliegender Kleidung arbei-
ten.
❏Vor jeder Benutzung Gerät und Akku überprüfen.
Werden Schäden festgestellt, Gerät nicht weiter
benutzen. Reparatur nur von einem Fachmann
durchführen lassen. Gerät nie selbst öffnen.
❏Verwenden Sie nur die dafür vorgesehenen
Akkus in den Elektrowerkzeugen. Der Gebrauch
von anderen Akkus kann zu Verletzungen und
Brandgefahr führen.
❏Bei falscher Anwendung kann Flüssigkeit aus
dem Akku austreten. Vermeiden Sie den Kontakt
damit. Bei zufälligem Kontakt mit Wasser abspü-
len. Wenn die Flüssigkeit in die Augen kommt,
nehmen Sie zusätzlich ärztliche Hilfe in
Anspruch. Austretende Akkuflüssigkeit kann zu
Hautreizungen oder Verbrennungen führen.
❏Vor allen Arbeiten am Gerät (z. B. Wartung,
Werkzeugwechsel, usw.) sowie bei dessen
Transport und Aufbewahrung den Drehrich-
tungsumschalter stets in Mittelstellung bringen.
Sonst besteht Verletzungsgefahr bei unbeabsich-
tigtem Betätigen des Ein-/Ausschalters.
❏Stellen Sie sicher, dass das Gerät ausgeschaltet
ist, bevor Sie den Akku einsetzen. Das Einsetzen
eines Akkus in ein Elektrowerkzeug, das einge-
schaltet ist, kann zu Unfällen führen.
❏Überzeugen Sie sich vor der Benutzung vom siche-
ren Sitz des Akkus im Gerät.
❏Das Gerät nicht so weit belasten, dass es zum Still-
stand kommt.
❏Beim Arbeiten das Gerät immer fest mit beiden
Händen halten und für einen sicheren Stand sor-
gen.
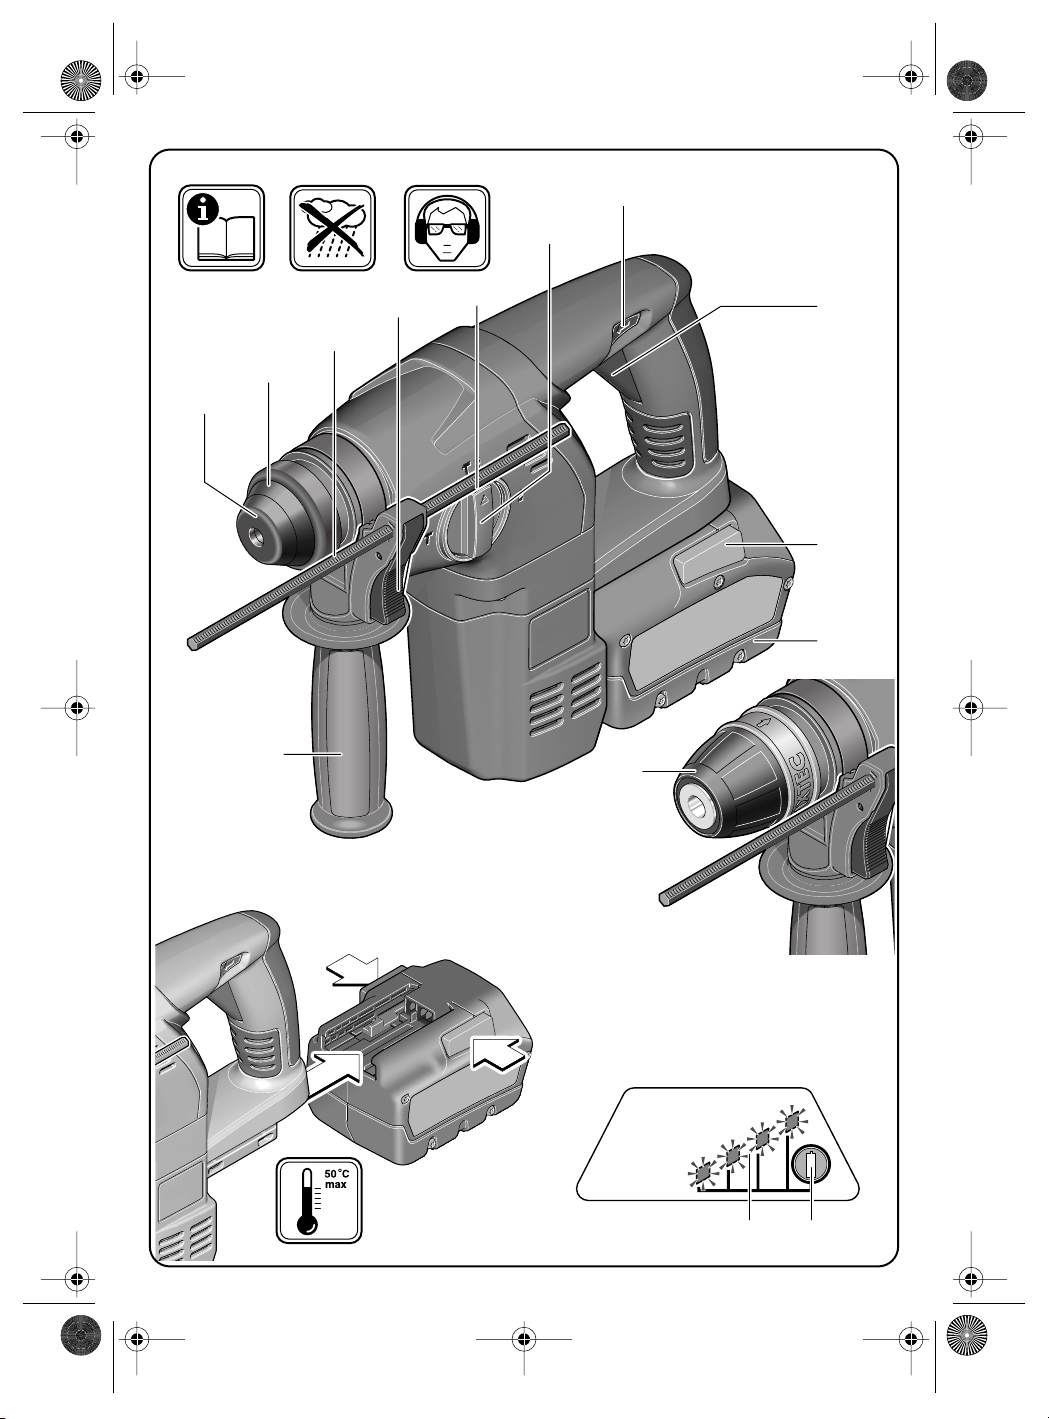
❏Verwenden Sie Ihr Gerät nur mit dem Zusatz-
griff 11. Der Verlust der Kontrolle über das Gerät
kann zu Unfällen führen.
❏Das Elektrowerkzeug nur an isolierten Handgrif-
fen anfassen, wenn das Einsatzwerkzeug eine
verborgene Leitung treffen kann.
Kontakt mit einer spannungsführenden Leitung
kann Metallteile des Gerätes unter Spannung set-
zen und zu einem elektrischen Schlag führen.
❏Verwenden Sie geeignete Suchgeräte, um ver-
borgene Versorgungsleitungen aufzuspüren,
oder ziehen Sie die örtliche Versorgungsgesell-
schaft hinzu.
Kontakt mit Elektroleitungen kann zu Feuer und
elektrischem Schlag führen. Beschädigung einer
Gasleitung kann zur Explosion führen. Eindringen
in eine Wasserleitung verursacht Sachbeschädi-
gung.
❏Das Gerät vor dem Ablegen immer ausschalten
und warten bis das Gerät zum Stillstand gekom-
men ist.
❏Niemals Kindern die Benutzung des Gerätes
gestatten.
Akku und Ladegerät
❏Unbedingt die beiliegende Bedienungsanleitung
des Ladegerätes lesen!
❏Laden Sie die Akkus nur in Ladegeräten auf, die
vom Hersteller empfohlen werden. Für ein Lade-
gerät, das für eine bestimmte Art von Akkus geeig-
net ist, besteht Brandgefahr, wenn es mit anderen
Akkus verwendet wird.
❏Erwärmten Akku vor dem Laden abkühlen lassen.
Akku vor Hitze und Feuer schützen: Explo-
sionsgefahr! Akku nicht auf Heizkörper
ablegen oder längere Zeit starker Son-
neneinstrahlung aussetzen, Temperaturen
über 50 °C schaden.
❏Akku nicht öffnen sowie vor Stoß schützen. Tro-
cken und frostsicher aufbewahren.
❏Halten Sie den nicht benutzten Akku fern von
Büroklammern, Münzen, Schlüsseln, Nägeln,
Schrauben oder anderen kleinen Metallgegen-
ständen, die eine Überbrückung der Kontakte
verursachen könnten.
Ein Kurzschluss zwischen den Akkukontakten kann
Verbrennungen oder Feuer zur Folge haben.
Den Akku nicht in
den Hausmüll, ins
Feuer oder ins Was-
ser werfen.
❏Nur Original Würth-Zubehör verwenden.
Zu Ihrer Sicherheit
D
☞Weitere Sicherheitshinweise siehe Beilage
H 28 MA - Buch Seite 6 Montag, 12. Februar 2007 10:42 10