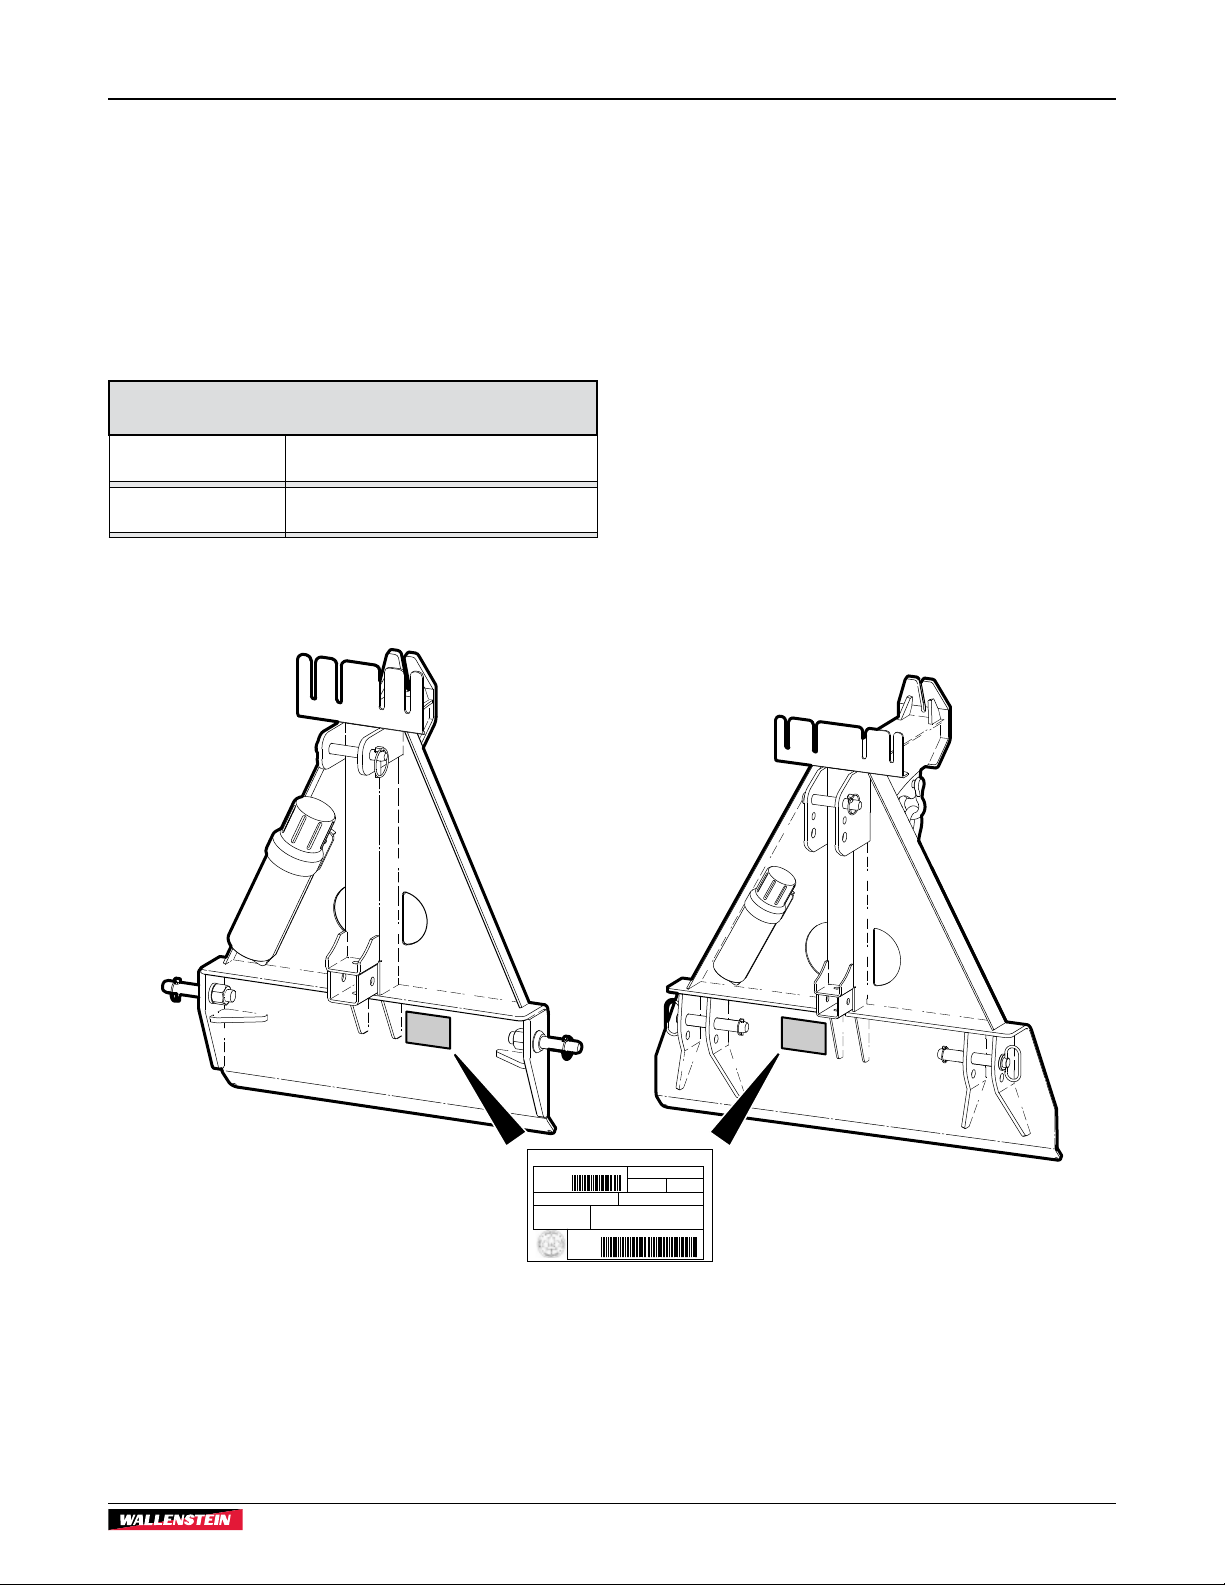
Wallenstein FXP Series User manual

OPERATOR'S MANUAL
Skidding Plate
FXP
Series
Part Number: Z97031_EnRev Mar-2021

Foreword FXP20, FXP30
Skidding Plate
2
1. Foreword
1.1 Introduction
Congratulations on your choice of a Wallenstein skidding
plate!
FXP Series skidding plates are designed to raise the front-end of
logs off the ground. This reduces damage to the bark and trails,
and creates a pivot axis for tighter turns (similar to towing a
trailer).
This manual applies to the following FXP Series models:
Model Engine range
Number of
saddle-grab
hooks
Mounting
system
FXP20 Up to 40 hp (30 kW) 1 Cat I
FXP30 Up to 80 hp (60 kW) 2 Cat I or
Cat II
Model Configuration
FXP20
Series Identification
number
Safe, efficient and trouble-free operation of this Wallenstein
product requires that anyone using or maintaining the product
reads and understands the Safety, Operation, and Maintenance
information contained within this Operator's Manual.
Units of measurement in Wallenstein Equipment technical
manuals are written as: US Customary (SI metric).
Keep this manual handy for frequent reference and to pass on
to new operators or owners. Call your Wallenstein dealer or
distributor if you need assistance, information, or additional
copies of the manuals.
WARNING!
Avoid the risk of personal injury or equipment
damage! Read the operator’s manual before
using this equipment. Carefully read all safety
messages in the manual and follow all safety
signs on the equipment.
W093
www.wallensteinequipment.com
Wallenstein Equipment Inc. • © 2021. All rights reserved.
No part of this work may be copied, reproduced, replaced,
distributed, published, displayed, modified, or transferred in
any form or by any means except with the prior permission of
Wallenstein Equipment Inc.

FXP20, FXP30
Skidding Plate Foreword
3
Table of Contents
1. Foreword ................................................................2
1.1 Introduction .........................................................2
1.2 Delivery Inspection Report..................................4
1.3 Serial Number Location ......................................5
1.4 Types of Decals on the Equipment.....................6
2. Safety......................................................................7
2.1 Safety Alert Symbol ............................................7
2.2 Signal Words ......................................................7
2.3 Why SAFETY is important ..................................7
2.4 Safety Rules .......................................................8
2.5 Equipment Safety Guidelines .............................8
2.6 Safe Condition ....................................................9
2.7 Sign-OForm ...................................................10
2.8 Safety Signs......................................................11
2.9 Replacing Damaged Safety Signs ....................12
3. Familiarization......................................................13
3.1 To the New Operator ........................................13
3.2 Operator Orientation .........................................13
3.3 Training.............................................................13
3.4 Work Site Familiarization ..................................13
3.5 Equipment Condition ........................................13
3.6 Skidding Plate Components .............................14
4. Installation............................................................15
4.1 Attaching to a Tractor .......................................15
4.2 Removing from a Tractor ..................................16
4.3 Ball-mount Hitch ...............................................16
5. Operating Instructions ........................................17
5.1 Pre-start Checks ...............................................17
5.2 Equipment Break-In ..........................................17
5.3 Attaching a Log.................................................17
5.4 Skidding Logs ...................................................19
5.5 Rough Terrain...................................................19
5.6 Tractor gets Stuck.............................................19
6. Service and Maintenance....................................20
6.1 Maintenance Safety ..........................................20
6.2 Maintenance Schedule .....................................20
6.3 Storage .............................................................20
6.4 Transport ..........................................................21
7. Specications ......................................................22
7.1 EquipmentSpecications .................................22
7.2 Common Bolt Torque Values............................23
8. Product Warranty.................................................24
9. Index .....................................................................25

Foreword FXP20, FXP30
Skidding Plate
4
1.2 Delivery Inspection Report
Wallenstein FXP Series Skidding Plate
To activate the warranty, register your product at: www.wallensteinequipment.com
This form must be filled out by the dealer, and then signed by the dealer and customer at the time of delivery.
The product manuals have been received by me and I have
been thoroughly instructed as to the care, adjustments, safe
operation, and applicable warranty policy.
Customer
Address
City, State/Province, ZIP/Postal Code
( )
Phone Number
Contact Name
Model
Serial Number
Delivery date
I have thoroughly instructed the customer about the equipment
care, adjustments, safe operation, applicable warranty policy,
and reviewed the manuals.
Dealer
Address
City, State/Province, ZIP/Postal Code
( )
Phone Number
Dealer Inspection Report
All components are attached and in good condition.
All fasteners are tight.
Safety Checks
All safety sign decals are applied and in good condition.
A hitch and lynch pin are installed through each hitch point.
Operating and safety instructions reviewed.

FXP20, FXP30
Skidding Plate Foreword
5
1.3 Serial Number Location
Always provide the model and serial number of your Wallenstein
product when ordering parts or requesting service or other
information. This information is found on the serial number plate
shown in the illustration below.
Record product information in the spaces provided for future
reference.
Fig. 1 – Serial Number Plate Location
Record Product Information Here
Model:
Serial Number:
01597
VIN/
NLV:
MODEL: ##########
#########
Manufactured by:
Wallenstein Equipment Inc., 7201 Line 86, Wallenstein ON N0B2S0, Canada
TYPE OF VEHICLE/TYPE DE VEHICLE:
TRA / REM
GAWR/PNBE (KG): GVWR/PNBV (KG):
###
DIMENSION- RIM/JANTE /ERIT: PNEU:
COLD INFL. PRESS/PRESS DE
CONFLA A FROID (PSI/LPC):
THIS VEHICLE CONFORMS TO ALL APPLICABLE STANDARDS
PRESCRIBED UNDER THE CANADIAN MOTOR SAFTEY REGULATIONS
IN EFFECT ON THE DATE OF MANUFACTURE / CE VEHICLE EST
CONFORME A TOUTES LES NORMES QUI LUI SONT APPLICABLES EN
VERTU DU REGLEMENT SUR LA SECURITE DES VEHICLES
AUTOMOBILES DU CANADA EN VIGUEUR A LA DATE DE SA FABRICATION.
###
### ###
###
FXP20 FXP30

Foreword FXP20, FXP30
Skidding Plate
6
1.4 Types of Decals on the
Equipment
When getting familiar with the Wallenstein product, notice
that there are decals located on the equipment. There are
different types of decals for safety, information, and product
identification. The following section explains what they are for
and how to read them.
Safety Sign Decals have a yellow background and are generally
two panel. They can be either vertical or horizontal.
Safety Notice Decals are pictorial with a blue background
and generally rectangular with single or multiple symbols.
This example decal informs users what personal protective
equipment is required for safe operation.
Product Decals indicate the equipment model and serial
number, and other important information.
VIN/
NLV:
MODEL: ##########
#########
Manufactured by:
Wallenstein Equipment Inc., 7201 Line 86, Wallenstein ON N0B2S0, Canada
TYPE OF VEHICLE/TYPE DE VEHICLE:
TRA / REM
GAWR/PNBE (KG): GVWR/PNBV (KG):
###
DIMENSION- RIM/JANTE /ERIT: PNEU:
COLD INFL. PRESS/PRESS DE
CONFLA A FROID (PSI/LPC):
THIS VEHICLE CONFORMS TO ALL APPLICABLE STANDARDS
PRESCRIBED UNDER THE CANADIAN MOTOR SAFTEY REGULATIONS
IN EFFECT ON THE DATE OF MANUFACTURE / CE VEHICLE EST
CONFORME A TOUTES LES NORMES QUI LUI SONT APPLICABLES EN
VERTU DU REGLEMENT SUR LA SECURITE DES VEHICLES
AUTOMOBILES DU CANADA EN VIGUEUR A LA DATE DE SA FABRICATION.
###
### ###
###
See the section on safety signs for safety decal definitions.
For a complete illustration of decals and decal locations,
download the parts manual for your equipment at
www.wallensteinequipment.com.

FXP20, FXP30
Skidding Plate Safety
Safety
7
2. Safety
2.1 Safety Alert Symbol
This symbol means:
ATTENTION! BE ALERT !
YOUR SAFETY IS INVOLVED !
The Safety Alert Symbol identifies important safety messages
on the Wallenstein product and in the manual.
When you see this symbol, be alert to the possibility of
personal injury or death! Follow the instructions in the safety
message.
2.2 Signal Words
The signal words DANGER, WARNING and CAUTION determine
the seriousness level of the warning messages in this manual.
The appropriate signal word for each message in this manual
has been selected using the following guidelines:
DANGER –
Indicates an imminently hazardous situation that, if not avoided,
will result in death or serious injury. This signal word is to be
limited to the most extreme situations typically for equipment
components which, for functional purposes, cannot be guarded.
WARNING –
Indicates a potentially hazardous situation that, if not avoided,
could result in death or serious injury, and includes hazards that
are exposed when shields are removed. It may also be used to
alert against unsafe practices.
CAUTION –
Indicates a potentially hazardous situation that, if not avoided,
may result in minor or moderate injury. It may also be used to
alert against unsafe practices.
IMPORTANT – To avoid confusing equipment protection
with personal safety messages, the signal word IMPORTANT
indicates a situation that, if not avoided, could result in damage
to the equipment.
2.3 Why SAFETY is important
• Accidents Disable and Kill
• Accidents Cost
• Accidents Can Be Avoided
YOU are responsible for the SAFE operation and maintenance
of your Wallenstein Skidding Plate. YOU must make sure that
anyone who is going to use, maintain or work around the
skidding plate is familiar with the operating and maintenance
procedures, and related SAFETY information contained in this
manual.
Remember, YOU are the key to safety. Good safety practices
not only protect you, but also the people around you. Make
these practices a working part of your safety program. Be
certain that EVERYONE using this equipment is familiar with
the recommended operating and maintenance procedures
and follows all the safety precautions. Most accidents can be
prevented.
Do not risk injury or death by ignoring good safety practices.

Safety FXP20, FXP30
Skidding Plate
Safety
8
2.4 Safety Rules
Safety is a primary concern in the design and manufacture of
Wallenstein products. Unfortunately, efforts to provide safe
equipment can be wiped out by a single careless act.
• It is the operator's responsibility to read,
understand and follow ALL safety and
operation instructions in this manual.
• The operator of this skidding plate must be a responsible,
properly trained and physically able person familiar with
the equipment and trained in the operation of a tractor.
Learn the controls and how to stop the tractor quickly in an
emergency before working with the skidding plate.
• An employer has the responsibility to train employees how
to operate the equipment they are using. When someone
does not understand the basic operation of a piece of
equipment, they can create dangerous situations very
quickly. Operators must completely understand:
-Safety section of this manual
-Safety decals on the equipment
-Tractor operator's manual
• If this equipment is used by any other person, loaned or
rented, it is the owner's responsibility to make certain that
prior to using it, every operator is fully trained.
• Review safety related items annually with all personnel who
will be operating the equipment or performing maintenance.
• Keep a first-aid kit available for use
should the need arise and know how to
use it.
• Have a fire extinguisher available for use
should the need arise and know how to
use it.
• Never consume alcohol or drugs when operating this
equipment. Alertness or coordination can be affected.
Consult your doctor about using this equipment while
taking prescription medications.
• Always wear PPE when operating, servicing, or maintaining
the equipment. Hard hats, protective glasses, protective
shoes, gloves, reflector type vests and ear protection are
types of PPE that may be required.
• Avoid loose fitting clothing, loose or uncovered long hair,
jewelry, and loose personal articles. These can get caught
in moving parts.
• Prolonged exposure to loud noise may
cause permanent hearing loss! Power
equipment with or without equipment
attached can often be noisy enough to
cause permanent, partial hearing loss.
• Wear hearing protection on a full-time basis if the noise in
the operator's cab exceeds 80 dB. Noise over 85 dB on a
long-term basis can cause severe hearing loss. Noise over
90 dB adjacent to the operator on a long-term basis may
cause permanent, total hearing loss.
• Keep bystanders at least 20 ft (6 m) from the equipment or
logs during operation.
• Complete the Pre-start Checks before starting work (see
page 17).
• Do not risk injury or death by ignoring good safety
practices.
2.5 Equipment Safety Guidelines
• Place the equipment in a Safe Condition before performing
any service, maintenance, storage preparation, or hooking
up (for instructions, see page 9).
• Replace any safety sign or instruction sign that is not
readable or is missing. Location and explanation of safety
signs start on page 12.
• Make sure that the following components are in good
condition and not worn or damaged. Replace damaged
components.
-Anchor shackle(s)
-Saddle-grab hook(s)
-Pins (toplink, hitch, lynch, and implement)
• Before using the equipment, check the condition of the
choker chain, logging tongs, synthetic choker, or other
items used to attach logs to the skidding plate. A damaged
chain, tongs, or synthetic choker can break and cause
serious injury or equipment damage. Replace damaged
items.
• Do not modify the equipment in any way. Unauthorized
modification may result in serious injury or death and may
impair the function and life of the equipment.
• Always skid up a slope. Do not skid across or down a
slope.
• Do not allow riders on the equipment at any time. There is
no safe place for any riders.
• Do not exceed a safe travel speed when skidding.
• When using a tractor, make sure that it is equipped with a
full complement of suitcase weights on the front frame or a
front end loader for added stability.
• Never exceed the limits of the equipment if its ability to do a
job, or to do it safely is in question.

FXP20, FXP30
Skidding Plate Safety
Safety
9
2.6 Safe Condition
References are made to safe condition throughout this manual.
What this means is, parking the equipment in a manner that
makes it safe to load, service, maintain, or store.
Complete the following to place the equipment in a
Safe Condition before loading, performing any service,
maintenance work, or storage preparation:
1. Stop the tractor.
2. Set the parking brake.
3. Lower the skidding plate to the ground.
4. Turn the tractor engine off.
5. Remove the ignition key and keep it with you.
6. Block the tractor wheels.
7. Make sure that all motion is stopped.

Safety FXP20, FXP30
Skidding Plate
Safety
10
2.7 Sign-Off Form
Anyone using this equipment must read and thoroughly
understand all of the Safety, Operation, and Maintenance
information in this manual. An untrained operator should never
use this equipment.
To help document this training, the sign-off sheet provided
below can be used.
Make periodic review of Safety and Operation a standard
practice for all operators. Review it again at the start of every
season.
Sign-off Form
Date Owner Employee

FXP20, FXP30
Skidding Plate Safety
Safety
11
2.8 Safety Signs
The top (or left-hand) panel on the decal shows the safety alert
(the potential hazard), and the bottom (or right-hand) panel
shows the message (how to avoid the hazard).
Hazard
How to avoid the
hazard
2.8.1 Safety Sign Locations
Practicing good safety means becoming familiar with safety
signs and warnings and being aware of the situations that
require alertness.
Think SAFETY! Work SAFELY!
Fig. 2 – Safety Sign Locations
01598
1
2
3

Safety FXP20, FXP30
Skidding Plate
Safety
12
2.8.2 Safety Sign Explanations
1. Caution!
See the operator's manual. Read ALL
operating instructions in the manual and
learn the meaning of ALL safety signs on
the equipment.
The best safety feature is an informed
operator.
2. Caution!
Be aware of crush hazards from large
moving objects.
3. Warning!
Always wear appropriate personal
protective equipment when using this
equipment. For example:
• A hard hat
• Heavy gloves
• Hearing protection
• Protective shoes with slip
resistant soles
• Protective glasses, goggles or
face shield
IMPORTANT! Safety signs must always be replaced if they
become damaged, are removed, or become illegible.
Safety signs are included in the product decal kit available from
your authorized dealer. Decals are not available separately.
2.9 Replacing Damaged Safety Signs
• Always replace safety signs that are missing or have
become illegible. Replacement safety signs are available
from your authorized distributor, dealer parts department, or
the factory.
• Keep safety signs clean and legible at all times.
• Parts replaced that had a safety decal on them must also
have the safety sign replaced.
Procedure
Installation area must be clean and dry. Make sure the surface is
free of grease or oil. Ambient temperature must be above 50 °F
(10 °C).
Determine exact position before removing the
backing paper on the decal.
1. Peel the decal off the backing sheet.
2. Align the decal with an edge on the machine if possible.
3. Starting on one edge, carefully press the center of the
exposed sticky backing in place, smoothing it out as you
work from one side to the other.
4. Use a squeegee, credit card or similar to smooth it out.
Work from one end of the decal to the other end.
Small air pockets can be pierced with a pin and smoothed out
using the piece of sign backing paper.

FXP20, FXP30
Skidding Plate Familiarization
13
3. Familiarization
3.1 To the New Operator
It is the responsibility of the owner or operator to read this
manual and to train all other operators before they start working
with the skidding plate. Follow all safety instructions exactly.
By following recommended procedures, a safe working
environment is provided for the operator, bystanders, and the
area around the work site. Untrained operators are not qualified
to use the equipment.
3.2 Operator Orientation
IMPORTANT! When describing equipment use throughout
this manual, the directions for left-hand, right-hand,
backward, and forward, are determined when sitting in the
tractor seat, facing the direction of forward travel.
01599
Fig. 3 – Orientation Direction of Travel
3.3 Training
Each operator must be trained in the correct set-up and
operating procedures before operating the equipment.
1. Review control location, function, and movement
directions.
2. Move the skidding plate to a large open area to allow the
operator to become familiar with control function and
equipment response.
3. After a new operator is familiar and comfortable with
the equipment, they can proceed with the work. Do not
allow untrained operators to use the equipment. They can
endanger themselves and others or damage property.
3.4 Work Site Familiarization
Become familiar with the work site prior to beginning. Avoid the
possibility of problems or accidents by reviewing the following:
• Make sure that there is sufficient space and clearance to
attach the log to the skidding plate.
• Organize the work area to minimize the skidding and
transporting distances.
• Position the tractor so that the prevailing winds blow engine
exhaust fumes away from the operator.
3.5 Equipment Condition
• Periodically check the general condition of the skidding
plate.
• Before use, make sure that all the fasteners and removable
components are present, secure, and in good condition.

Familiarization FXP20, FXP30
Skidding Plate
14
01600
9
3
5
4
6
8
7
2
9
3
4
5
6
7
8
1
12
Fig. 4 – Skidding Plate Components
1. Mast
2. Chain holder
3. Toplink pin with lynch pin
4. Operator's Manual container
5. Hitch pin with lynch pin
6. Main frame
7. Ball-mount hitch kit
8. Saddle-grab hook
9. Anchor shackle
3.6 Skidding Plate Components
FXP20
FXP30

FXP20, FXP30
Skidding Plate Installation
15
4. Installation
4.1 Attaching to a Tractor
IMPORTANT! FXP Series skidding plates are not quick hitch
compatible (including the iMatch™ quick-hitch).
• FXP20 model three-point hitch is Category I.
• FXP30 model three-point hitch is Category I and II.
WARNING!
Never let anyone stand between the tractor and
the implement during hitching. Too fast of an
approach or the operator’s foot slipping from the
clutch can lead to injury or fatality to the person
standing nearby.
W048
Procedure
1. Make sure:
-There is enough room and clearance to safely back the
tractor up to the skidding plate.
-The tractor and skidding plate are on level ground.
-The tractor parking brake is applied and the engine is
off.
2. Move the tractor drawbar for clearance, if required.
3. Retract and secure the toplink, if required.
4. Loosen the stabilizers and move the tractor lift arms to the
full sway position.
5. Remove the hitch and lynch pins from the skidding plate, as
required.
6. At the slowest speed, reverse the tractor keeping it aligned
with the skidding plate. While reversing, raise or lower the
lift arms to align them with the skidding plate hitch pin
(FXP20) or hitch-pin holes (FXP30).
01601
Fig. 5 – Align Tractor to Skidding Plate (model FXP30 shown)
7. After the tractor is correctly aligned, apply the parking brake
and turn off the engine.
8. On each side of the skidding plate, attach the tractor lift arm
to the skidding plate. Make sure to insert the lynch pins.
01602
Fig. 6 – Hitch Pins Installed (model FXP30 shown)

Installation FXP20, FXP30
Skidding Plate
16
9. Install the toplink:
-Remove the skidding plate toplink pin.
-Adjust the turnbuckle to align the toplink hole with the
skidding plate holes.
-Insert the toplink pin through the skidding plate and
toplink holes, and then insert the lynch pin.
-Lock the turnbuckle.
01603
Fig. 7 – Skidding Plate Attached (model FXP30 shown)
10. Adjust and tighten the lower lift-arm stabilizers to secure
and level the skidding plate.
11. Start the tractor, and then slowly raise the skidding plate off
the ground.
4.2 Removing from a Tractor
1. Stop the tractor on level ground.
2. Lower the skidding plate to the ground.
3. Apply the parking brake and turn off the engine.
4. If required, remove any logs and chains from the skidding
plate.
5. Remove the toplink:
-Remove the toplink pin.
-Adjust the toplink to the storage length.
-Lock the turnbuckle.
-Insert the toplink pin through the skidding plate toplink
holes, and then insert the lynch pin.
6. On each side of the skidding plate, loosen the stabilizer and
remove the lift arm from the skidding plate.
7. Carefully, tip the skidding plate away from the tractor and
lower it to the ground.
8. Insert the hitch and lynch pins in the skidding plate, as
required.
9. At the slowest speed, drive the tractor forward, away from
the skidding plate.
4.3 Ball-mount Hitch
FXP Series skidding plates include a heavy-duty ball-mount hitch
that fits into the 2-inch square receiver.
Attach the ball-mount hitch using the implement pin, and then
install the cotter pin to secure it.
01604
Fig. 8 – Ball-mount Hitch (model FXP20 shown)

FXP20, FXP30
Skidding Plate Operating Instructions
17
5. Operating Instructions
The operator is responsible to be familiar with and follow all
operating and safety procedures.
• Learn the basic skidding plate operation to prevent the
chance of creating a dangerous situation with the load.
• When using the skidding plate, drive the tractor with care.
5.1 Pre-start Checks
Before using the skidding plate, complete the following pre-start
checks.
The Pre-start Checklist is provided for both personal safety and
to keep the skidding plate in good condition.
Pre-start Checklist
Make sure that all the components are in place and
secured as designed (see page 14).
Check and tighten all fasteners. Make sure the
equipment is working properly and in good repair.
Make sure that personal protective equipment
including hard hat, safety glasses, safety shoes,
safety vest, hearing protection and gloves are being
used and in good repair.
Make sure that loose fitting clothing or jewelry is not
worn, and long hair is tied up.
5.2 Equipment Break-In
Although there are no operational restrictions on the skidding
plate when used for the first time, it is recommended that the
following mechanical items be checked.
After 1–5 hours of operation:
1. Check that all nuts, bolts, and other fasteners are tight and
in good condition. If required, tighten to the specified torque
(for torque specifications, see page 23).
2. Check the condition of the choker chain, tongs, synthetic
choker, or other item being used to attach logs to the
skidding plate. Replace if it is worn or damaged.
3. Check for entangled material. Remove all entangled material
before resuming work.
5.3 Attaching a Log
1. Attach one of the following items to a log:
-Choker chain (for instructions, see page 17.)
-Logging tongs (for instructions, see page 18.)
-Synthetic choker (for instructions, see page 18.)
2. Extend the chain through the mast or a saddle-grab hook
and secure it to the skidding plate. Do not leave slack
between the log and the mast or saddle-grab hook.
3. Use the chain holder to secure the chain or synthetic
choker to the skidding plate.
5.3.1 Choker Chain
Choker chains are available as an accessory. For more
information, contact an authorized dealer or Wallenstein
Equipment.
1. Push the choker-chain rod end under the log.
2. Pull the choker chain around the log until the choker-chain
hook end is at the top of the log.
3. Attach the choker-chain hook end to the opposite side of
the choker chain.
4. Extend the choker-chain rod end to the skidding plate.
01607
Fig. 9 – Attach a Choker Chain

Operating Instructions FXP20, FXP30
Skidding Plate
18
5.3.2 Logging Tongs
Logging tongs are available as an accessory. For more
information, contact an authorized dealer or Wallenstein
Equipment.
1. Open the logging tongs and position them over the log.
2. Release the logging tongs to grip the log.
3. Extend the chain rod end to the skidding plate.
01608
Fig. 10 – Attach Logging Tongs
5.3.3 Synthetic Choker
WARNING!
Synthetic rope that fails under tension can snap
back with great force causing injury or death.
Avoid sudden jerks, quick starts or stops. Start
slowly and smoothly. Replace if kinked, badly
frayed, has knots, cuts, or broken strands.
W095
Synthetic chokers are available as an accessory. These
chokers weigh less than a choker chain and are easier to
handle; however, they are more susceptible to abrasion. For
more information, contact an authorized dealer or Wallenstein
Equipment.
Before each use, check the condition of the synthetic choker for
visible damage. Replace if kinked, frayed, has knots, cuts, or any
broken strands. Failure to replace could result in breakage.
Points to remember:
• A synthetic choker is very susceptible to damage from
rubbing against or sliding along rough ground or surfaces.
• Synthetic choker strength can be reduced if subjected to
sudden jerking, or quick starts and stops. Avoid high shock
loads on the rope by starting slowly and smoothly.
Procedure
1. Push the rod end of the synthetic choker under the log.
2. Pull the ends together and push the rod end through the
opposite loop.
3. Extend the rod end to the skidding plate.
01609
Fig. 11 – Attach a Synthetic Choker

FXP20, FXP30
Skidding Plate Operating Instructions
19
5.4 Skidding Logs
Points to remember:
• Keep the pulling point as low as possible.
• Raise the skidding plate (and logs) above the ground to
clear obstacles.
• Be cautious of hills, boulders, and rough terrain.
Procedure
1. Complete the Pre-start Checks listed on page 17.
2. Attach one or more logs to the skidding pate (for
instructions, see page 17).
3. Raise the skidding plate off the ground. Make sure that it is
level.
4. Drive the tractor forward to pull the logs to the desired
location.
5. Lower the skidding plate.
6. Apply the tractor parking brake, and then turn off the engine.
7. Remove the choker chain, tongs, or synthetic choker from
the logs and skidding plate, as required.
5.5 Rough Terrain
When there is rough terrain in the skidding path:
1. Before entering the rough area, stop the tractor, apply the
parking brake, and then turn off the engine.
2. Remove the choker chain, tongs, or synthetic choker from
the skidding plate.
3. Drive the tractor through the rough area, stop, apply the
parking brake, and then turn off the engine.
4. Reattach the choker chain, tongs, or synthetic choker to the
skidding plate.
5. Drive the tractor forward to pull the log(s) through the rough
area, stop, apply the parking brake, turn off the engine, and
then repeat Step 2.
6. Reverse the tractor to the logs, and then repeat Step 4.
5.6 Tractor gets Stuck
• Remove the logs from the skidding plate, drive the tractor
to firm ground, and then use a winch to pull the logs to the
tractor.
• If the tractor cannot be moved, remove the logs from the
skidding plate, arrange to have the tractor pulled out, and
then use a winch to pull the logs to the tractor.

Service and Maintenance FXP20, FXP30
Skidding Plate
20
6. Service and Maintenance
WARNING!
Do not risk personal injury by working in an
unsafe situation. Make sure that the work
environment is safe and place the equipment in a
safe condition for service and maintenance.
W096
6.1 Maintenance Safety
• See the Safety information that starts on page 11.
• Before service or repair, place the skidding plate in a Safe
Condition to work on (for instructions, see page 9).
• Always wear the correct personal protective equipment
when performing any service or maintenance.
• Use water and, if required, a non-abrasive detergent to
clean the equipment. Do not use gasoline, diesel fuel, or
thinners.
• Always use the correct tools, and make sure that they are
in good condition.
6.2 Maintenance Schedule
Perform maintenance tasks at the specified time or hour
interval, whichever comes first.
Task 8 hours or
daily
100 hours
or annually
Inspect and secure all
fasteners (see page 23).
Inspect all components for
wear or damage. Replace
components, as required.
Clean the equipment. Remove
debris and entangled material.
6.3 Storage
After the season's use or when the skidding plate is not going be
used for a period of time, place it in storage.
Completely inspect the skidding plate. Replace or repair any
worn or damaged components to prevent any unnecessary
down time at next use.
1. Park the skidding away from human activity in a dry, level
area.
2. Lower the skidding plate to the ground. If the ground is soft,
place a board or pallet below the skidding plate.
3. Detach the skidding plate from the tractor (for instructions,
see page 16).
4. Wash the equipment to remove all dirt, mud, and debris.
Inspect all parts and remove any entangled material.
5. Check the condition of choker chains, tongs, synthetic
chokers, or other items used to attach logs to the skidding
plate. Replace or repair, as required.
6. If the skidding plate cannot be stored inside, cover it with a
waterproof tarp.
01612
Fig. 12 – Storage Position
This manual suits for next models
2
Table of contents
Other Wallenstein Tractor Accessories manuals
Popular Tractor Accessories manuals by other brands

WilTec
WilTec 51704 Operation manual

Degelman
Degelman Speedblade 15 manual

Kubota
Kubota 77700-12652 installation manual

Original Tractor Cabs
Original Tractor Cabs 11876 Assembly instructions and parts list

Sears
Sears CRAFTSMAN C 151 61680 3 owner's manual

Worksaver
Worksaver HPD-16 HFL Owner's/operator's manual

Walker
Walker A44 Assembly instructions operator's manual

Claas
Claas 529 Series Information and Basic Field Settings

Bomford
Bomford B324 instruction manual

LS tractor
LS tractor LM1160 Operator manual & service manual

MTD
MTD 19A70041OEM installation manual

Grouser Products
Grouser Products 450 Owner's manual & parts book