Waltron 9065 Service manual

104-001-A.7 Released 06/14/2019
9065 Luminescent Dissolved Oxygen Analyzer Calibration Kit
Quick Reference Manual

Step
Description
Key Points
104-001-A.7 Released 06/14/2019
WALTRON CUSTOMER COMMITMENT
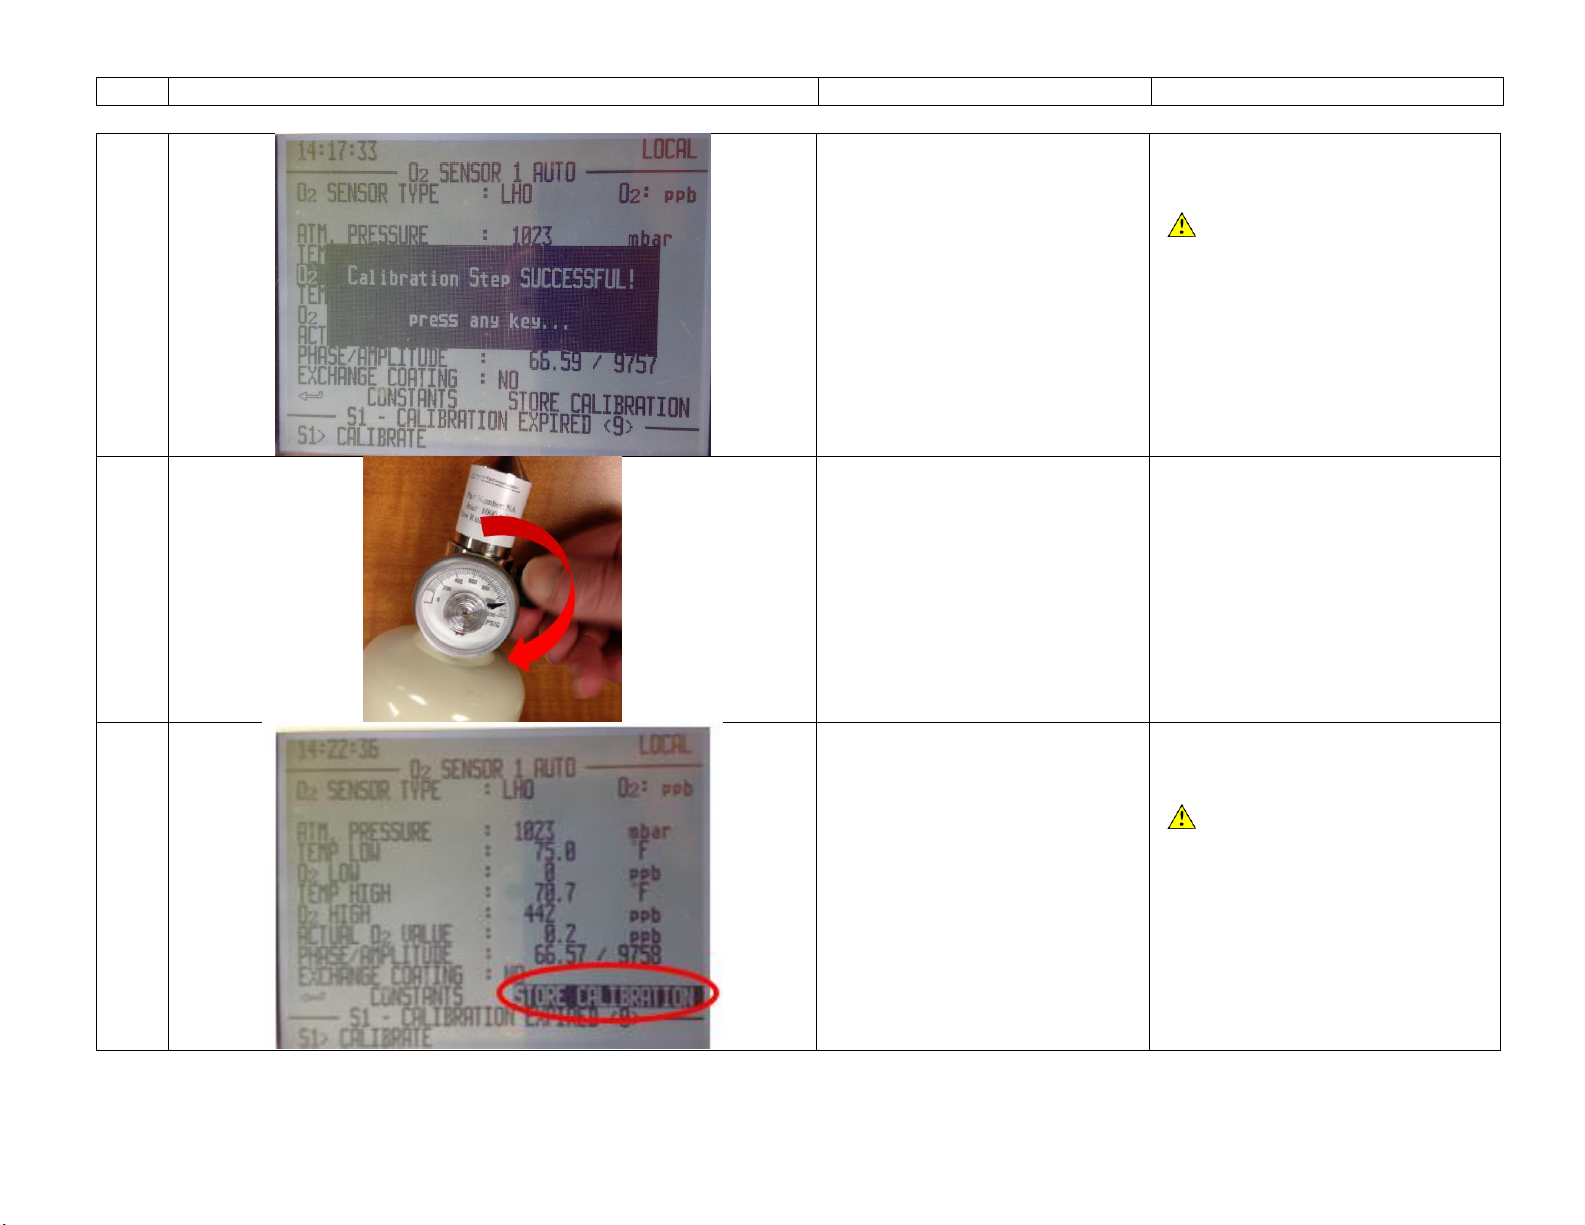
This quick reference manual is a technical guide to aid the customer in the calibration of the Waltron 9065 Dissolved Oxygen Analyzer using the
9065 calibration kit. Waltron provides continuous product improvement and reserves the right to make any modifications to the information
contained herein without notice.
For technical service:
Mike Welenteychik
Technical Service & Support
mwelenteychik@waltron.net
office: (908)534-5100 x106
For engineering and program support:
Kenneth Then
Director of Documentation/Service
office: (908)534-5100 x120
Waltron’s technical expertise and extensive experience provides personalized solutions to the water quality industry. It is Waltron’s commitment
to provide the customer with timely and accurate technical service and support.
Waltron fully expects the customer to be satisfied with the quality, performance, and cost of this product.
SAFETY
Please observe proper safety and handling precautions when operating this product. The following should be noted and adhered to:
Read and understand manual before working with the analyzer and calibration kit.
Safety precautions are highlighted throughout this manual within the Key Points column.
WARRANTY AGREEMENT
Waltron guarantees the equipment to be free of defects. If you believe you have received faulty equipment or an incomplete kit please contact
Waltron at the above contact list. Please follow carefully all instructions on the operation the equipment.

Step
Description
Key Points
104-001-A.7 Released 06/14/2019
1
INTRODUCTION AND SETUP
1.1
Read this manual. Ensure you
have an understanding of the key
points listed in the right hand
column.
1.2
Make sure you have all items
necessary to complete calibration.
Inventory your calibration kit
(Calibration Kit p/n K6000-101).
A calibration beaker is provided
with each 9065 analyzer order.
Contact Waltron for additional
beakers p/n K5000-039.
1.3
Calibration is Due!
Determine if the Dissolved Oxygen
Analyzer requires calibration. If
the screen is flashing and a
triangle appears in the upper right
corner, your 9065 sensor needs
calibration.
Each sensor comes with an
internal light pulse counter.
When the light pulse counter
reaches 1 million your analyzer
requires calibration.
1.4
Turn off sample flow to the
analyzer.

Step
Description
Key Points
104-001-A.7 Released 06/14/2019
1.5
Disconnect the plumbing from the
flow cell.
1.6
Remove the flow cell.
1.7
Air dry
Allow the sensor to air dry and to
allow the sensor and the
calibration kit to equalize to the
same temperature. You may flow
extra calibration gas or clean dry
air over the sensor to expedite
drying.
DO NOT wipe dry the black
sensor spot. Touching the
sensor may damage the
delicate coating.
1.8
Store the calibration kit in the
same room as the sensor for at
least 4 hours while the sensor is
drying to equalize to the same
room temperature.
The calibration process is
temperature sensitive. The
temperature of the sensor
must be roughly equal to the
temperature of the calibration
gas.

Step
Description
Key Points
104-001-A.7 Released 06/14/2019
2
CONNECT THE NITROGEN CALIBRATION GAS
2.1
Attach M5 barb fitting (provided)
to calibration beaker inlet.
The inlet is the side that is closer
to the flange than the other
fitting.
A calibration beaker is included
with the initial analyzer order.
Ensure the provided O-Ring is
installed on the fitting to
provide a seal against leaks
between the fitting and the
beaker.
2.2
Install the calibration beaker by
pushing straight upwards over the
sensor.
2.3
Inspect O-Ring on provided gas
regulator for any debris or
damage.
Take care to ensure there
are no leaks between the
calibration gas tank and the
sensor.

Step
Description
Key Points
104-001-A.7 Released 06/14/2019
2.4
Remove the protective cap from
the provided nitrogen tank.
2.5
Install the gas regulator on
nitrogen gas tank.
2.6
Install one end of the provided
tubing on to gas regulator.

Step
Description
Key Points
104-001-A.7 Released 06/14/2019
2.7
Install the other end of the
provided tubing on to the barb
fitting on the calibration beaker.
2.8
Open the regulator all the way to
allow flow of Nitrogen gas.
The provided fixed flow
regulator will supply the
correct flow rate.
2.9
Wait approximately 15 minutes.
Oxygen readings should drop
rapidly and stabilize to close to 0
ppb.

Step
Description
Key Points
104-001-A.7 Released 06/14/2019
3
CALIBRATION
3.1
Press and hold the ENTER button to get to the MAIN MENU.
Using the arrow buttons select USER. Press ENTER button.
Using the arrow buttons enter the Password 6848.The analyzer will
show “Password Accepted!”
Go back one level by using the arrow keys to select the . Press
ENTER button
Switch to SUPERVISOR Mode.
3.2
Using the arrow buttons select CALIBRATION. Press ENTER button.
Select SENSOR 1 (Or Sensor 2 for calibrating your second sensor in a
dual stream analyzer). Press ENTER button.
Go to O2 SENSOR 1 (or 2)
CALIBRATION Menu.
If you have a dual stream analyzer
you may select Sensor 1 or Sensor 2.
3.3
For oxygen free calibration gas
values for PHASE and AMPLITUDE
should be:
PHASE: 65-68
AMPLITUDE > 5000-6000
If either PHASE or AMPLITUDE do
not fall within these ranges then
the sensor spot needs
replacement.
Watch rate of degradation of
AMPLITUDE. A brand new
sensor spot will have amplitude
= 20000. Typical degradation
rate is approximately 5000 per
year, but will degrade faster or
slower depending on the
makeup of the sample water
Contact Waltron for a
replacement sensor spot p/n
K5000-010. Refer to 9065 User
manual for installation.

Step
Description
Key Points
104-001-A.7 Released 06/14/2019
3.4
Using the Arrow buttons select
O2 AUTO. Press ENTER button.
In the next screen select O2 LOW.
Press ENTER button.
Select 000000 ppb. Press ENTER
button.
3.5
Calibration will begin. Wait
approximately 2 minutes. Do not
disturb the analyzer or the
calibration equipment.

Step
Description
Key Points
104-001-A.7 Released 06/14/2019
3.6
After approximately 2 minutes the
analyzer will show an alert for
successful calilbration.
Press any button to clear this
alert.
If calibration is not successful,
make sure the sensor spot is
completely dry and try again.
Contact Waltron technical
support if you are still
unsuccessful.
3.7
Close the valve on the gas
regulator to preserve your
calibration gas.
3.7
Use the arrow buttons to select
STORE CALIBRATION. Press
ENTER button.
Wait for approximately 2 minutes
the analyzer will show an alert for
successful storage of calibration.
Perform this step to store the
calibration results. Otherwise
the analyzer will revert back to
the last calibration results and
the calibration process must be
repeated.

Step
Description
Key Points
104-001-A.7 Released 06/14/2019
3.8
After calibration is successfully
stored, cycle the power to reboot
the analyzer by disconnecting and
then reconnecting the power cord
(connector at the bottom of the
transmitter which is furthest to
the left).
3.9
Make sure the valve on the gas regulator is closed. Remove the gas
regulator from the gas cylinder. Replace plastic cap and store in a
clean safe location in the provided kit box.
Remove the calibration beaker and store in a clean safe location for
the next calibration.
Reinstall the flow cell and the inlet and outlet connections. Restore
the sample flow to the analyzer.
Disconnect and store the
calibration kit for the next usage.
Reconnect the analyzer flow cell
and restore sample flow.
The nitrogen gas cylinder can
last up to 5-7 calibrations or
until the expiration date printed
on the cylinder, whichever is
sooner.
3.10
Press START button to put the
analyzer back online.
Other manuals for 9065
1
Table of contents
Other Waltron Analytical Instrument manuals