MN-111| Instructions for Use |MN-111 W&H Med ENG Rev12 |2019/08/31 |© 2019 W&H Sterilization Srl 5
Conformity
CONFORMITY TO EUROPEAN AND AMERICAN STANDARDS AND
DIRECTIVES
STERILIZER featuring sterilization cycles conform with the following
standards:
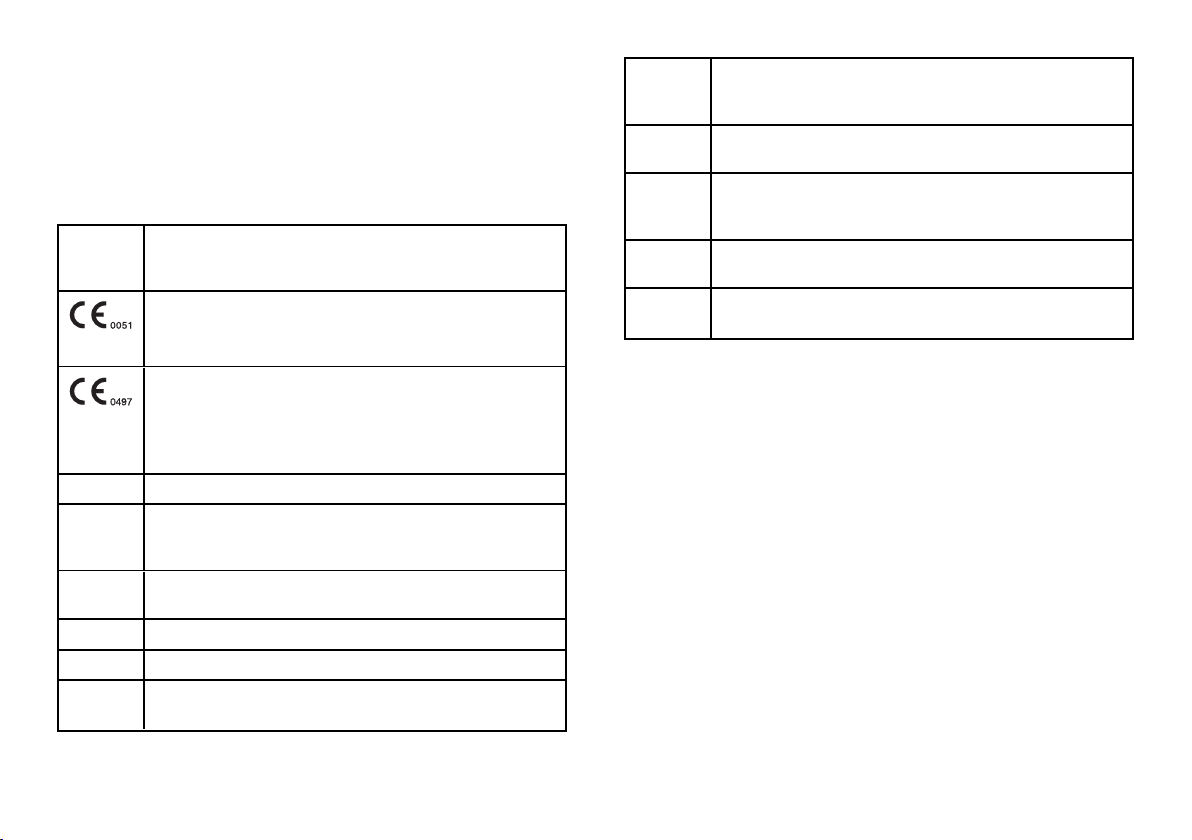
Standards
and
Directives
Description
93/42/EEC
Medical Device Directive (MDD).
Medical Device Directive 93/42/EEC for devices class IIb, in
accordance with the Rule 15 – ANNEX IX of the above Directive.
2014/68/EU
Pressure Equipment Directive (PED).
Directive 2014/68/EU (PED – Pressure Equipment Directive) for
every sterilization chamber designed and manufactured in
conformity to the ANNEX 1 and to the procedure described in the
module D1 Annex III.
2012/19/EU Waste Electrical and Electronic Equipment (WEEE).
CSA C22.2
No. 61010-
1-12
Safety requirements for electrical equipment for measurement,
control and laboratory use, general requirements.
UL 61010-
1:2012
Safety requirements for electrical equipment for measurement,
control and laboratory use, general requirements.
ASME Boiler and pressure vessel code.
EN 13060 Small steam sterilizers.
ANSI/AAMI
ST55:2010
Table-top steam sterilizers.
Standards
and
Directives
Description
IEC 61010-1 Safety requirements for electrical equipment for measurement,
control and laboratory use, general requirements.
IEC 61010-
2-040
Safety requirements for electrical equipment for measurement,
control and laboratory use; particular requirements for sterilizers and
washer-disinfectors used to treat medical materials.
IEC 61326-1 Electrical equipment for measurement, control and laboratory use -
EMC requirements; general requirements.
IEC 61770 Electric appliances connected to the water mains - Avoidance of
backsiphonage and failure of hose-sets.
Note: Every new sterilizer is delivered with a Declaration of Conformity and a
Warranty Card.