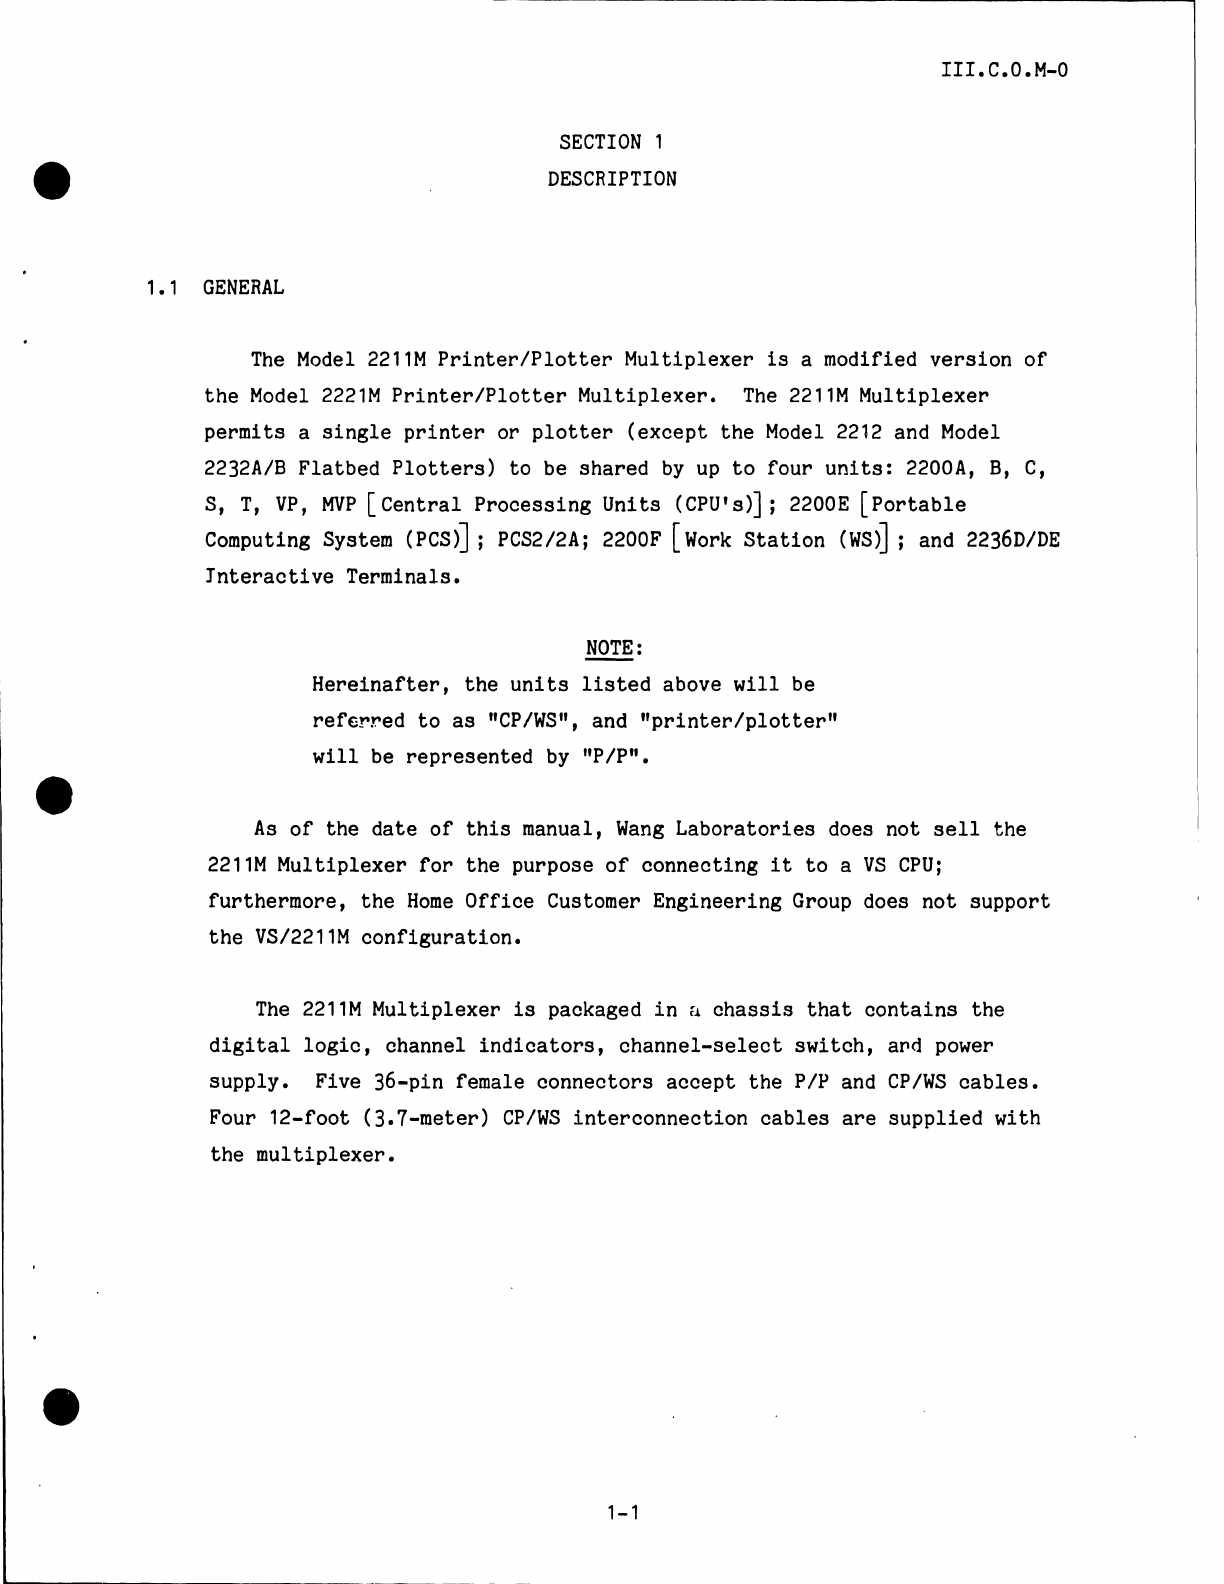
Wang 1111M User manual

CUSTOMER
ENGINEERING
MODEL
1111M
PRINTER/PLOTTER
MULTIPLEXER
MAINTENANCE
MANUAL
NOTICE:
This
document
is
the
property
of
Wang
Laboratories,
Inc.
I
nformat1on
contained
herein
is
considered
company
propri·
etary
information
and
1ts
use
1s
restricted
solely
to
the
purpose
of
assisting
you
in
servicing Wang
products.
Repro·
duct1on
of
all
or
any
part
of
this
document
1s
proh1b1ted
without
the consent
of
Wang
Laboratories.
111.C.O.M-O
( )
LABORATORIES,
INC.
WANG
ONE
INDUSTRIAL AVENUE. LOWELL, MASSACHUSETTS
0185t,
TEL.16171
459.5000.
TWX
710
343·6769,
TELEX
94·7421

III.C.O.M-0
SECTION
1•1
1.2
SECTION
2
SECTION
3
SECTION
4
4.
1
4.2
4.3
4
.1~
4.5
TABLE
OF
CONTENTS
DESCRIPTION
.................................................
..........................................................
GENERAL
SPECIFICATIONS
.........
~
.........................................
UNPACKING
AND.INCOMING
INSPECTION
INITIAL
SETUP
...............................................
THEORY
OF
OPERATION
(BLOCK
LEVEL)
...........................
GENERAL
..........................................................
.........................................................
POWER-ON
CHANNEL-SELECTION
PROTECT-DELAY
SIGNAL
MNEMONICS
................................................
....................................................
......................" ..........................
SECTION
5
DIAGNOSTIC
TESTING
PROCEDURES
...............................
5.
1
5.2
SECTION
6
................................................
PRELIMINARY
CHECK
PRINTER/PLOTTER
DIAGNOSTIC
.......................................
TROUBLESHOOTING
.............................................
1-1
1-1
1-2
2-1
3-1
4-1
4-1
4-1
4-1
4-2
4-2
5-1
5-1
5-1
6-1
SECTION
7
BILL
OF
MATERIALS
•••••••••••••••••••••••••••••••••••••••••••
7-1
SECTION
8
SCHEMATICS
.................................................. 8-1

III.C.O.M-0

-
I

III.C.O.M-0
SECTION
1
e
DESCRIPTION
1.1
GENERAL
The
Model
2211M
Printer/Plotter
Multiplexer
is
a modified
version
of
the
Model
2221M
Printer/Plotter
Multiplexer.
The
2211M
Multiplexer
permits
a
single
printer
or
plotter
(except
the
Model
2212
and
Model
2232A/B
Flatbed
Plotters)
to
be
shared
by
up
to
four
units:
2200A,
B, C,
S,
T,
VP,
MVP
[Central
Processing
Units
(CPU's)]; 2200E
[Portable
Computing System
(PCS)]
;
PCS2/2A;
2200F [Work
Station
(WS)]
; and
2236D/DE
Interactive
Terminals.
NOTE:
Hereinafter,
the
units
listed
above
will
be
refe!'red
to
as
11
CP/WS",
and
"printer/plotter"
will
be
represented
by
"PIP".
As
of
the
date
of
this
manual,
Wang
Laboratories
does
not
sell
the
2211M
Multiplexer
for
the
purpose
of
connecting
it
to
a
VS
CPU;
furthermore,
the
Home
Office
Customer
Engineering
Group does
not
support
the
VS/2211M
configuration.
The
2211M
Multiplexer
is
packaged
in
a
chassis
that
contains
the
digital
logic,
channel
indicators,
channel-select
switch,
aPd
power
supply.
Five
36-pin
female
connectors
accept
the
P/P and
CP/WS
cables.
Four
12-foot
(3.7-meter)
CP/WS
interconnection
cables
are
supplied
with
the
multiplexer.
1-1

III.
C.O.
M-0
1.2
SPECIFICATIONS
Required Supply Voltage:
115
or
230
volts
C,:t10%),
ac,
50
or
60
hertz
C.:t1
hertz)
Power
Consumption:
25
watts
Heat Output:
85
BTU/hr
Fuse Rating:
115
volts
-6/10 ampere,
250
volts,
slow-blow
(WL
#360-1006SB)
230
volts
-3/10 ampere,
250
volts,
slow-blow
(WL
#360-1003SB)
Cable
Description:
Ac
Power
Cord
- 6
ft
(1.8
m)
CP/WS
Inter-connection
Cable -
12
ft
(3.7
m)
(WL
#220-0105)
Operating Environment:
Temperature -50°F
to
90°F
(10°C
to
32°c)
Relative
Humidity -
30%
to
80%,
non-condensing
Dimensions
of
Chassis:
Height -
5.5
in.
(13.8
cm)
Width - 8
in.
(20.0
cm)
Length -11.5
in.
(28.8
cm)
Weight -
15
lbs
(6.7
kg)
1-2


III.C.O.M-0
SECTION
2
UNPACKING
AND
INCOMING
INSPECTION
Before unpacking
the
unit,
visually
inspect
the
shipping
container
for
any
indications
of
shipping
damage
{crushed edges
or
corners,
punctures,
tears,
etc.).
If
any
shipping
damage
is
found,
file
an
appropriate
claim
with
the
carrier
involved.
Open
the
shipping
container
and remove
all
packing
material.
Remove
the
unit
from
the
shipping
container
and
place
the
unit
on
a
flat,
sturdy
surfaae.
Once
again
visually
inspect
the
unit
for
damage.
If
any
shipping
damage
is
found,
file
an
appropriate
claim with
the
carrier
involved
and
notify
the
Wt
Distribution
Center
(Department
90),
Quality
Assurance Department, Tewksbury,
MA.
01876,
of
the
nature
and
extent
of
the
damage, making arrangements
for
equipment replacement,
if
necessary.
Four
12-foot
(3.7-meter)
CP/WS
interconnection
cables
should
be
included
with
the
unit.
Inspect
each
cable
for
damage.
2-1

'

III.
C.O
.M.:..o
SECTION
3
~
INITIAL
SETUP
A.
Remove
the
six
screw8
that
secure
tte
multiplexer
cover
to
the
chassis
and
then
remove
the
cover
of
the
unit.
Inspect
the
unit
for
damaged
assemblies,
loose
hardware
and/or
solder
splashes.
B.
Ensure
that
the
ac
line
voltage
and frequency provided
at
the
installation
site
is
correct
for
the
unit.
(The
line
voltage
and
frequency
at
which
the
unit
is
set
to
operate
is
indicated
on
the
unit
serial
number
tag;
refer
to
FIGURE
3-2.)
Verify
that
the
voltage-select
switch
(ref:
FIGURE
3-3)
is
set
properly.
Verify
that
the
multiplexer
ac power
ON/OFF
switch
is
in
the
OFF
position.
The
ac power cord
may
now
be
plugged
in.
C.
Place
the
ac power
switch
(ref:
FIGURE
3-2)
to
the
ON
position.
The
POWER
indicator
and
the
channel
#1
(CH
1)
indicator
on
the
front
panel
should
light.
D.
Check
+5VR
with a
digital
voltmeter
(dvm).
This
may
be done
by
placing
the
negative
lead
of
the
dvm
on
pin 7
of
L1 and
the
positive
lead
on
pin
14
of
L1
(ref:
FIGURE
3-4).
Ensure
voltage
is
between
+4.8V and +5.2V. There
is
no
+5VR
adjustment.
E.
Place
the
multiplexer
ac power
switch
to
the
OFF
position.
F.
(Refer
to
FIGURE
3-1 and
FIGURE
3-5.)
Plug
the
I/O
cable
that
is
attached
to
the
printer
or
plotter
into
the
jack
labeled
"I/O".
Using
the
CP/WS
interconnection
cables
supplied
(WL#
220-0105),
connect
the
CP/WS
designated
111
to
the
jack
labeled
"CH
1
11
; connect
the
112
CP/WS
to
"CH
2
11
,
the
#3
to
"CH
3",
and
the
114
to
"CH
4
11
•
G.
Place
the
multiplexer
ac
power
switch
to
the
ON
position
and run
all
appropriate
(printer
or
plotter)
diagnostics
on each system channel
(ref:
Diagnostic
Testing
Procedures,
Section
5).
After
each channel
has been
tested,
replace
the
cover
of
the
unit.
3-1

CHANNEL
ill
(CPU
ii
1}
JACK
CHANNEL
114
(CPU
114)
JACK
FIGURE
3-1
I/O
(PRINTER/
PLOTTER}
JACK
2211M;
FRONT
VIEW
CHANNEL-
SELECT
SWITCH
POWER
INDICATOR
CHANNEL
1/1
INDICATOB
CHANNEL
1111
INDICATOR
H
H
H
.
n
.
0
.
f
0

SERIAL
fl
TAG
FIGURE
3-2
2211M;
REAR
VIEW
A.C.
POWER
SWITCH
H
H
H
•
n
.
0
.
'f
0

III.C.O.M-0
VOLTAGE-
SELECT
SWITCH
FIGURE
3-·3
VOLTAGE-SELECT
SWITCH
3-4
•

w
I
U1
FIGURE
3-4 210-7430
PCB;
+5VR
CHECK
POINTS
L1-14
+5VR
CHECK
POINTS
L1-7
1-1
1-1
1-1
•
n
•
0
•
'f·
0

w
I
O'I
WL
1/220-0105
*CP/WS
113
*CP/WS
114
APPROPRIATE
_...,___PRINTER/
PLOTTER
I/0
CABLE
F
a
•
•
2211M
MULTIPLEXER
•
:
*2200A,
B, C,
E,
F,
S,
T,
VP,
MVP;
PCS2/2A;
22360/DE
**
PRINTER/
PLOTTER
**NOT
2212
OR
2232A/B
FIGURE
3-5
SYSTEM
CONFIGURATION
H
H
H
•
n
•
0
•
=f
0

-

III.c.o.M~o
SECTION
4
THEORY
OF
OPERATION
(BLOCK
LEVEL)
4.1
GENERAL
The
2211M
Multiplexer
controls
access
to
the
printer
or
plotter
by
means
of
select
circuitry
that
is
regulated
by
a
channel-select
switch.
This manually
operated
switch determines which
of
the
four
possible
CP/WS's
will
have
exclusive
access
to
the
P/P.
At
power-on,
the
multiplexer
automatically
selects
channel #1.
Incorporated
into
the
multiplexer
electronics
is
a four-second
channel-select
delay
that
prevents
inadvertent
output
from
a bypassed channel while
the
desired
channel
is
being
selected.
4.2
POWER-ON
(Reference
FIGURE
4-1.)
Power-on
sets
the
channel-selection
counter
(L3), which
is
made
up
of
two
7473-type
flip/flops
wired
to
count from
'0'
to
'3'
in
binary,
to
the
'clear'
state
(00
2
).
This
action
lights
the
CH
1
indicator,
and
channel
#1
is
selected
for
printer
access.
(See following Channel
Selection
theory.)
4.3
CHANNEL-SELECTION
(Reference
FIGURE
4-1.)
When
the
channel-select
switch
is
depressed,
the
select
flip/flop
(L13)
'sets',
and then
'resets'
when
~he
switch
is
released.
The
pulse
provided
by
the
select
flip/flop
output
(pin
6)
clocks
the
channel-selection
counter.
A count
of
'1'
causes
the
LED
decoder (L2)
to
illuminate
the
CH
2
indicator.
At
the
same
time,
the
outputs
from
the
channel-selection
counter• allow the
eight
data
bits,
the
data
strobe
bit,
and
the
prime
bit
from
CP/WS
#2
to
pass through
multiplexers
(L4,7,8,9,15)
to
the
printer.
The
channel-selection
counter
outputs
also
allow
the
P/P
status
bits
to
pass through
de-multiplexers
(L5,6,16)
to
CP/WS
#2.
4-1

III.C.O.M-0
Operation
for
other
CP/WS
channels
is
similar
to
that
described
above-- with a
channel-selection
counter output
of
00
2
selecting
channel 11,
10
2
selecting
channel
#3,
and
11
2, channel #4.
4.4
PROTECT-DELAY
(Reference
FIGURE
4-1.)
When
the
channel-select
switch
is
depressed,
the
protect-delay
circuitry
(L17, 18) produces a 4-second
pulse.
This pulse
disables
all
multiplexer
and
de-multiplexer
outputs
for
that
4-second
protect
interval.
This design
feature
ensures
no
inadvertent
output
from
a
bypassed channel while
the
desired
channel
is
being
selected.
Four
seconds
after
the
desired
channel
is
selected,
the
2211M
Multiplexer
will
enable
the
data
and
status
lines
to
the
PIP.
4.5
SIGNAL
MNEMONICS
ACK
BUSY
CLK
D1
-
D8
DSTB
FAULT
FAULT1-4
PO
PRIME
SL
Acknowledge
from
PIP;
buffered
acknowledge
to
CP/WS
Busy
status
from
P/P;
buffered
busy
status
to
CP/WS
Clock from
PIP;
buffered clock
to
CPIWS
Data
lines
from
CPIWS;
buffered
data
lines
to
PIP
Data
strobe
from
CPIWS;
buffered
data
strobe
to
PIP
Fault
status
from
PIP
Fault
status
to
CP/WS
Paper
out
status
from
PIP;
buffered
paper out
status
to
CPIWS
Prime
line
from
CPIWS;
buffered
prime
line
to
PIP
Select
line
from
CP/WS;
buffered
select
line
to
PIP
4-2

j_
0--
SELECT
SWITCH
1----<
F/F
113
CHANNEL
SELECTION
COUNTER
L3
PROTECT
DELAY
CIRCUIT
117,18
FIGURE
4-1
LED
DE-MUX
&
DRIVERS
Ll,2
DATA
-DATAa
'-------...DATA
1
sTROBE,
PRIME
MUX
L4,7,8,9,15
t>RTR/PLTR
JS
BLOCK
DIAGRAM
4-3
III.C.O.M-0
PRTR/PLTR

Table of contents
Other Wang Printer manuals