manuals.online logo
Brands
  1. Home
  2. •
  3. Brands
  4. •
  5. Wardrobes Online
  6. •
  7. Indoor Furnishing
  8. •
  9. Wardrobes Online CH Series User manual

Wardrobes Online CH Series User manual

INSTALLATION INSTRUCTIONS
TO SUIT CH & CC SERIES
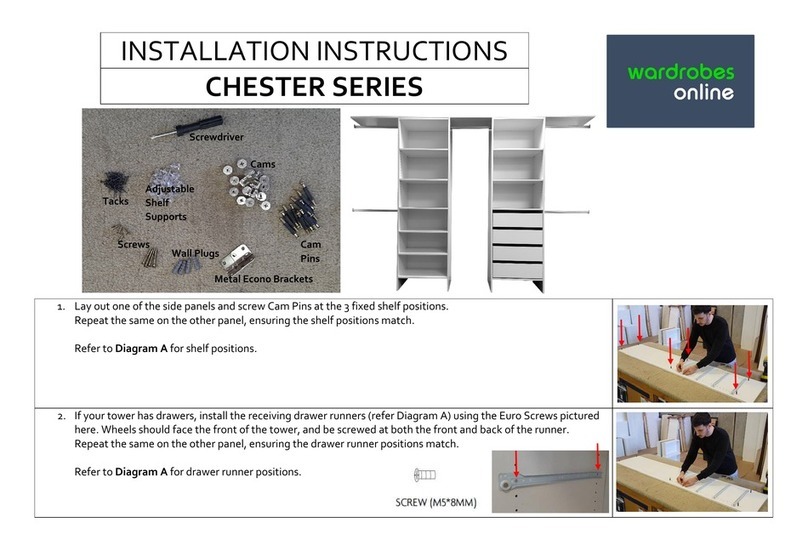
1. Lay out one of the side panels and screw Cam Pins at the fixed shelf positions.
Repeat the same on the second panel, ensuring the shelf positions match.
Refer to Diagram A on the last page for shelf positions.
2. For drawer towers: install the receiving drawer runners (refer Diagram A) using the Euro Screws pictured.
Wheels to the front of the tower, screw at both the front and back of the runner.
Repeat on the second panel, ensure drawer runner positions match.
Refer to Diagram A for drawer runner positions.
Back of
tower
Front of
tower
CAM PINS CAM LOCKS SHELF SUPPORT SCREW LARGE
SILVER BRACKETS WALL PLUG SCREWDRIVER
SCREW SMALL
.
There are fixed shelves. Insert
the
Cam
L
ocks
into the fixed shelves, arrow facing outwards.
If they are a
tight
fit, gently tap them in place with a hammer.
4.
On one of the side panels, slot the top shelf into the first fixed shelf position. Ensure the white edge of the shelf
is at the front of the tower, and that the cams are facing the ceiling at the top of the tower.
Once the shelf is in place, tighten the cams with the screwdriver. Be careful not to overtighten.
Repeat with the middle and lowest fixed shelf, but ensure the cams are facing the floor.
5.
Once
the
drawer runners have been installed on both side panels, lower the second side panel into place where
Cam Pins meet with fixed shelf Cam Locks. Screw Cam Locks to tighten.
6.
As the tower is currently on its side, t
urn
the
tower
on
to
its back
.
From
this position c
arefully stand
the
tower up
.
IMPORTANT: do not stand the tower u from its side. The tower will be unstable until it has been secured
to the back wall of the wardrobe – refer Ste 7.
7.
Once your tower is
upright, carefully
position the tower in place within your wardrobe
. Using a level, ensure the
tower is standing square and fix the tower to the back wall using the Silver Brackets (pictured). We recommend
installing one on top of the tower, and the other bracket under the middle-fixed-shelf (this will be hidden if
drawers are being used). Where possible, fix brackets into studs, or if studs are not available use the Wall Plugs
provided. Use a 5mm drill bit.
Use Small Screws to attach to tower, and Large Screws to attach to the wall.
8.
Insert the Adjustable Shelves at your desired heights using the
Shelf Su orts
.
If your system has drawers, install your drawers by angling the drawer upwards (as shown) and lower and level
the drawer as you slide it in. See Drawer Assembly for more information.
For drawers to operate correctly, make sure the wardrobe tower is on a level surface and square to the back wall.
If the floor is not level then floor packers may be required (not included).
9. To install your Gable End Panel - IF you have purchased separately
Using a spirit level, ensure the panel is straight.
Secure to the back wall using the Econo Brackets into studs, on higher, one lower (if studs are not available use
the wall plugs provided).
If using the Gable End Panel at an open end (not against a side wall), install the Econo Brackets into studs either
side of the Gable. Extra fixings may be required to ensure Gable is fixed in place.
10.
Cut
and install your top shel
ves
and hanging rails.
Refer to Top Shelf Installation and Hanging Rail Installation for information about installing these into your
wardrobe.
If you have a shelf tower, you can choose any height to install your adjustable shelves between the top, middle and lowest fixed shelves.
Diagram A
← (1
st
hole) - top fixed
shelf position
← 30
th
hole - middle fixed
shelf
← (36
th
hole) 1st drawer
runner
← (42
nd
hole) 2nd drawer
runner
← (4
th
hole) 3rd drawer
runner
← (54
th
hole) 4th drawer
runner
← Last hole (55
th
hole)
Lowest fixed shelf
position
Tower Installation 1 4 Drawers Tower Installation for 5 Drawers
Chester Country Club (For Chester and Country Club)
← (1
st
hole) - top fixed
shelf position
← (30
th
hole) - middle
fixed shelf
← (36
th
hole) 1st drawer
runner
← (42
nd
hole) 2nd drawer
runner
← (4
th
hole) 3rd drawer
runner
← (54
th
hole) 4th drawer
runner
← Last hole (55
th
hole)
Lowest fixed shelf
position
← (1
st
hole) - top fixed
shelf position
← (24
th
hole) – middle
fixed shelf
← (30
th
hole) 1st drawer
runner
← (36
th
hole) 2nd drawer
runner
← (42
nd
hole) 3rd drawer
runner
← (4
th
hole) 4th drawer
runner
← (54
th
hole) 5th drawer
runner
← Last hole (55
th
hole)
Lowest fixed shelf
position

This manual suits for next models

1

Other Wardrobes Online Indoor Furnishing manuals

Wardrobes Online Chester Series User manual

Wardrobes Online

Wardrobes Online Chester Series User manual

Wardrobes Online Chester Series User manual

Wardrobes Online

Wardrobes Online Chester Series User manual

Wardrobes Online Maxi Wall Hung Series User manual

Wardrobes Online

Wardrobes Online Maxi Wall Hung Series User manual

Wardrobes Online Country Club User manual

Wardrobes Online

Wardrobes Online Country Club User manual

Popular Indoor Furnishing manuals by other brands

Hillsdale Furniture NORWOOD 4935-826S quick start guide

Hillsdale Furniture

Hillsdale Furniture NORWOOD 4935-826S quick start guide

Next OAK ROUND DINING TABLE 148036 Assembly instructions

Next

Next OAK ROUND DINING TABLE 148036 Assembly instructions

Extreme Networks VX-RPS-CH3 quick reference

Extreme Networks

Extreme Networks VX-RPS-CH3 quick reference

Dorel DA1010-7MOV manual

Dorel

Dorel DA1010-7MOV manual

Malouf Structures E450 owner's manual

Malouf

Malouf Structures E450 owner's manual

Core Products CR 800-Set Assembly instructions

Core Products

Core Products CR 800-Set Assembly instructions

FMD CHAT 229-001 Assembly guide

FMD

FMD CHAT 229-001 Assembly guide

il Tutto bambino FELIX ITI-FEL-BUTTER Assembly instructions

il Tutto bambino

il Tutto bambino FELIX ITI-FEL-BUTTER Assembly instructions

Triarch 75365/10 Assembly instructions

Triarch

Triarch 75365/10 Assembly instructions

READY To ASSEMBLE TRUNDLE BED Assembly instructions

READY To ASSEMBLE

READY To ASSEMBLE TRUNDLE BED Assembly instructions

adorini Cabinet humidor Installation

adorini

adorini Cabinet humidor Installation

Coaster 651302PP Assembly instructions

Coaster

Coaster 651302PP Assembly instructions

Triarch 32510 Assembly instructions

Triarch

Triarch 32510 Assembly instructions

Next LOUIS 917174 Assembly instructions

Next

Next LOUIS 917174 Assembly instructions

Coaster 931215 Assembly instructions

Coaster

Coaster 931215 Assembly instructions

pakoworld APOLLON 119-001092 manual

pakoworld

pakoworld APOLLON 119-001092 manual

Mimosa 0101381 Assembly instructions

Mimosa

Mimosa 0101381 Assembly instructions

Safco Urbane 7960 Assembly instructions

Safco

Safco Urbane 7960 Assembly instructions

manuals.online logo
manuals.online logoBrands
  • About & Mission
  • Contact us
  • Privacy Policy
  • Terms and Conditions

Copyright 2025 Manuals.Online. All Rights Reserved.