WAREMA EWFS Weather station plus User manual

Operating and installation instructions
EWFS Weather station plus
Keep for future use!
Valid from 01 october 2019
890464_k•en•2019-10-01 We reserve the right to carry out improvements 1
Safety instructions
ARNINGW
The electrical installation must be per-
formed by a certified electrician in accord-
ance with the electrical installation regula-
tions published by the Association of Ger-
man Electrical Engineers (VDE 0100) or the
standards and regulations of the country
in which the device is being installed. The
specialist must observe the installation
instructions included with the electrical
device.
ARNINGW
If hazard-free operation cannot be
assumed, the device may not be commis-
sioned or must be decommissioned.
This assumption is justified,
If the housing or the supply lines show
signs of damage,
The device is no longer working.
ARNINGW
An automatically controlled mechanism
may begin to move unexpectedly!
Therefore, never place any objects in the area of move-
ment of an automatically controlled mechanism.
Disconnect the power supply of the controlled sun
shading products before maintaining or cleaning the
products.
AUTIONC
Never activate buttons on your transmitter
arbitrarily without visual contact to the sun
shading product. Children may not play with
this product - Remote controls or transmit-
ters may not get into the hands of children!
OTICEN The receiver (e.g. the radio plug receiver,
radio tubular motor) cannot function in the
event of a power failure. Therefore, raise the
sun shading system early enough in case of
an approaching storm.
General information
1
23
5
4
Fig. 1 EWFS Weather station plus
1 Heated sensor surface (precipitation sensor)
2 Photodiodes (photo sensor)
3 Wind current sensor (wind sensor)
4 Joint
5 Mounting plate with cover
The connection for the weather station power supply is
found under the cover.
The EWFS Weather station plus enables the wireless con-
trol of sun shading drives and is equipped with sensors
for brightness, wind speed and precipitation. The weather
station is supplied with mains voltage. The device sends
move commands to EWFS-compatible receivers.
Intended use
The EWFS Weather station plus is an electronic device
developed to control sun shading systems. The approval
of the manufacturer must be obtained for uses outside of
the purposes listed in these instructions.

890464_k•en•2019-10-01We reserve the right to carry out improvements
2
The radio control range is limited by legal regulations for
radio systems and by structural factors. Adequate radio
reception must be taken into consideration when planning
the system. This is particularly important when the radio
signal must pass through walls and ceilings. The control
unit should not be installed in the immediate vicinity of
metal components (steel beams, steel-reinforced concrete,
fire door).
Therefore, check that the receiver is functioning prop-
erly before the final installation.
Strong local transmitter systems (e.g. baby monitors or
neighbouring transmitters) can interfere with the reception.
Installation
This device is designed for surface mounting on a build-
ing facade. It can also be mounted on a pole using the
included cable ties.
Included fixing materials:
2 screws 4.5 x 40 mm
2 dowels 6mm
2 spacers for wall and ceiling installation (Fig. 2)
2 steel cable ties 360 mm
Use suitable fixing materials only. Depending on the
substructure (e.g. plastered outer insulation), other
screws and dowels may need to be used.
Do not remove the protective cap of the wind current
sensor until the device is fully installed.
Important information on the installation location
Attach the device outdoors at a readily accessible but
raised location.
Metal-clad buildings, domestic interference sources
(unshielded household appliances, television sets,
computers), supply lines and metallic objects such
as sheet metal enclosures must have a distance of at
least 0.5 m from the weather station.
Install the device in a position in which the wind current
sensor is horizontal (housing inclination of 15°). When
installing the device on sloped surfaces, the sensor
can be positioned horizontally using the joint (Fig. 1).
When selecting an installation location, ensure that
precipitation can fall onto the sensor surface from all
directions without being obstructed. For example, an
overhanging roof may shield the panel.
Before installing the device, consider that trees, bushes
or parts of the building may shade the photo sensor
during the course of the day. In this case, the sen-
sor cannot deliver exact values and the results will
be incorrect. Therefore, select the installation location
carefully.
When selecting an installation location, ensure that the
photo sensor is exposed to the same brightness condi-
tions as the sun shading product being controlled. This
means that you need to position the photodiodes ac-
cording to the building facades being shaded. Ideally,
the weather station is oriented in the same direction as
the sun shading product being controlled.
Mount the device in the vicinity of the sun shading
product although not in places where the sun shading
product affects the wind currents; otherwise, the sen-
sor will not provide correct wind readings.
Separate spacers are included for wall and ceiling
installation. They prevent cracking and deformation of
the plastic (Fig. 2).
Fig. 2 Clipping the separate spacers into the threaded hole
Additional installation information can be found in the
documentation of your sun shading product.
Mounting plate
4,5
9,0
207,5
4,5
9,0
56
185
Fig. 3 Dimensions

3
890464_k•en•2019-10-01 We reserve the right to carry out improvements
Wall mounting
Fig. 4 Wall mounting
Clip one of the included spacers in the threaded hole
(horizontally or vertically, Fig. 2).
Attach the weather station to a suitable substructure
using the included screws and dowels as shown
(Fig. 4).
The connecting cable must be correctly positioned in
the guide on the back of the mounting plate to ensure
it is not pinched during installation.
Ceiling installation
Fig. 5 Ceiling installation
Loosen the screw on the weather station joint.
Swing the mounting plate of the weather station up by
90° (or by the necessary angle).
Tighten the screw on the joint.
Clip one of the included spacers in the threaded hole
(horizontally or vertically, Fig. 2).
Attach the weather station to a suitable substructure
using the included screws and dowels as shown
(Fig. 5).
The connecting cable must be correctly positioned in
the guide on the back of the mounting plate to ensure
it is not pinched during installation.
Pole installation
Fig. 6 Pole installation and steel cable ties locking mechanism
Remove the thin (triangular) pieces at the top and
bottom edge of the mounting plate using a wire cutter
(Fig. 6*).
Pass the included steel cable ties through the mount-
ing plate openings as shown. The cable tie closures
must face outward.
Turn both ends of the cable tie inwards, one at a time,
using needle-nosed pliers.
Check that the weather station cannot be turned.

890464_k•en•2019-10-01We reserve the right to carry out improvements
4
Connection
4
3
2
1
Fig. 7 Connecting the weather station
1 Cable conduit
2 Strain relief
3 Rubber seal
4 Terminals
The weather station is supplied with mains voltage.
An on-site overload current disconnecting and isolating
switch to switch off the entire system must be provided.
Route the line in such a way that water cannot flow into
the device.
Use a line that is approved for the operating voltage
and is resistant to weather and UV radiation (suitable
for outdoor use).
If the line immediately enters the device after it emerg-
es from the wall through the cable conduit (1), you can
use an NYM 3x1.5 mm2.
Pass the line through the cable conduit (1) and rubber
seal (3) into the housing. Secure the line with the strain
relief (2).
Connect the wires to the terminals (4). Note the labels
on the terminals.
OTICEN You can also route a surface-mounted line
directly from below into the housing. To
do this, introduce a hole into the cover of
the mounting plate. The inside of the cover
is thinner at the location designed for this
purpose.
Operating elements
6
7
9
8
10
Fig. 8 Operating elements, view from below, factory setting
6 Wind: Wind speed limits can be preselected using
this switch.
7 LED: Flashes green when the L button is
pressed. Flashes red (three at a time) while a wind
alarm is active. Flashes red (three at a time) while a
wind alarm is active. Lights up green when the precipi-
tation monitor is switched on.
8 Brightness: Brightness limit values can be prese-
lected using this switch.
9 Learn button: For learning the weather station into
a receiver. This button must be held down until the sun
shading system waves once. If the button is held down
until the sun shading product stops moving, the wind
and brightness evaluation is learned into the receiver
as well.
10 Precipitation button: To switch precipitation
monitoring on and off, press the button. The status
LED lights up green permanently when precipitation
monitoring is switched on.
Commissioning
You can find instruction videos on our
YouTube channel at:
http://www.youtube.com/user/SonnenLichtManager/videos
Remove the transparent protective cap from the current
sensor.
Switch the mains voltage on.
The device is now switched on and ready for operation.

5
890464_k•en•2019-10-01 We reserve the right to carry out improvements
Symbols used
When the receiver is delivered, it does not "know" any
transmitters initially and first needs to learn to which
transmitters it should respond. We refer to this process as
"learning".
Power-up: To learn in a receiver, you must
de-energize a receiver or group of receiv-
ers, either at the in-line circuit breaker or at
the associated plug-in connector, and then
switch it back on again after approx. 5 sec-
onds. (Power-up procedure). Always carry
out a power-up procedure when you see the
symbol of the circuit breaker.
The receiver is now in learn mode for ap-
prox. one minute. The training key on the
transmitter must be pushed within this period
or the learn mode is closed. Push the train-
ing key on your transmitter whenever you
see the symbol of the training key.
Wave: After the learn button on the transmit-
ter is activated, the connected sun shad-
ing system carries out several movements.
In these instruction, we use the adjacent
symbol for waving. Waving once: Press the
learn button on the transmitter, wait until the
connected sun shading system moves and
then release the button immediately.
Learning in the weather station
The weather station sends wind-, brightness- and precipita-
tion-related move commands to an EWFS Receiver. It must
be learned into the receiver first.
OTICEN The weather station can only be learned as
an auxiliary channel.
Example: You would like to operate an external venetian
blind with a 1-channel hand-held transmitter (I) and control
it with the weather station based on brightness, precipita-
tion and wind values.
1
Ι
= Master channel = Auxiliary channel
Fig. 9 Controlling an external venetian blind with a hand-held
transmitter (I) and a weather station.
Perform the following steps consecutively:
Place receiver1 into learn
mode: Perform the power-up
procedure on external vene-
tian blind1.
Learn in the hand-held
transmitter (I) as the master
channel: Take the hand-held
transmitter (I), press and hold
the learn button, the external
venetian blind1 waves once,
release the button.
The learn mode is ended
automatically. The hand-held
transmitter (I) is now the mas-
ter channel for external vene-
tian blind1.
External venetian blind1 can now be operated with the
hand-held transmitter (I).
Now learn the weather station into the receiver as an
auxiliary channel:
Ι

890464_k•en•2019-10-01We reserve the right to carry out improvements
6
For this function, the wind
speed limit may not be set to
TEST and the brightness limit
value may not be set to OFF
at the weather station.
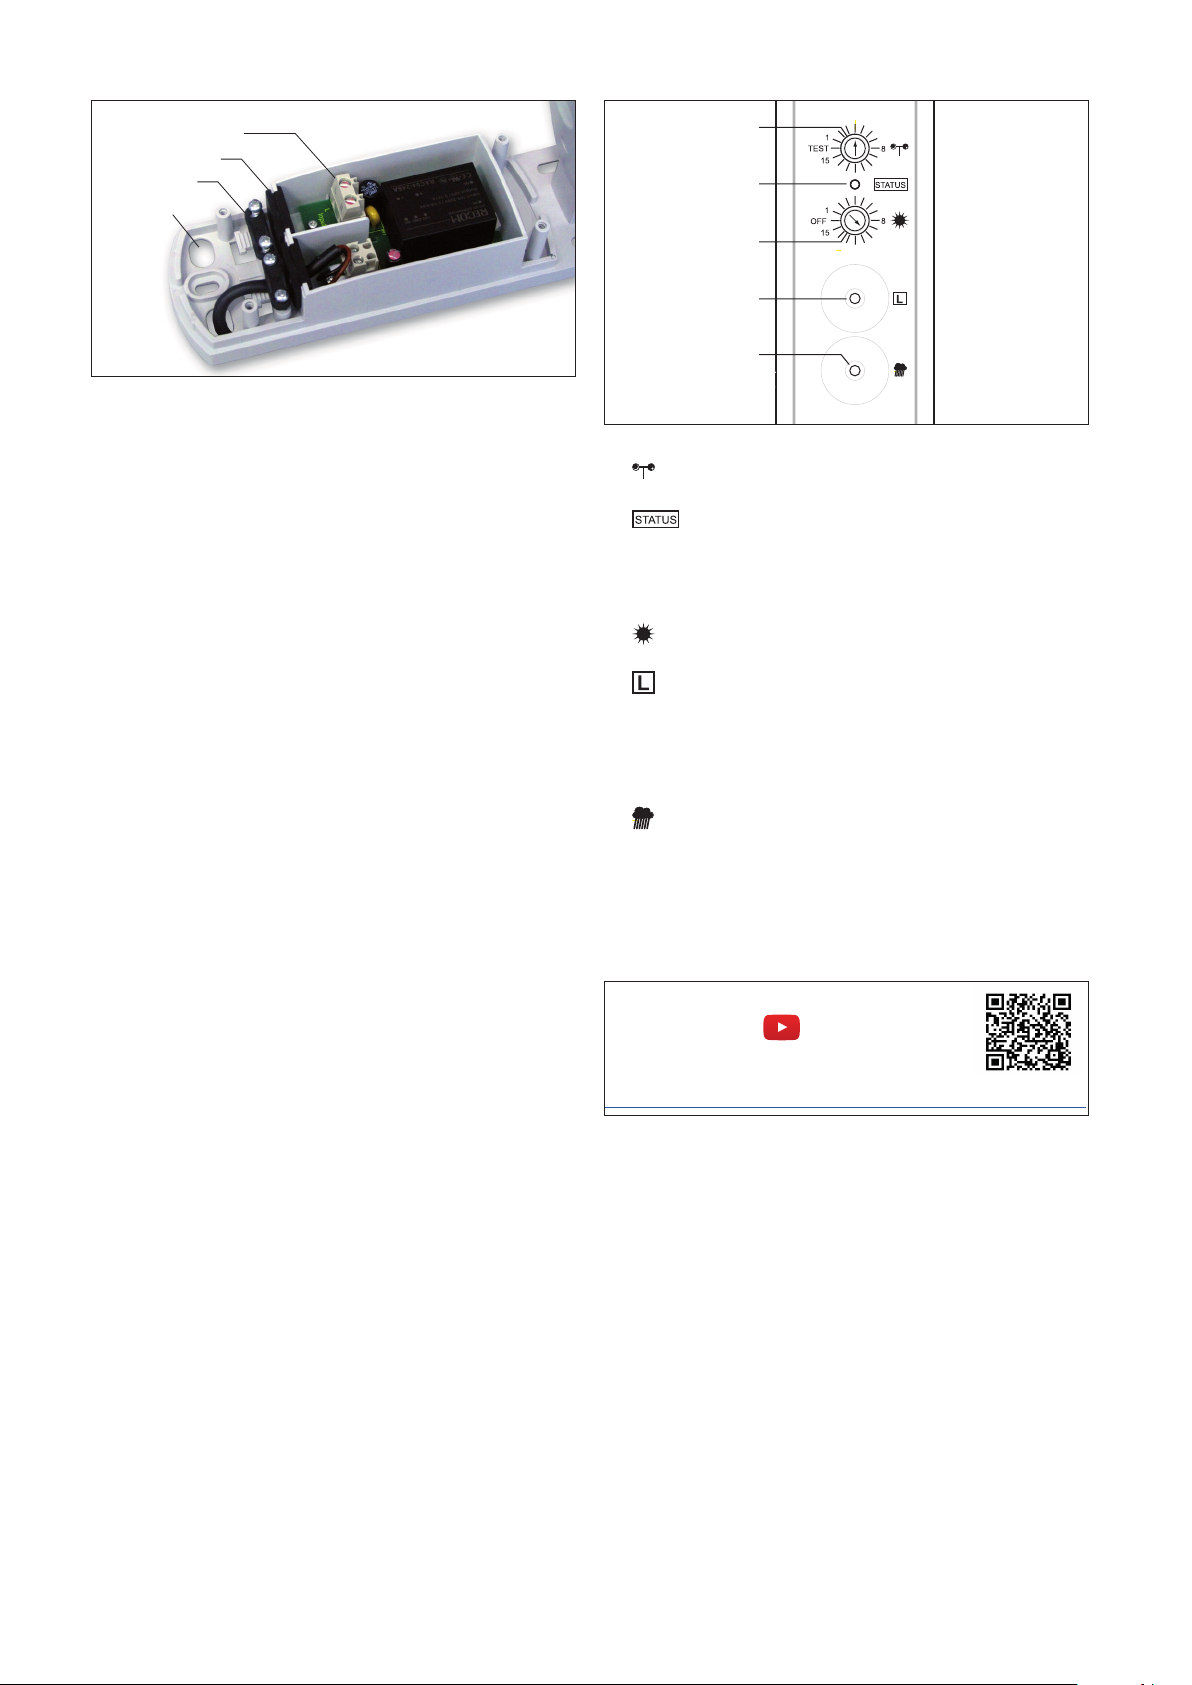
Switch on precipitation
monitoring: Press the
button on the weather sta-
tion. The status LED lights
up green permanently when
precipitation monitoring is
switched on.
Place receiver1 into learn
mode: Take the hand-held
transmitter into which the mas-
ter channel was just learned (I),
press and hold the learn but-
ton, external venetian blind1
waves once, release the button.
Learn in the weather station
as an auxiliary channel: Press
the button on the weather
station and hold until the sun
shading system stops moving
(the external venetian blind
waves three times). The weath-
er station is now an auxiliary
channel for external venetian
blind1. The wind, precipitation
and brightness evaluation was
learned in at the same time.
End the learn mode: Take the
hand-held transmitter with the
master channel (I) and press
the "Up" or "Down" button.
External venetian blind1 now can also be controlled
with the weather station.
The weather station evaluates the brightness, precipitation
and wind speed data and controls the sun shading system
accordingly.
Testing the weather station
Perform the following steps to test the functions of the
weather station.
In the previously described learning procedure, the wind,
precipitation and photo sensors were learned in together.
If you discover during the test that one of the sensors was
not learned in (e.g. due to electromagnetic interference), it
must be learned in again separately.
OTICEN If a sensor that has already been learned in is
learned in again, it is learned out.
Example: During the learning procedure,
only the precipitation and wind sensors were
learned in. If the learning procedure is re-
peated, the photo sensor is learned in but the
precipitation and wind sensors are learned out.
Ι
Ι
1. Test the wind monitoring function
Move the "Wind" switch on the weather station to the
TEST position. Move the sun shading system down
slightly and simulate a gust of wind on the wind sen-
sor. The sun shading system should now move up as
a wind alarm is triggered. The sun shading system
now cannot be operated for the duration of approx.
1minute (wind alarm).
OTICEN In the TEST position, the duration of the wind
alarm is only approx. one minute, after which
the system can be operated again. For all other
settings (see the adjacent limit value table) a
wind alarm takes approximately 10minutes.
The TEST setting should not remain set during
normal operation since the weather station oth-
erwise continuously sends a wind alarm (high
power consumption).
If the sun shading system does not move up, the wind
sensor may not have been learned in. To test whether the
wind sensor was correctly learned into the receiver:
Move the "Wind" switch on the weather station to any
position other than TEST. Move the "Brightness" switch
to OFF. Lower the sun shading system slightly and
press the button on the weather station.
If wind monitoring has been learned in correctly, the
sun shading system moves down for approx. one
second.
If the sun shading system does not move during this test,
wind monitoring was not learned in. Learn in wind monitoring
again separately (see „Learning in functions individually“).
OTICEN In this test, EWFS tubular motors do not re-
spond when the button is pressed.

7
890464_k•en•2019-10-01 We reserve the right to carry out improvements
2. Test the sun control
Move the sun shading system manually to its middle
position.
Move the "Wind" switch on the weather station to the
TEST position and the "Brightness" switch to position
"1".
Trigger a wind alarm: Simulate a gust of wind on the
wind sensor. The wind alarm was triggered when the
sun shading system moves up.
After 1 or 2 minutes the sun shading system must
move down again.
If the sun shading system does not move down, the photo
sensor may not have been learned in. To test whether the
photo sensor was learned into the receiver correctly:
Move the "Brightness" switch on the weather station to
any position other than "OFF". Move the sun shading
system down slightly and press the button on the
weather station.
If the sun control was learned in correctly, the sun
shading system moves down for approx. one second.
If the sun shading system does not move during this test,
the sun control was not learned in. Learn in the sun control
again separately (see „Learning in functions individually“).
3. Test the precipitation monitoring function
Move the sun shading system manually to its middle
position.
Wet the sensor surface of the precipitation sensor
slightly with water.
The status LED flashes red. The sun shading system
should now move up.
If the sun shading system does not move during this
test, precipitation monitoring was not learned in. Learn in
precipitation monitoring again separately (see „Learning in
functions individually“).
OTICEN In this test, EWFS tubular motors do not re-
spond when the button is pressed.
Learning in functions individually
If problems arose when learning in the weather station of a
sun shading product, the functions can be learned into the
sun shading product separately later on.
Learning in wind monitoring individually
Perform the following steps consecutively:
Place receiver1 into learn
mode: Take the hand-held
transmitter into which the
master channel was learned
(I), press and hold the learn
button, external roller blind1
waves once, release the but-
ton.
Set the switches on the
weather station: The "WIND"
switch is located in any posi-
tion other than "TEST", and
the "Brightness" switch is in
the "OFF" position. Precipita-
tion monitoring is switched
off (the LED does not light up
green permanently).
Learn in wind monitoring:
Press the button on the
weather station and hold it
until the sun shading system
stops moving (the external
venetian blind waves once).
Release the button. The
weather station is now an
auxiliary channel for external
venetian blind1. Wind moni-
toring was learned in at the
same time.
End the learn mode: Take
the hand-held transmitter with
the master channel (I) and
press the "Up" or "Down" but-
ton.
Wind monitoring is now learned into the sun shading
product.
Ι
Ι

890464_k•en•2019-10-01We reserve the right to carry out improvements
8
Learning in the sun control individually
Perform the following steps consecutively:
Place receiver1 into learn
mode: Take the hand-held
transmitter into which the
master channel was learned
(I), press and hold the learn
button, external roller blind1
waves once, release the but-
ton.
Set the switches on the
weather station: The
"WIND" switch is located in
the "TEST" position and the
"Brightness" switch is in any
position other than the "OFF"
position. Precipitation moni-
toring is switched off (the
LED does not lights up green
permanently).
Learn in the sun control:
Press the button on the
weather station and hold it
until the sun shading system
stops moving (the external
venetian blind waves once).
Release the button. The
weather station is now an
auxiliary channel for external
venetian blind1. The sun
control was learned in at the
same time.
End the learn mode: Take
the hand-held transmitter with
the master channel (I) and
press the "Up" or "Down" but-
ton.
The sun control is now learned into the sun shading
product.
Return the wind monitoring setting back to the original
value.
Ι
Ι
Learning in precipitation monitoring individually
Perform the following steps consecutively:
Place receiver1 into learn
mode: Take the hand-held
transmitter into which the
master channel was learned
(I), press and hold the learn
button, external roller blind1
waves once, release the but-
ton.
Set the switches on the
weather station: The "WIND"
switch is located in the
"TEST" position, and the
"Brightness" switch is in the
"OFF" position. Precipitation
monitoring is switched on
(LED lights up green perma-
nently).
Learn in precipitation moni-
toring: Press the button
on the weather station and
hold it until the sun shading
system stops moving (the
external venetian blind waves
once). Release the button.
The weather station is now an
auxiliary channel for external
venetian blind1. Precipitation
monitoring was learned in at
the same time.
End the learn mode: Take
the hand-held transmitter with
the master channel (I) and
press the "Up" or "Down" but-
ton.
Precipitation monitoring is now learned into the sun
shading product.
Return the wind monitoring and sun control settings
back to the original values.
Ι
Ι

9
890464_k•en•2019-10-01 We reserve the right to carry out improvements
Changing the limit values
AUTIONC
Changing these settings may impair the
safety of the system or reduce its effective-
ness. It is better to consult an expert if you
are not sure about the effect of a change.
Set the limit values as required for your system (to the
product most sensitive to the wind) based on the fol-
lowing table.
Wind speed limit Photo limit
"Wind"
switch
position
Wind speed
limit (m/s)
"Brightness"
switch
position
Brightness
limit value
(klx)
TEST Test OFF Off
1 2 1 5
2 3.5 2 15
3 6 3 20
4* 7.5* 4 25
5 9 5 30
6 10.5 6 35
7 12 7 40
8 13.5 8 45
9 15 9 50
10 16.5 10* 55*
11 18 11 60
12 19.5 12 65
13 21 13 70
14 22.5 14 80
15 25 15 >90
*= Factory setting
Operation
Switching the sun control on/off temporarily
("A" button)
To temporarily switch off the sun control for a channel into
which the weather station has been learned in using the A
button:
Press the Abutton and hold until the sun shading sys-
tem stops moving. Release the button again.
The sun control is now switched off for 12hours. After
this period, the sun control is reactivated again auto-
matically.
To reactivate the sun control with the Abutton:
Press and hold the Abutton. Release the button again
when the sun shading system waves.
The sun control is active again.
OTICEN The sun control can be switched off temporar-
ily with the master channel or with the auxiliary
channels.
Switching the sun control on/off permanently
Set the switch for the sun control on the weather sta-
tion to OFF.
The weather station stops sending brightness-related
move commands.
Set the switch for the sun control on the weather sta-
tion to the previous value to switch the sun control
back on.
Switching precipitation monitoring on/off
Press the button on the weather station to switch
precipitation monitoring on or off. If precipitation
monitoring is switched on, the status LED lights up
permanently in green. When it is switched off, the LED
does not light up.

890464_k•en•2019-10-01We reserve the right to carry out improvements
10
Cleaning
Photo sensors or solar panels must always be clean
to avoid incorrect measuring values and to ensure
operating reliability. The device should occasionally be
checked for soiling (e.g. bird droppings) and cleaned
carefully. Standard household cleaners may be used.
Do not use solvents.
In snowfall, check daily that the solar panel and pho-
todiodes are free of snow. A snow-covered weather
station may fail to function properly. If the energy in the
buffer is depleted, the weather station fails completely.
It resumes normal operation after it is recharged via
the solar panel.
The weather station may ice over and the wind wheel
may freeze up in extreme weather conditions. To avoid
wind damage, take your sun shading system out of
operation until wind monitoring can be resumed.
Never remove firmly attached layers of ice and snow.
Scratching, heat and chemical antifreeze agents may
damage the weather station.
Maintenance
There are no parts within the device that require mainte-
nance.
Strong vibrations at the installation location (for exam-
ple, from frequent high wind loads) can loosen the fixing
screws. If the joint screw is not properly tightened, the
orientation of the weather station may change as well.
Therefore, check from time to time that the weather
station is still firmly installed and that all screws are
sufficiently tight.
Liability
Failure to comply with the product information in these
instructions and use of the device in a manner that con-
travenes its intended use and purpose may result in the
manufacture refusing to honour warranty claims for prod-
uct damage. In this case, liability for consequential harm
to persons or damage to property will also be excluded.
Follow also the instructions in the operating manual of
your sun shading system. The automatic or manual opera-
tion of the sun shading system when iced over as well as
using the sun shading system during severe weather may
cause damages and must be prevented by the user by
taking suitable precautions.
OTICEN The device meets the requirements on interfer-
ence resistance and interference emission for
use in residential and commercial areas.
Disposal
After its use, the device must be disposed off according to
legal regulations or returned to your local recycling centre!

11
890464_k•en•2019-10-01 We reserve the right to carry out improvements
Heartbeat function
The weather station cyclically sends a so-called "heartbeat
pulse" to all receivers into which it is learned.
If the receiver does not receive measuring values for 24h,
it is assumed that the weather station has failed (heartbeat
function). The receiver moves the connected product to
a safe position. Depending on the type of sun shading
product, operation is limited or impossible until a new valid
value is received. This is a safety function and not an error.
AUTIONC
If you force the sun shading system to move
down by repeatedly activating the DOWN
button when the weather station has failed,
the safety functions are not active. The sun
shading system may become damaged (e.g.
due to high winds).
Technical data
EWFS Weather station plus
Min. typ. Max. Unit
Supply
Operating voltage 85 230 253 V AC
Frequency 50 60 Hz
Power consumption 3 W
RF transmitter
Transmission frequency 433.92 MHz
Transmission power 10 dBm
Range (environment
without interference) 30 m
Wind measurement
Wind speed 2 25 m/s
Locked time in case of
wind alarm 10 min
Brightness measurement
Brightness 5 100 klx
Switch-off delay
(if brightness falls below
60% of the set limit value)
10 min
Enclosure
Dimensions in mm
(LxWxH) 248 x 59 x 207 mm
Degree of protection IP43
Safety class II
Miscellaneous
Conformity available at www.warema.de/ce
This device meets the requirements on electromagnetic immu-
nity and electromagnetic interference for use in residential and
commercial environments.
WAREMA Renkhoff SE declares herewith that this radio system
type [EWFS Weather station plus] is in compliance with the
current guidelines.
Ambient conditions
Operating and storage
temperature -20 60 °C
Humidity
(non-condensing) 10 40 100 %RH
Pollution degree 2
Article numbers
EWFS Weather station plus 1002 811
WAREMA Renkhoff SE
Hans-Wilhelm-Renkhoff-Strasse 2
D-97828 Marktheidenfeld

890464_k•en•2019-10-01We reserve the right to carry out improvements
12
Troubleshooting
Type of malfunction Possible cause Remedy
The sun shading system does not wave
when the button is pressed (the status
LED flashes green while the button is
pressed)
The receiver is not in learn mode Place the receiver into learn mode
No operating voltage at the receiver Switch on the mains voltage
The sun shading system is driven by the
EWFS tubular motor
For design reasons, EWFS tubular motors
do not respond when the button is
pressed
The sun shading system does not wave
when the button is pressed (status LED
does not flash)
The operating voltage of the weather sta-
tion failed
Switch on the mains voltage
When activated with the transmitter, the
sun shading system moves down only
briefly and then back up
A wind alarm was triggered Wait 10 minutes until the wind alarm is
cleared. Then repeat the move command
The sun shading system retracts even in
low winds.
The wind speed limit is set too low Set the correct wind speed limit after con-
sulting the specialist dealer.
The wind speed limit depends on the most
wind-sensitive product controlled by the
weather station.
The sun shading system does not retract
in high winds
The wind speed limit is set too high Lower the wind speed limit
The weather station is installed in an area
protected against the wind
Check the mounting position
The sun shading system is not lowered in
sunshine
The brightness limit value is set too high Decrease the value incrementally
The sun shading system does not move
up in cloudy weather
The brightness limit value is set too low Increase the value incrementally
The sun shading system does not move
up during precipitation
Precipitation monitoring is switched off Switch precipitation monitoring on at the
weather station (the status LED must light
up green permanently)
The sun shading system retracts although
there is no precipitation
The sensor surface of the precipitation
sensor is dirty or became moist due to
factors that are not weather related (bird
droppings, spayed water)
Clean the sensor surface
(see "Cleaning")
The sun shading system unexpectedly
moves up for no apparent reason
The operating voltage of the weather sta-
tion failed or the weather station cannot
be received. The sun shading system is
retracted for safety reasons
Switch on the mains voltage, check the
installation
No communication between the weather
station and the sun shading system or
the EWFS Plug receiver (interference from
unrelated transmitters or device faulty)
Switch off unrelated transmitters, check
that the device is operating properly
The sun shading system can only be low-
ered in stages and stops after 5 seconds
The operating voltage of the weather sta-
tion failed or the weather station cannot be
received. The sun shading system cannot
be operated normally until the weather sta-
tion is received again
Switch on the mains voltage, check the
installation
Move commands of the weather station
are executed only sporadically
Interference through unrelated transmitters Switch off unrelated transmitters (baby
monitors)
There are reinforced concrete covers or
steel-reinforced concrete walls between the
weather station and receiver
Reduce the distance to the receiver
Table of contents
Other WAREMA Weather Station manuals
Popular Weather Station manuals by other brands

Elsner
Elsner P03 3 quick start guide

La Crosse Technology
La Crosse Technology WS-9077U-IT Quick setup guide

La Crosse Technology
La Crosse Technology WS-2814U-IT Operation manual

Meade
Meade TE923W-M user manual

General
General WS831DL user manual

La Crosse Technology
La Crosse Technology C83100v3 instruction manual

Oregon Scientific
Oregon Scientific BAR898HGA user manual

2measure
2measure 170605 Operation manual

Meteotronic
Meteotronic START instruction manual

BALANCE TIME
BALANCE TIME 862458 user manual

Bresser
Bresser ClimaTemp TB instruction manual

La Crosse Technology
La Crosse Technology T83646v2 Instructional manual