Waring MG105 User manual

MEAT GRINDER
For your safety and continued enjoyment of this product,
always read the instruction book carefully before using.
MG105

1
IMPORTANT SAFEGUARDS
When using electrical appliances, basic safety precautions
should always be followed, including the following:
1. READ ALL INSTRUCTIONS.
2. Unplug from outlet when not in use, before putting on
or taking off parts, and before cleaning.
3. To protect against risk of electrical shock, do not put
appliance in water or other liquids.
4. This appliance should not be used by or near children or
individuals with certain disabilities.
5. Avoid contact with moving parts.
6. Never put the unit near a hot burner, in an oven, or in a
dishwasher.
7. Do not operate the Waring Pro®Meat Grinder, or any other
electrical equipment, with a damaged cord or plug, or after
the appliance malfunctions or is dropped or damaged in
any manner. Return to the nearest authorized service center
for examination, repair, or adjustment.
8. Never feed food by hand; always use the pusher. Keep
hands, hair, clothing and utensils away from moving discs
during operation to reduce the risk of personal injury and/or
damage to the Waring Pro®Meat Grinder.
9. Do not use outdoors, or use for other than intended use.
10. WARNING – THE CUTTING BLADE IS SHARP;
HANDLE WITH CARE BOTH WHEN USING AND WHEN
CLEANING.
11. Do not let cord hang over edge of table or counter, come
into contact with sharp edges, or touch hot surfaces.
12. Do not pull on the power cord to disconnect.
13. Never plug in the appliance where water may ood the area.
14. Place the appliance on a rm and stable surface.
15. NEVER PUT YOUR FINGERS NEAR THE FOOD CHUTE
(GRINDER/FEEDER HEAD) WHILE GRINDER IS IN
OPERATION.

2
16. Ensure that the appliance is not placed close to the edge of
the table, worktop, etc., where it can be pushed off or fall.
17. The use of attachments not recommended or sold by the
manufacturer may cause re, electric shock or injury.
18. Never use abrasive cleaning agents or abrasive cloths when
cleaning the unit.
19. Do not use ngers to scrape food away from cutting blade
while appliance is plugged in. Laceration may result.
20. Use the unit only when completely assembled.
21. Do not leave the Waring Pro®Meat Grinder unattended
while it is running.
22. Before using for the rst time, remove all packaging and
wash parts.
23. This appliance has a polarized plug (one blade is wider than
the other). To reduce the risk of electric shock, this plug will
t in a polarized outlet only one way. If the plug does not t
the outlet perfectly, reverse the plug. If it should still not t,
contact a qualied electrician. Do not modify the plug in any
way.
24. Do not operate your appliance in an appliance garage
or under a wall cabinet. When storing in an appliance
garage, always unplug the unit from the electrical
outlet. Not doing so could create a risk of re, especially
if the appliance touches the walls of the garage or the door
touches the unit as it closes.
FOR HOUSEHOLD USE ONLY
SAVE THESE INSTRUCTIONS

3
PARTS
6
7
13
14
12
10
15
11 9
8
4
2
1
3
5
16
1. ON/OFF/REVERSE switch
2. Locking knob
3. Motor housing
4. Attachment opening
5. Food pusher
6. Die-cast hopper
7. Grinder/feeder head
8. Feed screw
9. Cutting blade
10. Cutting plate (ne)
11. Cutting plate (medium)
12. Cutting plate (coarse)
13. Sausage attachment (small)
14. Sausage attachment (large)
15. Screwing ring
16. Power cord

4
ASSEMBLING
Make sure unit is unplugged while assembling.
1. Insert grinder/feeder head tightly into attachment opening.
Holding head with one hand, place locking knob into the
hole on the side of the motor housing and tighten knob by
turning clockwise.
2. Insert feed screw into grinder/feeder head, long end spindle
rst; turn it slightly until it is set into motor housing.
3. Position cutting blade onto feed screw shaft with the at
cutting surface facing out from the feed screw. NOTE: If it is
not tted properly, meat will not be ground and the cutting
plate may be permanently damaged.
4. Position the desired cutting plate onto the at sides of the
cutting blade. Ensure that the notches of the cutting plate t
into the slots of the grinder/feeder head.
5. Secure screwing ring to the end of the grinder/feeder head
by turning clockwise.
6. Place die-cast hopper on the grinder/feeder head.
7. Use the food pusher to gently feed food, one piece at
a time. Do not force the food into the grinder/feeder head.
CUTTING PLATES
Fine Cutting Plate – Great for spreads, pâtés, baby food and
hamburgers
Medium Cutting Plate – Great for ground meat used in
soups, or for relishes
Coarse Cutting Plate – Great for ground meat used in chili
and sausages, or for vegetables
THESE PLATES ARE NOT DISHWASHER SAFE.
PLEASE HAND-WASH ONLY!

5
NOTE – REVERSE SWITCH
If the motor slows or stops, this may be due to jammed food.
Immediately switch the Waring Pro®Meat Grinder to its OFF
position. Put the ON/OFF/REVERSE switch in the REVERSE
position to push the food in the opposite direction. Put the
ON/OFF/REVERSE switch in the ON position and turn the meat
grinder on again. If the meat grinder should get jammed again,
you may need to switch it off, unplug, disassemble the grinder
head, and clean the internal parts.
HOW TO USE
1. Before rst use, wash all parts of the Waring Pro®Meat
Grinder.
2. Place the Waring Pro®Meat Grinder on a stable work
surface.
3. Make sure the ON/OFF/REVERSE Switch is in the OFF
position.
4. Insert plug into wall outlet.
5. Place a wide, shallow bowl or plate beneath the grinder tube
to catch food.
6. Switch appliance to ON position. The Waring Pro®Meat
Grinder must ALWAYS be on before adding food.
7. Place food on the die-cast hopper and use pusher to feed
food through opening.

6
HELPFUL HINTS
• Grindingpiecesofstalebreadmayhelpremovefoodresidue
left in the Waring Pro®Meat Grinder after use.
• Cutfoodintostripsorcubesslightlysmallerthantheopening
on the die-cast hopper.
• Makesurefoodisfreeofbone,toughtendon,nutshells,etc.,
before grinding.
• Rawmeatandshshouldbethoroughlychilled(notfrozen)
before grinding to reduce the loss of juices.
• Freshlygroundmeatshouldberefrigeratedandcookedwithin
24 hours.
• Duringextendedgrinding,fatsfrommeatscanbuildup
inside the grinder tube, slowing down grinding and straining
the motor. If this happens, you should stop the Waring Pro®
Meat Grinder, wash parts in hot water, and reassemble. When
possible, alternate meat with bread. This helps keep the feed
screw clean.
• Trimahandfuloffatfrommeat.Processthefatthroughthe
hopper to lubricate grinding mechanism for better processing
results.
• Forbestdryingresults,preparesausageadayortwoprior
to use.

7
1. Attach grinder/feeder head to
motor housing.
2. Insert feed screw into the
grinder/feeder head.
3. Assemble cutting blade on
the end of the feed screw.
4. Place the coarse cutting plate
in the grinder/feeder head.
5. Put the desired sausage
attachment (small or large)
into the screwing ring and
screw onto the grinder/feeder
head.
6. Slide casing over the end of the
sausage attachment, leaving
approximately 2" overhanging the
end of the sausage attachment.
Grinder/feeder head
Motor housing
Feed screw
Grinder/feeder head
Cutting blade
Coarse cutting
plate
Grinder/feeder head
Grinder/feeder head
Sausage attachment
Screwing ring
Pusher
Die-cast
hopper
Sausage
attachment
Casing
ASSEMBLING THE WARING PRO®
MEAT GRINDER TO MAKE SAUSAGES

8
TO MAKE SAUSAGES
The sausage attachments allow you to blend meats and spices
for homemade sausages.
1. If you have purchased dry casings, they must be soaked in
cold water or a mixture of 2 cups water and 1 tablespoon
of vinegar until they become soft and pliable. Soak for
approximately 1 hour, changing water 3 times to rinse salt off.
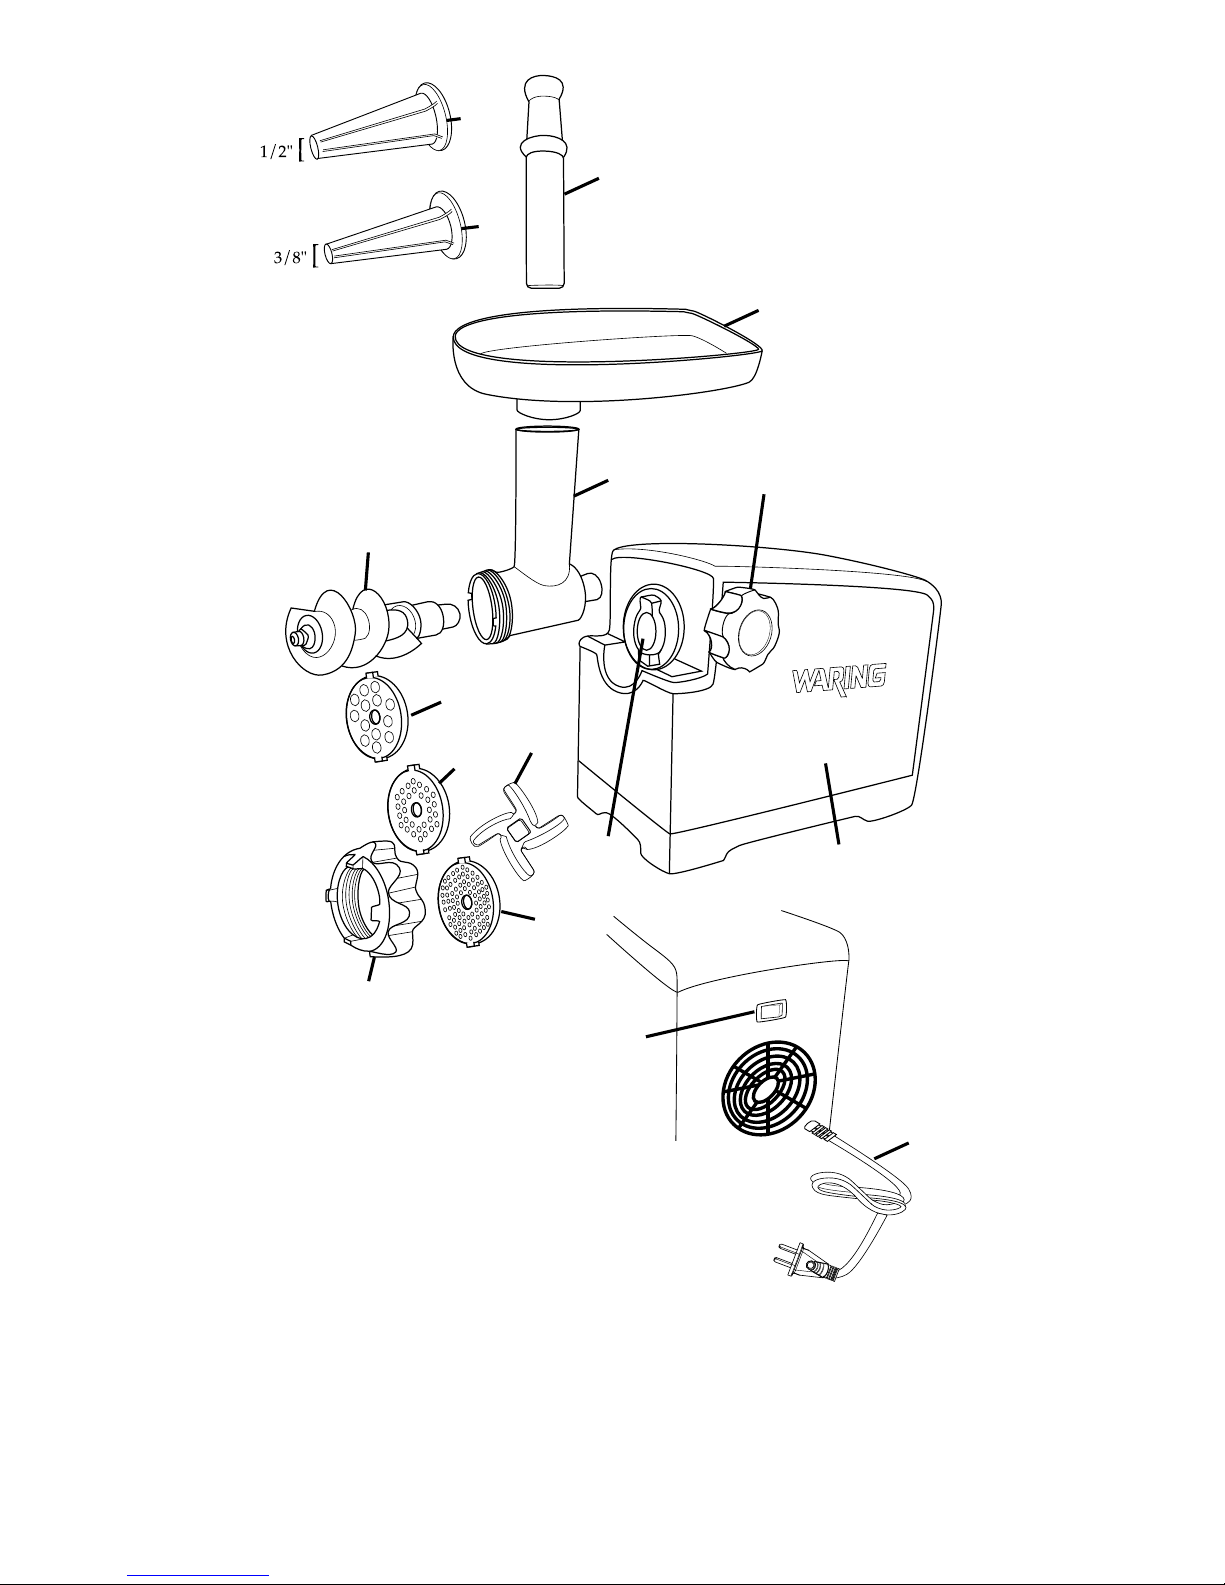
Assemble the meat grinder per instructions on page 7.
2. Cut meat into cubes that will t through the die-cast hopper
opening. Meat can be seasoned before or after cutting.
3. Place seasoned meat cubes in the die-cast hopper and turn
the unit on. Push the meat cubes into the die-cast hopper
opening with pusher until the mixture appears at the end of
the sausage attachment. Turn the unit off and tie a knot at the
end of the 2-inch casing overhang.
4. Turn unit on and feed the meat cubes into the die-cast hopper
opening until all the meat cubes have been used or the casing
is approximately 2 inches from being completely full.
5. Turn unit off, remove the end of the casing from the sausage
attachment, and tie a knot in the open end of the casing. If air
bubbles have formed, use a knife or needle to burst.
6. Sausages can be made to the desired length by twisting the
casing at intervals.
NOTE: To avoid over-stretching and splitting the casing, do not
make the sausages too thick. The meat mixture will expand
slightly during cooking. Keep casing moist; water frequently by
dipping the sausage casing into a bowl of water or vinegar.
CLEANING AND MAINTENANCE
• Alwaysunplugmotorunitwhennotinuse,beforeinsertingor
removing parts, and before cleaning.
• Neverimmersepowerunitinwaterorotherliquids.
• Washallpartsexceptmotorunitinhotsoapywater,usingcare
when handling the sharp blades.
• Rinsethesepartswithclearhotwater,thendry.
PARTS ARE NOT DISHWASHER SAFE!
• Wipemotorunitwithadampcloth.Donotuseharshor
abrasive cleaners.
• Cuttingbladeandcuttingplatesshouldbecoatedwith
cooking oil after washing and then wrapped in grease-proof
paper to keep them lubricated and rust free.

9
RECIPES
Chicken, Feta & Spinach Sausage
Makes 5 pounds of sausage
3 pounds boneless, skinless chicken thighs
1 pound boneless, skinless chicken breast
8 ounces crumbled feta cheese
4 garlic cloves, peeled and minced
1 tablespoon oregano
2 teaspoons basil
1 teaspoon chopped lemon zest
2 teaspoons kosher salt
1 teaspoon freshly ground black pepper
½ teaspoon red pepper flakes
4 ounces fresh spinach, shredded/chopped
Remove gristle, cartilage and large amounts of excess fat from the
chicken, and cut into 1-inch cubes. Place chicken in a large bowl. Add
feta cheese, garlic, oregano, basil, lemon zest, salt, pepper, and
pepper flakes. Stir to combine. Mixture can be ground immediately, or
covered and refrigerated for up to 24 hours for a more intense flavor.
Just before grinding, stir shredded spinach into chicken mixture.
Assemble Waring Pro®Meat Grinder with the medium cutting plate and
grind chicken mixture. Meat may be stuffed into prepared casings or
shaped into patties for cooking. Fresh sausage should be cooked
within 24 hours or double-wrapped and frozen. Cook thoroughly before
serving – internal temperature should register 170°F when tested with
an instant-read thermometer.
Nutritional information per 4-oz. serving:
Calories 213 (46% from fat) • carb. 1g • pro. 27g • fat 11g • sat. fat 4g
chol. 94mg • sod. 341mg • calc. 81mg • fiber 0g
Italian Fennel Sausage
Makes 4 pounds of sausage
4 pounds pork butt
6 garlic cloves, peeled and minced
¼ cup Italian parsley leaves, packed
1½ tablespoons fennel seeds, crushed
½ tablespoon oregano
2 teaspoons kosher salt
2 teaspoons freshly ground pepper

10
Remove any gristle from meat. Cut into 1-inch cubes. Place meat
in a large bowl and combine with remaining ingredients. Cover and
refrigerate for at least 8 hours and up to 24 hours for best flavor.
Assemble Waring Pro®Meat Grinder with fine or medium cutting
plate and grind mixture. Stuff into prepared casings, form into patties
or leave loose as needed. Fresh sausage should be cooked within 24
hours or double-wrapped and frozen. Cook thoroughly before serving –
internal temperature should register 160°F when tested with an instant-
read thermometer.
Nutritional information per 4-oz. serving:
Calories 183 (48% from fat) • carb. 1g • pro. 22g • fat 9g • sat. fat 3g
chol. 73mg • sod. 244mg • calc. 39mg • fiber 0g
Andouille Sausage
With its distinctly smoky flavor, traditional andouille sausage is a
staple of Cajun cookery and an important ingredient in jambalayas
and gumbos. The unsmoked version is made in smaller links and is
known as andouillette.
Makes 3 pounds of sausage
3 pounds boneless pork butt (may substitute half turkey
for a lighter sausage)
4 – 6 large garlic cloves, peeled and minced
1 teaspoon browning sauce such as Gravy Master®
2 teaspoons kosher salt
2 tablespoons sweet paprika
½ – 1 tablespoon cayenne pepper, to taste
1 tablespoon onion powder
2 teaspoons dry thyme
½ teaspoon freshly ground black pepper
½ teaspoon crushed red pepper
½ teaspoon rubbed sage
1⁄8teaspoon allspice
Remove any gristle from meat. Cut into 1-inch cubes. Place meat
in a large bowl and combine with remaining ingredients. Cover and
refrigerate for at least 12 hours and up to 24 hours for best flavor.
Assemble Waring Pro®Meat Grinder with medium or large cutting plate
and grind mixture. Stuff into prepared casings, tying off links into
desired lengths. Sausage may then be smoked in a homestyle smoker.
Recommended smoking temperature is 175°–200°F, and smoking time
should be 4 to 6 hours. Suggested woods for smoking andouille are

11
pecan or hickory. Cook thoroughly before serving – internal
temperature should register 160°F when tested with an instant-read
thermometer. The andouille may then be used as is, sliced thinly as an
hors d’oeuvre, or as an ingredient in jambalaya, gumbo or other Cajun
dish. Smoked andouille may be frozen.
Nutritional information per 4-oz. serving:
Calories 339 (66% from fat) • carb. 2g • pro. 27g • fat 24g • sat. fat 9g
chol. 68mg • sod. 300mg • calc. 25mg • fiber 0g
Country Breakfast Sausage
Pork is paired with turkey to make this breakfast favorite a little lighter.
Makes 4 pounds of sausage
2 pounds boneless, skinless turkey thighs
2 pounds boneless pork butt
1 tablespoon browning sauce, such as Gravy Master®
1 teaspoon kosher salt
1½ tablespoons rubbed sage
2 teaspoons freshly ground black pepper
1 teaspoon crushed red pepper, optional
Remove any visible gristle from meat. Cut turkey and pork into
1-inch cubes. Place meats in a large bowl and add the remaining
ingredients. Stir well to combine. Cover and refrigerate for at least
8 hours and up to 24 hours.
Assemble Waring Pro®Meat Grinder with the medium cutting plate.
Grind meat, mixing turkey and pork evenly while grinding. Ground meat
may be stuffed into prepared casings or formed into patties. Fresh
sausage should be cooked within 24 hours or double-wrapped and
frozen. Cook thoroughly before serving – internal temperature should
register 170°F when tested with an instant-read thermometer.
Nutritional information per 4-oz. serving:
Calories 225 (45% from fat) • carb. 0g • pro. 30g • fat 11g • sat. fat 4g
chol. 94mg • sod. 173mg • calc. 14mg • fiber 0g

12
Spicy Venison Sausage
Adding some pork butt makes the sausage a little moister, but you may
use all venison if you wish.
Makes 4 pounds of sausage
3 pounds venison
1 pound pork butt
1 garlic clove, peeled and minced
1½ tablespoons kosher salt
1½ tablespoons freshly ground pepper
2 teaspoons sweet paprika
1 teaspoon honey
1 teaspoon cayenne pepper
½ teaspoon rubbed sage
½ teaspoon savory
Remove any visible gristle from meat. Cut meat into 1-inch cubes.
Place in a large bowl and add the remaining ingredients. Stir
well to combine. Cover and refrigerate for at least 8 hours and up to 24
hours.
Assemble Waring Pro®Meat Grinder with the medium cutting plate.
Grind meat, mixing venison and pork evenly while grinding. Ground
meat may be stuffed into prepared casings or formed into patties.
Fresh sausage should be cooked within 24 hours or double-wrapped
and frozen. Cook thoroughly before serving – internal temperature
should register 160°F when tested with an instant-read thermometer.
Sausage may also be smoked in a homestyle smoker. Use wood
flavor of your choice; suggestions would include hickory or mesquite.
Recommended smoking temperature is 175°–200°F, and smoking time
should be 4 to 6 hours. Cook or smoke sausage thoroughly before
serving – internal temperature should register 160°F when tested with
an instant-read thermometer.
Nutritional information per 4-oz. serving:
Calories 1170 (33% from fat) • carb. 1g • pro. 27g • fat 6g • sat. fat 2g
chol. 97mg • sod. 431mg • calc. 14mg • fiber 0g

©2012 Waring Consumer Products
150 Milford Road
East Windsor, NJ 08520
www.waringpro.com
Printed in Taiwan
MG105A IB
11WR127955
IB-10764
Any trademarks or service marks of third parties herein are
the trademarks or service marks of their respective owners.
This manual suits for next models
1
Table of contents
Other Waring Meat Grinder manuals