Warwick 878SHE User manual

WARWICK
INDUSTRIES INC.
878SHE

#WU21-10 w w w . w a r w i c k – s p r a y g u n s . c o m
Spray Gun Model # 878SHE [HVLP]
High volume low pressure spray gun complaint with EPA regulation, the transfer efficiency of HVLP gun exceeds 65% to meet
VOC legislation, also reduces overspray, saving cost of materials.
Technical Data
Recommended spray gun inlet pressure: 29 PSI (2 bar)
Recommended spray distance: 4’’-6’’
Air consumption: 4 CFM @ 29 PSI inlet pressure
Weight: 0.66 lbs (gun only)
Finish: Nickel plated. Aluminum Die Cast Gun Body, Stainless Steel Nozzle and Needle are Standard on all Warwick guns.
Tip Sizes available (mm): 0.8 / 1.0 / 1.2 Optional (mm): 1.3 / 1.4 / 1.5 Special order (mm): 2.0
Disposable cup reference: 3M PPS ADAPTOR # 21 (16105)
Safety Instruction
See page 3. Please make sure you read the complete instructions carefully before you start use of spray gun.
Operation
NOTE: DO NOT disassemble a brand new spray gun without testing/spraying it first.
Always wear proper protection equipment when using it.
Tighten packing nut and screws if needed; tighten the fluid nozzle firmly by proper tool.
Rinse the fluid path with appropriate cleaning solution.
Adjust air cap to a proper position as shown to ensure a perfect spraying pattern.
(In normal use, the nozzle wings are horizontal as shown, this provides a vertical
fan-shaped pattern which gives maximum, even, material coverage as the gun is
moved back and forth parallel to the surface being finished.
Insert the paint strainer and install the cup by WRENCH. DO NOT use your hand to install or uninstall the cup at any time.
Fill the cup properly and close the lid.
Connect spray gun to a proper air compressor; ensure minimum compressed air volume and the proper pressure
according to the technical data we suggest for this gun. For air compressor set up, please refer to the user manual the air
compressor manufacturer provides. We suggest a 5 HP and up air compressor and a 20 and up gallon air tank to operate this
spray gun continuously nonstop in a reasonable time period.
Start spraying:
** Before pulling the trigger, the regulator should read at 29 PSI or higher (for your best spraying performance).
** Fluid control screw: to increase and decrease the fluid flow.
** Spray width adjustment screw (Fan Control) : to change the fluid pattern round or flat.
** During spraying, if it sprays too fine, decrease the air pressure or open the fluid control screw; if it sprays too thick, close
the fluid control screw a bit. Repeating the adjustment if needed.
Great Quality Best Value Unbeatable Service – Warwick industries Inc. since 1995
Page 1

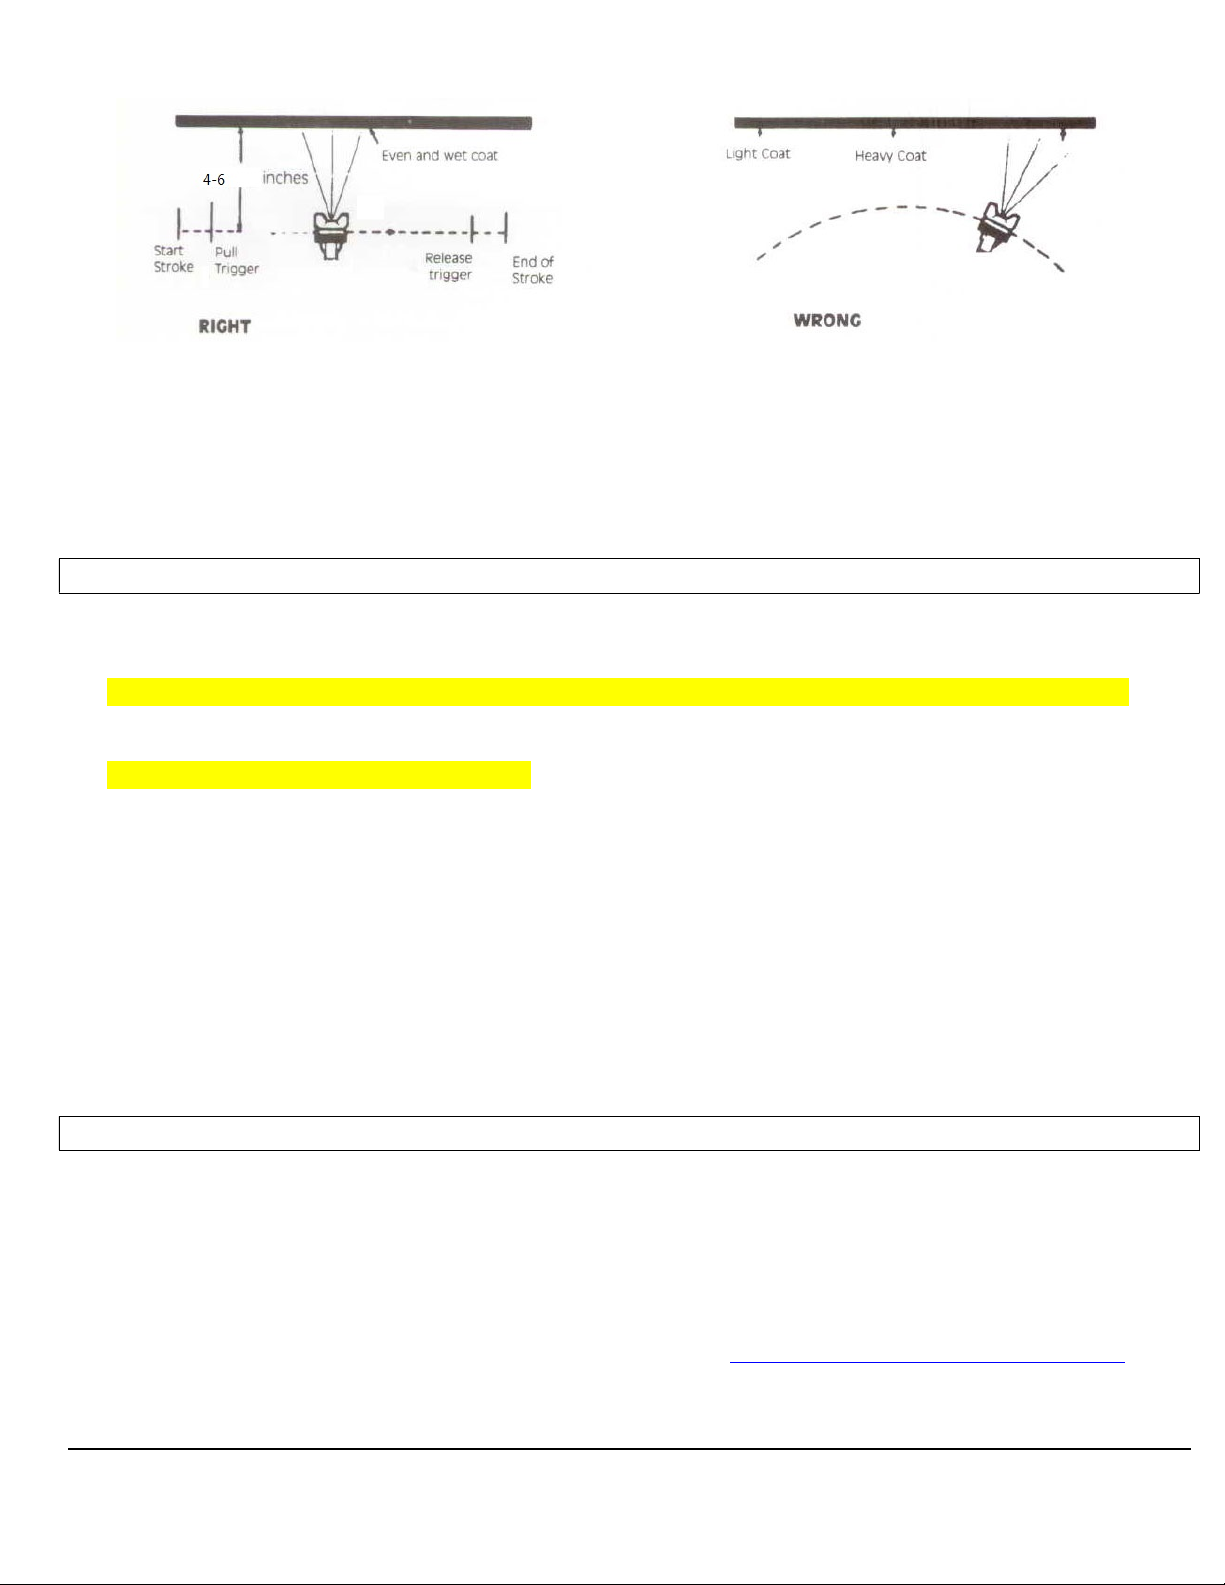
Proper handing of the gun is essential for obtaining a good finish. The gun should be held at a right angle to
the surface being covered, and moved parallel with it. For precise control of the gun and material, the trigger should be
released before the end of the stroke.
Hold the gun from 4 to 6 inches away from the surface depending on material and atomizing pressure. For a
uniform finish, lap each stroke over the preceding stroke, making sure the spray is smooth and wet. Using the lowest
possible atomizing air pressure will reduce overspray and provide maximum efficiency.
Cleaning & Maintenance
Prior to cleaning, make sure to disconnect the spray gun from the air compressor system.
Empty the cup, using WRENCH to remove the cup from the spray gun. NEVER USE HAND.
Always use proper tool to assemble and disassemble the parts. DO NOT remove the brass baffle
Use proper cleaning solution. DO NOT use acid or any other aggressive chemical as they may result in parts failure.
Submerge the front end of the gun in solvent just to cover the fluid connection. Paint built up on the gun should be
removed by using tools [ACC-818] cleaning kit.
Never submerge the entire spray gun in solvent :
- This will dissolve the lubricant in the leather packing and on wear surfaces, causing them to dry out and resulting
in difficult operation and faster wear.
- Air path in the gun will clog with dirty solvent.
Using a rag moistened with solvent, wipe down the outside of the gun.
Oil gun daily. Use a drop of lightweight machine oil on Fluid needle, Air valve packing, and Trigger pivot point.
NOTE: DO NOT use lubricants which contain silicone. Silicone may cause defects in the finish application.
Submerge the front end of the gun in solvent just to cover the fluid connection. Paint built up on the gun should be
removed by using tools [ACC-818] cleaning kit.
To clean nozzle, immerse it in solvent until dried material is dissolved, and blow it clean afterwards. DO NOT use metal
or sharp instrument to probe any of the holes in the nozzle.
Service, Warranty and Liability
Warwick Industries Inc. CANNOT be held responsible in the following cases:
- When proper operating instruction is disregarded.
- When spray gun is manipulated, altered, inappropriate assemble/disassemble or use with non-warwick original
parts on the spray guns.
Warranty detail information is listed on our website. For service, you should reach your local distributor for further
assistance. If your distributor is not able to help, please contact us at customer.support@warwick-sprayguns.com
Great Quality Best Value Unbeatable Service – Warwick industries Inc. since 1995
Page 2

Great Quality Best Value Unbeatable Service – Warwick industries Inc. since 1995
Page 3

Great Quality Best Value Unbeatable Service – Warwick industries Inc. since 1995
Page 4

General guideline for selecting the spray gun tips:
Great Quality Best Value Unbeatable Service – Warwick industries Inc. since 1995
Page 5
Table of contents