WatchDog 3900PG User manual

1
Plant Growth Pup Station
PRODUCT MANUAL
Model #’s
3900PG, 3905PG, 3930PG

2
Quick Start
1. Package Contents
(Check components included in the box) Pg 4
2. Install Batteries Pg 7
3. Attach the Pup to the T/RH Sensor and
Aspirated Radiation Shield Pg 6
HARDWARE UNBOXING & ASSEMBLY
FIELD INSTALLATION AND CONFIGURATION
4. Install the Pup Station Pg 8
5. Level the Quantum Light Sensor (ET) Pg 7

3
Table of Contents
This manual will familiarize you with the features and
operation of your new WatchDog Plant Growth Pup Station.
Please read this manual thoroughly before launching the unit.
For customer support or to place an order, call Spectrum
Technologies, Inc. at 800-248-8873 or 815-436-4440,
FAX at 815-436-4460, or e-mail at info@specmeters.com.
www.specmeters.com
Spectrum Technologies, Inc.
3600 Thayer Court
Aurora, IL 60504
Introduction 4
Package Contents 4
Specifications 5
Temperature/RH Sensor 6
PAR Light Sensor 7
Installing Batteries 7
Checking Battery Level 7
Pup Station Installation 8
Connecting to a Retriever Network 9

4
Thank you for purchasing a Watchdog Plant Growth Pup Station for
use in a Retriever & Pup Wireless Sensor Network. This manual de-
scribes the setup and use of the station
The Sensor Pup component of the Station has been pre-configured to
use the Temperature/RH and PAR light sensors. Ports C and D are
available for sensors of your choice.
The Pup transmits sensor data to the Retriever either directly or via a
Repeater Pup. For details on how to configure the Sensor Pup Sta-
tion into the network, refer to the “Retriever and Pup Wireless Network
Product Manual”.
Introduction
Package Contents
• Bagged items:
* 6 AA alkaline batteries
* Antenna with stabilizer
* 2 sets of U-bolt and clamp
* 2 0.35" (0.9cm) screws
• Temperature/RH sensor assembly (includes aspirated radiation
shield, bracket, and solar panel)
• PAR Light sensor
• Manuals

5
SPECIFICATIONS
Sensor Measurement Accuracy Resolution
Air
Temperature -40° to 257°F
-40° to 125°C ±0.54°F(40 to 194°F)
±0.3°C (-40 to 90°C) 0.1°F (0.1°C)
Relative
Humidity 0 to 100% ±2% @ 77°F (25°C) 0.1 %
PAR Light 0-3000 µmol/m2/s ±5% 1 µmol/m2/s
Pup
Data Capacity 256 data interval records can be stored on the Pup
until it is able to send them to the Retriever
Dimensions 3.75 x 2 x 8 in (9.5 x 5.2 x 20.2 cm)
Power Source 6 AA batteries (Lithium or alkaline)
Battery Life 6 months with alkaline batteries
Operating
Temperature -22 to 130°F (-30 to 55 °C)
Fan/Shield
Battery NiMH 4.8 V, 2200 mA-Hr
Absent charge, powers fan for 6 to 8 hours to dissipate heat
Solar Panel 2W, 6V
Fan 5V, 350 mA (peak)
While Charging: 2960 rpm, 12 ft3/min (0.34 m3/min)
Battery Only: 2450 rpm, 9.9 ft3/min (0.28 m3/min)
Operating
Temperature 14 to 140°F (-10 to 60 °C)
Dimensions 5.7 x 12.2 x 4.3 in (14.5 x 31 x 11 cm)
Weight
(Shield + Pup) 2.78 lbs (1.26 kg)

6
Temperature/RH Sensor
The Temperature/RH sensor is installed in an aspirated radiation shield
(ARS). The aspirator fan induces air flow over the sensor which leads to
more accurate data for indoor installations. The radiation shield is
shipped fully built.
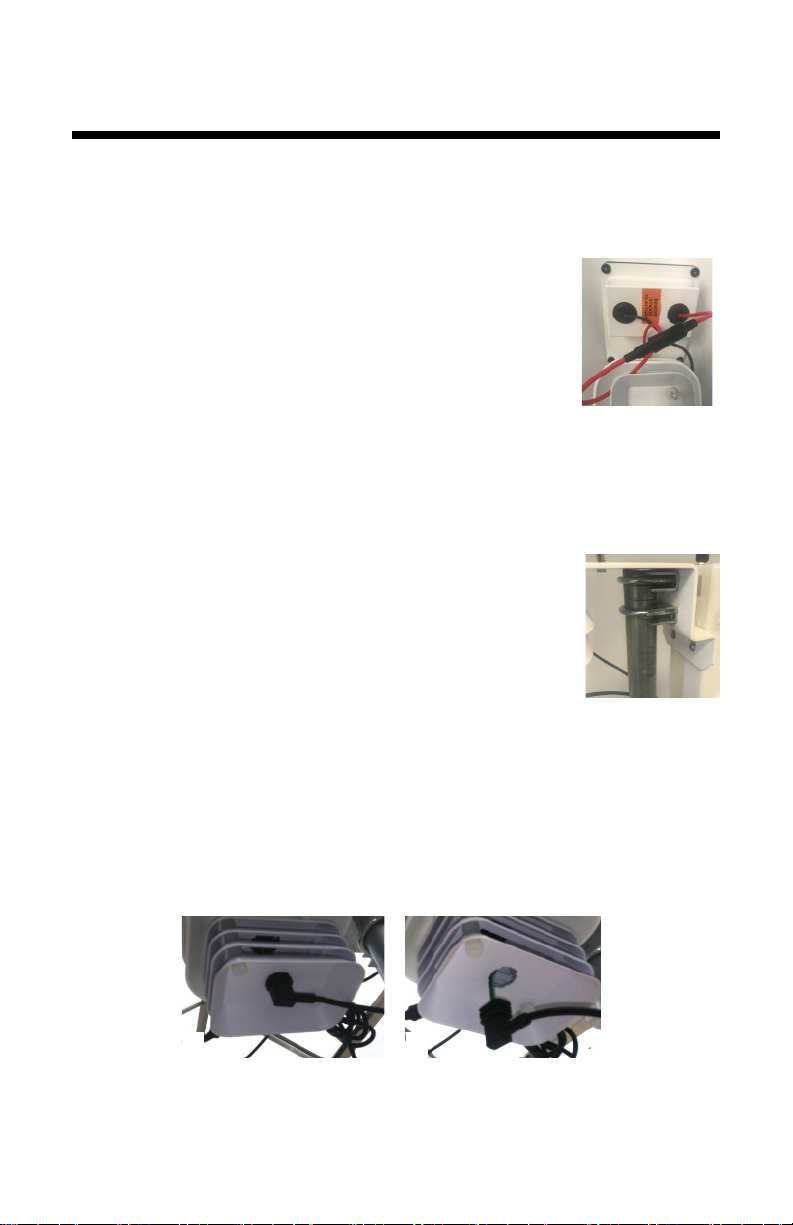
Preventing the fan from spinning
The ARS is shipped with a magnet attached to the bat-
tery pack (under sticker in fig. 1). The magnet prevents
the fan from receiving power from the battery. This pre-
vents the battery from being depleted when not in use.
The magnet must be removed to allow the fan to spin
overnight or during low light conditions. The magnet
does not prevent the fan from receiving power directly
from the solar panel. To completely interrupt fan opera-
tion, cover the solar panel, disconnect the red wire that
connects the solar panel to the battery pack, and slowly slide the mag-
net around until you find a location that the stops fan.
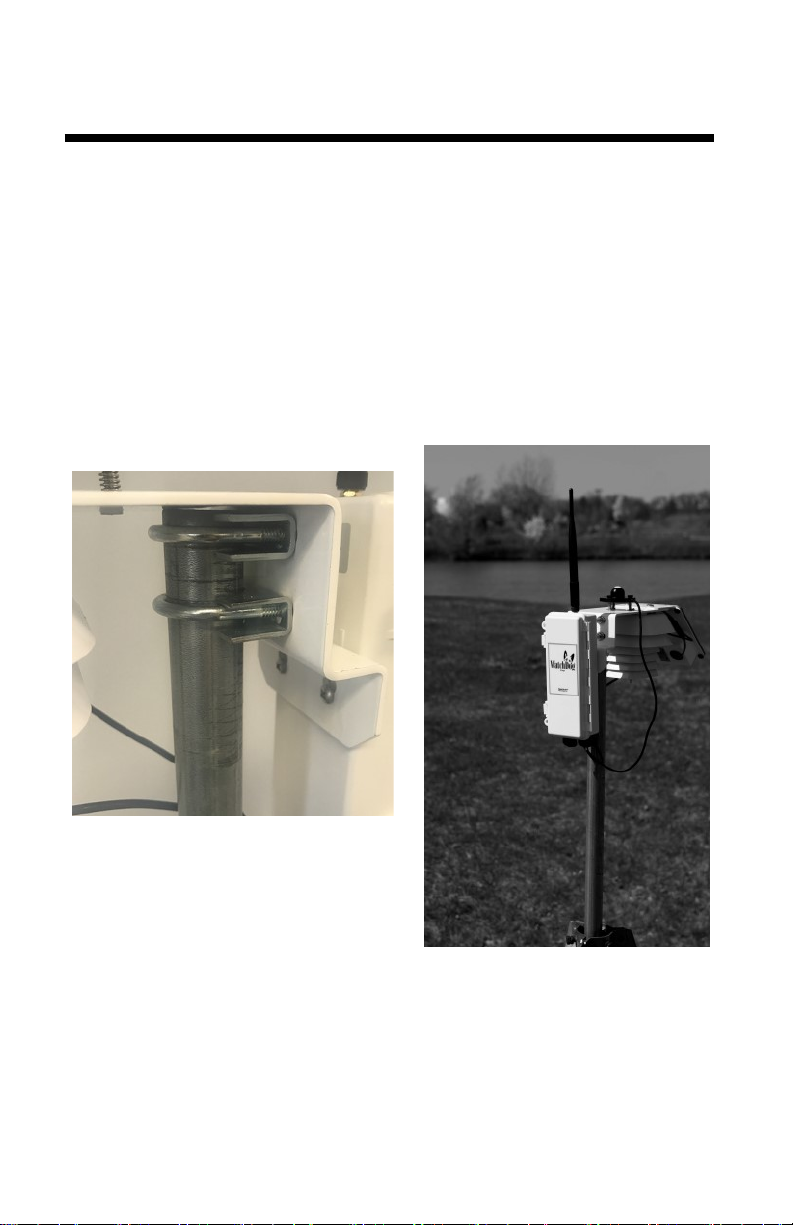
Deploying the sensor
The sensor can be attached to the top of a pole or post
with the included U-Bolts and bracket (fig. 2). Connect
the 2.5mm plug to channel A. The solar panel should
be oriented so that it is facing the sun. In the northern
hemisphere, the panel should be facing south. Config-
ure the Pup using SpecConnect web software or the
PC-based Retriever and Pup Launch Utility.
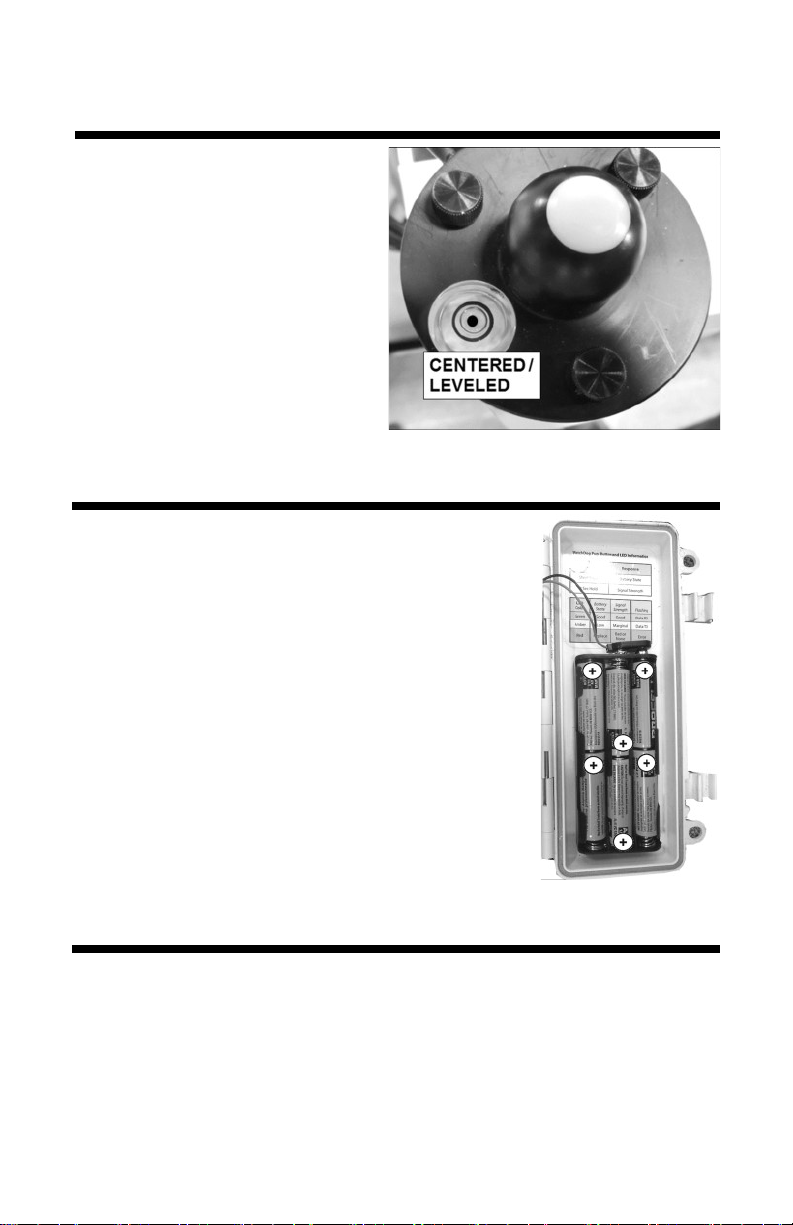
Replacing the T/RH sensor
The T/RH sensor connects into the bottom plate of the radiation shield
(fig. 3). To remove the sensor, rotate the sensor 90 degrees. This will
allow the molding to be removed from the slot. To install the sensor,
push the sensor up through the wide portion of slot and rotate it 90 de-
grees to keep it from falling out.
Fig. 1: Battery
Enclosure
Fig. 2: Mounting
Bracket
Fig. 3: T/RH sensor a.) installed and b.) uninstalled
ab

7
Installing Batteries
Ensure correct polarity of all AA batteries when
placing them in the battery holder. The battery
holder has markings that indicate the polarity.
The Pup’s batteries will last for about 6 months
under normal Retriever-Pup network operation.
Caution: When using the Solar Power Package
(item 3999), do not install non-rechargeable bat-
teries in the Pup.
Checking Battery Level
To view the battery level, briefly press the button inside the Pup. The
battery state will be indicated by the color of the status LED:
Green = Good; Amber = Low; Red = Replace.
The battery level of the Pup can also be checked with RPLU software
on a PC directly connected to the Retriever or remotely via the Spec-
Connect website.
PAR Light Sensor
The PAR light sensor attaches
to the three holes on top of the
bracket for the aspirated radia-
tion shield. The PAR light sen-
sor needs to be leveled to
measure accurately. Adjust the
spring mounting screws of the
sensor to center the bubble as
shown in image to the right.

8
The Pup Station should be located in an open, unobstructed, grassy
area to ensure accurate measurement of wind, rainfall and sunlight. The
station can be mounted to any post that can accommodate the
1.5" (4cm) U-bolt. Unless you are using the mounting tripod (item #
3396TPS), the post should be firmly anchored in the ground.
Connect the U-bolts to the inner side of the bracket. Place the bracket
over the top of the post. Attach the Pup Station to the post with the nuts
(fig. 1). Do not tighten the U-bolt nuts until you have oriented the station
(fig. 2).
Pup Station Installation
Fig. 1. Attaching U-bolt
Fig. 2 Station attached to
tripod

9
Connecting To A
Retriever Network
The Pup Station collects data from the sensors connected to its
ports. The Pup sends logged data to the Retriever at the interval
configured for the network.
Refer to the Retriever and Pup Wireless Network Product Manual
for detailed instructions.

10

11
Warranty
This product is warranted to be free from defects in material or
workmanship for one year from the date of purchase. During the
warranty period Spectrum will, at its option, either repair or re-
place products that prove to be defective. This warranty does not
cover damage due to improper installation or use, lightning, negli-
gence, accident, or unauthorized modifications, or to incidental or
consequential damages beyond the Spectrum product. Before
returning a failed unit, you must obtain a Returned Materials Au-
thorization (RMA) from Spectrum. Spectrum is not responsible for
any package that is returned without a valid RMA number or for
the loss of the package by any shipping company.

12
Spectrum Technologies, Inc
3600 Thayer Court
Aurora, IL 60504
(800) 248-8873 or (815) 436-4440
Fax (815) 436-4460
E-Mail: Info@specmeters.com
www.specmeters.com
Rev. 5/18
This manual suits for next models
2
Table of contents
Other WatchDog Pet Care Product manuals
Popular Pet Care Product manuals by other brands

chipdeal
chipdeal Reader Plus Extra Elementary user's manual

New Cat Condos
New Cat Condos Cat Stairway Assembly instructions

Innotek
Innotek SD-2100E quick start guide

Cat Camp
Cat Camp Cat Tent instruction manual

HoneyGuaridan
HoneyGuaridan S36 user manual

Red Sea
Red Sea aquazone Installation & operation manual