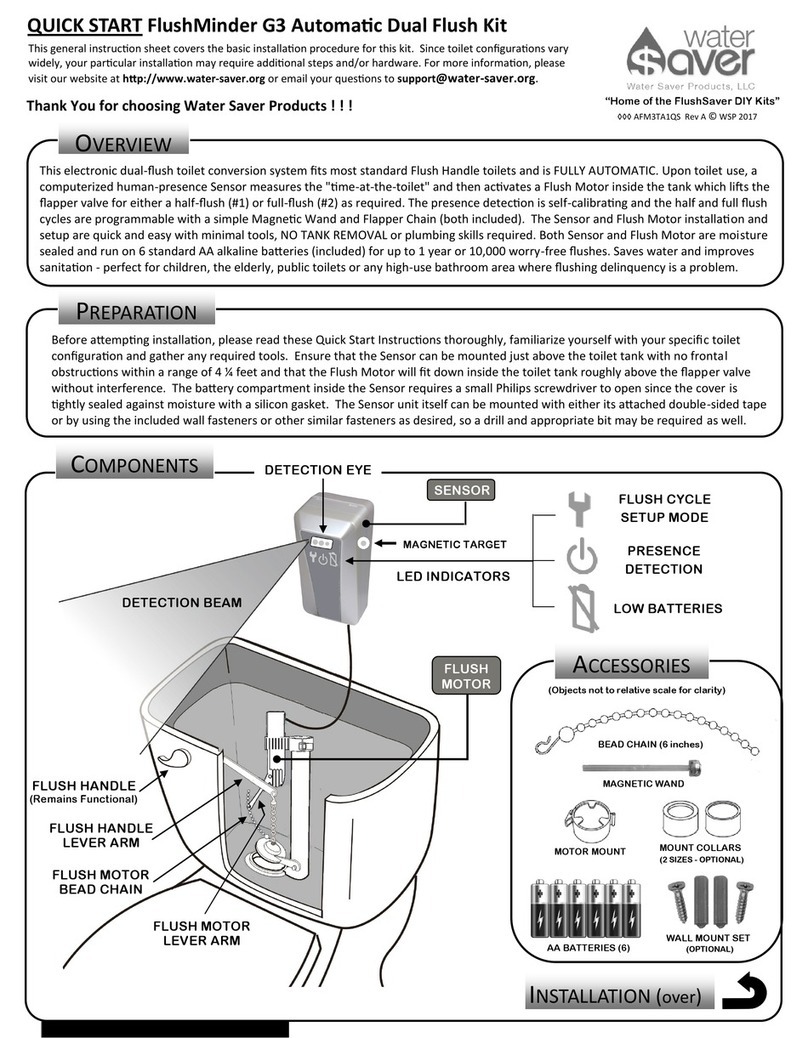
PRESS
1
USE A CABLE TIE TO BETTER
SECURE THE MOUNT IF REQUIRED
INSTALLATION
. . .
2
Remove the 4 screws from the Receiver/Baery Box
cover and install 6 AA baeries. Be sure to orient the
baeries correctly and check that the silicone gasket
remains in posion, then replace the screws with the
Tank Clip at the desired locaon.
Tighten the screws just enough to slightly compress
the gasket - DO NOT OVERTIGHTEN!
4
The amount of water released during a ush can be
increased or decreased by removing or adding slack
in the Bead Chain and also by raising or lowering the
water in the tank. Further, some Flapper Valves
have mulple liing points where the chains aach
to allow for more or less li height.
Press and Release the Remote
Control Buon for a #1 Half Flush
or Press and HoId the Buon for
1 second or more and then
Release for a #2 Full Flush.
NOTE: The Remote Control baery should last longer than
the Receiver/Flush Motor baeries, so anyme the Flush
Motor becomes sluggish or fails to operate, change the
baeries in the Receiver rst and then the Remote Control.
Press the Remote Control
buon repeatedly unl the
Red LED on top of the
Receiver lights up, indicang that
the units are now linked.
5 ADJUSTMENTS
OPERATION 6
SNAP CLIP
MOUNT COLLAR
Once any adjustments have been completed, mount
the Remote Control in the selected locaon and ax
the appropriate Remote Control Label as desired.
GASKET
Half Flush Acvate: Press - Release
Half Flush Cycle Time: 8 secs
Flush Flush Acvate: Press - Hold 1 sec+
Full Flush Cycle Time: 12 secs
Remote Control: 2.25 x 0.75 inches (57 x 19 mm)
Radio Frequency: 2.4GHz Unlicensed Consumer Band
Range: 15 feet Average Line of Sight (4.5 meters)
Power: CR2032 3V Lithium Coin Cell
SPECIFICATIONS
Receiver/Baery Box: 2.75W x 2.0D x 3.75H inches (70 x 51 x 95 mm)
Power: 6x AA 1.5V Alkaline Baeries
Baery Life: 6 Months or 5,000 Flushes (Average)
Actuator Motor: Servo Jackscrew
Posion the Flush Motor (D) so
that the Lever Arm is over top of
the apper valve area but does
not interfere with the exisng
ush handle assembly.
Now slide the motor down onto
the motor mount tab (A) using
the closest motor mount slot.
Unclip and t the Motor
Mount (A) onto the bowl ll
tube (C) using one of the
Mount Collars (B) if required.
A
B
C
(2 SIZES - OPTIONAL)
LEVER ARM
MOTOR MOUNT
D
3
Now snap the upper end of the
Bead Chain into the lever arm
groove (B), leaving a lile slack
in the chain.
Clip the lower end of the Bead
Chain to the top of the apper
valve (A) at the same aach point
as the exisng Lever Handle Chain.
Check the relave alignment of
both lever arms and chains to
ensure there is no interference,
adjust as necessary, then secure
the motor mount Snap Clip.
B
A
SNAP
CLIP
INSTALLATION AND SETUP COMPLETE!
PRESS HOLD
1 SEC+
RELEASE
(FULL DOWN)
In order to conserve water when operang this system,
the Flapper Valve should not fully “pop” open as when
operated with the Lever Handle.
BEAD
CHAIN
PRESS
PRESS
. . .
. . .
D
A
E
B C
Locate the nger tab on the Back Cover (A) of the
Remote Control and rotate it counter clockwise to
release it. Then remove the 4 screws underneath to
separate the Push Buon (C) from the Inner Body (B).
Flip over the Inner Body and peel o the Silicone Cap
(D), li out the Circuit Board (E) and ip it over. Now
slide the CR2032 baery into its holder with the (+) plus
side up. Reassemble all components in reverse order.
Tighten the screws unl snug - DO NOT OVERTIGHTEN!
TANK
CLIP
QUICK
PRESS
RELEASE
FLASH
Install the Receiver, connect the
Flush Motor to the Receiver and
screw on the connector collar to
secure it.

