WaterChef EVO100 User manual

System installation requires the
services of a licensed plumber.
PREMIUM WATER FILTRATION
EVO100
INSTALLATION, USE & CARE GUIDE
WHOLE HOUSE
Water Filtration System
Read & Save These Instructions.
IMPORTANT
QUESTIONS?
1.800.879.8909
(int’l +1.775.359.9500)
MON - FRI 8 AM - 5 PM PST
My System Serial #:
Serial Number is located on lter housing base.
System Certified by IAPMO R&T
against NSF/ANSI Standard 53 and
CSA B483.1 for the reduction of Lead,
Cysts, Perfluorooctanoic Acid (PFOA)
and Perfluorooctane Sulfonate (PFOS).

TABLE OF CONTENTS
Introduction ...................................................................... 2
Important Use Guidelines ........................................................... 2
Product Specications and Performance ............................................... 3
Where to Install ................................................................... 3
System Installation................................................................. 4
Filter Cartridge Installation .......................................................... 5
Replacing the Filter Cartridge ........................................................ 6
Warranty ......................................................................... 12
Product Registration ............................................................... 13
WHAT’S IN THE BOX [MODEL: EVO100]
EVO100 Filter Housing Assembly
(includes Top Cap and Snap Ring)
WaterChef®EVR1
Filter Cartridge
Flow Control Valve
Reducer Tees (2)
Flow Meter Assembly
Straight 1” MNPT
Connectors (2)
90º Elbow 1” MNPT
Connectors (2)
3/8” Drain Valve Assembly
with Shut-o
Umbrella Cover with
Monitor Assembly
and Battery Backup
Power Supply
Also Included:
- Food Grade Silicone
- AAA Batteries (3)
- 3/8” O.D. Drain Hose (5ft.)
- Installation, Use & Care Guide
- Performance Data Sheet
- Product Registration Card
waterchef.com
1

waterchef.com
INTRODUCTION
2
•Readthismanualcompletelybeforeattemptingtoinstallorusethisproduct.Ifsystemisnotmaintained
andoperatedasspeciedinthismanual,thereisariskofexposuretocontaminants.
•Testingwasperformedunderstandardlaboratoryconditions,actualperformancemayvary.Actual
performanceisdependentoninuentwaterquality,owrates,systemdesignandapplication.
For optimal performance, replace your Filter Cartridge upon the rst occurrence of the following:
-Annually
-Younoticeatasteorodorrecurrence,orasignicantreductioninowrate
-System LEDs turn RED (indicating rated capacity of the lter cartridge has been reached)
•Donotusewaterthatismicrobiologicallyunsafeorofunknownqualitywithoutadequatedisinfection
beforeoraftertheSystem.
•Individualsrequiringspecicmicrobiologicalpurityshouldconsulttheirphysician.
•Systemscertiedforcystreductionmaybeusedondisinfectedwaterthatmaycontainlterablecysts.
•InstallationofthisSystemmustcomplywithallstateandlocallawsandregulations.
•Forresidentialuseonly.
•ThecontaminantsorothersubstancesremovedorreducedbythisSystemmaynotbeinallusers’water.
•Systemtobesuppliedonlywithcoldwater.
•Ifthisoranyothersystemisinstalledinametal(conductive)plumbingsystem(i.e.copperofgalvanized
metal),theplasticcomponentsofthesystemwillinterruptthecontinuityoftheplumbingsystem.Asa
result,anyerrantelectricityfromimproperlygroundedappliancesdownstreamorpotentialgalvanicactivity
intheplumbingsystemcannolongergroundthroughcontiguousmetalplumbing.Somehomesmayhave
beenbuiltinaccordancewithbuildingcodesthatactuallyencouragedthegroundingofelectricalappliances
throughtheplumbingsystem.Consequently,theinstallationofabypassconsistingofthesamematerial
astheexistingplumbingoragrounded“jumperwire”bridgingtheequipmentandreestablishingthe
contiguousconductivenatureoftheplumbingsystemmustbeinstalledpriortosystemuse.
•FlushnewCartridgesforaminimumof10minutespriortouse.
•Spentabsorptionmediawillnotberegeneratedandused.Ifabsorptionmediaisaectedbychlorine,
inuentwillbetreatedtoremovechlorine.
•DONOTUSEextralubricants,unapprovedsealants,ortoolstotightenhandtightenonlyparts.Useof
toolsonhandtightenonlypartswillvoidwarranty.
•ForthisSystemtocontinuetoperformastestedandrepresented,besuretouseonlygenuine,certied
WaterChef®FilterCartridges.Foradditionalpurchaseinformation,contactWaterChefCustomerCare
at 1.800.879.8909(int’l+1.775.359.9500)orvisitusonlineatwww.waterchef.com.
Congratulations on the purchase of your new WaterChef®Premium Whole House Water Filtration System!
WaterChefFiltrationSystemsarecraftedusingthenestmaterialsandworkmanship,andwillserveyoureliably
formanyyearstocomewhenoperatedandmaintainedaccordingtothedirectionscontainedinthisguide.
Youhavemadeawiseinvestmentinprovidingqualitywaterforyouandyourlovedones.Nowpleasetake
afewminutestolearnaboutallthefeaturesandbenetsyournewSystemhastooer!
IMPORTANT USE GUIDELINES

CITY
WATER
INLET
WELL
WATER
INLET
PRESSURE
TANK
PRE-FILTER
SYSTEM
EVO100
WATER
METER
PUMP
SERVICE
Relief Valve
MUST be
Installed
Grounded &
Unswitched
115-Volt Outlet
O
F
F
O
F
F
PRODUCT SPECIFICATIONS
PERFORMANCE
WHERE TO INSTALL
Installation . . . . . . . . . . . . . . . . . . Whole House
ParticleRetentionSize . . . . . . . . . . . . .Sub-Micron
IntelligentMonitor. . . . . . . . . . . . . . . . . . . . LED
RatedCapacity . . . . . . . . 100,000 gallons (378,541 L)
RatedServiceFlow . . . . . . . . . . . . . . . 4.51gpm
PeakFlow&ReductionofLead . . . . . 8gpm@99.62%
ReplacementFilterCartridge. . . . . . . . . . . . . EVR1
MaximumWorkingPressure . . . . 125psig(8.89kg/cm2)
MinimumWorkingPressure . . . . . 20psig(1.41kg/cm2)
MaximumOperatingTemperature . . . . . . 120˚F/50˚C
MinimumOperatingTemperature. . . . . . . . . 34˚F/1˚C
ElectricalRequirements. . . Grounded&Unswitched115V,
3-AAA Batteries
WATERCHEF®WHOLE HOUSE WATER FILTRATION SYSTEM (Model: EVO100)
RefertoPerformanceDataSheetforactualcontaminantandsubstancereductioncapabilities.
Manufacturerinternallytestedfor
Chlorine and Chloramine reduction.
waterchef.com
3
ThissystemhasbeencertiedbyIAPMOforNSF/ANSIStandard53andCSAB483.1forthespecic
performanceclaimsveriedandsubstantiatedbytestdata.Actualperformanceisdependentoninuent
waterquality,owrates,systemdesignandapplications.Yourresultsmayvary.Performanceclaimsare
basedonacompletesystem,includingltercartridge,housing,andconnectiontoapressurizedwater
source.Thisltermustbeoperatedaccordingtothesystem’sspecicationsinordertodelivertheclaimed
performance.Itisessentialtofollowoperational,maintenance,andlterreplacementrequirements,as
directedforeachapplication,forthislterandsystemtoperformcorrectly.ReadthePerformanceData
Sheetaccompanyingthesystemandchangetheltercartridgeassuggested.
System Certified by IAPMO R&T against NSF/ANSI
Standard 53 and CSA B483.1 for the reduction of
Lead, Cysts, Perfluorooctanoic Acid (PFOA) and
Perfluorooctane Sulfonate (PFOS).
waterchef.com
To Power Supply
INLET
NOTE: Flow Direction arrows embossed on
the Flow Control Valve are incorrect for this
application. Plumb unit opposite of arrows.
Drain Valve
Plumber’s Tape Threads
DO NOT Overtighten
OUTLET
O
F
F
O
F
F
or
4
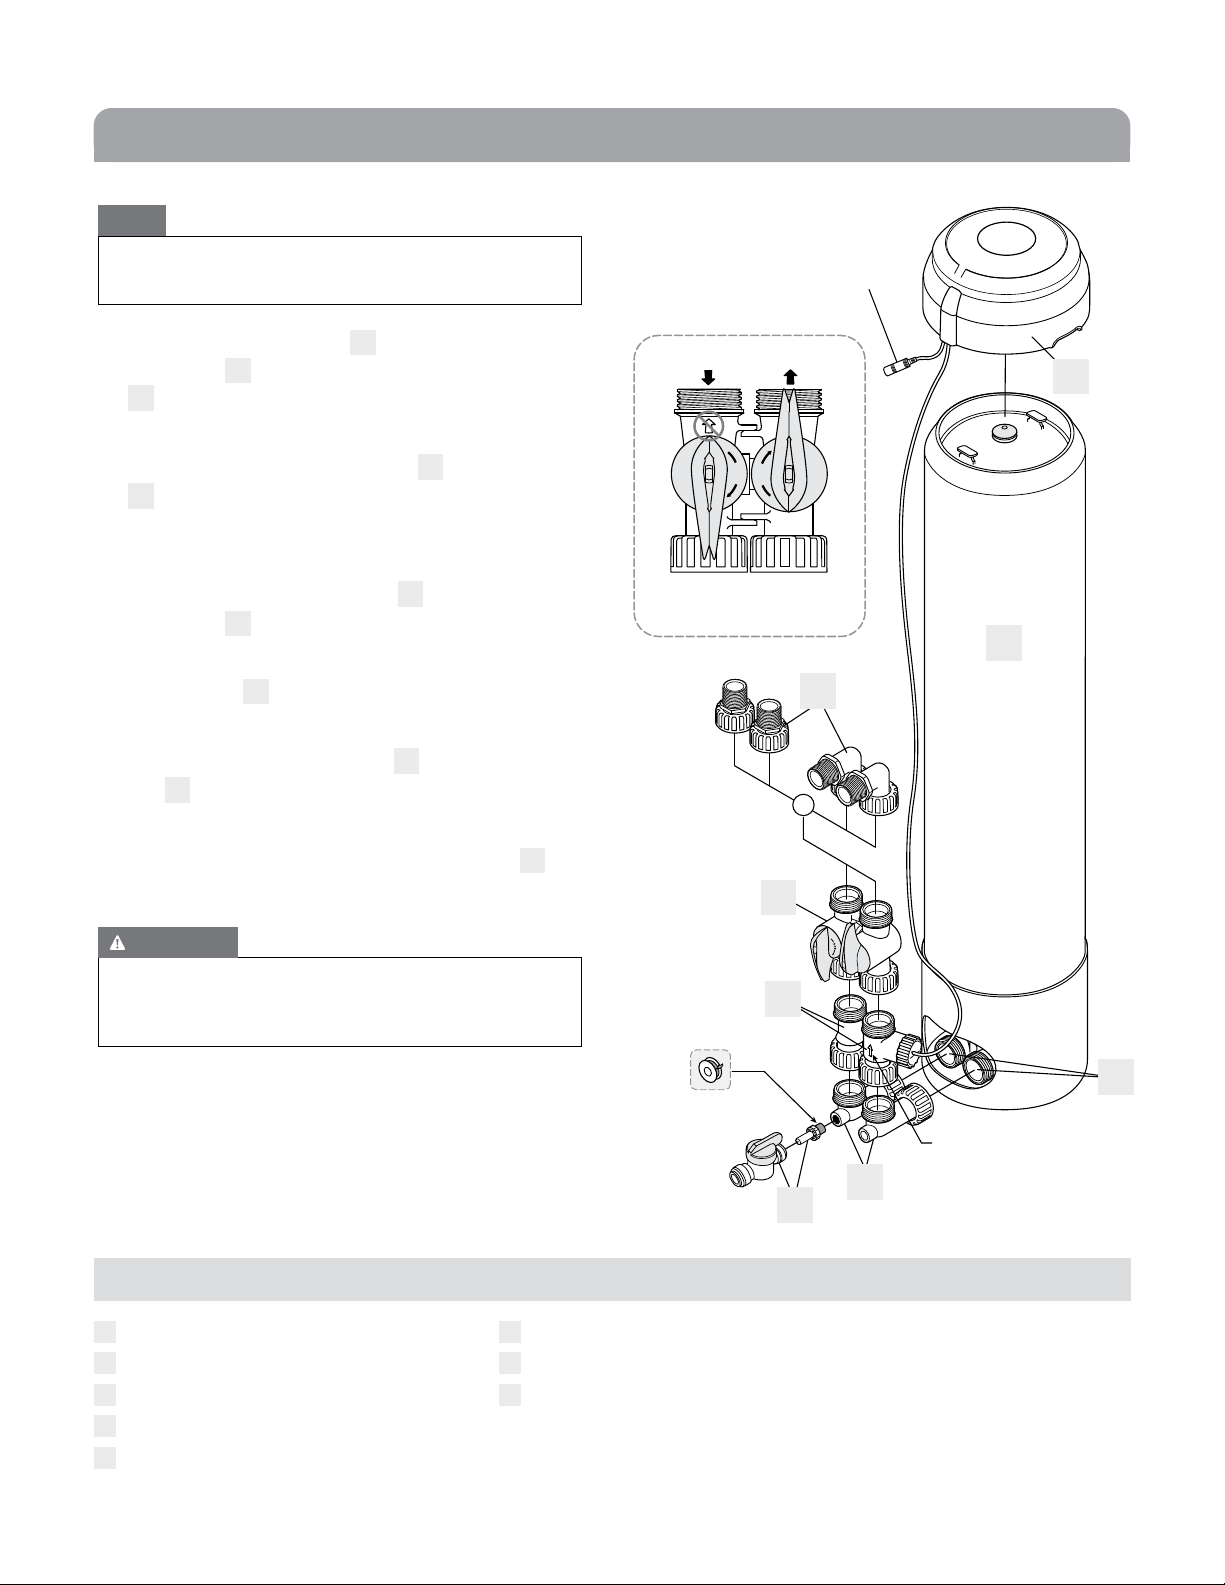
SYSTEM INSTALLATION
PART IDENTIFICATION
1.ConnectReducerTees3toInlet/OutletCap
Assembly2locatedonbottomofFilterHousing
. (Reducer Tee with plugged tting installs
on the right side.) Hand Tighten Only
2.ConnectFlowMeterAssembly4toReducerTees
3;wiredFlowMetershouldbeplacedonthe
Outlet Side (right). (Note the ow direction arrow
on meter body.) Hand Tighten Only
3.ConnectFlowControlValve5toFlowMeter
Assembly4.Hand Tighten Only
4.UseeitherStraightor90ºElbow1”MNPT
Connectors6forconnectingyourplumbing
system. Hand Tighten Only
5.InstallDrainValveAssembly7intoleftReducer
Tee3usingthethreadedconnectionand
plumber’stape.Hand Tighten Only
6.Install3AAAbatteriesinUmbrellaCover8;
connecttopowersupply.
Filter Housing
BottomInlet/OutletCapAssembly
ReducerTees(2) (1 plugged tting)
FlowMeterAssembly
FlowControlValve
6 Straightor90ºElbow1”MNPTConnectors (2 each)
7 3/8”DrainValveAssemblywithShut-O
8 UmbrellaCover(with Monitor Assembly and Battery Backup)
NOT SHOWN: Power Supply
PlacewiredFlowMeter
on the Outlet Side (right).
Note the ow direction
arrow on meter body.
IMPORTANT
DO NOT USE extra lubricants or unapproved sealants;
DO NOT USE tools to tighten hand tighten only parts.
Use of tools on hand tighten only parts will void warranty.
NOTE
Allow 3 feet of open space above the System to allow for filter
cartridge installation and replacement.
A
A
A
B
B
B
C
C
C
C
C
D
D
D
D
E
E
E
F
F
F
G
G
G
H
H
H
waterchef.com
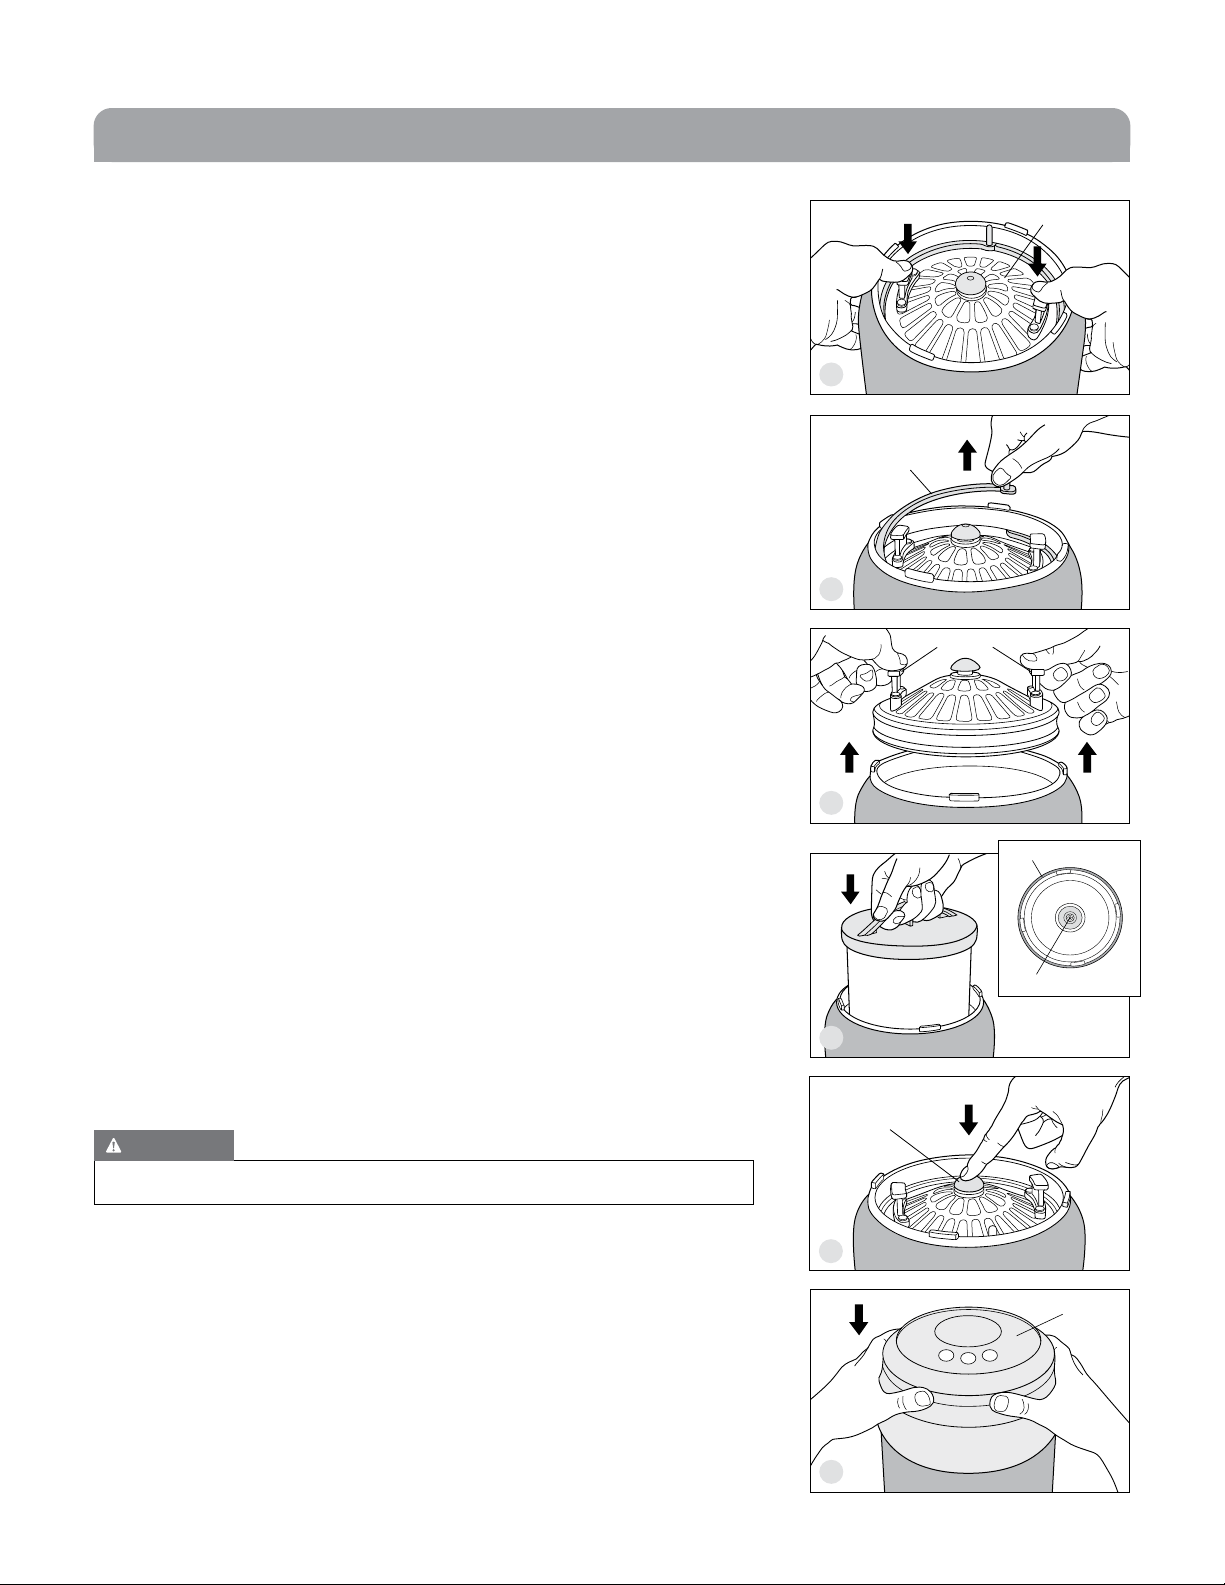
FILTER CARTRIDGE INSTALLATION
5
System comes pre-assembled without the Cartridge installed.
1.PressdownontheHousingAssembly’sTopCapwithbothhands
tounseattheSnapRing. (g. A) RemovetheSnapRingbycarefully
graspingthehandleandpullinginward,thenupward.TheRing
shouldslidecompletelyoutofthegroove. (g. B)
2.RemovetheTopCapfromtheHousingbyholdingtheCapHandles
and lifting. (g. C) (Place the Cap on a clean and dry surface, free
of debris, so that no contamination of the O-ring occurs.)
3.RemovepackagingfromFilterCartridge.
4.SlidetheCartridgeintotheHousingTankwiththedoubleO-ring
facingdown. WhileloweringCartridgeintoTank,aligntheCartridge
withthecenteropeninginthebottomoftheTank.Pressdown
ontheCartridgesothatthedoubleO-ringseatsintothebottom,
centeropening.(g. D)
5.RepositiontheTopCapintoitsoriginallocationontheHousing.
6.ReattachtheSnapRingthenpullupontheTopCaphandlesto
seat the O-ring.
7.TurnwatersupplyONbyopeningtheInlet&OutletValveson
theFlowControlValve.
8.AstheSystemllswithwater,pushdownontheREDPressure
ReleaseButtonontheTopCaptorelievetheSystemofair.Keep
Button pushed down until ALL air is released and water starts
to come out of the Button. Release Button. (g. E)
9.SeatUmbrellaCoverontopofHousingAssembly(g. F) and
check for leaks.
10.FlushSystembyrunningwaterthroughSystemfor10minutes
beforeuse.
B
C
D
F
IMPORTANT
Repeat flushing procedure each time a new Filter Cartridge is installed.
A
SnapRing
TopCap
Umbrella
Cover
CapHandles
Bottom,CenterOpening
HousingTank
Pressure
Release
Button
E

waterchef.com
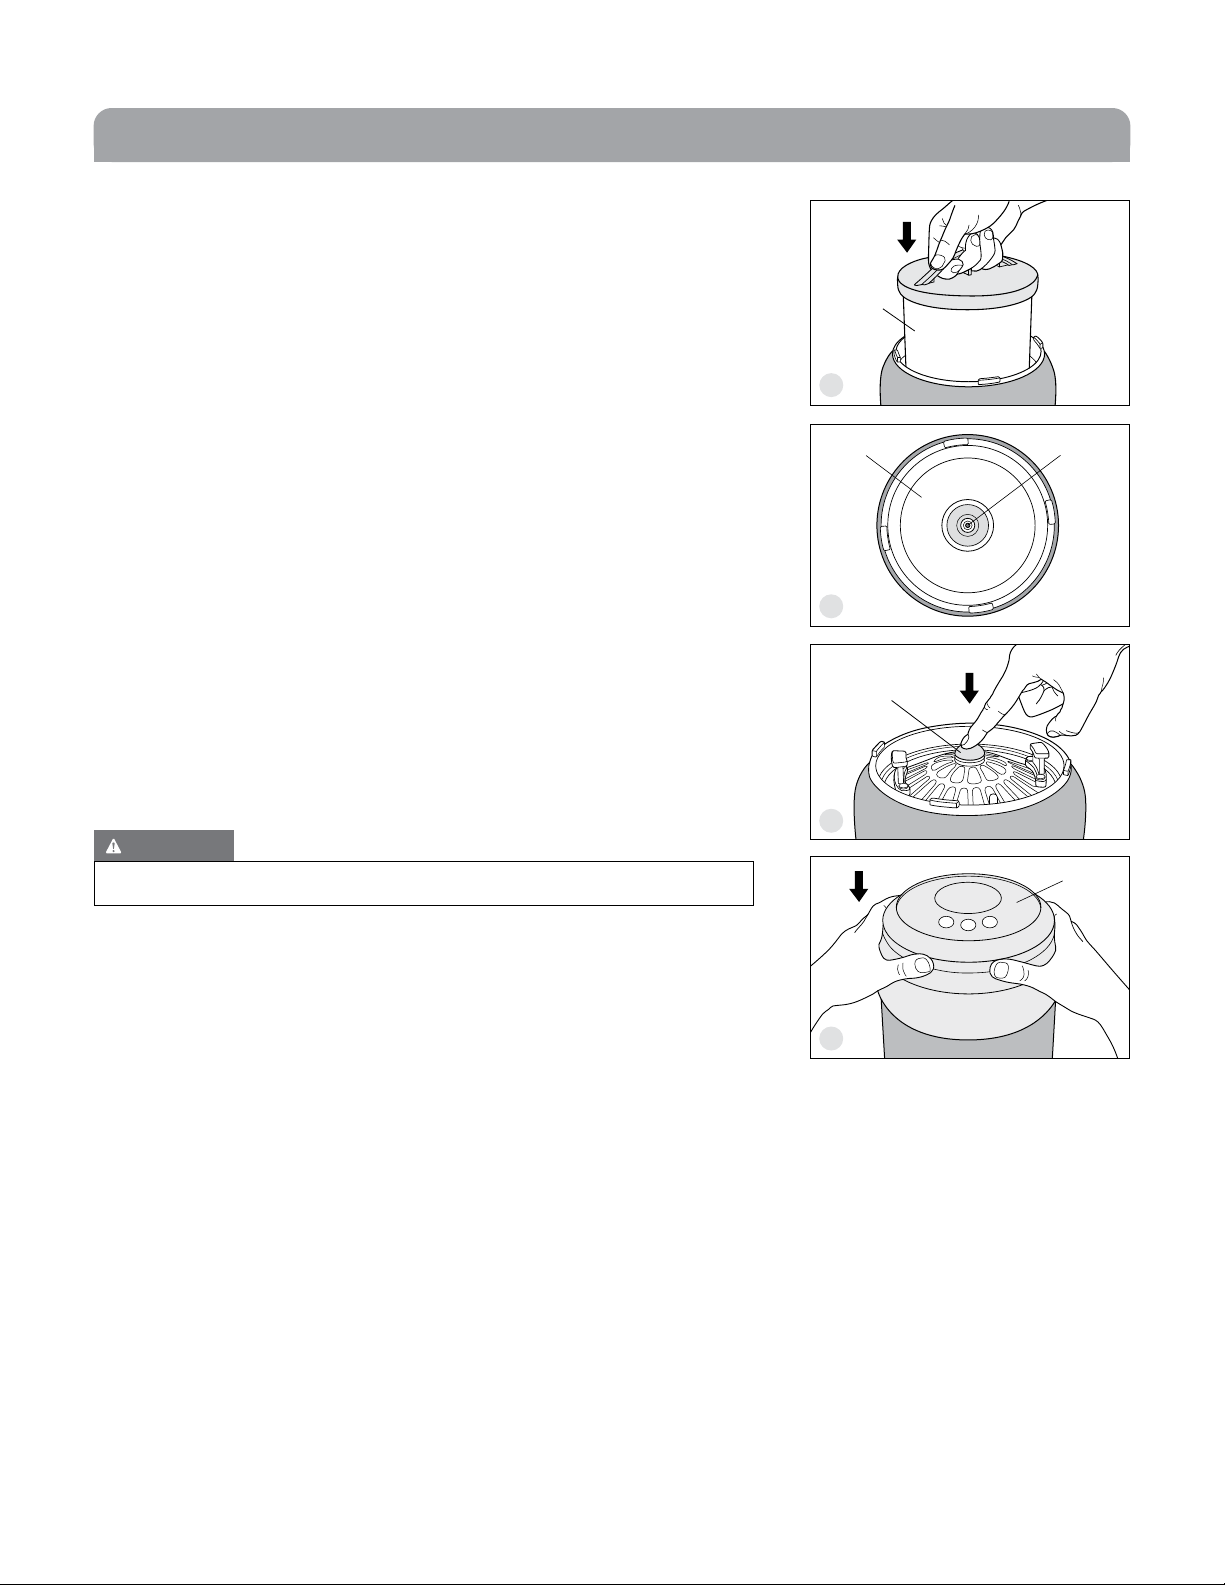
REPLACING THE FILTER CARTRIDGE
FILTER STATUS NOTIFICATIONS
6
1.TurnOFFthewatersupplytotheSystembyshuttingotheInlet
&OutletValvesontheFlowControlValve.
2.RemoveUmbrellaCoverfromthetopoftheHousing.Replacethe
3AAAbatterieswithnewbatteries.ResettheIntelligentMonitor™
bypushingandholdingtheResetButtononthemonitorboard
for3seconds.TheGREENLEDlightswillash3timesto
conrmreset. (g. G)
3.DepressurizetheSystembypushingdownontheREDPressure
ReleaseButtonontheTopCapoftheHousinguntilALLtheairor
waterpressureiscompletelyreleased. (g. H)
4.PressdownontheTopCapwithbothhandstounseattheSnap
Ring. (g. I) RemovetheSnapRingbycarefullygraspingthe
handleandpullinginward,thenupward.TheRingshouldslide
completelyoutofthegroove. (g. J)
5. RemovetheTopCapfromtheHousingbyliftingupontheCap
Handles.RemovetheoldFilterCartridge.
6.Connect3/8”O.D.Tubing(included with EVO100 System) to the
DrainValvethatconnectstotheinletsideoftheFiltrationSystem.
RunthehosetoaoordrainorbucketthenOPENtheDrainValve
andushoutthebottomoftheSystem.
Thebuilt-inIntelligentMonitor™measureswaterandowrateinreal-time,notifyingyouaboutremaininglter
cartridgelifewithsimplecolor-codedLEDnotications.
GREEN
Peak Operating
Performance
FILTER IS
GOOD
YELLOW
Under 10% of
Filter Life Remains
ORDER NEW
FILTER
RED
End of Filter Life
has Been Reached
REPLACE
FILTER NOW
(continued on following page)
AAA
AAA
AAA
SnapRing
Pressure
Release
Button
UmbrellaCover
(underside) AAA Batteries
Reset Button
TopCap
I
H
G
J
waterchef.com
REPLACING THE FILTER CARTRIDGE
7
7.RemovepackagingfromnewFilterCartridgethenslideinto
HousingTankwiththedoubleO-ringfacingdown. (g. K)
8.PositiontheCartridgesothatitisalignedwiththebottom,center
openingintheTank.(g. ) PressdownontheCartridgesothat
thedoubleO-ringsealseatsintothebottom,centeropening.
9.RepositiontheTopCapintoitsoriginallocationonHousing.
10.ReattachtheSnapRingthenpullupontheTopCapHandlesto
seat the O-rings.
11.CLOSEtheDrainValvethenturnONthewatersupplytotheSystem
byopeningtheInlet&OutletValvesontheFlowControlValve.
12.AsSystemllswithwater,pushdownontheREDPressure
ReleaseButtononTopCaptorelieveSystemofair.(g. M) Keep
Button pushed down until ALL air is released and water starts
to come out of the Button. Release Button.
13.SeatUmbrellaCoverontopofHousingAssembly(g. N) and
check for leaks.
14.FlushSystembyrunningwaterthroughSystemfor10minutes
beforeuse.If lights are not ashing GREEN, see step 2.
Housing
Tank
Umbrella
Cover
Bottom,
Center
Opening
Filter
Cartridge
K
L
N
Pressure
Release
Button
M
IMPORTANT
Repeat flushing procedure each time a new Filter Cartridge is installed.

waterchef.com 8
INTELLIGENT MONITOR™
POWER
OPERATION
Thisunitistobepoweredusing+12VDC.Thepowerunitisawiretailwith2.5mm,centerpositivebarreljack.
TheIntelligentMonitor™hasabatterybackupthatuses3AAAsizebatteries.Thebatteryholderispartofthe
MonitorAssemblylocatedinsidetheUmbrellaCaponthetopoftheSystem.Itcanbeaccessedbyliftingthe
UmbrellaCapfromtheSystem.Batterylifewillvarybasedonwaterowwhenrunningonbatterymodeand
typeofbatteriesused.Withhighcontinuousow,thebatteriesareexpectedtolastapproximately14days.
Withnoow,thebatteriesareexpectedtolastapproximately6months.
TheIntelligentMonitor™keepstrackofthegallonsofwaterthatpassthroughtheSystem.TheMonitoris
removableforinspectionandcleaning.MakesurewaterisbypassedorturnedowhenremovingtheMonitor
formaintenance.TheMonitorhasathreepinplugthatconnectstotheelectronicboardintheUmbrellaCap.
LEDs
Simplecolor-codedLEDnoticationsdisplaytheusagestatusoftheltercartridge:
GREEN 100%-10%oflterliferemains
YELLOW Under10%oflterliferemains
RED Endoflterlifehasbeenreached
Ifthereisow,LEDsshouldalternatelyblinkinthefollowingpattern:1-2-3-2(repeat).Thefrequencythatthe
LEDsblinkcorrespondstotheowratereceivedfromtheMonitor.ForeveryrevolutionfromtheMonitor,
theLEDpatternshouldbeincrementedtoturnothenextLED.Iftherearenorevolutionsfor2seconds,all
LEDswillturnonsolid.
Ifthebatteriesarelow,themiddleLEDwillturnWHITE.Thebatterylevelischeckedonceanhourto
minimizethebatterydrainfromcheckingthevoltage.
Reset Button
TheResetButtonallowsfortheIntelligentMonitor™tobereset.
ToresettheIntelligentMonitor™,pressandholdtheResetButtonfor3seconds.Oncereset,theLEDsshould
ashgreen3timestoconrmreset.
Power Monitoring and Battery Mode
Inadditiontomonitoringwaterusage,theIntelligentMonitor™alsomonitorstheSystem’s12VDCpower
andbatterypower.Ifthereisapowerfailureandnobatteriesareinstalled,theMonitor’svaluewillbesaved
tonon-volatilememory.Whenpowerisresumed,thegalloncountwillresumefromwhereitleftowhen
powerwaslost.
Ifthereisapowerfailureandbatteriesareinstalled,theMonitorgoesintobatterymode.Duringbattery
mode,theLEDsshouldshuto.IftheMonitorisintheYELLOWorREDstate,orifthebatteryvoltagegets
low,theLEDswillashonintheappropriatecolorfor.125secondsevery4seconds.IftheResetButtonis
pressedinbatterymode,theLEDswillturnonfor4secondsandthenreturntobatterymode.

waterchef.com
9
5-YEAR LIMITED WARRANTY
WaterChef®warrantsthat this ltrationsystemwill be freefromdefects in materials andworkmanshipin
manufacturingfortheperiodofveyears(60months)fromthedateofpurchase.Thiswarrantyisextendedto
theoriginalpurchaser.UseofthisproductconstitutesBuyer’sacceptanceofthisLimitedWarranty.
WaterChef,atitssolediscretion,willrepairorreplacethisproductorcomponentoftheproductfoundto
bedefectiveduringthiswarrantyperiod.Replacementwillbemadewithaneworremanufacturedproductor
component.Iftheproductisnolongeravailable,replacementmaybemadewithasimilarproductofequalor
greatervalue.Thisisyourexclusivewarranty.
Thiswarrantyisvalidfortheoriginalretailpurchaserfromthedateoforiginalretailpurchaseandisnot
transferable.Keeptheoriginalsalesreceipt.Proofofpurchaseisrequiredtoobtainwarrantyservice.
WHAT IS NOT COVERED
This warranty does not cover lter cartridges, systems that were not installed in compliance with the
installationinstructionsbyalicensedplumber,normalwearofcomponentsorthefollowing:
•DamagecausedbyimproperinstallationorusecontrarytotheInstallation,Use&Care
Guide,disassembly,
modicationoralterationbyanyoneotherthanWaterCheforaWaterChefauthorized
servicecenter.
•Damagecausedbynegligent useormisuseofthe product,neglect,oxidizingagents(suchaschlorine,
ozonechloraminesandotherrelatedcomponents).
•Damageduetoexcessivesedimentinwatersupplyorclogging(replacementofpre-ltercartridgeisthe
purchaser’sresponsibility),usewithnon-potablewatersuppliesorusewithwaterpressurethatisoutside
thespeciedoperatingrange.
•
Damagecausedbyaccident,re,freezing,oodoractsofGod.
•
Cost of labor or expenses expended in the installation and/or removal of system, lter cartridges, or any
surroundingdevice.
•Incidentalorconsequentialdamagecausedbyafailureoftheproductorthebreachofanyexpressedor
impliedwarranty.Excepttotheextentprohibitedbyapplicablelaw,anyimpliedwarrantyormerchantability
islimitedtothedurationoftheabovewarranty.
ThisWarrantyifvoidediftheproductisusedwithnon-genuineWaterChefpartsorreplacementltercartridges.
Somestates,provincesorjurisdictionsdonotallowtheexclusionorlimitationoftheincidentalorconsequential
damages,sotheabovelimitationorexclusionmaynotapplytoyou.Thiswarrantygivesyouspeciclegal
rightsandyoumayhaveotherrightswhichvaryfromstatetostateorprovincetoprovince.
HOW TO OBTAIN WARRANTY SERVICE
Call 1.800.879.8909 (int’l +1.775.359.9500) or email customercar[email protected]withinthewarrantyperiod
todescribetheproblem.Ifitisdeterminedthatitisnecessarytoreturnthedefectivepart,aReturnAuthorization
Numberwillbeissued.Parts returned without a Return Authorization Number will be refused.Packthe
productinashippingcarton,usingnewspaperorotherpackingmaterialstoprotecttheproductfromdamage
intransit.Beforesealingthecarton,besuretoincludeproofofpurchaseandproofofinstallationbylicensed
plumber.BecertaintoincludeyourreturnshippingaddressandReturnAuthorizationNumberontheoutside
of the carton.
Uponreceivingtheproduct,wewillrepairorreplacethepartandreturnittothereturnaddressontheshipping
carton at no cost to you (U.S. customers only).
PREMIUM WATER FILTRATION
EVO100 WHOLE HOUSE WATER FILTRATION SYSTEM
waterchef.com
WATERCHEF®PRODUCT REGISTRATION
10
Thank you for choosing WaterChef®!Don’tforgettotakeamomenttoregisteryournewSystem.Doingso
willallowustobetterserveyouintheeventthattechnicalorwarrantyassistanceiseverrequired.
Simply visit www.waterchef.com to register your system online,orifyouprefer,youmaycompleteand
returnthisregistrationformto:WaterChefCustomerCare·3760BarronWay·Reno,NV89511
NAME:
STREET ADDRESS:
CITY: STATE: ZIP:
PHONE: ( ) EMAIL:
MODEL #: EVO100 SERIAL #: DATE OF PURCHASE: / /
PURCHASED FROM:
Sign me up for WaterChef Updates, Special Promotions & Exclusive Discounts!
Please send me Courtesy Email Notications when it’s time to replace my lter cartridge.
We value your privacy and will not sell or share your information with anyone. You may unsubscribe from updates and cartridge reminder
notications at any time.
NOTES

1-404-0122 r19.10
WaterChef®|3760BarronWay·Reno,NV89511 |tel 1.800.879.8909 |int’l +1.775.359.9500
email customercar[email protected]|web waterchef.com
Table of contents
Other WaterChef Water Filtration System manuals


Popular Water Filtration System manuals by other brands


amiad
amiad 4" Sigma Pro Installation & operation manual

Pico Macom
Pico Macom BPF Installation and operation manual

Rainfresh
Rainfresh R1245 Installation & maintenance instructions

Nimbus Water Systems
Nimbus Water Systems WaterMaker Five Introduction manual

STF-Filtros
STF-Filtros FMA-3000 Installation, operation and maintenance manual

Frizzlife
Frizzlife PD1000-TAM4 owner's manual