Waterco OXISWIM User manual

D U A L S A N I T I S A T I O N
Installation and Operation manual
Version: 1.1.3
December 2022

OXISWIM MANUAL
P a g e 2 | 45
WARNING
This equipment must be installed and serviced by a
qualified technician.
Improper installation can create electrical hazards,
which could result in property damage, serious
injury, or death. Improper installation will void the
warranty. If you cannot obtain the information to a
particular question from this guide, please contact
the place of purchase or your nearest Waterco
branch for further information.
Notice to Installer
This manual contains important information about
this product's installation, operation, and safe use.
Once the product has been installed, this manual
must be given to the owner/ operator of this
equipment.

OXISWIM MANUAL
P a g e 3 | 45
Contents
1CHEMICAL GUIDE...............................................................................................................5
2INTRODUCTION..................................................................................................................7
3WHAT IS IN THE BOX..........................................................................................................9
4PEROX PRO - SAFETY GUIDE.............................................................................................10
5INSTALLATION GUIDE.......................................................................................................12
5.1 Water Chemistry...........................................................................................................12
5.2 Phosphate Treatment ...................................................................................................14
5.3 Planning.........................................................................................................................14
6SYSTEM INSTALL...............................................................................................................16
6.1 Install the Controller Panel ...........................................................................................16
6.2 Install the Chemical Injection Points.............................................................................17
6.3 Connect the Chemical Supply Tubes.............................................................................18
6.4 Connect Chemical Injection Points to the Chemical Dosing Unit.................................19
6.5 Assemble the Foot Filter & Weight...............................................................................21
6.6 PUMP PROGRAMMING PROCEDURE –OXISWIM ........................................................22
6.6.1 Set Time .............................................................................................................23
6.6.2 Set Timer............................................................................................................24
7WATER PREPARATION .....................................................................................................27
7.1 Balance the Pool Water ................................................................................................27
8MAINTENANCE.................................................................................................................29
8.1 Regular Care..................................................................................................................29
8.1.1 Water testing and balancing..............................................................................29
8.1.2 Low levels of hydrogen peroxide.......................................................................31
8.1.3 Shock dose .........................................................................................................31
9RECOMMENDED CHEMICAL LIST.....................................................................................32
9.1 Chemical Supply............................................................................................................33
9.2 Cartridge Filters.............................................................................................................33
9.3 Draining Water..............................................................................................................33
9.4 Topping up The Pool .....................................................................................................33
9.5 Hydroxyl Radical Generator (HRG) ...............................................................................34
9.6 Peristaltic Pumps...........................................................................................................34
9.6.1 Changing the tube without dismantling the rotor.............................................34

OXISWIM MANUAL
P a g e 4 | 45
9.6.2 Injection valve maintenance..............................................................................35
10 GREEN WATER POOL RECOVERY .....................................................................................36
10.1 Green Pool Recovery Using Chlorine ............................................................................36
10.2 Changing from Hydrogen peroxide to chlorine. ...........................................................38
10.3 Changing from Chlorine to Hydrogen Peroxide............................................................39
11 GENERAL SAFETY GUIDELINES .........................................................................................40
WARRANTY...............................................................................................................................41

OXISWIM MANUAL
P a g e 5 | 45
1CHEMICAL GUIDE
Oxiswim Support Chemicals
When operating the system chlorine-free, the following chemicals are recommended:
•Perox Pro –Hydrogen peroxide designed explicitly for use in a swimming pool
•Perox Safe & Clear –Needed to generate chlorine dioxide from Oxiswim Sanitiser
•Perox Activate –Used to break down and remove body fats, oils, sun tan lotions, and
makeup. Prevents scum build-up around the water line and prevents and removes
biofilms.
•Perox pH Control - Hybrid acid that is non-fuming, does not need to be diluted,
removes phosphates, clarifies the water, and will help prevent algae.
Safe to use with a chemical dosing system
•Perox Start-Up - Protects the surface of your pool and pipework from calcium
deposits reducing the consumption of hydrogen peroxide and chlorine
•Aqua~Health Concide / Aquachlor Long Life Algaecide -Activates hydrogen
peroxide in the pool water and helps prevent algae growth
•Perox Perfect - Used for green pool recovery or phosphate removal
•C5 Tablets - Prevents formation of biofilm and will reduce consumption of hydrogen
peroxide and chlorine
Filter Cleaners:
•Aqua~Health Natural Filter Cleaner or similar cartridge filter cleaner may also be
used
When running chlorine, you can continue to use the above support chemicals in conjunction
with liquid, powdered chlorine, or chlorine produced by a salt chlorinator.
Perox Pro is not used when running chlorine.
Do not use any polyquats or lanthanum chloride-based products at any time while using this
system.

OXISWIM MANUAL
P a g e 6 | 45
CHEMICAL
INITIAL DOSE
MAINTENANCE
PEROX PRO
1.5 litres per 10,000 litres raises
Hydrogen Peroxide level by 100ppm
21 fl oz. per 1000 US gal raises HP level
by 100ppm
Approx. 0.09 litres (90ml per
10,000 litres per day)
1/8 fl oz. per 1000 US gal, per day
PEROX SAFE &
CLEAR
100 grams per 10,000 litres
1.6 oz per 1000 us gal
Every 3 months:
100 grams per 10,000 litres
1.6 oz per 1000 us gal
PEROX ACTIVATE
250mL per 50,000 litres
Every 3 months:
250mL per 50,000 litres
PEROX
START-UP
250mL per 10,000Litres
3.20 fl oz. per 1000 US
Every 6 months:
250mL per 10,000 litres
gal 3.20 fl oz. per 1000 US gal
COPPER ALGICIDE
100mL per 10,000 litres
1.3 fl oz. per 1000 US gal
Every 6 months:
100mL per 10,000 litres
1.3 fl oz. per 1000 US gal
C5
1 Tablet per 10,000 litres
1 Tablet per 2500 US gal
Every 3 months:
1 tablet per 50,000
1 tablet per 12500 US gal
PEROX PERFECT
Shock dose (green pool recovery,
phosphate
removal or use with Perox Activate);
300mL per 10,000 litres
3.80 fl oz. per 1000 US gal
Every 3 months:
250mls per 50,000
If using chlorine, refer to the recommended dosage rate for the individual product that you
are using. Maintain a chlorine level as per the information located in section 4.1.1

OXISWIM MANUAL
P a g e 7 | 45
2INTRODUCTION
The Oxiswim Sanitisation system is a revolution in how a swimming pool owner can run
their swimming pool or spa. The system has been developed as a result of many years of
research using alternatives to chlorine whilst offering the cost savings of being able to use
chlorine if desired. When operating the pool using Perox Sanitisers at the recommended
level, chlorine cannot co-exist in the water - even if added at very low dosage rates. Chlorine
can only become the dominant sanitiser when all Hydrogen Peroxide has been consumed in
the pool water. When operating using Hydrogen Peroxide, it's free of odours and taste and
is soft and gentle on the skin. What's more, no shower is required after swimming. It's been
described by users as "just like a refreshing swim in a natural spring".
The Oxiswim system uses new catalytic technology that removes the need to use ozone.
However, the advanced oxidation process continues to be the cornerstone of the system
when operating on hydrogen peroxide. Using the advanced oxidation process is a chemical
reaction generated by combining Perox (a chlorine-free, hydrogen peroxide-based sanitiser)
and a catalytic material that will remove bacterial threats better than any other oxidation
process.
NOTE
The Oxiswim system is a kit of components. Attempting to operate the system
without correctly installing all parts or with chemicals other than those
recommended in this manual may result in the system not functioning
correctly, and failure of the system may be hazarous or may cause adverse
effects to your swimming pool or bathers.
Do not use chemicals other than those recommended in this manual
Gloves and safety glasses should be worn when handling chemicals.

OXISWIM MANUAL
P a g e 8 | 45
Attention Installer
READ AND FOLLOW ALL INSTRUCTIONS
In emergencies, the system should be switched off
immediately.
The manufacturer is not liable for misuse of this product that
may cause damage to persons and/or materials.
Only a certified service technician should perform servicing
requirements to reduce the risk of injury.
The use of chemicals other than those recommended may
result in the system not functioning correctly; failure of the
system may be hazardous or may cause adverse effects to
your swimming pool or bathers.

OXISWIM MANUAL
P a g e 9 | 45
3WHAT IS IN THE BOX
1) 1 x Wall-mounted panel with Chemical Controller, Timer, and Pump Power Outlet
2) 1 x Hydroxyl Radical Generator
3) 2 x Chemical injection assemblies
4) 2 x Chemical hose connections kits
5) 2 x Chemical pick-up and float pieces
6) 1 x Oxiswim Sanitiser (Electrolysis equipment)
Additional materials required, but not supplied in kit
The following items may be required to install the Hybrid system but are not supplied in the
kit:
•40mm/48mm/1 ½ in or 50mm/63mm/2 in pipe and fittings
•UPVC Pipe Adhesive and Primer
•Mounting screws for wall-mounted panel
•Cable Ties
•Hole saw 22mm (55/64 in)
Recommended Tools
The following tools will be required as a minimum for the installation:
•Cordless Drill
•Hammer Drill (if mounting on a masonry wall)
•Philips Head Screwdriver
•PVC Saw
•Adjustable wrench 0-25mm (1in) or 10mm (25/64 in) Socket and Multigrips
•Utility knife

OXISWIM MANUAL
P a g e 10 | 45
4PEROX PRO - SAFETY GUIDE
Ensure that all work complies with local authority regulations and any local or organisational
workplace health and safety regulations, policies and procedures.
STORAGE AND HANDLING
Store in the original closed container in an upright position in a cool, well-ventilated place.
Do not store in direct sunlight. Wear chemical splash goggles and rubber gloves when
handling. Do not mix with other chemicals. Avoid contact with combustible materials or
organic liquids as they may cause fire or explosion. If spilled, rinse, with plenty of water
immediately. Do not pour the unused liquid back into the container. Replace the cap after
use. Do not replace the vented cap with another cap.
WEAR PROTECTIVE CLOTHING AND FOOTWEAR
DISPOSAL
Triple or preferably pressure rinse containers before disposal. Add rinsings to the pool. Do
not dispose of undiluted chemicals on site. If recycling, replace the cap and return the clean
container to the recycler or designated collection point. If not recycling, break, crush,
puncture, and bury empty containers in local authority landfill. If not available, bury the
container below 500mm (20in) in a disposal pit specifically marked and set up for this
purpose clear of waterways, desirable vegetation, and tree roots. Empty containers and
products should not be burnt.
SAFETY DIRECTIONS
•Corrosive.
•Attacks eyes, nose, throat, and skin.
•Protect eyes when using.
•Avoid contact with skin.
•Do not inhale the vapour.
•Wash hands thoroughly after use.
•When using the product, wear rubber gloves and safety glasses
FIRST AIDS
If poisoning occurs, get to a doctor or hospital quickly. Give plenty of water. If skin contact
occurs, remove contaminated clothing and wash the skin thoroughly with soap and water. If
in eyes, hold open and flush with water for 15 minutes and see a doctor.
Notice to the purchaser: Perox products are manufactured following the highest standards.
Therefore all conditions and warranties expressed or implied by law and all negligence
claims are excluded. Our liability is limited to replacing any portion of the product supplied
which is shown to our reasonable satisfaction to be defective.
IN AN EMERGENCY CONTACT THE RELEVANT LOCAL AUTHORITIES

OXISWIM MANUAL
P a g e 11 | 45
INSTALLATION AND COMMISSIONING

OXISWIM MANUAL
P a g e 12 | 45
5INSTALLATION GUIDE
The Oxiswim system can be fitted into most types of pools or spas. In addition, the system
can be retrofitted into other existing sanitisation systems to complement the operation of
the existing system.
5.1 Water Chemistry
When operating with hydrogen peroxide, the following operating parameters are
recommended
Test
Result
Perox Pro (Hydrogen Peroxide)
100ppm - 300ppm
pH level
7.2 - 7.6
Total Alkalinity level
60ppm - 80ppm
Calcium Hardness
180ppm - 400ppm
Salinity (= total Pool salt & Mineral Crystals) For low salt
cell use*
2000ppm-3000ppm
Phosphate level
Less than < 0.5ppm
Chlorine Dioxide
0.4ppm - 0.5 ppm

OXISWIM MANUAL
P a g e 13 | 45
When operating on chlorine, the following operating parameters are recommended:
Test
Result
Residual sanitiser chlorine
1.0ppm –3.0ppm
pH level
7.2-7.6
Total Alkalinity level
100ppm –150ppm
Calcium Hardness
180ppm –400ppm
Salinity (= total Pool salt & Mineral Crystals) For low salt cell
use*
2000ppm-3000ppm
Phosphate level (ppm)
Less than < 0.5ppm
PLEASE NOTE: The above information is a guide only. Please refer to the local laws that
govern a swimming pool or spa operation in your area. Always operate the system in
compliance with local laws.
IMPORTANT: When refilling a pool, use municipal or tank water only. It is not
recommended that Bore or Well water is used to fill or top up a pool unless it has been
tested and recommended for this purpose.

OXISWIM MANUAL
P a g e 14 | 45
5.2 Phosphate Treatment
If Phosphate levels are higher than 1.0ppm, then;
Treat the high phosphate levels as an event, and complete a shock dose treatment using
Perox Perfect once the system has been commissioned.
There should be no need to treat phosphates regularly with any other chemicals other than
Perox Perfect, provided Perox pH control is used to control the pH.
Diatomaceous Earth filters are not recommended for use with Hydrogen Peroxide.
Copper ionisers can be used in conjunction with the Oxiswim system, but total copper levels
must not exceed 1ppm.
5.3 Planning
Before commencing the installation, take time to plan;
•That the chemical drums will be at least 1.5m (5 ft.) apart.
•Ensure the unit is protected from the weather and, when possible, not exposed to
elements.
OXISWIM MANUAL
P a g e 15 | 45
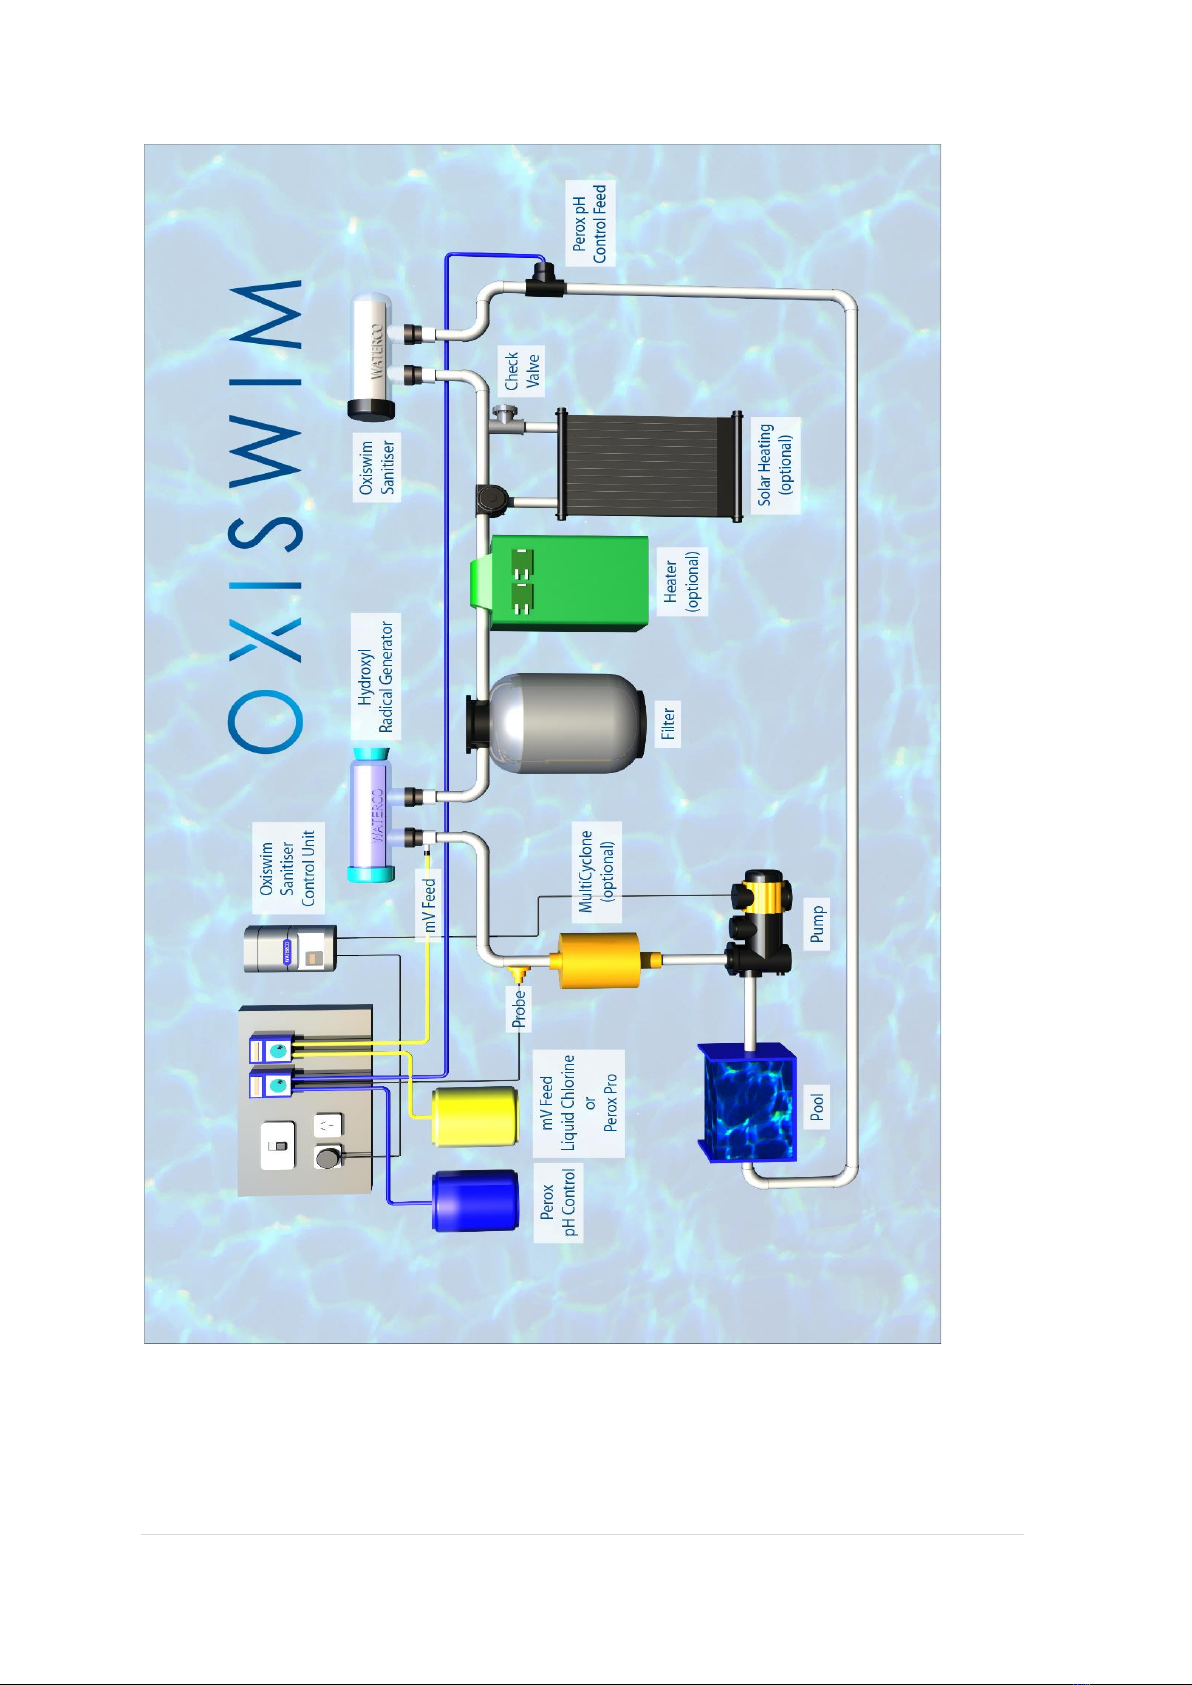
Oxiswim Typical Installation Layout

OXISWIM MANUAL
P a g e 16 | 45
6SYSTEM INSTALL
ENSURE THE POWER TO THE SYSTEM AND GPO's OFF AT THIS POINT
6.1 Install the Controller Panel
6.1.1 Install the wall-mounted panel, ensuring that the POWER supply is OFF
6.1.2 Plug the pool pump into the GPO outlet marked 'PUMP', ensuring the POWER is
OFF at the GPO.
6.1.3 Install the Hydroxyl Radical Generator as per the diagram on the inlet side of the
filter. For additional information regarding the Hydroxyl Radical Generator, please
refer to the instruction manual located in the box that contains the Hydroxyl
Radical Generator.
6.1.4 Connect the chemical dosing tubes as per the diagram. Use blue tube for acid and
yellow tube for hydrogen peroxide/chlorine. Use the tapping saddle provided to
connect the acid feed in an appropriate position based on the installation
diagram. Refer to 6.2 for instructions on how to install a tapping saddle.
Refer to 6.3 and 6.4 on how to fit the chemical tube to injectors and foot valves.
6.1.5 Plug the power cord from the Hybrid system into a 10amp power outlet. Ensure
the POWER supply is off until ready to commission the unit.
6.1.6 Plug the Oxiswim Sanitiser (OS) unit into the GPO located on the Oxiswim
controller board. Switch the OS unit to the on position (refer to instructions of the
OS). The OS will automatically come on when the pump is signalled to operate.
The OS should always be on in conjunction with the system in either Fresh Water
or Chlorine mode
NOTE
Note on Filters Warranty.
Waterco will honour the warranty of all Waterco media and cartridge filters
when used with the Hybrid System, as their construction materials are
designed to withstand the injection of hydrogen peroxide. Waterco can't
support the use of any other brand of filters for use in a Hybrid System pool

OXISWIM MANUAL
P a g e 17 | 45
6.2 Install the Chemical Injection Points
6.2.1 Acid Injection Point
I. The acid (pH) injection point is to be installed on the pool return line, after all,
other pool equipment.
II. Dry fit the chemical injection point saddles to ensure sufficient space and
clearances.
III. Ensure that the heads of the chemical injection points have a minimum of
200mm (8in) clearance so that the chemical feeder hoses may attach freely.
The chemical injection points may be installed on either vertical or horizontal
pipe.
IV. Whilst in dry fit, mark the holes to be drilled into the pipes, so they are
directly under the open head of the chemical injection point.
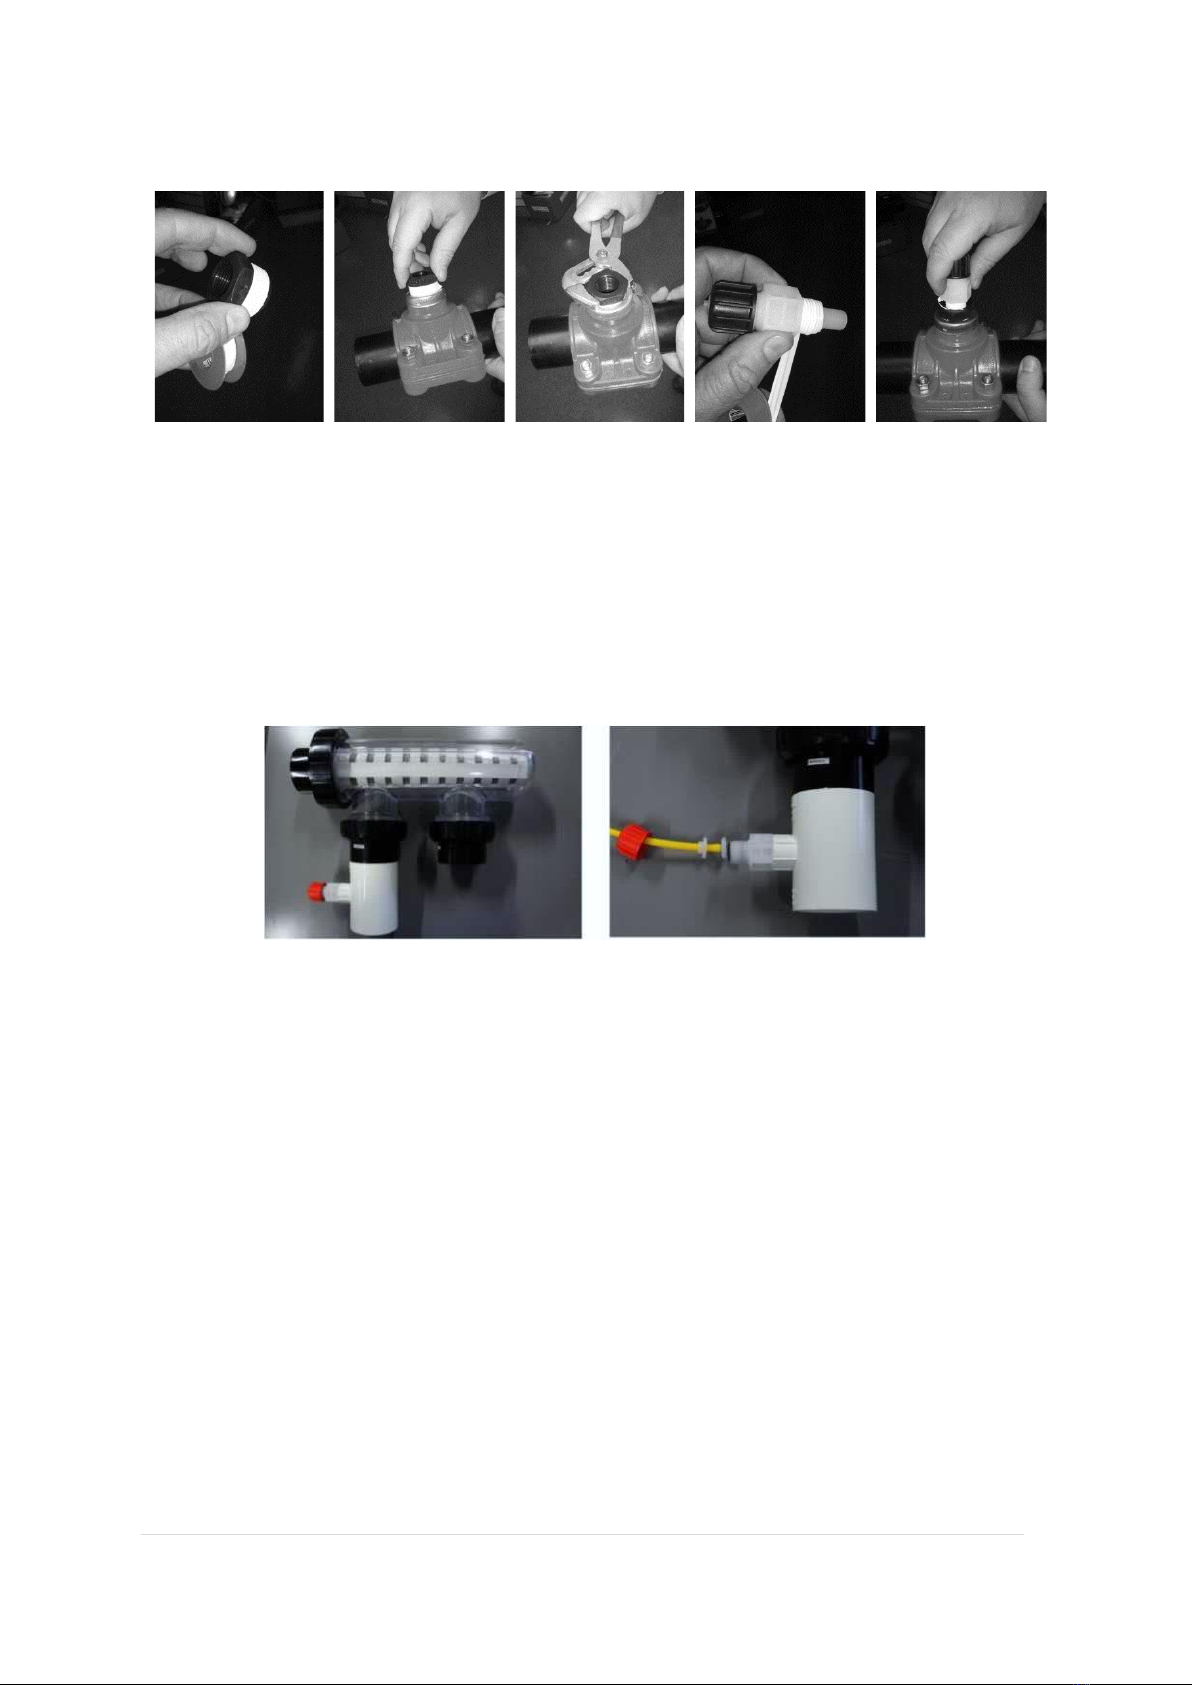
V. Use a 22mm (55/64 in) hole saw, drill the first hole and clean the swarf
(Figures 6.1 and 6.2)
VI. Install the lower and upper clamps (Figures 6.3 and 6.4) so that the hole is
directly beneath the open head of the upper clamp. Then secure the clamps
together using the nuts and bolts provided, tightening with an adjustable
wrench or 10mm (25/64 in) socket wrench (Figure 6.5)
Figure 6.1
Figure 6.2
Figure 6.3
Figure 6.4
Figure 6.5
VII. Using the Teflon tape provided, install the reducing bush to the top of the
chemical injection clamp (Figures 6.6 and 6.7). Hands tighten and then / turn
with an adjustable wrench (Figure 6.8). Do not over tighten
VIII. Using the Teflon tape provided, install the chemical injectors to the reducing
bush. Hand tightens, and then % turn with an adjustable wrench (Figures 6.9
and 6-10).
OXISWIM MANUAL
P a g e 18 | 45
Figure 6.6
Figure 6.7
Figure 6.8
Figure 6.9
Figure 6.10
6.2.2 Hydrogen Peroxide/Chlorine Injection Point
I. The Hydrogen Peroxide/Chlorine injection point is connected to the chemical
injection point located on the Hydroxyl Radical. The injection point should be on
the inlet side of the Hydroxyl Radical Generator. See illustration below
6.3 Connect the Chemical Supply Tubes
The Electrochlor pH is supplied with ample chemical supply tubes, which may be cut to
length using a sharp utility knife.
6.3.1 Connect to chemical injection assembly, use Figure 6.11 as a reference for the
assembly of the connection point of the tubing to the injection valve and the acid
dosing pump.

OXISWIM MANUAL
P a g e 19 | 45
Figure 5.11 Connection Point Assembly6
6.3.2 Take one end of the chemical supply tube and feed it through the tightening nut and
holding ring. Then push the end of the tube over the pipe holder. Ensure that the
tube is pushed on firmly over the tip and screw the tightening nut hand tight. See the
images below.
Figure 6.12 Connecting acid feed line to the injector
6.4 Connect Chemical Injection Points to the Chemical Dosing Unit
Cut the chemical supply tube connected to the chemical injection point to a suitable length
allowing enough slack. Then feed the tightening nut and holding ring over the tube. Next,
push the open end of the tube onto the pipe holder in the base of the chemical dosing unit
RIGHT-HAND SIDE (discharge side Figure 5-13) and screw the collar hand tight (Figures 5-
14).
OXISWIM MANUAL
P a g e 20 | 45
Figure 5.13
Figure 5.14
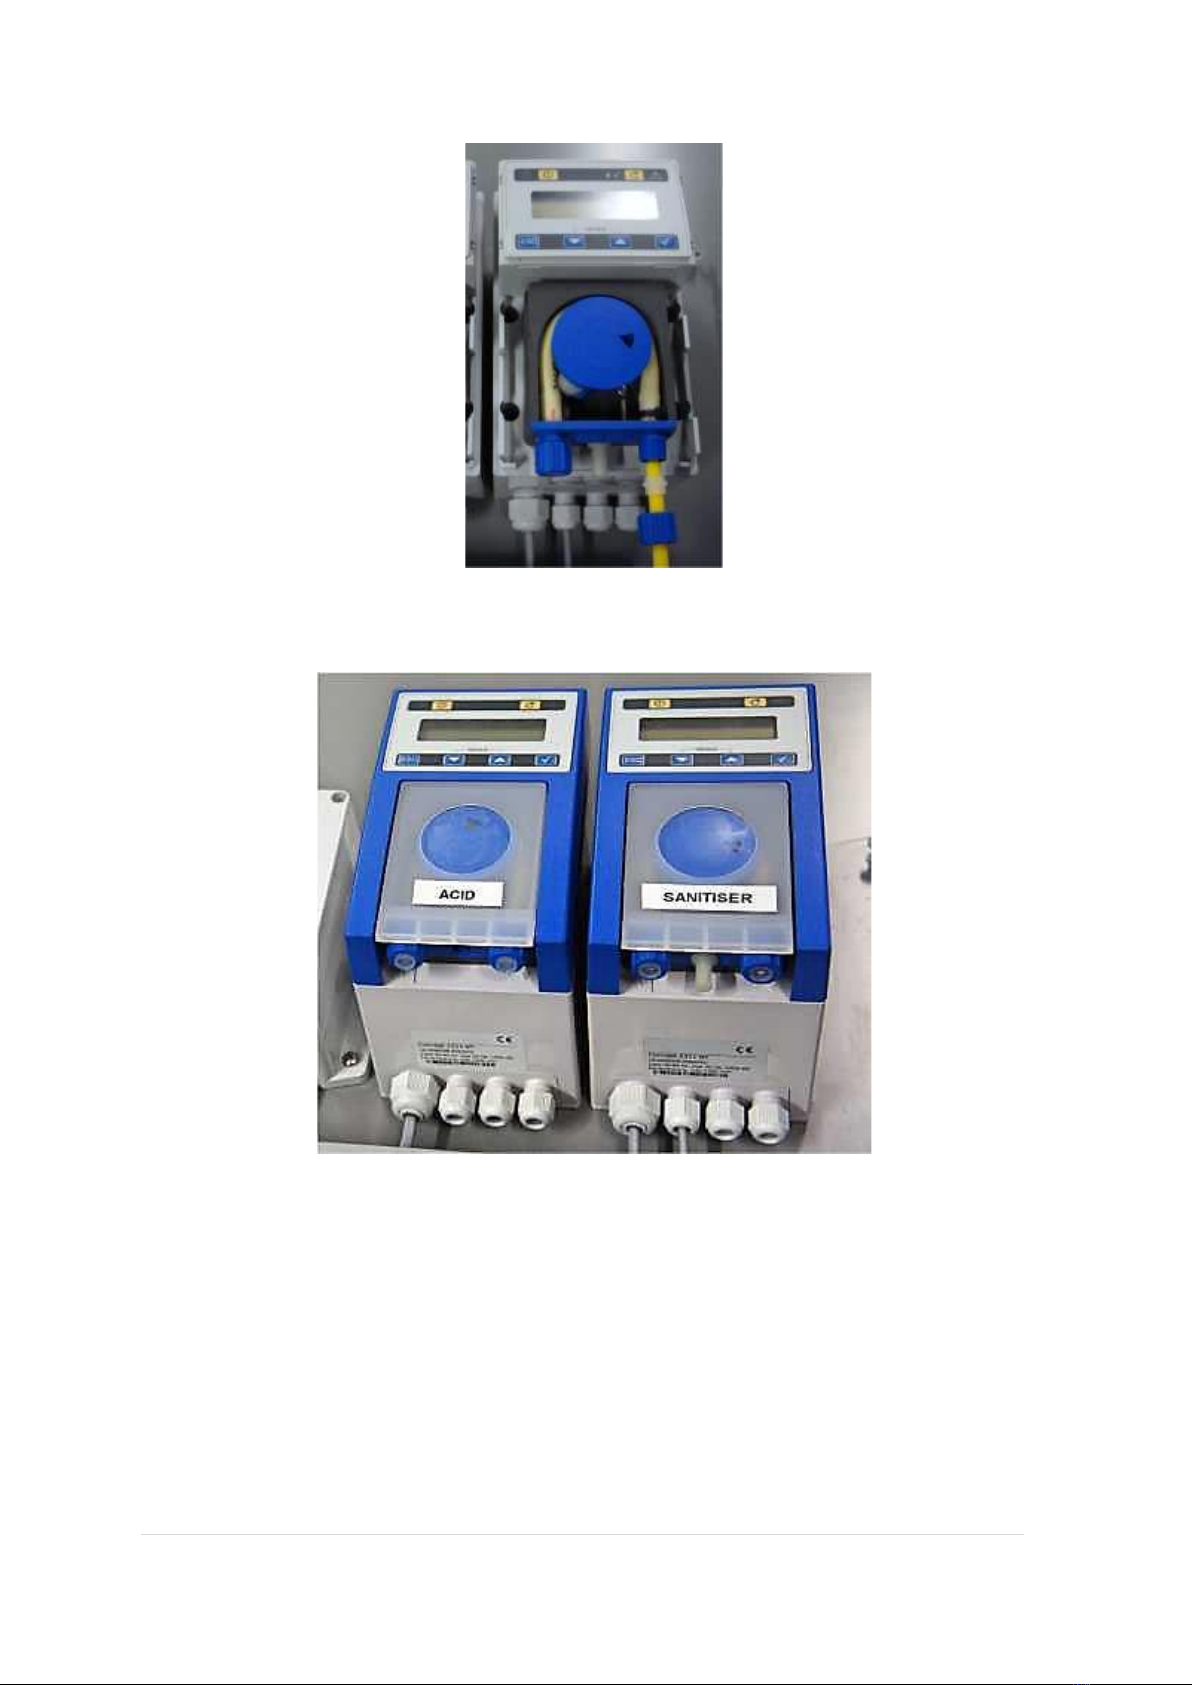
LEFT Peristaltic Pump HEAD (pH)
RIGHT Peristaltic Pump HEAD (hydrogen
peroxide or chlorine )
Repeat, so both tubes are now connected with one end joined to the chemical injection
point, and the other joined to the RIGHT-HAND SIDES (discharge sides) of the chemical
dosing unit pumps.
6.4.1 Connect chemical dosing unit to chemical supply tanks.
Ensure that the supply tanks are positioned no less than 1.5m (5ft) apart.
Other manuals for OXISWIM
1
Table of contents
Other Waterco Water System manuals


Popular Water System manuals by other brands


Elgo
Elgo RWK50 Installation and operation instructions

Oase
Oase SwimSkim 25 operating instructions

Water
Water HP02 quick start guide

Everpure
Everpure Quad-MC EV9628-28 Specification sheet

Oase
Oase Water Jet Lightning Warranty, safety and operating instructions

aero-stream
aero-stream AS500-3 Operator's guide

Everpure
Everpure Exubera Pro CT EV9333-40 Specification sheet

US Water Systems
US Water Systems L1-200 manual

OMEGA AIR
OMEGA AIR AOK 20SS Installation and operating manual

Diamond H2O
Diamond H2O Element LT Series manual

Grunbeck
Grunbeck GENO-EDI-X Operation manual

FLOWMARK
FLOWMARK Mark-II-SC Installation & operation manual