Water Filters Australia Pty Ltd (WFA) warrants to you, the
first person who has purchased and used the unit (“you”)
that this unit is free from defects due to faulty material
and workmanship in accordance with the conditions set
out in this document.This warranty is provided to you in
addition to your rights at law,including but not limited to
your rights under the Trade Practices Act 1074 (Cth) and
applicable legislation in your Australian State or Territory.
What this warranty covers:
This warranty covers defects due to faulty material and
workmanship of the unit supplied to you:
• For a period of 10 years from the date of purchase in
respect of the entire unit, excluding the Replaceable
Elements.The Replaceable Elements are consumable
components and all parts of the unit which can be
replaced including but not limited to the filter or water
treatment cartridge if there is a defect in the filter or
cartridge.This does not include the replacement of
the filter or cartridge to extend the life of the filter or
cartridge. The life of the filter cartridge is affected by
water quality, usage and water pressure.The warranty
only extends to the original purchaser of the unit.
What this warranty does not cover:
This warranty does not cover the unit or a Replaceable
Element of the unit where:
• The defect, fault or failure is attributable, or substantially
attributable to misuse, abuse, accident, misapplication,
neglect, freezing, oxidizing agents (including but not
limited to chlorine, ozone, chloramines and other
related components) or act of God.
• The unit has been in conditions which do not conform
to the recommended design guidelines or has been
operated in a manner which is contrary to WFA’s printed
instructions.
• The unit has not been installed in accordance with
WFA’s printed instructions and has not been installed
in compliance with all applicable laws, regulations and
industry standards.
• The unit has not been used in accordance with the
manufacturer’s instructions.
• The unit does not meet the conditions for use described
PRODUCT SPECIFICATION
• Usage: For mains cold
water only.
• Temperature Range: 2-38oC
• Min.-Max. Working
Pressure: 70-500 kPa
• Service Flow Rate: 6.3 Lpm*
• Capacity: 56,700 litres*
• Rating: 1 micron nominal
• Removes/reduces
Chlorine, cysts, giardia,
cryptosporidium, bad taste
and odours, and all particles
down to one micron in size.
• Filter Change: Annually or
sooner if flow rate becomes
inconveniently slow.
• This filter does not remove
fluoride.
• Inhibits limescale buildup in
water using appliances.
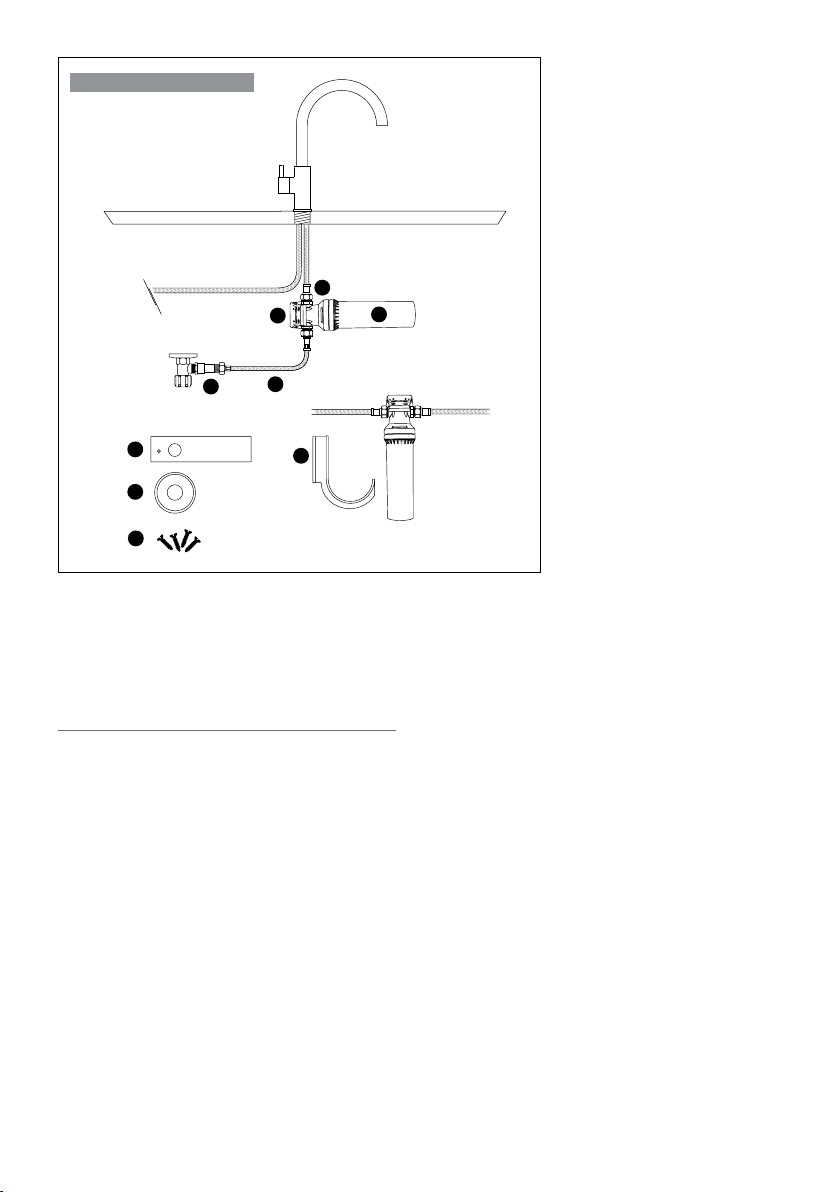
Hot Water Line Cold Water Line
KITCHEN MIXER TAP
P
L
U
M
B
I
N
G
T
A
P
E
FILTER ALARM
The cartridge can be installed
horizontally or vertically
Existing
Cistern Ta p
(not supplied)
8
5
4
6
7
9
2
3
1
in the owners manual or performance data sheet for
this unit.
• You use accessories or components which do not meet
WFA’s specifications as set out in the Owners Manual.
• The defect,fault or failure is due to normal wear and
tear.
• The defect, fault or failure has occurred where the unit
has been used reasonably or has reached its serviceable
life.
• The serial or model number label of the unit is
removed or defaced.
• The unit is serviced, modified, altered or repaired
by an unauthorized or unqualified person.
How to make a claim under this warranty:
To make a claim under this warranty you must contact
WFA within 21days of the defect, fault or failure occurring.
WFA’s warranty Contact number is 1300 785 355. At the
time of repair or replacement under your warranty claim
you must provide to WFA:
• Proof that you purchased the unit from an authorized
retailer or dealer within the warranty time; and
• A copy of a certificate which certifies that the unit was
installed in compliance with our printed installation
instructions and all applicable laws, regulations and
industry standards. WFA will only pay for repair or
replacement upon receipt of proof of your purchase
showing the date of purchase.
• Immediately execute measures to mitigate damages as
well as protection from any secondary damages
• WFA may arrange for examination of the claim by
WFA or an assignee thereof and agrees to assess any
claim under Warranty within sixty (60) days of receiving
notification of a claim.
• WFA is entitled to investigate the damage within an
appropriate period of time, either by itself or by a third
party.
• Any parts believed to be responsible for the damage
are to be made available to WFA for investigation and
are to be kept by WFA until the final investigation of the
damage is complete.
• WFA will inform the Consumer or its assignee
immediately after the investigation as to whether the
Warranty claim is accepted and if so provide information
regarding remedy.
• If any of the above specified obligations are violated
then WFA is released from the liability arising from this
statement.
Limitation of Liability of WFA under this warranty: Where
a warranty exists or is implied by law, WFA liability is
limited (to the extent that it can be limited) to repair or
replacement of the faulty Replaceable Element or the unit
or an equivalent unit. WFA may, in its discretion, choose
whether it shall repair or replace any unit or Replaceable
Element or WFA may choose to pay to you the cost of
replacing the Replaceable Element or the unit or the cost
of having the unit repaired. To the extent permitted by
law, WFA assumes no liability whatsoever and disclaims
all liability for direct, indirect or consequential loss, or
special, general or other damage or expense caused by or
arising out of:
• Any failure to install or use the unit in accordance with
the Manufacturer’s Instructions, the Installation and
Operating Manual or WFA’s printed instructions; or
• The purpose for which you are purchasing the unit.
You acknowledge that the quality of water supplied and
your water usage rate and influent water pressure may
vary seasonally or over a period of time.
In addition to this water characteristics can differ if the
unit is relocated or the environment changes.
You acknowledge that WFA does not know your
requirements and cannot and does not warrant that the
unit is fit for the purpose for which you intend to use the
unit or is appropriate for the purpose for which you intend
to use the unit. WFA does not authorize others to assume
any obligation on its behalf even if you inform them of the
purpose for which you intend to use this unit.
WARNING WFA does not recommend making alterations
to your existing plumbing to accommodate this filter
system. If you wish to modify existing plumbing you must
comply with AS 3500 and use a licensed plumber.
WARNING The contaminants or other substances
removed or reduced by this water treatment system are
not necessarily in your water supply. Do not use with
water that is microbiologically unsafe or of an unknown
quality without disinfection before or after the system.
IMPORTANT This filter is designed to be used with mains/
city water supplies.
Use of this system may increase the bacterial content of
water unless supplementary treatment is provided.
CAUTION Safely isolate the water supply prior to installing
the filter system to avoid injury and property damage.
IMPORTANT NOTICE The WFA Inline Water Filtration
System filters water down to 1 micron. The filter’s very
fine mechanical and chemical filtering process removes
chlorine, dirt and many other potential contaminants.
When water is filtered so finely it can absorb part of
everything it comes into contact with. This can cause taste
and odour issues.
Accordingly, you may find that with new kitchen tapware
the braided flex hose supplied with the new kitchen tap
has a rubber internal. This rubber internal may, in some
instances, cause taste and odour issues when the filtered
water first comes into contact with the hose.
Should this occur then flush the filtered water through
the hose over a period of time to remove taste and odour
issues.
Our goods come with guarantees that cannot be excluded
under the Australian Consumer Law. You are entitled
to a replacement or refund for a major failure and for
compensation for any other reasonably foreseeable loss
or damage. You are also entitled to have all the goods
repaired or replaced if the goods fail to be of acceptable
quality and the failure does not amount to a major failure.
Refer to www.hiflowwaterfilters.com.au for warranty
details.
Product Specifications: The unit must only be used for a potable
water source and with cold water (with a temperature range
between 2 and 38o C).
WARRANTY
1 Head assembly with Mounting Bracket
2 Filter Cartridge
3 Mounting Screws
4 Dual Check Valve
5 Pex Hose 650mm – 1/2” female to 3/8” male with sealing o-ring
6 Brass Hex Nipple 3/8” male to 1/2” male with sealing o-ring
7 Horizontal Stabilizing Bracket
8 Filter Monitor Alarm
9 Plumbing Tape
* Subject to water quality,
water pressure and usage
INSTALLATION INSTRUCTIONS
WARNING: For correct operation of this system it is
essential to observe the instructions below.
IMPORTANT - PLEASE NOTE
PLEASE NOTE FOLLOWING FOR INSTALLATION OF
THIS SYSTEM
• HOSE FITTINGS & HEX ADAPTER WITH SEALING
O-RING
The braided pex hose and hex adapter are fitted with
a sealing o-ring – teflon tape / joining compound
is not required for this fitting. Check the fitting to
ensure the o-ring is in place and not damaged.
Ensure the inlet thread and mounting surface are
smooth and clean. O-ring grease may be applied
to the o-ring as required. Tighten until the o-ring
contacts the surface of the filter head assembly inlet
and outlet, then further tightened by 0.5 turns to
reach approx 3.5 nm of force to compress the o-ring
and effect a seal. DO NOT USE A SEALING TAPE
OR A JOINING COMPOUND WHEN CONNECTING
THE HOSES AND/OR ADAPTER TO THE HEAD
ASSEMBLY.
• MAXIMUM WATER PRESSURE – PRODUCT
WARRANTY
Australian standards call for a maximum water
pressure of 500 kpa for plumbing installations.
Having water pressure above 500 kpa may damage
connected products including water filters and
will void the product warranty. If water pressure
exceeds 500 kpa a watermark approved pressure
limiting valve must be installed at the same time as
installing the water filter system.
• When installing this filter system in a new home or
kitchen please ensure that the cold water lines under
the sink are flushed to remove all debris within the
pipes, before installation of the water filter system.
1. Open Carton and Inspect Parts.
Parts included – refer installation diagram
Item No.
Head Assembly with Mounting Bracket 1
Filter Cartridge 2
Mounting Screws 3
Dual Check Valve 4
Pex Hose 650mm – ½” female to 3/8” male
with sealing o-ring 5
Brass Hex Nipple 3/8” male to ½” male
with sealing o-ring 6
Horizontal Stabilizing Bracket 7
Filter Monitor Alarm 8
Plumbing Tape 9
2. Ensure that the cold water at mains supply is turned
off
Where an existing tap and connections are already
installed - after you have turned off the mains cold
water at the mini cistern tap, open the kitchen /
mixer tap and release any water pressure.
Unscrew the braided flex hose from the existing cold
water line mini cistern tap or isolation valve. Clean
the ½” male water connection thread.
3. Undersink Mounting Position
As you will note from the associated diagram,
this Inline Filter System can be installed in either
the horizontal or vertical position. Horizontal is
preferable.
a) Horizontal Position
Measure 460mm horizontally, and mark the
mounting location for the side of the Filter
Head Assembly and end of the filter cartridge.
Make sure there is adequate space to avoid
crimping the water line flex hoses. Also make
sure your chosen location offers easy access for
future cartridge changes and installation of the
stabilizing support bracket. (item 7).
b) Vertical Installation
Measure 460mm from the base of the cabinet (or
shelf), and mark the mounting location for the top
of the Filter Head Assembly. Make sure that there
is adequate space to avoid crimping the water line
flex hoses. Also make sure your chosen location
offers easy access for future cartridge changes.
4. Important - If necessary you can easily change the
direction of the flow of water through the inlet and
outlet of the filter system. You will notice on the
head assembly that the inlet is shown by the word
“IN” and the outlet is shown by the word “OUT”.
To change direction, simply remove the four (4)
screws that hold the mounting bracket to the head
assembly and replace/refit the mounting bracket in
the opposite direction. This allows flexibility when
choosing the desired location for your filter system.
a) Take the Pex Hose 3/8” male connection (item
5) and screw this connection to the inlet side
of the Filter Head Assembly (item 1). This hose
fitting has a sealing o-ring and does not require
plumbing tape or compound to be applied to
create the seal (do not use).You will notice on
the head assembly that the inlet is shown by the
word “IN” and the outlet is shown by the word
“OUT”.
Owners Manual
head (item1). This brass fitting has a sealing o-ring
5. Connect Dual Check Valve – (item 4)
6. Attach Pex Hose (item 5)
7. Attach Filtered Water to Cold Water Line of Kitchen
filter head).
8. For Horizontal Installations – Install Stabilizing
horizontal position.
9. Install Filter Cartridge (item 2)
10. Flush the Filter Cartridge
with use.
11. Installing the Filter Monitor Alarm (item 8)
months.
cartridge.