Watergen GENNY Operating and safety instructions

1 |
GENNY
Installation & Maintenance Guide
3 |
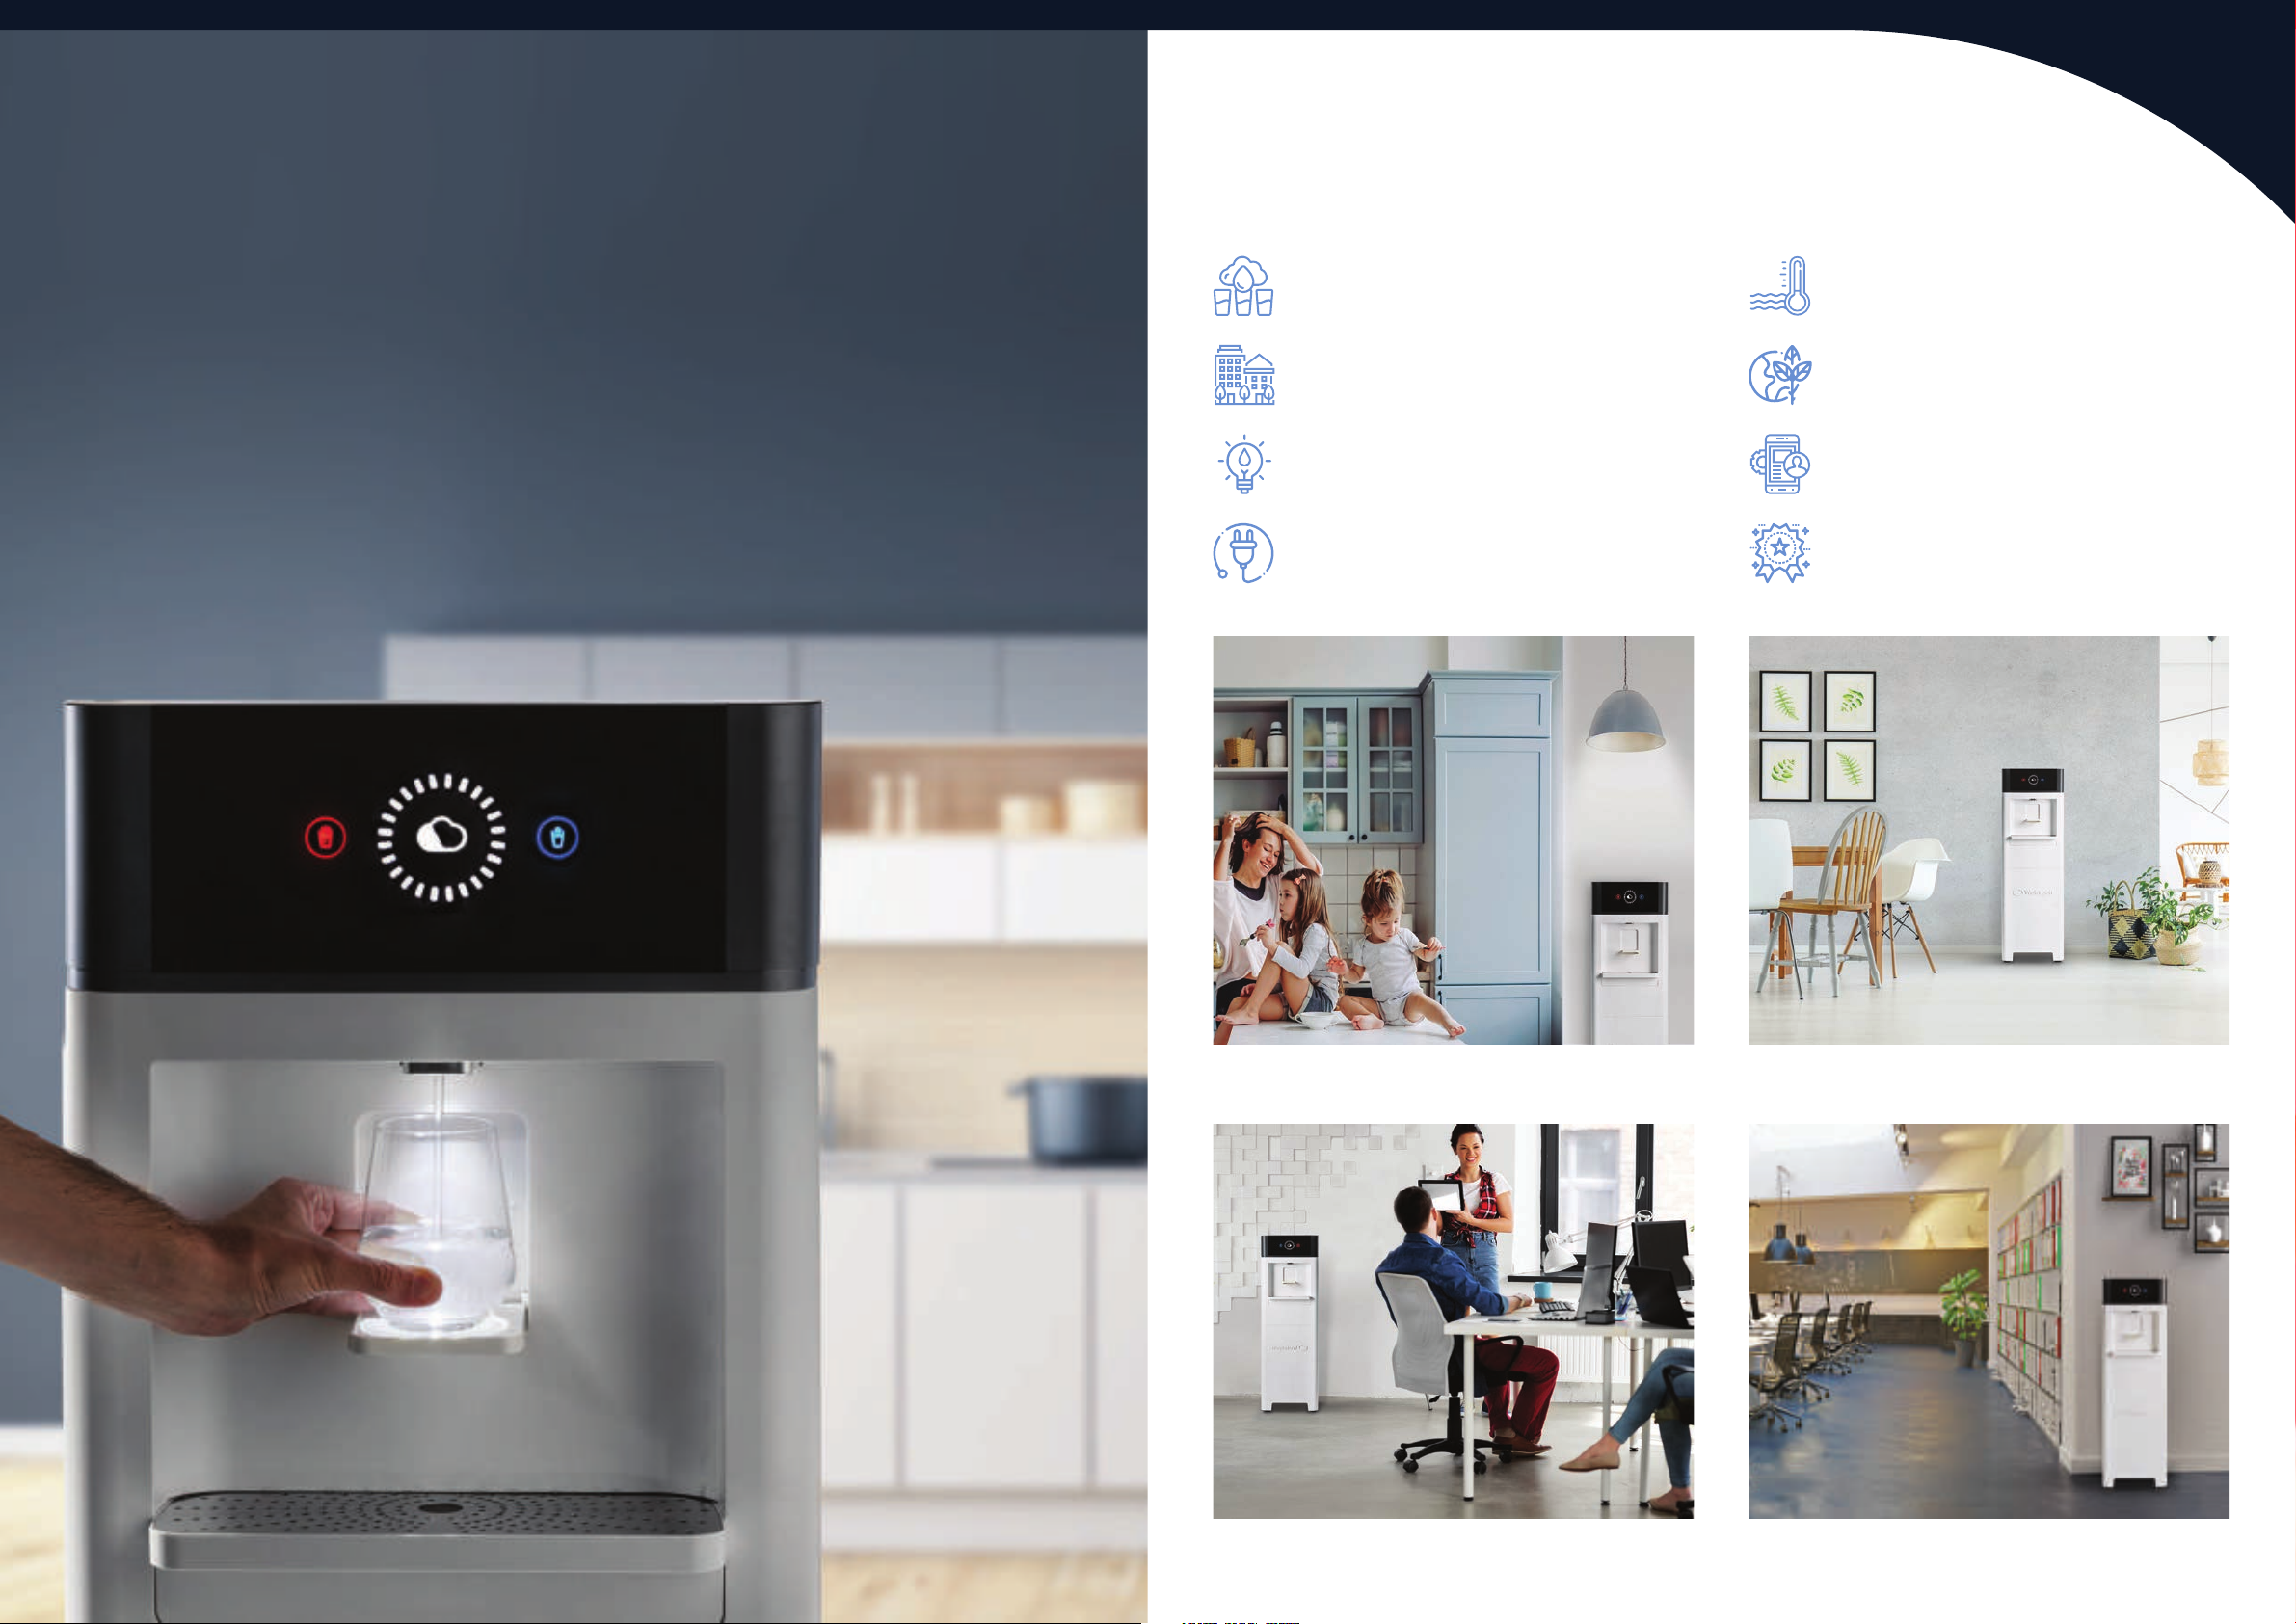
In your kitchen In your dining room
In your meeting room and at your office
An innovative water-from-air device that guarantees a steady supply of fresh, great-tasting drinking
water extracted from the humidity in the air around you. The GENNY can produce up to 30 liters
(8 gallons) of drinking water per day, depending on the temperature and humidity levels. No need
to connect the device to water pipes; all that’s needed is an electric power socket.
The water production process is based on innovative, GENius patent-protected technology. GENNY’s
unique air filtration process is designed to operate in residential environments. GENNY produces
cold, as well as hot drinking water.
The state-of-the-art, multi-stage water purification system ensures that the GENNY delivers the
highest quality drinking water. GENNY provides an eco-friendly, sustainable drinking water solution
by creating a new source of fresh drinking water from air, and eliminating the need for single use
plastic bottles and water coolers, thus reducing carbon footprint.
Fresh sip from the air
GENNY Why GENNY?
Plug & Drink
No infrastructure or piping required
Standards Compliance
Complies with international water
purification standards
Unique and innovative
Patented heat-exchange technology
User friendly support app
For GENNY maintenance and support
Your own source of drinking water
Extracted in your home or office
Environmentally friendly
Reduces plastic waste and carbon footprint
High-quality drinking water
Fresh, clean and safe drinking water from air
Convenience, hot & cold water
No need to order ahead or store water
| 2

| 4
1615 17
1Hot water button
2Cold water button
3Water level meter
4Water spout
5Glass tray
6Drip tray
7Magnetic front panel
8Front legs (2)
9Internal air filter
10 Carbon filter
11 Ultra filter
12 Mineral cartridge
13 UV treatment lamp
14 Hot water tank
4
7
1 23
5
6
8
9
13
14
10 11 12
15 Main switch On/off
16 Hot water thermostat switch
17 Power cable
18 External air filter & air inlet
19 Air flow exit
20 Gas service door
21 Drain point
22 Rear wheels
18
21
20
19
22
Get to know your GENNY
*
Please note that the extra box of filters and UV light received with the GENNY should be saved to be used
as part of the maintenance procedure after 6 months.
5 |
7 |
How to install your GENNY
Position the GENNY
Make sure there is at
least 15 cm between the
machine and the wall.
Make sure the GENNY is
straight and balanced,
level the front legs if
necessary.
15 cm
External air filter
Unscrew the nut and install the new air filter. Close the air
filter housing and the matching nut (B).
A. B.
Install the spacer
Install the spacer in the back
of the unit with 4 screws
using Philips screwdriver.
Remove the front
panel by holding both
sides.
Internal air filter
Slide the internal filter
in place.
1 2 3
4 5
6 7
Install water filters
Install the 3-filters set in the right order from 1 to 3
(left to right) by inserting each one (A) and screwing
until you hear a click (B).
A. B.
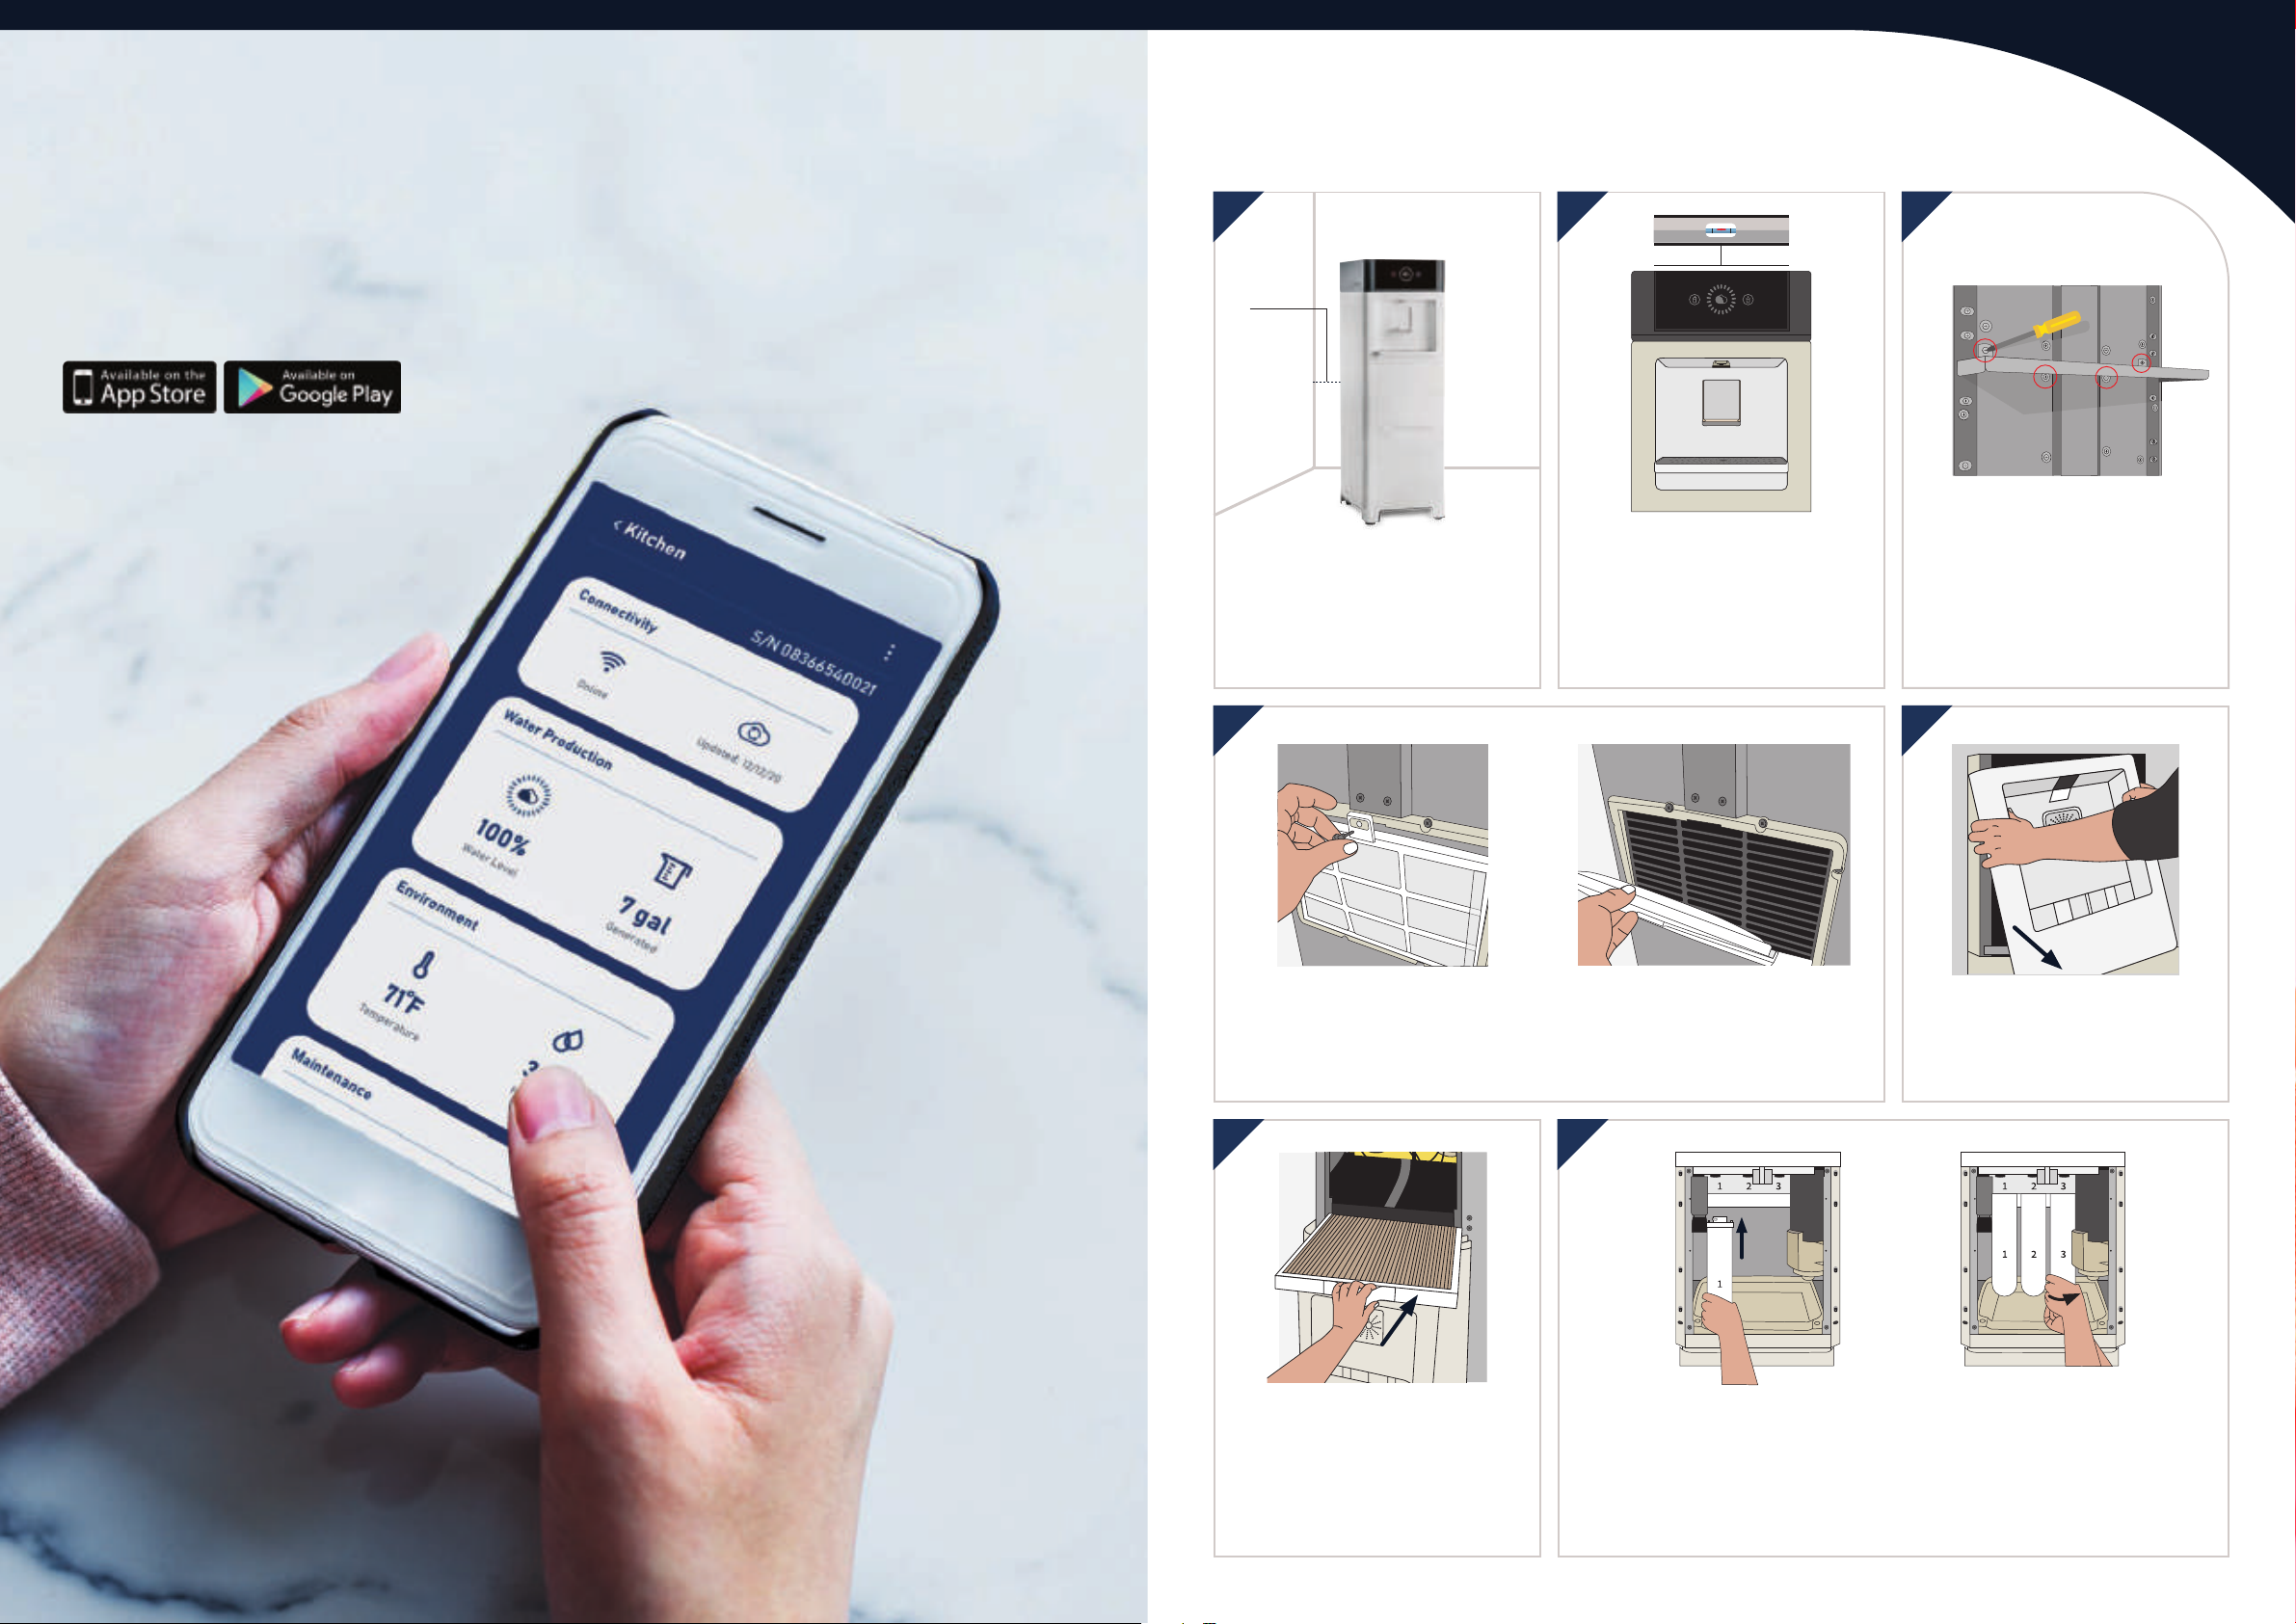
Smart Control App for Managing your GENNY.
By connecting your GENNY to the Wi-Fi, you will be able to monitor your GENNY from wherever you are, 24/7.
The GENNY mobile app offers a range of benefits including the ability to view an analytical summary of your
system, water production, climate conditions as well as remote technical support.
In addition, you will be able to get notification when the maintenance procedure should be performed.
Watergen's GENNY App is available on:
GENNY App
| 6

| 8
8 9
10
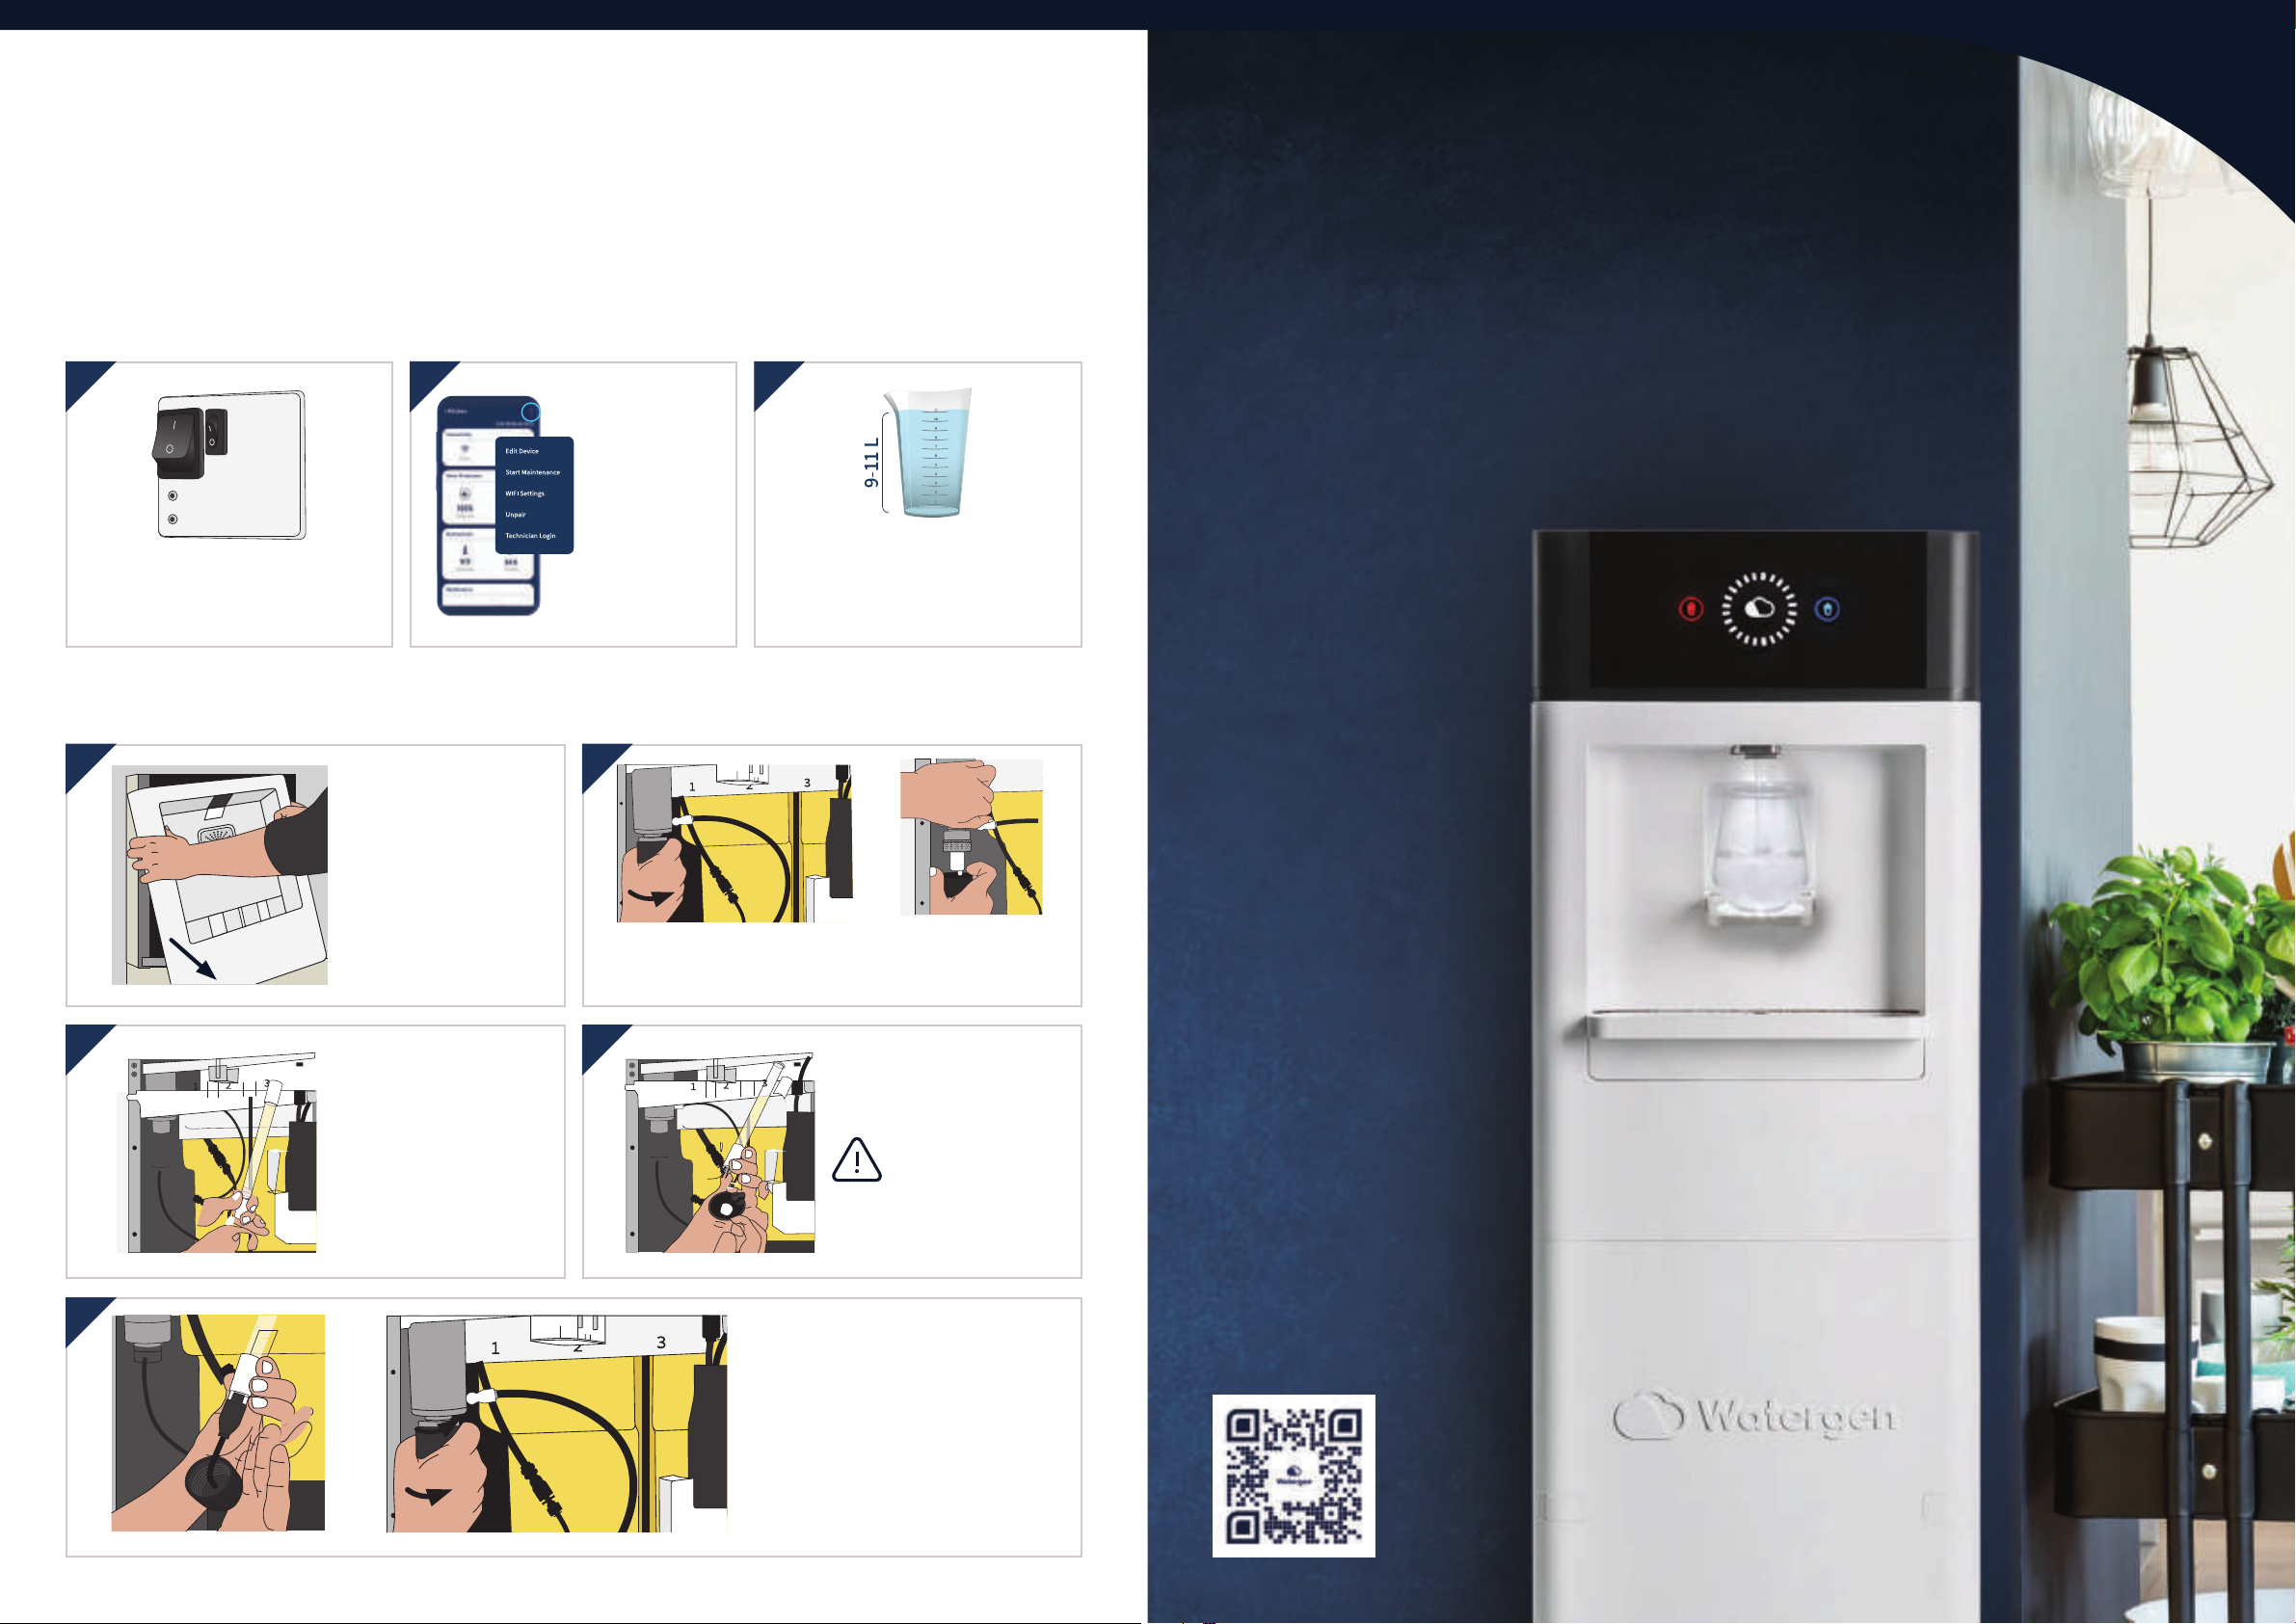
Install back the front panel
by holding both sides. Make sure that switches
#1 & #2 are OFF. They are
located at the rear of the
GENNY.
Connect to electricity
Connect the power cable
to the electric wall socket.
Electricity connection
EU: 230VAC/50Hz
US: 120VAC/60Hz
Hot water
thermostat
switch
Main
power
switch
Power
cable
1
3
11 12
Turn the GENNY ‘ON’ by pressing Switch #1
(the main power switch).
DO NOT turn on #2. Make sure that the hot
thermostat switch remains OFF.
Please make sure that:
‐ The Cloud, as well as the hot and cold
buttons are all lit in white
‐ Air comes out from the bottom of the unit
‐
Wait at least 15 hours (or until the water level
is 100%) before moving onto the next step.
15+
Hours
1 2
13
14
Press the hot water button until water
starts to pour out. Then turn ON the hot
water thermostat switch (#2), making
sure that the hot water button remains a
constant red (without flashing) until the
boiling process has completed.
Dispense hot water for two minutes, then
dispense cold water for three minutes.
Your GENNY is now ready for use!
12
2
9 |
| 10
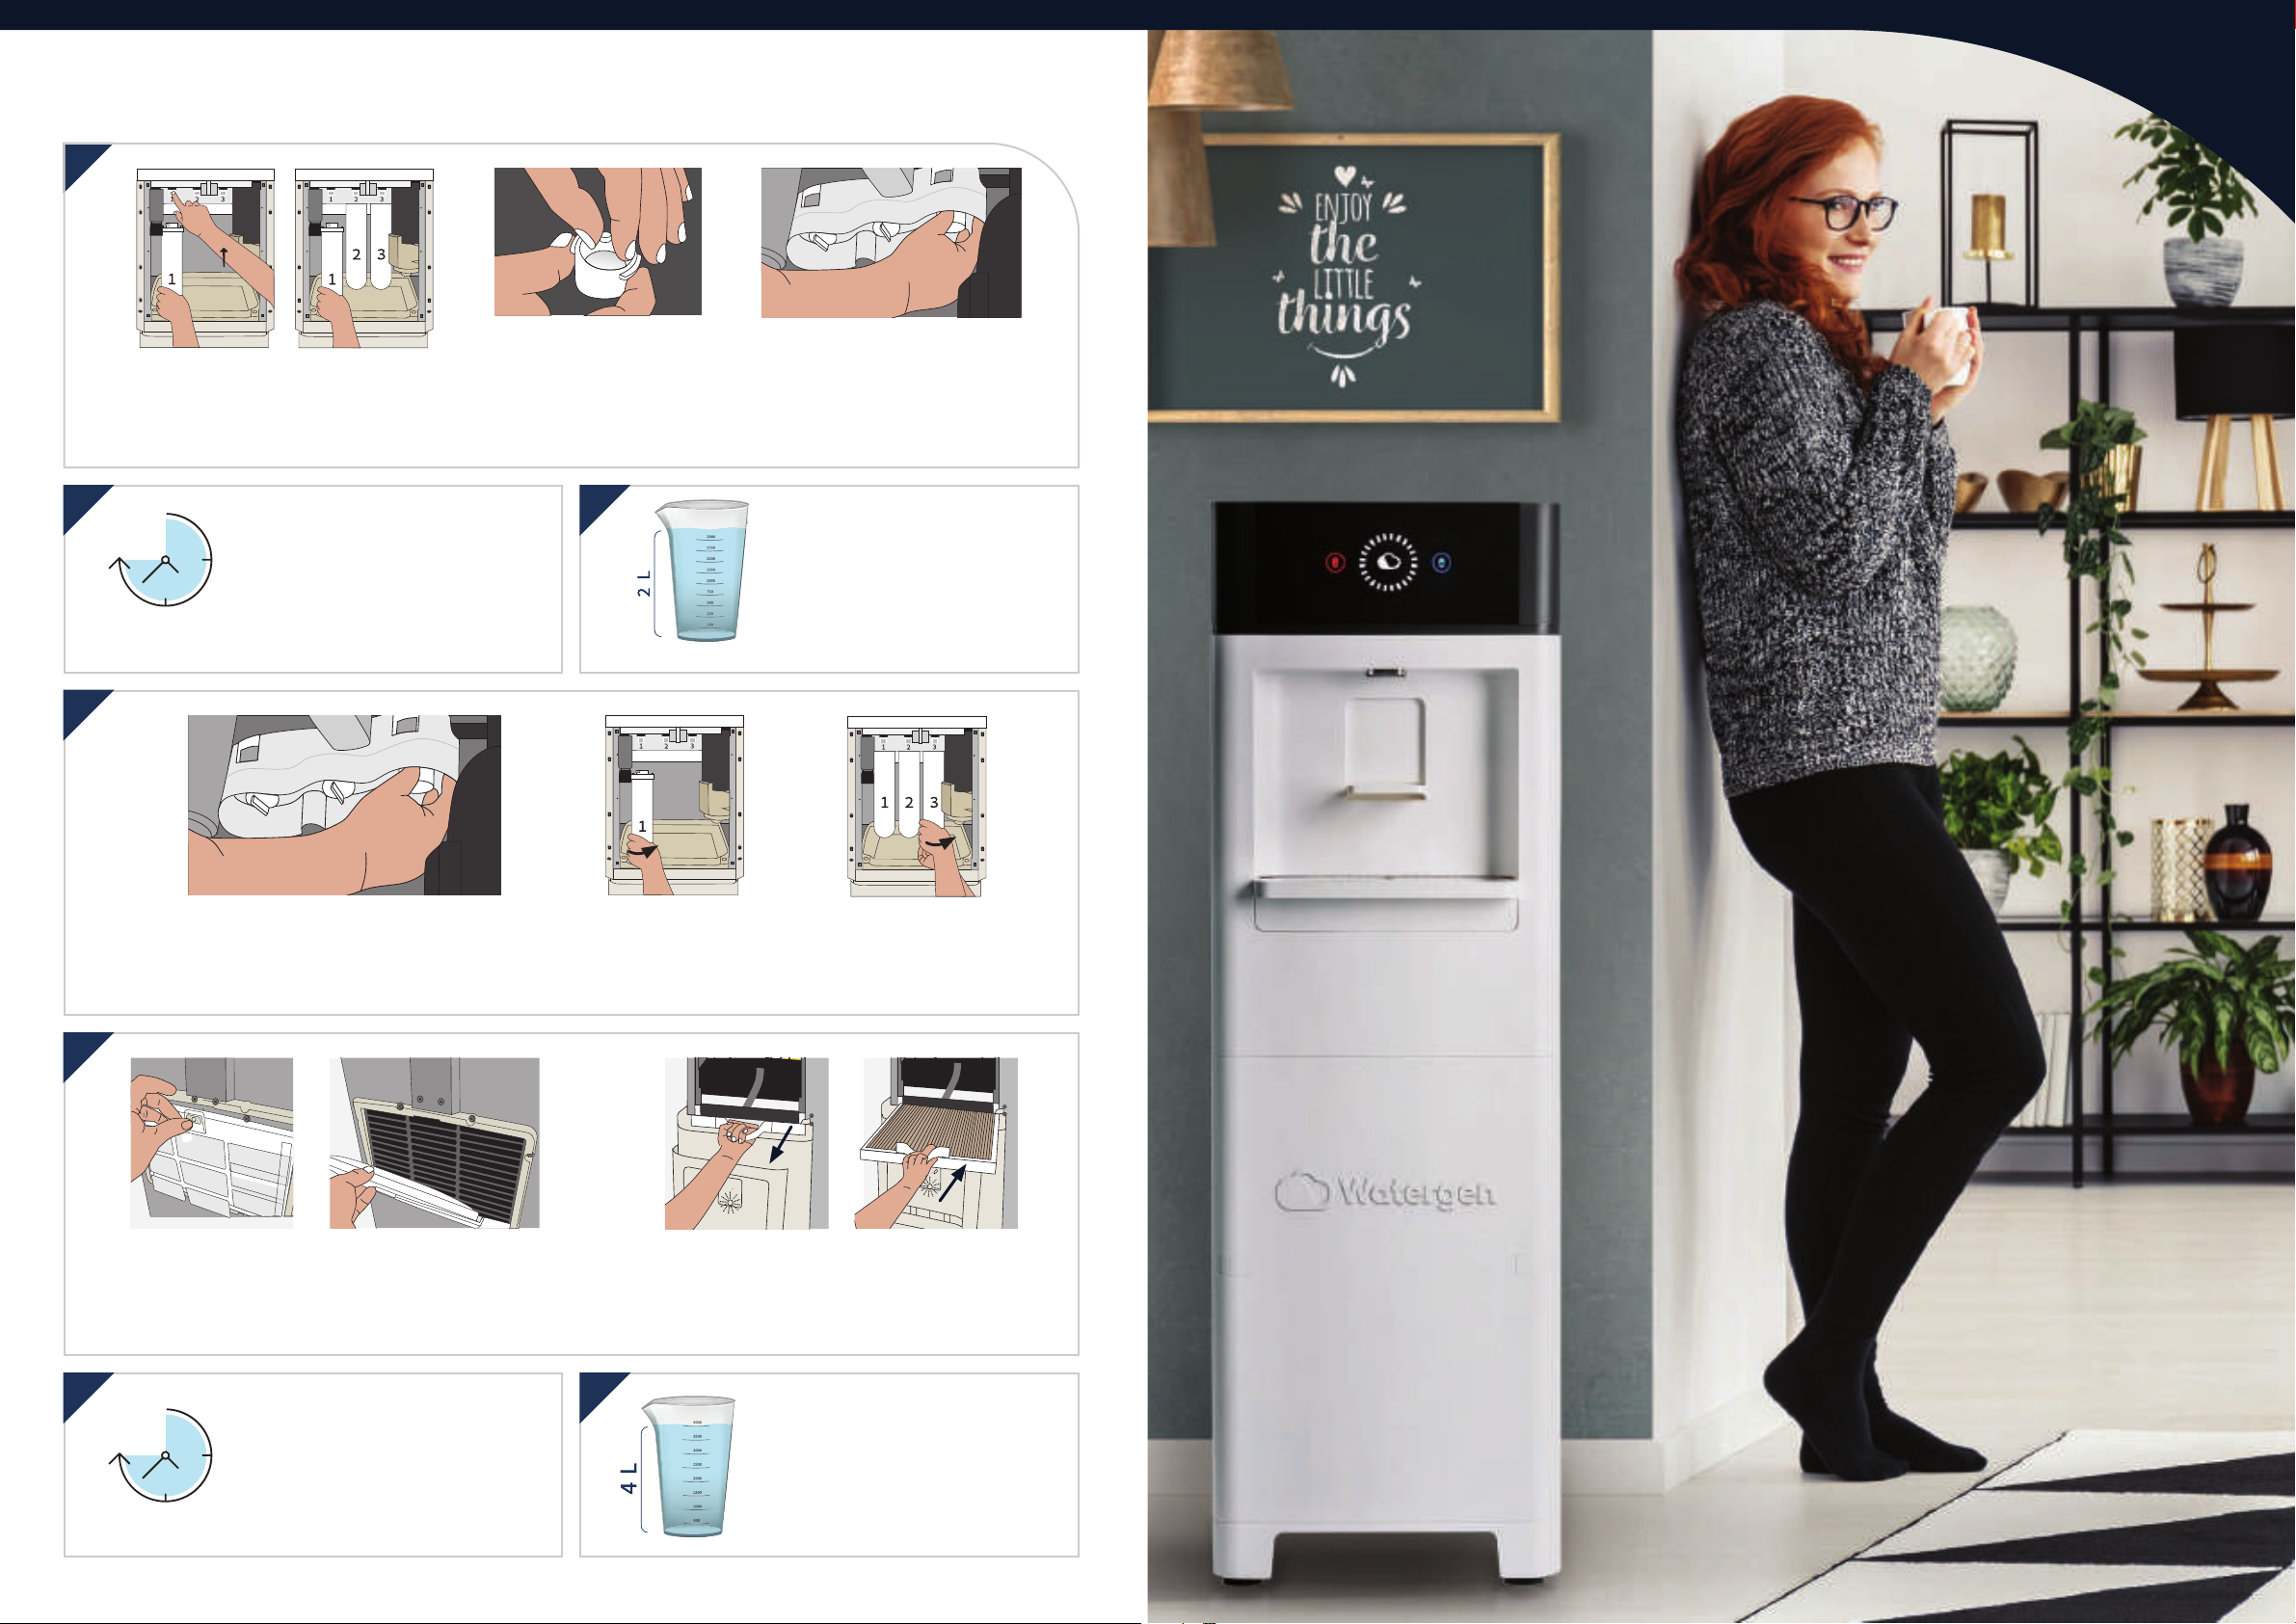
Maintenance Process
The maintenance process is vital for the safety and quality of your GENNY. You need to perform a sanitation
process every 6 months, which entails changing both air and water filters, as well as the UV lamp. This ensures
that you derive the highest quality of drinking water from your GENNY. The Watergen App will guide you
on how to perform the maintenance process.
• You need to be in the proximity of the GENNY during the maintenance process.
• The process should last approximately 90 minutes.
2. Replace UV Lamp
Take a new UV lamp
from the maintenance
kit and connect it into
the white connector.
Important! Be careful
not to touch the UV
lamp - only it's base!
Get to know your
GENNY
Open the
magnetic front
cover.
Screw the black cap counterclockwise while
pulling the UV lamp down with extreme care.
Hold the UV lamp
by its white base
and disconnect the
lamp from its black
connector with
extreme care.
1
5
3 4
2
Return the UV lamp,
together with its black
cap, to its correct position,
while screwing the black
cap counterclockwise.
1. System Preparation
Turn off the water
heating switch.
Choose ‘Start
Maintenance’
from the 3
dots menu
on the right
side.
Make sure that the GENNY
water tank's volume is between
9 – 11 liters (2.3-2.9 gal) to begin
the sanitization process.
1 2 3
11 |
| 12
A.
3. Sanitation Process
1
Expect the sanitization
process to last up to 45
minutes.
2
6
3
7
Add the chloride capsule
Remove the 3 water filters by turning them counterclockwise and pressing their safety buttons
(A). Add 2 sanitation capsules from the maintenance kit, insert into the filter cap, and close it in
filter house No. 1. (B). Close the other 2 filter caps (C).
Dispense and discard
2 liters (0.52 gal) of cold
water into a pitcher.
Cleaning finalization
Dispense and discard
4 liters (or 1.2 gal) of cold
water into a pitcher.
A. B. C.
4
5
New water filter assembly
Remove the 3 filter caps from positions 1 – 3 (A). Insert filter number 1 into its place, until you hear
a click (B). Repeat the same process for filters 2 and 3 (C).
Cleaning process
Wait up to 45 minutes
for the cleaning
process to end.
New air filter assembly
Remove the external air filter by unscrewing the nut, remove the existing filter and replace it with
the new filter. Close the air filter housing and screw the matching nut in place (A). Remove the
internal air filter by pulling the filter handle towards you, and sliding the new filter in place (B).
C.A.
45
minutes
45
minutes
B.
B.
13 |

| 14
Safety instructions
Read GENNY manual and maintenance instruction’s before opening the appliance. | Installation of this machine must comply with all local electrical and plumbing
codes and with all applicable federal, state, county and local standards for drinking water installations. During scheduled maintenance, carefully dispose of all used
filter parts, used UV lamps and other items following local disposal laws and regulations. | The appliance is not to be used by persons (including children) with reduced
physical, sensory or mental capabilities, or lack of experience and knowledge, unless they have been given supervision or instruction. Children shall be supervised
not to play with the appliance. | Appliance shall be installed in accordance with the national wiring rules. | Any filling or fixing refrigerants should be done in factory
level only. | WARNING: System contains refrigerant under very high pressure. The system must be serviced by qualified person only. | This Appliance contain UV lamp.
Precautions to be taken when replacing UV-C emitters and starters, if applicable: Unintended use of the GENNY or damage to the housing may result in the escape of
dangerous UV-C radiation. UV-C radiation may, even in small doses, cause harm to the eyes and skin. | GENNY that are obviously damaged must be not be operated.
Specifications
GENNY Front Panel
Lighting Legend
When both hot and cold water
buttons are white
The water tank is empty. Please wait
for more water to be produced.
When the cold water button is blue
Cold water is ready to use.
When the blue cold water button is
blinking fast
The cold water temperature is above 10
degrees. Please call local customer service.
When the hot water button is red
Hot water is ready to use.
When the cold water button is blue
and the hot water button is white
The hot water switch is off .
When the hot water button is blinking
The water is still being heated.
When the cold water is blinking and
the hot water button is red
The child lock is active.Press both red
and blue buttons for 1 second to use
the hot water button.
When the bell symbol is orange
The front cover is open.
When the red bell symbol is blinking
Error message. Please call customer
service.
Water generation capacity Up to 30 liters / 8 gallons gallons a day
Integrated water tank with
continuous water treatment 23 liters / 6 gallons
Cold water temp. 41°-44.6°F (5°-7°C)
Hot water temp. 185°-210°F (85°-95°C)
Dimensions (LxWxH) 54cm x 42cm x 130cm / 21.3" x 16.5" x 51.2"
Weight 80 kg / 176 pounds
Energy consumption
400 Wh/Liter for water generation in standard conditions (26.7°C, 60%RH)
Power EU: 230 Vac / 50 Hz
US: 120 Vac / 60 Hz
Power consumption EU: 550W Nominal / 2600W maximum, during water heating
US: 550W Nominal / 1200W maximum, during water heating
Water purification
Multi-step filtration cascade combined with high-end aqualen fibers and
microbial treatment technologies followed by a germicidal UV lamp and
UF. Vital minerals balance the water pH to achieve high purification and
tasty drinking water.
Air filtration Sub-micron barrier filter that eliminates <2.5 particulate matter
Illuminated white circle
Indicates the water level in the
internal tank.
When the first quarter is blinking white
Indicates a critical water level in the tank.
15 |

| 16
For more information about the GENNY
LIT-0001 Rev. A00
Table of contents
Popular Water Dispenser manuals by other brands


MERQUIP
MERQUIP NIAGARA Installation, use and maintenance handbook

Pontec
Pontec PondoPress 10000 operating instructions

Andrew James
Andrew James Chilled Drink Dispenser With Infuser user guide

Everpure
Everpure ESO Replacement Cartridge EV9607-20 Specification sheet

Philips
Philips ADD4952 user manual

IBC Water
IBC Water SAST0715 Installation & operating instructions

Kenmore
Kenmore SOFTENERS-275-280 owner's manual

Prozone
Prozone PZ7 Installation guide and operation manual

HANKISON
HANKISON Filter Monitor instruction manual

GUTHRIE & FREY
GUTHRIE & FREY GF24 Installation, operation and maintenance manual

Antunes
Antunes WSS-0948-R owner's manual

Bunn
Bunn H5E Installation & operating guide