WaterRower S4 Wood User manual

INTRODUCTION
We have all experienced the frustrations caused by incomprehensible Assembly Instructions. For this reason, we
have gone to added lengths to make our instructions as clear and concise as possible. Do not be intimidated by the
detail; it is simply intended to make the assembly process as comfortable as possible for you.
Your WaterRower comes partially dis-assembled in two boxes for protection during shipment.
Assembling your WaterRower should take no more than half an hour, all you require is a 5mm Allen Key which is
attached to the Rear Spacer.
STEP ONE
Lay the Rails on the floor and connect the Rear Spacer using the male JCN Nuts and the Allen Key provided.
STEP TWO
Sit the Seat between the Rails. Note the orientation of the Seat with the indent facing the rear. It may be necessary to
separate the Rails slightly to allow the seat to sit into place.
STEP THREE
Place the Tank Assembly between the Rails.
Rear Spacer
Male JCN Allen Key
WaterRower.com
S4 Wood Assembly Manual
Position rails with black extrusions on the inside.

STEP SIX
Press the Heelrest Adjustment Button (A) and insert the Heelrest/Footpads under the Footboard Cover Plate (B).
Release the button to ‘lock’ the Heelrests rests into place. You can adjust the height of the Heelrests according to
your foot size (refer to page 2/3 of the Owner’s Manual).
STEP FIVE
Place the Footboard between the Rails positioning the top two holes over the two threaded holes in the Tank Unit.
It may be necessary to slightly loosen the two bolts on the Top Deck (B) to allow the Footboard clearance. Insert
the JCN Nuts and JCB Bolts attaching the Footboard to the Rails at A. Screw the Handle Rests into position using
the Handle Rest Bolts (C); do not over tighten. *Should you experience any problem with aligning the components,
loosen all the fasteners, align and re-tighten.
STEP FOUR
Insert the JCN Nuts and JCB Bolts attaching the Tank to the Rails at A & B. The Nuts should be placed on the
inside and the Bolts on the outside. Should you experience any problem with aligning the components, loosen all
the fasteners, align and re-tighten.
WaterRower.com
A
B
A
JCN Nut
(x4)
JCB Bolt
(x4)
B
Handle Rest Bolt
(x2)
Handle Rest
(x2)
JCN Nut
(x4) JCB Bolt
(x4)
C
STEP SEVEN
Undo the Dolley Wheel Assembly and fix to the Rail in the order shown and tighten. Note - the Wheel goes on the
outside of the Rail.
STEP EIGHT
Stand the WaterRower upright. Release the Recoil Belt which is fastened to the bracket at the base of the machine.
Ensure that the Recoil Belt is passing over all Guide Pulleys. Connect the Bungee to the Recoil Strap by hooking the
Bungee Hook through the Recoil Belt D-ring.
STEP NINE
Before filling the Tank and rowing ensure that the Recoil Belt passes smoothly over all Rollers.
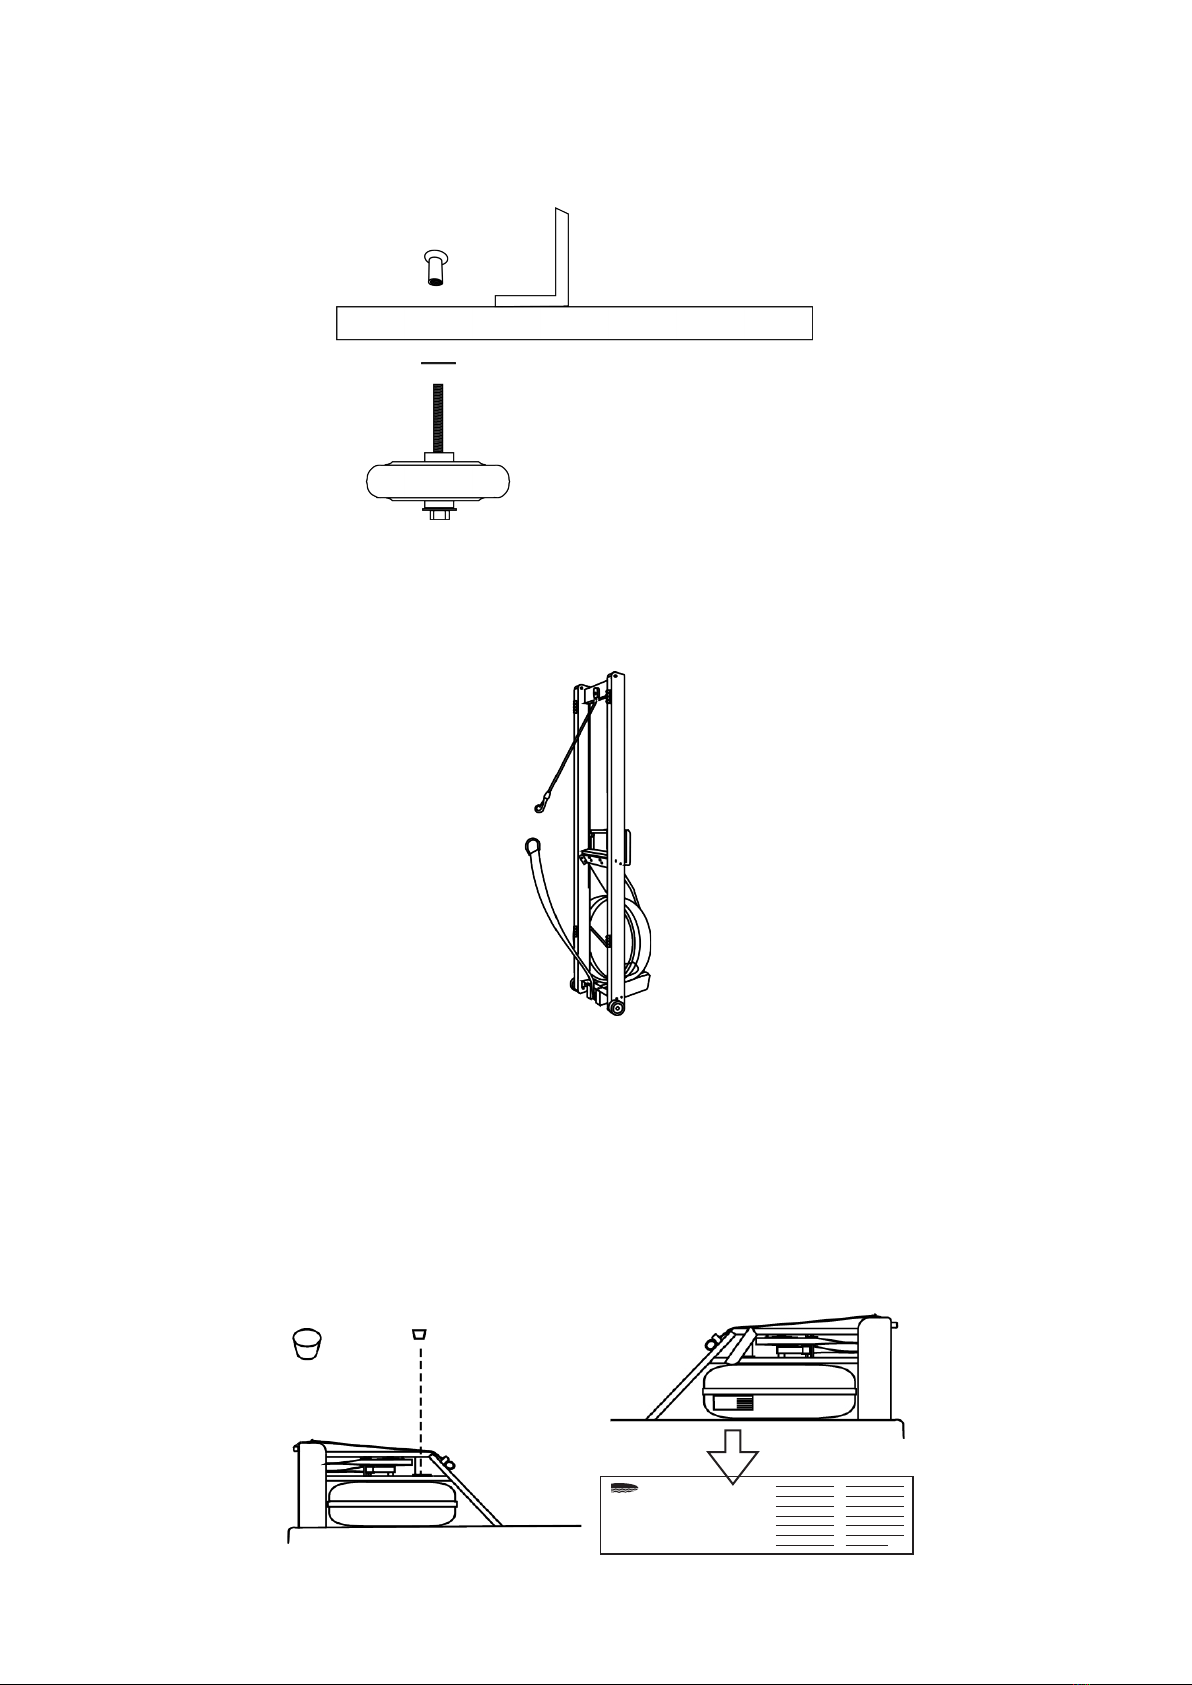
STEP TEN
Lay the WaterRower down and using the Syphon Pump provided (or a hose if available) fill the Tank to the desired
level (See Water Level section in the Owner’s Manual) with Chlorinated Town or Municipal Water. Do not over fill
your WaterRower. Anything more than half full (or above the bottom edge of the Paddle Shaft when the machine is
standing) may risk leaking. Insert the Stopper (it may be necessary to moisten the Stopper to assist replacement).
Congratulations, your WaterRower is now ready for use.
►Please wipe excess water from wooden components after lling.
Bungee
Recoil Belt
WaterRower.com
19
18
17
16
15
14
13 litres
WaterRower Level Guage
Made in USA by
WaterRower US • 560 Metacome Avenue
Warren, RI 02885
Tel: 800 852-2210 • www.waterrower.com
WaterFlywheel
TM Patent No. US 88/01580, EPA 88905091
Table of contents
Other WaterRower Home Gym manuals

WaterRower
WaterRower M1 SERIES User manual

WaterRower
WaterRower Be Dynamic Slider User manual

WaterRower
WaterRower S4 User manual

WaterRower
WaterRower S1 User manual

WaterRower
WaterRower Indo-row A1 User manual

WaterRower
WaterRower S4 User manual

WaterRower
WaterRower GX User manual

WaterRower
WaterRower Indo-row A1 User manual

WaterRower
WaterRower SERIES III User manual

WaterRower
WaterRower M1 SERIES User manual


