Waterworks Exeter Series User manual

RECOMMENDED TOOLS AND MATERIALS
Putty Knife Regular Screwdriver Adjustable Wrench Sealant Tape Measure
Hacksaw Wax Ring/Gasket Supply Tube Closet Bolts Carpenters Level
1REMOVE OLD TOILET
a. Close toilet supply valve and flush tank completely. Towel or sponge remaining water from tank and bowl.
b. Disconnect and remove supply line. NOTE:
If replacing valve, first shut off main water supply!
c. Remove old mounting hardware, remove toilet and plug floor waste opening to prevent escaping sewer gases.
d. Remove closet bolts from flange and clean away old wax, putty, etc. from base area.
NOTE:
Mounting surface must be clean and level before
new toilet is installed!
CAUTION: PRODUCT IS FRAGILE. TO AVOID BREAKAGE AND POSSIBLE
INJURY HANDLE WITH CARE!
NOTE:
Pictures may not exactly define contour of china and components.
!
To ensure this product is installed properly, please read these instructions carefully before you begin.
(Certain installations may require professional help.) Also be sure your installation conforms to local codes.
INSTALLATION INSTRUCTIONS
For Exeter 2-Piece Water Closets
2ROUGHING-IN DIMENSIONS:
ELONGATED (EXWA40) ROUND FRONT (EXWA36)
18-7/8"
C/L OF SEAT POST
MTG HOLES ON
5-1/2" CTRS
16-5/8"
28-1/2"
8-3/8"
1
1/4"
6-1/2"
13-5/8"
11-1/4"
31-1/4"
C/L OF SUPPLY
AS REQUIRED
FINISHED
FLOOR
FINISHED WALL
1/2"
3-1/2"
12"
18-3/4"
15"
C/L
6"
8"
C/L OF OUTLET AND
TOILET MTG BOLTS
*
*
16-7/8"
C/L OF SEAT POST
MTG HOLES ON
5-1/2" CTRS
26-3/8"
8-3/8"
6-1/2"
13-5/8"
FINISHED WALL
1/2"
3-1/2"
12" C/L OF OUTLET AND
TOILET MTG BOLTS
1 1/4"

5
7
6
POSITION TOILET ON FLANGE
a. Unplug floor waste opening and install toilet on closet flange
so bolts project through mounting holes.
b. (See 5a) Loosely install mounting clips, retainer washers and
nuts. Side of washers marked "THIS SIDE UP" must face up.
c. Position toilet squarely to wall and, with a rocking motion,
press bowl down fully on wax ring and flange. Alternately
tighten nuts until toilet is firmly seated on floor.
CAUTION:
DO NOT OVERTIGHTEN NUTS
OR BASE MAY BE DAMAGED!
b. Install bolt caps on mounting clips. (If necessary, cut
bolt height to size before installing caps.)
c. Smooth off the bead of sealant around base.
Remove excess sealant.
INSTALL TANK
a. Install large rubber gasket over
threaded outlet on bottom of tank and
lower tank onto bowl so that tapered
end of gasket fits evenly into bowl
water inlet opening.
b. Insert tank mounting bolts and
rubber washers from inside tank,
through mounting holes, and secure
with metal washers and nuts.
c. With tank parallel to wall,
alternately tighten nuts until tank is
snugged down evenly against bowl
surface.
INSTALL TOILET SEAT
Install toilet seat in accordance with
manufacturer's directions.
NUT
CLOSET
BOLT
WASHER
BOLT CAP
RUBBER
GASKET
TANK MTG.
BOLTS
NUT
WASHER
FLANGE
!
- 2 -
!CAUTION:
DO NOT OVERTIGHTEN NUTS MORE
THAN REQUIRED FOR A SNUG FIT!
RUBBER
WASHER
INSTALL CLOSET BOLTS
Install closet bolts in flange channel, turn 90, and slide
into place 6" apart and parallel to wall
3
CLOSET FLANGE
CLOSET BOLTS
A
WAX RING
SEALANT
4
INSTALL WAX SEAL
Invert toilet on floor (cushion to prevent damage), and install wax
ring evenly around waste flange (horn), with tapered end of ring
facing toilet. Apply a thin bead of sealant around toilet base.
5a
MOUNTING CLIP

- 3 -
8
11
9
CONNECT WATER SUPPLY
a. Connect water supply line be-
tween shutoff valve and tank water
inlet fitting. Tighten coupling nuts
securely. Check that refill tube is
inserted into overflow tube.
b. Turn on supply valve and allow
tank to fill until float rises to shutoff
position.
c. Check for leakage at fittings,
tighten or correct as needed.
CARE AND CLEANING
When cleaning your toilet, wash it with mild, soapy water, rinse thoroughly with clear water and dry with a soft cloth.
NEVER use abrasive scouring powders or abrasive pads on your toilet seat. Some bathroom chemicals and cosmetics
may damage the seat's finish.
WARNING: Do not use in-tank cleaners. Products containing chlorine (calcium hypochlorite) can seriously damage fittings
in the tank. This damage can cause leakage and property damage.
WATERWORKS shall not be responsible or liable for any tank fitting damage caused by the use of
cleaners containing chlorine (calcium hypochlorite).
TANK
COUPLING NUT FLEXIBLE
SUPPLY
WATER INLET
COMPRESSION
COLLAR
WASHER
VALVE NUT
TRIM PLATE
VALVE
!
ADJUSTABLE
HEIGHT
TANK
LEVER
"S"
CLIP
LINK
TOP ARM
NIPPLE
Diagram 1
PARTS FOR WATER
CONNECTION
(SEE STEP 9)
CONE WASHER
VALVE
BODY
WATER LEVEL
ADJUSTMENT
CLIP
FLAPPER
FLUSH
VALVE
THREADED
SHANK
SHANK
WASHER
COUPLING NUT
(HAND TIGHT ONLY)
FILL
VALVE
FLOAT
CUP
CRITICAL LEVEL
MARK ("C.L.")
MUST BE
1" ABOVE
OVERFLOW PIPE
REFILL
TUBE
LOCK NUT
ADJUSTMENTS
a. Flush tank and check that tank fills and shuts off within 30 to 60 seconds, and
tank water level is set as specified on tank rear wall.
b. To adjust water level: turn water level adjustment screw counterclockwise to
raise level; turn adjustment screw clockwise to lower level.
c. To adjust flow rate (tank fill time): turn flow rate adjustment screw clockwise to
decrease flow rate (increase fill time); turn adjustment screw counterclockwise
to increase flow rate (decrease fill time).
d. Carefully position tank cover on tank.
e. The flush valve float has been factory set and does not require adjustments.
Repositioning of the float will change the amount of water used which may
effect the toilet's performance.
f. If bowl fails to siphon, an adjustment may be required with the lift chain. Simply
remove the bead chain from the retainment clip (see Fig. 10A) and take up slack
on the chain, and reinsert on lift rod. Make sure the chain is not too taught.

TROUBLESHOOTING GUIDE
PROBLEM POSSIBLE CAUSE CORRECTIVE ACTION
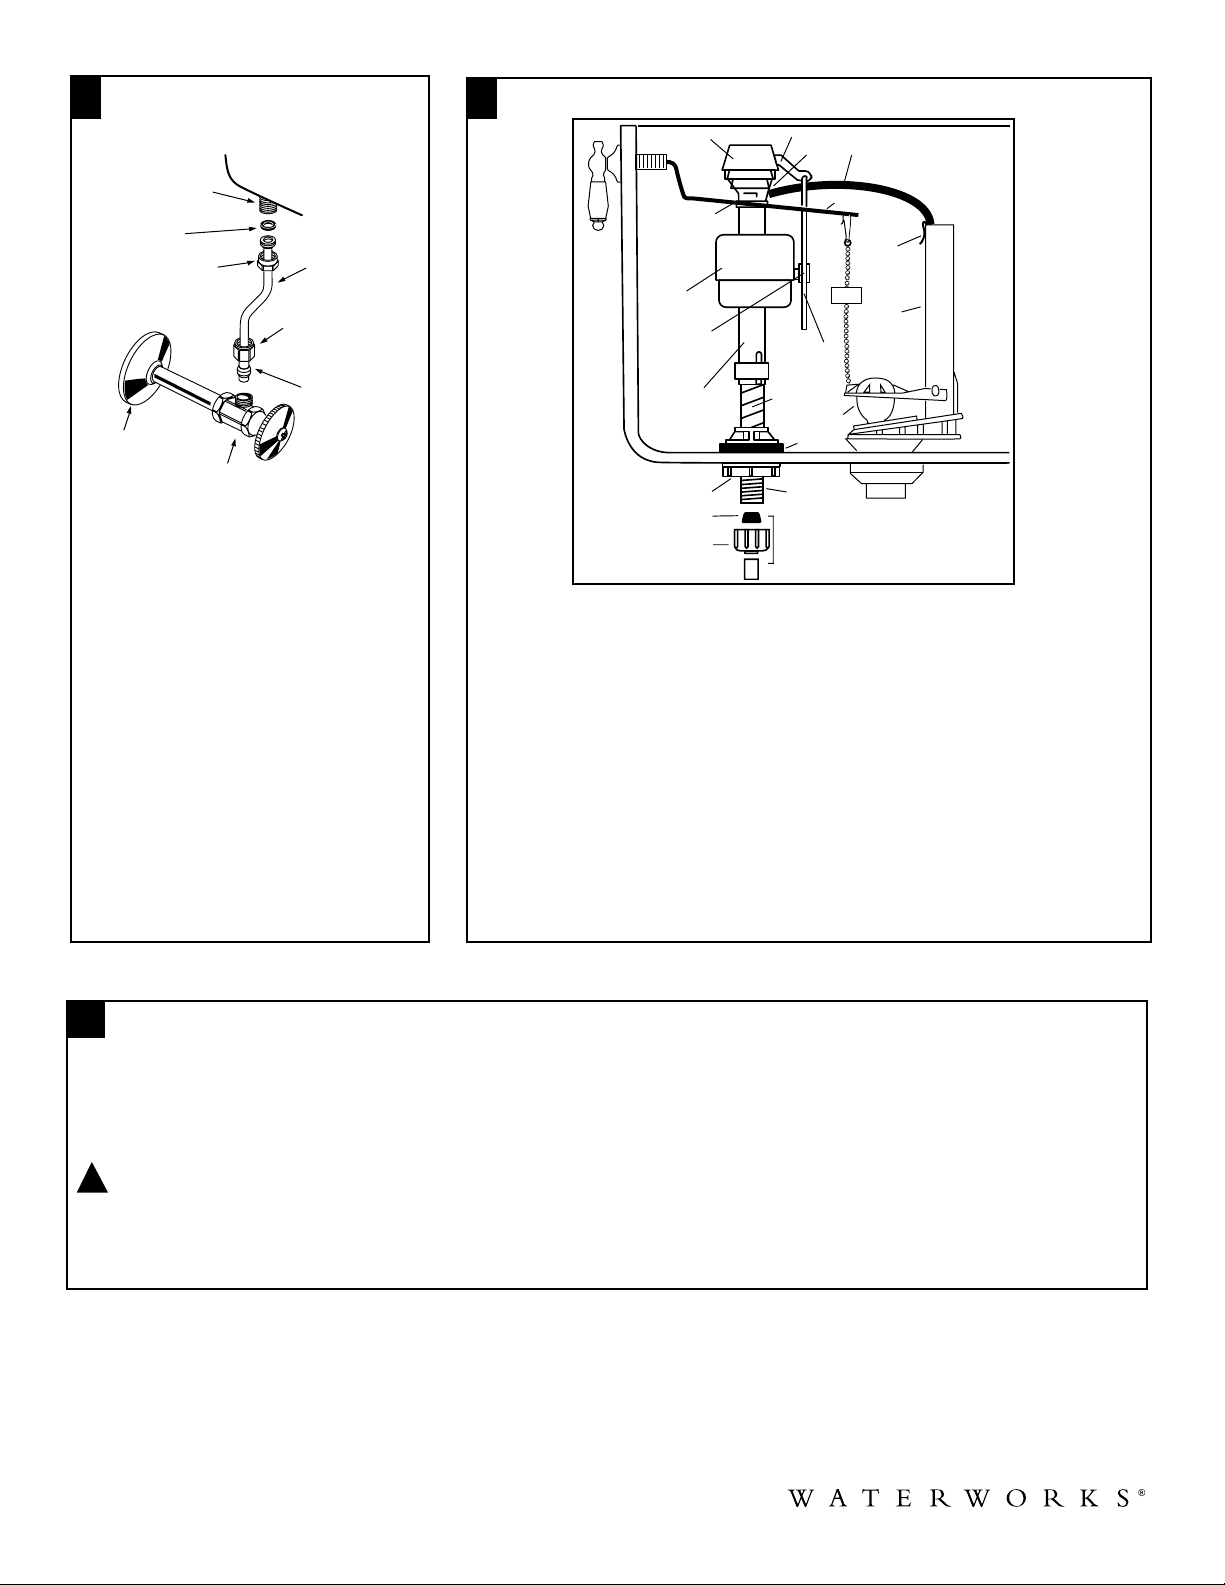
Does not flush a. Water supply valve closed. a. Open valve and allow water to fill tank.
b. Supply line blocked. b. Shut off water supply, disconnect supply line, and inspect
all gaskets and washers. Reassemble.
c. Flush valve chain too loose or c. Readjust chain length as required.
disconnected.
d. Stuck float/float rod. d. Adjust to allow free downward movement of float arm.
e. Water control flow rate too e. Follow instructions to increase water control flow rate.
restricted.
Poor or a. Tank water level too low. a. Follow instructions to adjust water level.
sluggish flush b. Bowl water level too low. b. Check that refill tube is connected to water control and
inserted into tank overflow without being kinked or damaged.
c. Supply valve partly closed. c. Open supply valve fully. Be sure that proper supply tube
size is used.
d. Flush valve closes early due to high d. Follow instructions to reduce water control flow rate.
supply pressure.
e. Partially clogged trapway and/or e. Remove obstruction. Consult a plumber if necessary.
drain pipe and/or vent.
f. Supply pressure too low. f. Normal supply pressure must be at least 20 psi.
Toilet leaks a. Poor supply line connection. a. Review Step 9 of installation procedure.
b. Poor bowl to tank/floor connection. b. Review Step 4 through 7 of installation procedure.
Toilet does not a. Tank water level too high. a. Follow instructions to adjust water level.
shut off b. Float rod or float ball depressed by b. Readjust float rod.
tank cover.
c. Flush valve chain too tight, holding c. Readjust chain length as needed.
flush valve open.
d. Float rod interfering with flush valve d. Follow installation instructions to reduce water control flow
closing. rate, which will lift lowest position of float rod without
affecting water level.
e. Flush valve seat and/or flapper worn e. Replace flapper/flush valve assembly, as needed.
or deformed.
f. Sand or debris lodged in water f. Shut off water supply. Consult a plumber, if necessary.
control.
Noisy Flush a. Water control flow rate too restricted. a. Follow instructions to increase water control flow rate.
- 4 -
WATERWORKS LIMITED LIFETIME MECHANICAL WARRANTY:
WATERWORKS warrants to the initial purchaser all plumbing and accessory products sold by Waterworks, which are installed in a residence
to be used in a residential application, to be free from manufacturing defects in materials and workmanship for as long as the purchaser continues to
own and maintain the residence where the products are initially installed.
FIVE-YEAR FINISH WARRANTY:
WATERWORKS warrants to the purchaser all plumbing and accessory products sold by Waterworks, which are installed in a residence
to be used in a residential application, to be free from manufacturing defects in materials and workmanship for a period of five years from installation
of the products. Waterworks must receive notice of any warranty claim within the five-year warranty period.
REPAIR OR REPLACEMENT:
If within the applicable warranty period the covered products shall be proved to the satisfaction of Waterworks to be defective, Waterworks
will repair or replace such products, at its expense (provided that such repair or replacement shall not include installation costs). Waterworks' obligation
shall be limited to such repair and replacement and shall be conditioned upon Waterworks' receiving notice of any alleged defect within the applicable
warranty period. [Purchaser shall be responsible for all shipping charges for returned products.]
The warranties set forth above shall be extended only to the purchaser and do not apply to any purchaser where the products are used for
commercial applications ad usage. Furthermore, the warranties do not cover installation or any other labor charges and do not apply to:
(i) products which have been repaired, altered or modified in any way by purchaser or any other person other than Waterworks or not using original
Waterworks spare parts, unless previously authorized in writing by Waterworks;
(ii) products which have not been installed, used, maintained or stored in accordance with the instructions provided to the purchaser by Waterworks;
(iii) products which have been used for purposes other than or in a manner contrary to their intended and normal use;
(iv) products which have been damaged as a result of misuse, negligence, freezing, accident or faulty installation or maintenance; and
(v) products damaged by the effects of dirt, salt water air, hard water, limescale, or abrasive or aggressive cleaners. If the normal life span of any
product is shorter than the applicable warranty period, the warranty shall apply only during the period of such shorter life span.
LIMITATIONS ON WARRANTY COVERAGE:
NOTICE OF WARRANTY CLAIMS:
For all warranty claims please call WATERWORKS PRODUCT SUPPORT at 800-927-2120, or write to Waterworks Product Support at
60 Backus Avenue, Danbury, Connecticut 06810.
Popular Toilet manuals by other brands

Helvex
Helvex WC MIURA installation guide

Aqualine
Aqualine PACO PC1012 installation manual

American Standard
American Standard Saver 2568.128NT Easy installation

Gima
Gima RIALZO WC manual

BEMIS
BEMIS bioBidet SLIM ONE owner's manual

American Standard
American Standard Cadet PRO 215AA Series INSTALLATION INSTRUCTIONS CARE AND MAINTENANCE

Kohler
Kohler FAMILY CARE S-TRAP K-23191T-NS installation instructions

Crosswater
Crosswater MPRO SENSE US-US-PRO6005CW manual

TECE
TECE TECElux 100 technical information

Cinderella
Cinderella Comfort NA user manual

Kohler
Kohler K-3900X-2 Homeowner's guide

Raritan
Raritan Crown Head Installation, operation and maintenance instructions