manuals.online logo
Brands
  1. Home
  2. •
  3. Brands
  4. •
  5. Watts
  6. •
  7. Cables And Connectors
  8. •
  9. Watts WattsRediant RadiantPEX-AL User manual

Watts WattsRediant RadiantPEX-AL User manual

Other Watts Cables And Connectors manuals

Watts Dormont ReliaGuard Manual

Watts

Watts Dormont ReliaGuard Manual

Watts FEBCO LF860 Small Series User manual

Watts

Watts FEBCO LF860 Small Series User manual

Watts FEBCO LF825Y Series User manual

Watts

Watts FEBCO LF825Y Series User manual

Watts 957RPDA-FS Series User manual

Watts

Watts 957RPDA-FS Series User manual

Watts 009-FS User manual

Watts

Watts 009-FS User manual

Watts SS009 User manual

Watts

Watts SS009 User manual

Watts FEBCO 825Y Series User manual

Watts

Watts FEBCO 825Y Series User manual

Watts C400-FS Series User manual

Watts

Watts C400-FS Series User manual

Watts LF860-FS Large Series User manual

Watts

Watts LF860-FS Large Series User manual

Watts 957-FS Series User manual

Watts

Watts 957-FS Series User manual

Popular Cables And Connectors manuals by other brands

StarTech.com ST124HD20 quick start guide

StarTech.com

StarTech.com ST124HD20 quick start guide

Philips SWV4543S/10 Features

Philips

Philips SWV4543S/10 Features

Larson Electronics 10-50C instruction manual

Larson Electronics

Larson Electronics 10-50C instruction manual

Grip MEK-PM Assembly and operating manual

Grip

Grip MEK-PM Assembly and operating manual

Ultra Products Travel Pack #3 ULT31436 Specifications

Ultra Products

Ultra Products Travel Pack #3 ULT31436 Specifications

Surpass QCH-F Operation manual

Surpass

Surpass QCH-F Operation manual

Philips SWA6310 Specifications

Philips

Philips SWA6310 Specifications

StarTech.com CRJ4550PK quick start guide

StarTech.com

StarTech.com CRJ4550PK quick start guide

Nohau EMUL-IP2K-PC user guide

Nohau

Nohau EMUL-IP2K-PC user guide

Foxun SX-SP144E-HD4K2K operating instructions

Foxun

Foxun SX-SP144E-HD4K2K operating instructions

Philips SWA3305W Specifications

Philips

Philips SWA3305W Specifications

opticis Stretch DVIM1-1P0x user manual

opticis

opticis Stretch DVIM1-1P0x user manual

Volkswagen VAS 6558A operating manual

Volkswagen

Volkswagen VAS 6558A operating manual

NEXIBO N-13 user manual

NEXIBO

NEXIBO N-13 user manual

CYP PU-1H3HBTL Operation manual

CYP

CYP PU-1H3HBTL Operation manual

Allen-Bradley 1784-u2dhp installation instructions

Allen-Bradley

Allen-Bradley 1784-u2dhp installation instructions

Global Caché Flex Link Blaster quick start

Global Caché

Global Caché Flex Link Blaster quick start

Hauppauge USB-Live2 Quick installation guide

Hauppauge

Hauppauge USB-Live2 Quick installation guide

manuals.online logo
manuals.online logoBrands
  • About & Mission
  • Contact us
  • Privacy Policy
  • Terms and Conditions

Copyright 2025 Manuals.Online. All Rights Reserved.

RadiantPEX-AL™Connections -
Press
Insulator Washer*
Stainless Steel Press Sleeve
EPDM O-Rings View Port
Brass
IS-WR-RadiantPEX-AL-Connections
For Residential or Commercial Radiant Heating and Snow Melt Applications
N
O
T
F
O
R
P
O
T
A
B
L
E
U
S
E
RadiantPEX-AL press fittings include o-rings on the barbed section of the fitting
and an insulator washer at the base. The stainless sleeve includes a view
port for ensuring the RadiantPEX-AL is properly seated before making a press
connection.
WARNING
!
Read these instructions and all product labels BEFORE
installation. Installation must be performed by qualified
personnel, in accordance with local codes and standards.
FAILURE TO COMPLY WITH PROPER INSTALLATION IN-
STRUCTIONS COULD DAMAGE TUBING AND FITTINGS CAUSING WATER
DAMAGE AND/OR DAMAGE TO THE PIPING SYSTEM WHICH CAN RESULT
IN PROPERTY DAMAGE AND/OR PERSONAL INJURY
WARNING: This product contains chemicals known to the
State of California to cause cancer and birth defects or
other reproductive harm.
For more information: Watts.com/prop65
Installation
1. Cut the Tubing. Use a tubing cutter. Ensure the cut is straight and
clean.
2. Prepare the connection
• Use a reamer tool to prepare the end of the tubing for the connection.
• Ensure the insulator washer is in place at the base of the fitting.
• Ensure the stainless steel sleeve is seated against the insulator washer.
• Slide the RadiantPEX-AL tubing over the barb until it is fully inside the
sleeve and can be seen through the view port.
3. Make the connection
• Place the assembly contained by the sleeve into the press tool jaws.
• Firmly close the jaws. The tool will automatically stop when complete.
4. Pressure Test
Test all connections between 50 to 100 psi (3.4 to 6.9 bar) with either air or
water (do not use both). If temperatures are near or below freezing, do not
use water.
O-rings and insulator must be re-installed before tubing is installed and
the connection finalized.
Refer to Watts Radiant's Product Catalog for connection and tool options.
RadiantPEX-AL™
Press & Compression Connections
NOTICE
• Only use Watts Radiant fittings that correspond to the selected size and
type of tubing. Improper sizing can result in leaks.
• Wrap completed connections with PVC electricians tape or shrink wrap if
they will be buried in concrete or other masonry material.
• For sweat fittings, remove o-rings and insulator washer before soldering.
Once cool, be sure to re-install.
• Do not splice multiple lengths of RadiantPEX-AL tubing together as this will
result in increased pressure drops. Refer to the tubing installation manual
available from WattsRadiant.com for recommended circuit lengths and
other tubing installation guidelines.
• Repairing RadiantPEX-AL that has been in service requires special atten-
tion, particularly when glycol has been used. Any residual amounts of
glycol or any other coating or debris inside the tube must be removed and
all fitting surfaces must be clean before making connections.
• Watts RadiantPEX-AL fittings are engineered to work together. Watts
extends no warranty – express or implied – to any failure or damage of any
kind resulting from the use of materials not specified by Watts.
RadiantPEX-AL™Connections -
Compression
RadiantPEX-AL compression fittings include o-rings on the barbed section and
an internal compression ring with an external compression nut.
Compression Ring
EPDM O-Rings
Compression Nut
Insulator Washer
Brass
Male NPT Adapter*
Installation
1. Cut the Tubing. Use a tubing cutter. Ensure the cut is straight and
clean.
2. Make the connection
• Use a reamer tool to prepare the end of the tubing for the connection.
• Slide the compression nut over the tubing.
• Slide the compression ring over the tubing.
• Ensure the insulator washer is in place in the recess of the fitting.
• Slide the RadiantPEX-AL tubing over the barb. Make sure the tubing is
seated against the insulator washer insert.
• Slide the compression nut up and begin threading it onto the fitting. The
compression ring will automatically be positioned as you tighten the nut..
• Use an open-end wrench to complete the connection (do not use a
crescent wrench). Tighten the connection to 20 in/lb (2.3 N-M) (snug and
then an additional 1/4 turn).
3. Pressure Test
Test all connections between 50 to 100 psi (3.4 to 6.9 bar) with either air or
water (do not use both). If temperatures are near or below freezing, do not
use water.
PEX-AL Compression Fitting Parts
Description Qty Order #
3/8" (9.5 mm) Compression Fitting Insulators 10 81011165
1/2" (12.7 mm) Compression Fitting Insulators 10 81010697
5/8" (15.9 mm) Compression Fitting Insulators 10 81009456
3/4" (19.1 mm) Compression Fitting Insulators 10 81009458
1" (25.4 mm) Compression Fitting Insulators 10 81009460
3/8" (9.5 mm) Compression Fitting O-Ring 10 81011167
1/2" (12.7 mm) Compression Fitting O-Ring 10 81010652
5/8" (15.9 mm) Compression Fitting O-Ring 10 81008567
3/4" (19.1 mm) Compression Fitting O-Ring 10 81008568
1" (25.4 mm) Compression Fitting O-Ring 10 81008569
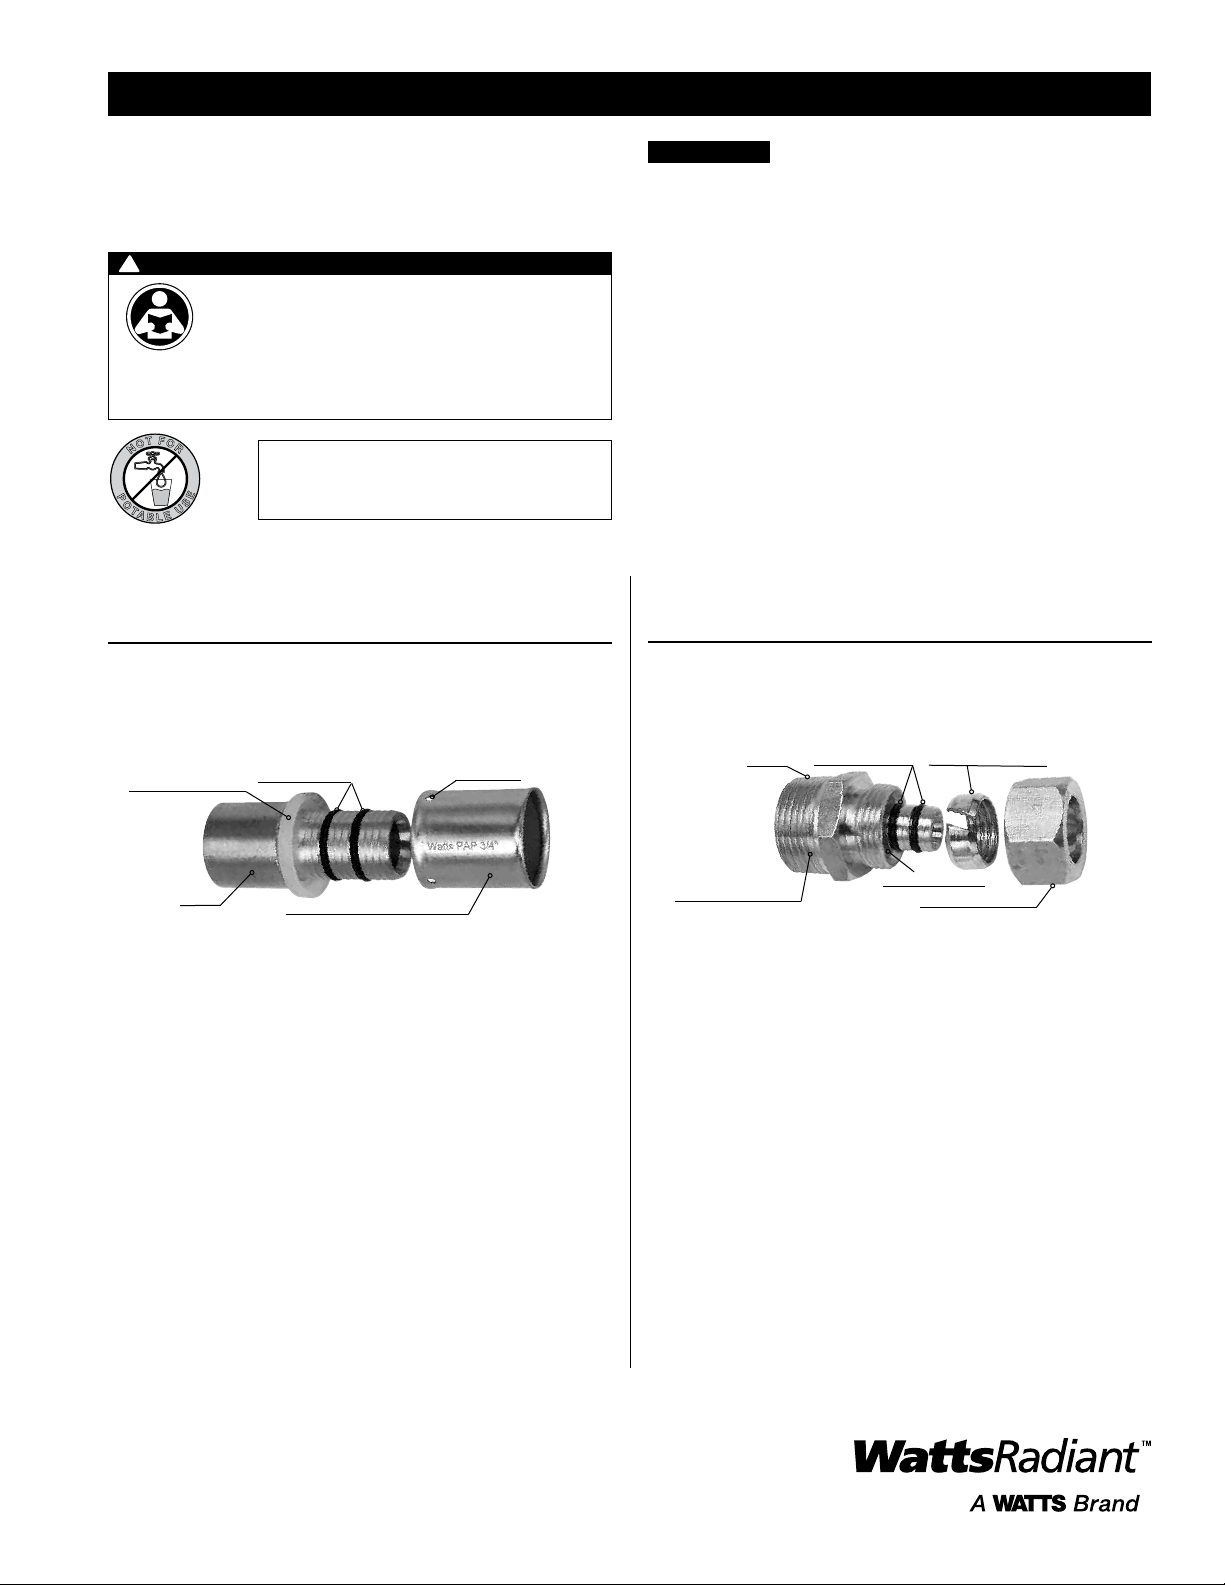
Compression Fitting
*1/2" fittings will be indicated by a blue mark.
Ream, shape and prep tubing
Insulator washer
Assemble components
Insert fitting
Thread connection
Limited Warranty: Watts Radiant (the “Company”) warrants each product to be free from defects in material and workmanship under normal usage for a period of one year from the date of original
shipment. In the event of such defects within the warranty period, the Company will, at its option, replace or recondition the product without charge.
THE WARRANTY SET FORTH HEREIN IS GIVEN EXPRESSLY AND IS THE ONLY WARRANTY GIVEN BY THE COMPANY WITH RESPECT TO THE PRODUCT. THE COMPANY MAKES NO OTHER
WARRANTIES, EXPRESS OR IMPLIED. THE COMPANY HEREBY SPECIFICALLY DISCLAIMS ALL OTHER WARRANTIES, EXPRESS OR IMPLIED, INCLUDING BUT NOT LIMITED TO THE IMPLIED
WARRANTIES OF MERCHANTABILITY AND FITNESS FOR A PARTICULAR PURPOSE.
The remedy described in the first paragraph of this warranty shall constitute the sole and exclusive remedy for breach of warranty, and the Company shall not be responsible for any incidental, special
or consequential damages, including without limitation, lost profits or the cost of repairing or replacing other property which is damaged if this product does not work properly, other costs resulting
from labor charges, delays, vandalism, negligence, fouling caused by foreign material, damage from adverse water conditions, chemical, or any other circumstances over which the Company has no
control. This warranty shall be invalidated by any abuse, misuse, misapplication, improper installation or improper maintenance or alteration of the product.
Some States do not allow limitations on how long an implied warranty lasts, and some States do not allow the exclusion or limitation of incidental or consequential damages. Therefore the above
limitations may not apply to you. This Limited Warranty gives you specific legal rights, and you may have other rights that vary from State to State. You should consult applicable state laws to
determine your rights. SO FAR AS IS CONSISTENT WITH APPLICABLE STATE LAW, ANY IMPLIED WARRANTIES THAT MAY NOT BE DISCLAIMED, INCLUDING THE IMPLIED WARRANTIES OF
MERCHANTABILITY AND FITNESS FOR A PARTICULAR PURPOSE, ARE LIMITED IN DURATION TO ONE YEAR FROM THE DATE OF ORIGINAL SHIPMENT.
IS-WR-RadiantPEX-AL-Connections 1652 EDP# 81014767 © 2016 Watts Radiant
USA: T: (800) 276-2419 • F: (417) 864-8161 • WattsRadiant.com
Canada: T: (905) 332-4090 • F: (905) 332-7068 • WattsRadiant.ca
Latin America: T: (52) 81-1001-8600 • F: (52) 81-8000-7091 • WattsRadiant.com
PEX-AL Press Fitting Parts
Description Qty Order #
1/2" (12.7 mm) Press Fitting Insulators 10 81010648
5/8" (15.9 mm) Press Fitting Insulators 10 81008563
3/4" (19.1 mm) Press Fitting Insulators 10 81008564
1" (25.4 mm) Press Fitting Insulators 10 81008565
1/2" (12.7 mm) Press Fitting O-Ring 10 81010652
5/8" (15.9 mm) Press Fitting O-Ring 10 81008567
3/4" (19.1 mm) Press Fitting O-Ring 10 81008568
1" (25.4 mm) Press Fitting O-Ring 10 81008569
1/2" (12.7 mm) Press Fitting Sleeve 10 81010648
5/8" (15.9 mm) Press Fitting Sleeve 10 81008559
3/4" (19.1 mm) Press Fitting Sleeve 10 81008560
1" (25.4 mm) Press Fitting Sleeve 10 81008561
Description Model# Order# lbs.
3/8" x 200' (Coil), RadiantPEX-AL RL06-200-OR 81011133 18
1/2" x 300' (Coil), RadiantPEX-AL RL0508-300-OR 81010635 23
1/2" x 1000' (Coil), RadiantPEX-AL RL0508-1000-OR 81010637 70
5/8" x 300' (Coil), RadiantPEX-AL RL10-300-OR 81007605 35
5/8" x 1200' (Coil), RadiantPEX-AL RL10-1200-OR 81007606 130
3/4" x 100' (Coil), RadiantPEX-AL RL12-100-OR 81007607 18
3/4" x 300' (Coil), RadiantPEX-AL RL12-300-OR 81007608 48
3/4" x 500' (Coil), RadiantPEX-AL RL12-500-OR 81007609 73
1" x 100' (Coil), RadiantPEX-AL RL16-100-OR 81007610 20
1" x 300' (Coil), RadiantPEX-AL RL16-300-OR 81007611 54
Press Fitting
*insulator washer is white for 5/8", 3/4", and 1" and blue for 1/2".
Ream, shape and prep tubing
Completed press connection
Assemble components
PressAll Tool kit
Press connection
Press fitting
view hole