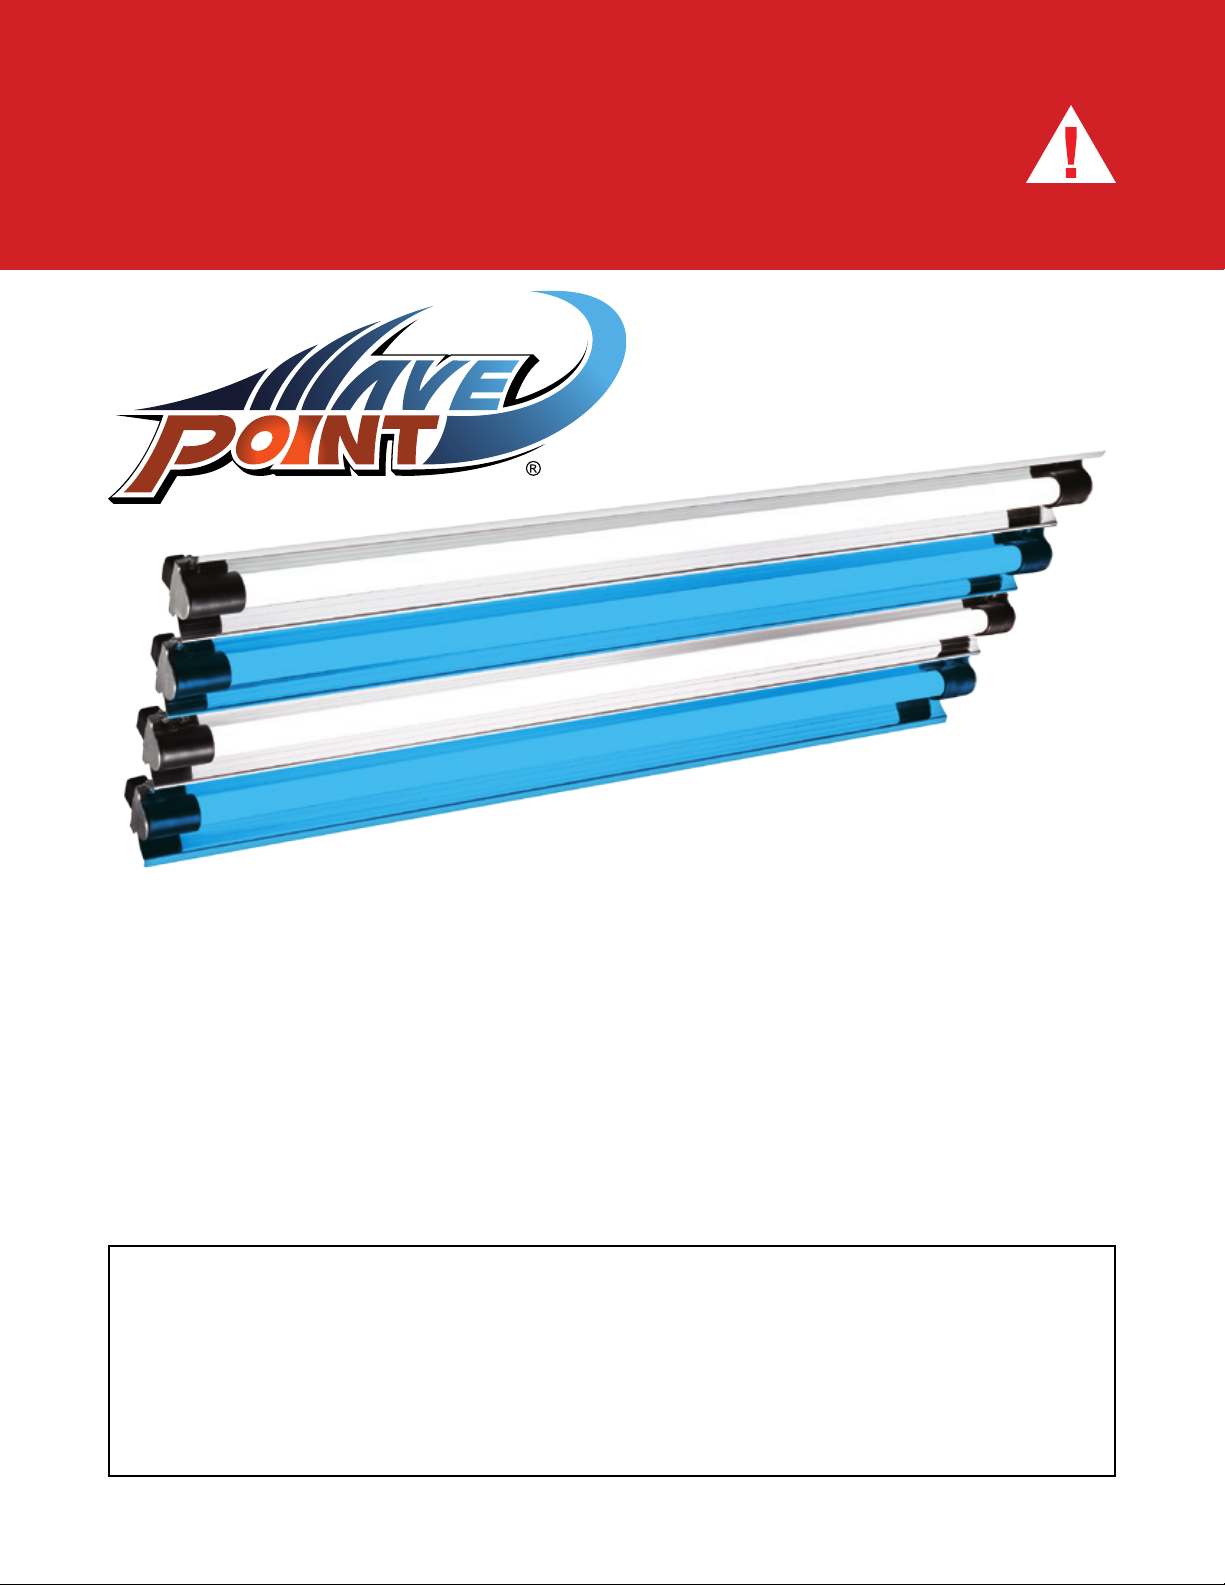
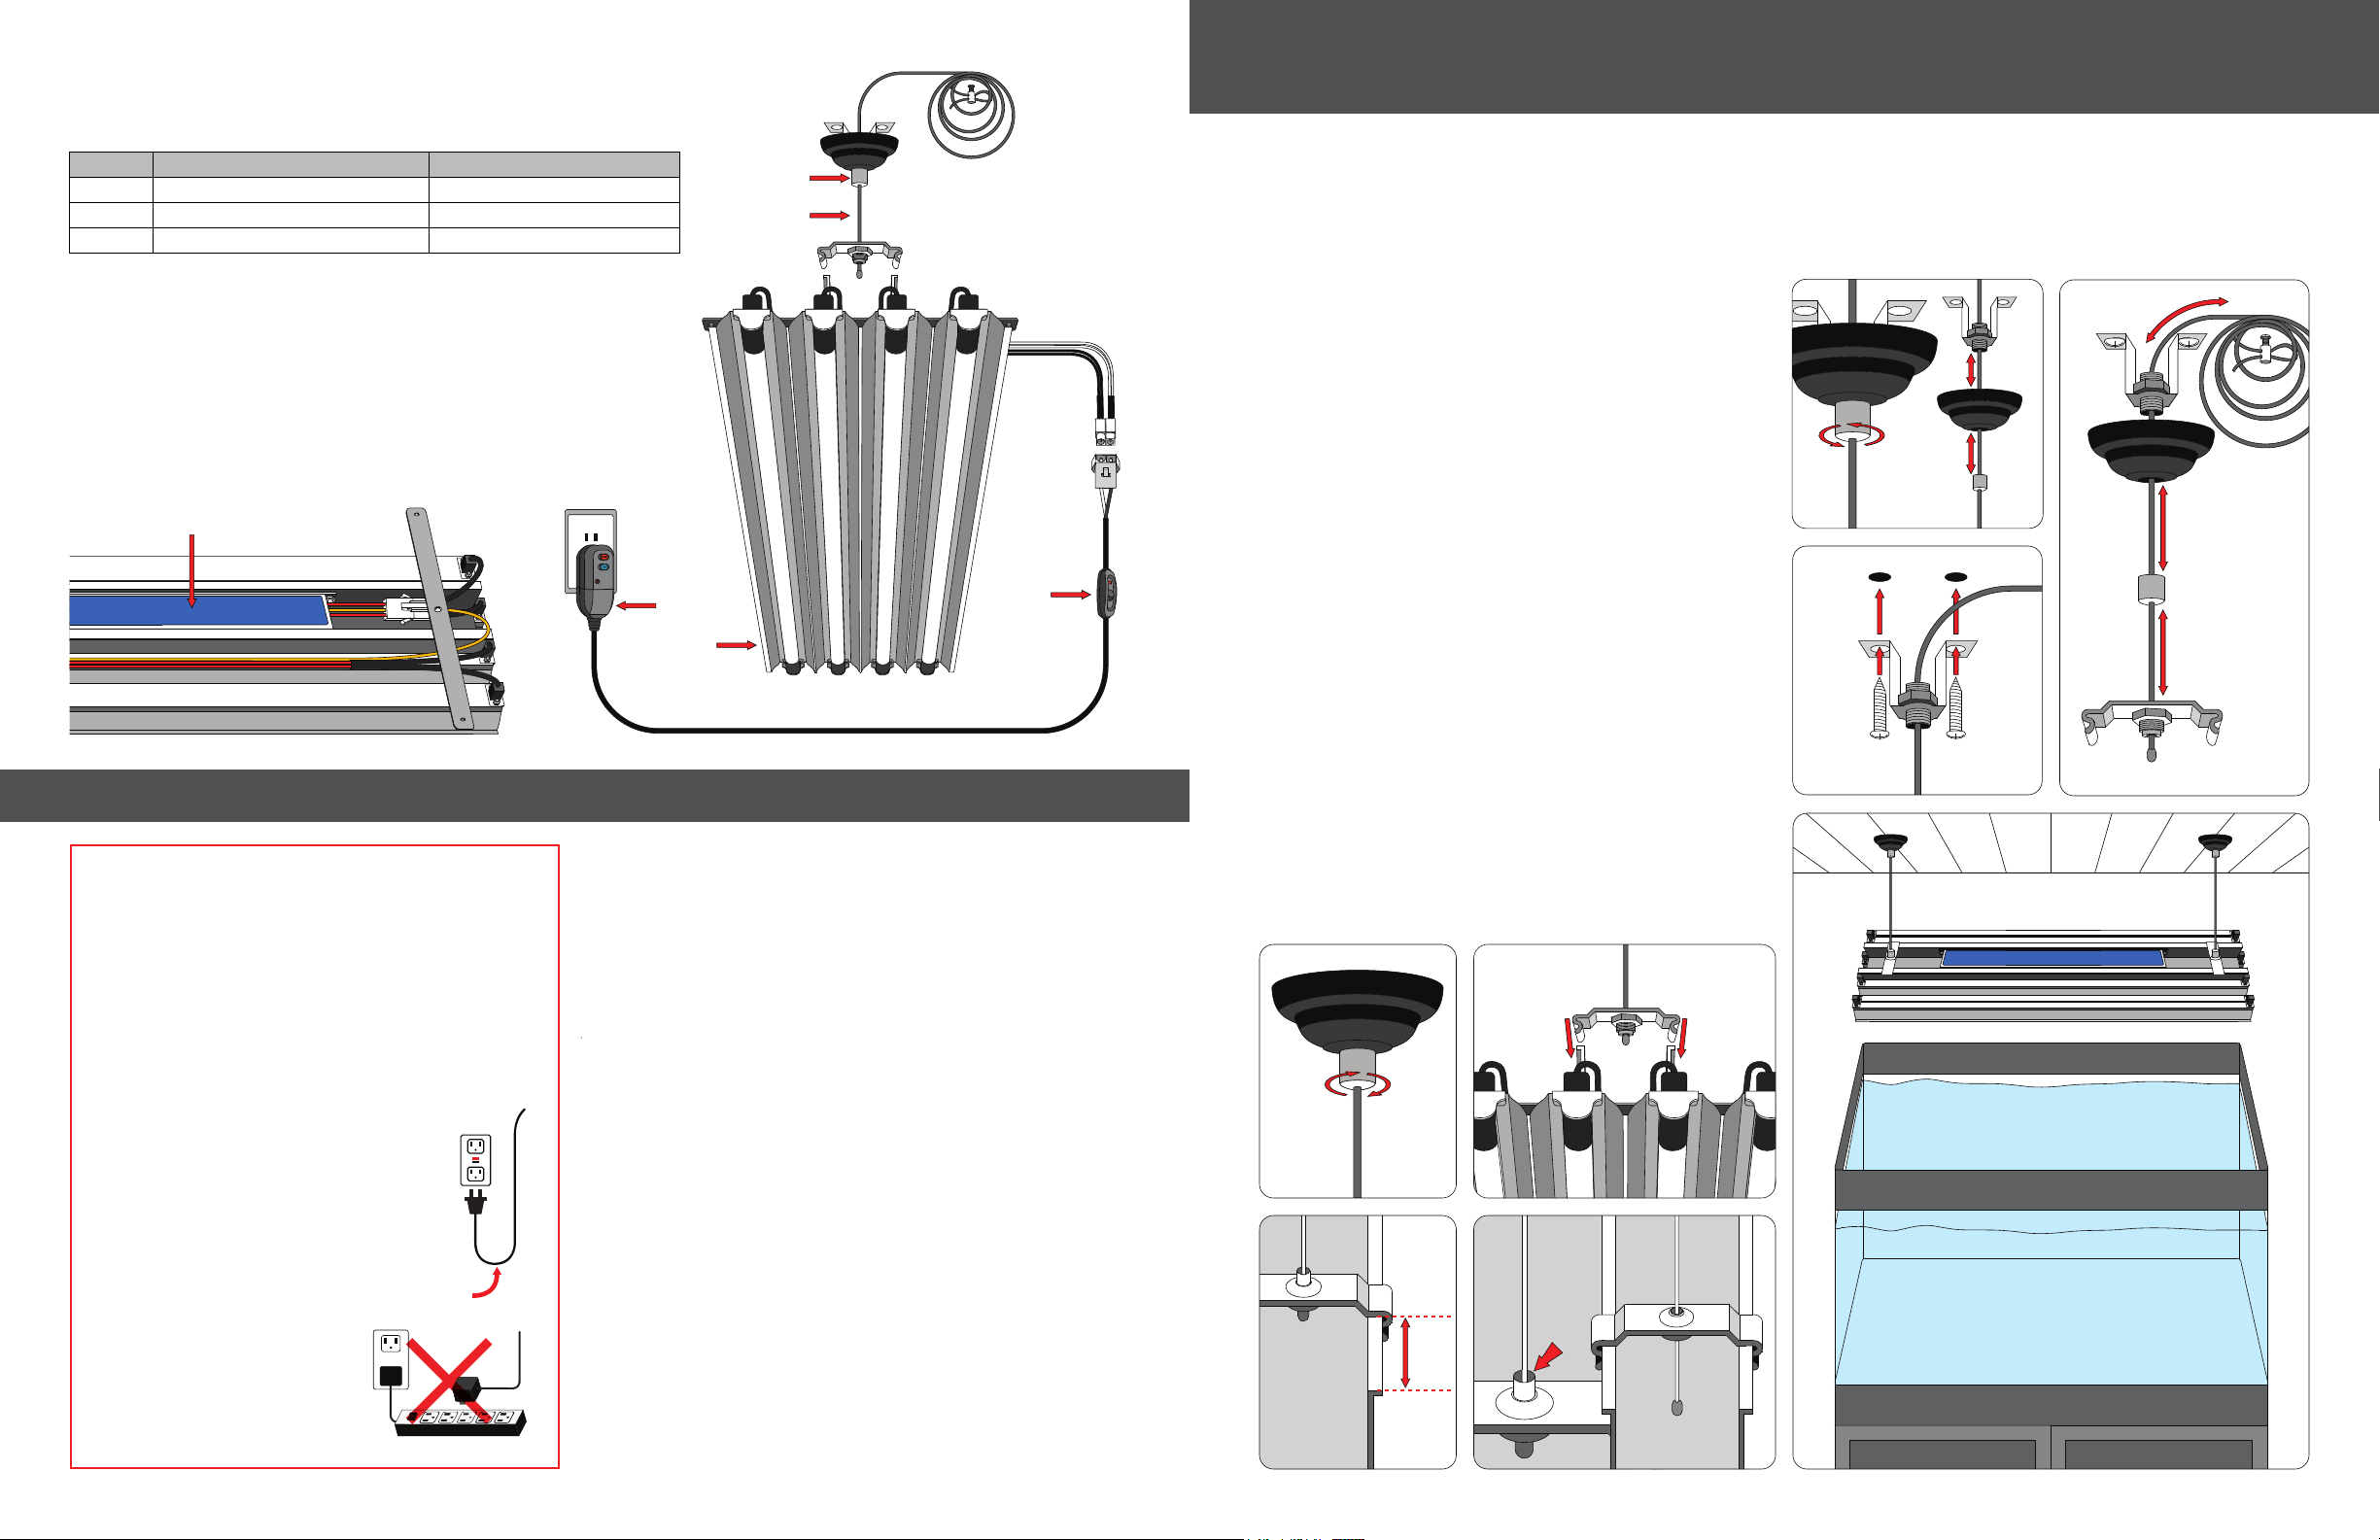
Wave Point 01019 User manual

8.5in x 11in
• READ AND FOLLOW THE GUIDELINES TO ENSURE THE PROPER USE AND APPLICATION.
FAILURE TO FOLLOW THESE GUIDELINES MAY RESULT IN RETROFIT KIT DAMAGE, ELECTRICAL
SHOCK, FIRE AND/OR INJURY.
• WARNING! LAMPS CAN BE HOT. HANDLE WITH CARE.
• NEVER TOUCH THE LAMP WHILE OPERATING. BEFORE WORKING ON THE RETROFIT KIT AND/
OR AQUARIUM, THE RETROFIT KIT MUST BE DISCONNECTED FROM THE POWER SUPPLY.
T5 4 Lamp Retrot Kit (4 Row Lamp Conguration)
• 14X LIGHT AMPLIFYING PARADYNAMIC REFLECTOR
• Water Resistant Endcaps
• Premium UL Listed GFCI Plug
• Ultra-Silent, No Fan Needed and Energy Efcient Ballast
• On/Off Switch
• Includes: 2 Sun Wave® and 2 SuperBlue 460®Lamps
Canopy Mounting Bracket (10in) and Hanging Kit
WARNING! Buyer/user assumes all responsibility
for safety and proper use not in accordance with the
directions and safety labels.

PAGE 2 PAGE 3
Min.
2in
Lock
Unlock
F G H
A
B C
DE
Adjust
Height
Press
Down
Adjust
Height
Drip Loop
GFCI
ONLY
Electronic ballast
Hangers
Lock Nut
GFCI Plug
Paradynamic
Reflector
ON/OFF
Switch
8.5in x 11in 8.5in x 11in
WAVE POINT® T5 4 Lamp Retrot Kit
(4 Row Lamp Conguration)
Includes: 2 Sun Wave® and 2 Superblue 460®lamps
MODEL # DESCRIPTION DIMENSION (W x H x L) (Approx.)
01019 96 watt 24in T5 4 Lamp Retrot Kit 8.125in x 2.25in x 23.8125in
01020 156 watt 36in T5 4 Lamp Retrot Kit 8.125in x 2.25in x 34.675in
01021 216 watt 48in T5 4 Lamp Retrot Kit 8.125in x 2.25in x 46.50in
PART LIST
1. 14X light amplifying paradynamic reector
2. GFCI plug
3. 2 Sun Wave®and 2 Superblue 460®HO T5 lamps
4. ON/OFF switch
5. Lock nut
6. Hanger
7. Electronic ballast
Read and follow the guidelines to ensure the proper
use and application. Failure to follow these guidelines
may result in Retrot Kit damage, electrical shock,
re and/or injury.
1. Use this product for its intended use only.
2. Never yank or pull the cord from the electrical outlet.
3. Do not place the Retrot Kit directly on top of the aquarium.
4. Do not operate if the plug or wire is damaged.
5. The Retrot Kit is not to come in contact with water.
6. The Retrot Kit must be turned off/disconnected from the power
supply before any maintenance is done to either the Retrot Kit or
the aquarium.
7. Verify that hands are dry prior to disconnecting the power.
8. To reduce the risk of electrocution keep all connections dry.
9. If the Retrokit Kit falls or comes in contact with water/excess
moisture, unplug the Retrot Kit from the power supply immediately
before removing. Failure to do so may cause electrical shock or
injury.
10. The Retrot Kit and connections need to be free of water, moisture
and salt build up at all times. Failure to do so will cause electrical
arching resulting in possible re or electrical shock.
11. Do not place above an open top aquarium.
INSTRUCTIONS FOR INSTALLATION
NOTE:
• Only place in well ventilated canopy. This Retrot Kit is intended to be above the aquarium. Do not place directly on
top of any aquarium without using hangers or canopy mounting bracket. Do not place above the aquarium without a
glass top.
• Use and/or consult a professional electrician or general contractor for installation
INSTALL TO THE CEILINGER
Additional hardware and tools required:
Anchors, drill and a screwdriver.
1. Undo lock nut. (A)
2. Locate a wood beam in the ceiling. Using the mounting
brackets drill 2 pilot holes in the intended locations.
Secure directly to the wood beam. (B)
NOTE: If using anchors to secure in the mounting
brackets and light Retrot Kit. Use and follow the
directions provided with the anchors. If there are
any questions or concerns consult a professional
electrician or general contractor.
3. Adjust the length of the cable. Cut off or hide
excess cable. Secure the end of the cable with the
cable stop. (C)
4. Lock the lock nut. (D)
5. Slide mounting bracket onto the track (E). Position
them equal distance from the edge. Slide bracket in a
minimum of 2in from the edge of the track. (F)
Note: Unit must be disconnected from the power.
6. To level the Retrot Kit adjust hanging wire to the
desired height by pressing the wire outlet in and
sliding cable in and out. (G)
7. Connect power supply cord to the Retrot Kit.
8. Plug directly to a GFCI outlet.
IMPORTANT WARNING AND SAFEGUARDS
This product may contain chemicals known to the state
of California to cause cancer and or birth defects or other
reproductive harm. Wash your hand after handling this
product.
It is your sole responsibilities to verify that the plug and the
receptacle are clean and free of moisture and salt build up at
all times. The receptacle must be free of water, salt, calcium,
magnesium and dust. Failure to do so can cause fire, damage
to property, permanent damage to the product and personal
injury not limited to loss of life.
Do not plug into extension cord/power strip.
Hg lamp contains Mercury
Manage in accordance with disposal laws
See: www.lamprecycle.org
A drip loop must be used when
plugging all electrical aquarium
devices. A drip loop is that part of the
cord hanging below the receptacle.
The national code requires that a
GFCI (Ground fault circuit interrupter)
be used in the branch circuit
supplying all power to water pumps
and electrical aquarium equipment.
If you do not have a GFCI, have
an electrician install one prior to
operating any aquarium component.

PAGE 4 PAGE 5
Min. 2in
A
B
C D
A B
C D
E F
8.5in x 11in 8.5in x 11in
MAINTENANCE
BULB REPLACEMENT:
Replace with genuine
Tools required: Hex driver and a small Philips screwdriver.
1. Verify the unit is unplugged. (A & B)
2. Remove the screw and nuts securing the rubber endcap
to the xture. Endcaps only need to be removed from one
side of the Retrot Kit. (C)
3. Slide the endcap directly off the bulb.
Avoid any twisting motion. (D)
4. Slide the old bulb out of the other endcap. (E)
5. Replace bulb: Align the pins on the bulb with the holes
in the end cap and press directly into endcap. Avoid any
twisting motion. Note: Endcap must match: endcap #1
on the right side of the Retrot Kit must be plugged into
endcap #1 on the left side of the Retrot Kit. (F)
6. Replace screws and nuts
7. Reinstall Retrot Kit
8. Plug directly into a GFCI outlet
INSTRUCTIONS FOR INSTALLATION (CONTINUE)
INSTALL ON THE CANOPY
Additional hardware and tools required:
4 screws and a screwdriver.
1. Slide canopy mounting brackets (10in) onto the track.
Position them equal distance from the edge of the Retrot
Kit. Slide bracket in a minimum of 2” from the edge of the
track. (A)
2. Verify the screws purchased do not penetrate all the way
through the canopy.
3. Screw Retrot Kit into canopy. (B & C)
4. Verify that the Retrot Kit is securely attached
to the canopy.
5. Verify that all wiring is secured to canopy and all
connections are free from moisture and or salt build up.
6. Connect power supply cord to the Retrot Kit.
7. Plug directly to a GFCI outlet.

PAGE 6 PAGE 7
A
B C
8.5in x 11in 8.5in x 11in
TROUBLESHOOTING
PROBLEM: All lamps will not light.
SOLUTION: Lamps in shipping have moved and are not making a proper connection. See Lamp replacement procedure for proper lamp installation.
FOR QUESTIONS AND ANSWERS, VISIT OUR WEBSITE: www.wave-point.com
REPLACEMENT LAMPS
COLOR MODEL # DESCRIPTION
COLOR WAVE®
Optimum Color Enhancer
01004 24 watt COLOR WAVE®Optimum Color Enhancer HO T5 Lamp 21in
01005 39 watt COLOR WAVE®Optimum Color Enhancer HO T5 Lamp 33in
01006 54 watt COLOR WAVE®Optimum Color Enhancer HO T5 Lamp 45in
TROPICAL WAVE®
Full Spectrum Daylight 6,500k
01007 24 watt TROPICAL WAVE®Full Spectrum Daylight 6,500k HO T5 Lamp 21in
01008 39 watt TROPICAL WAVE®Full Spectrum Daylight 6,500k HO T5 Lamp 33in
01009 54 watt TROPICAL WAVE Full Spectrum Daylight 6,500k HO T5 Lamp 45in
SUN WAVE®
Super Daylight 12,000k
01010 24 watt SUN WAVE®Super Daylight 12,000k HO T5 Lamp 21in
01011 39 watt SUN WAVE®Super Daylight 12,000k HO T5 Lamp 33in
01012 54 watt SUN WAVE®Super Daylight 12,000k HO T5 Lamp 45in
SUPERBLUE 460®
Super Blue Actinic 460
01013 24 watt SUPERBLUE 460®Super Blue Actinic 460 HO T5 Lamp 21in
01014 39 watt SUPERBLUE 460®Super Blue Actinic 460 HO T5 Lamp 33in
01015 54 watt SUPERBLUE 460®Super Blue Actinic 460 HO T5 Lamp 45in
REEF WAVE®
Super Violet O3 Actinic 420
01016 24 watt REEF WAVE®Super Violet O3 Actinic 420 HO T5 Lamp 21in
01017 39 watt REEF WAVE®Super Violet O3 Actinic 420 HO T5 Lamp 33in
01018 54 watt REEF WAVE®Super Violet O3 Actinic 420 HO T5 Lamp 45in
CORAL WAVE®
Coral Growth Accelerator
01022 24 watt CORAL WAVE®Coral Growth Accelerator HO T5 Lamp 21in
01023 39 watt CORAL WAVE®Coral Growth Accelerator HO T5 Lamp 33in
01024 54 watt CORAL WAVE®Coral Growth Accelerator HO T5 Lamp 45in
ULTRA GROWTH WAVE®
Plant and Reef Accelerator
01082 24 watt ULTRA GROWTH WAVE®Plant and Reef Accelerator HO T5 Lamp 21in
01083 39 watt ULTRA GROWTH WAVE®Plant and Reef Accelerator HO T5 Lamp 33in
01084 54 watt ULTRA GROWTH WAVE®Plant and Reef Accelerator HO T5 Lamp 45in
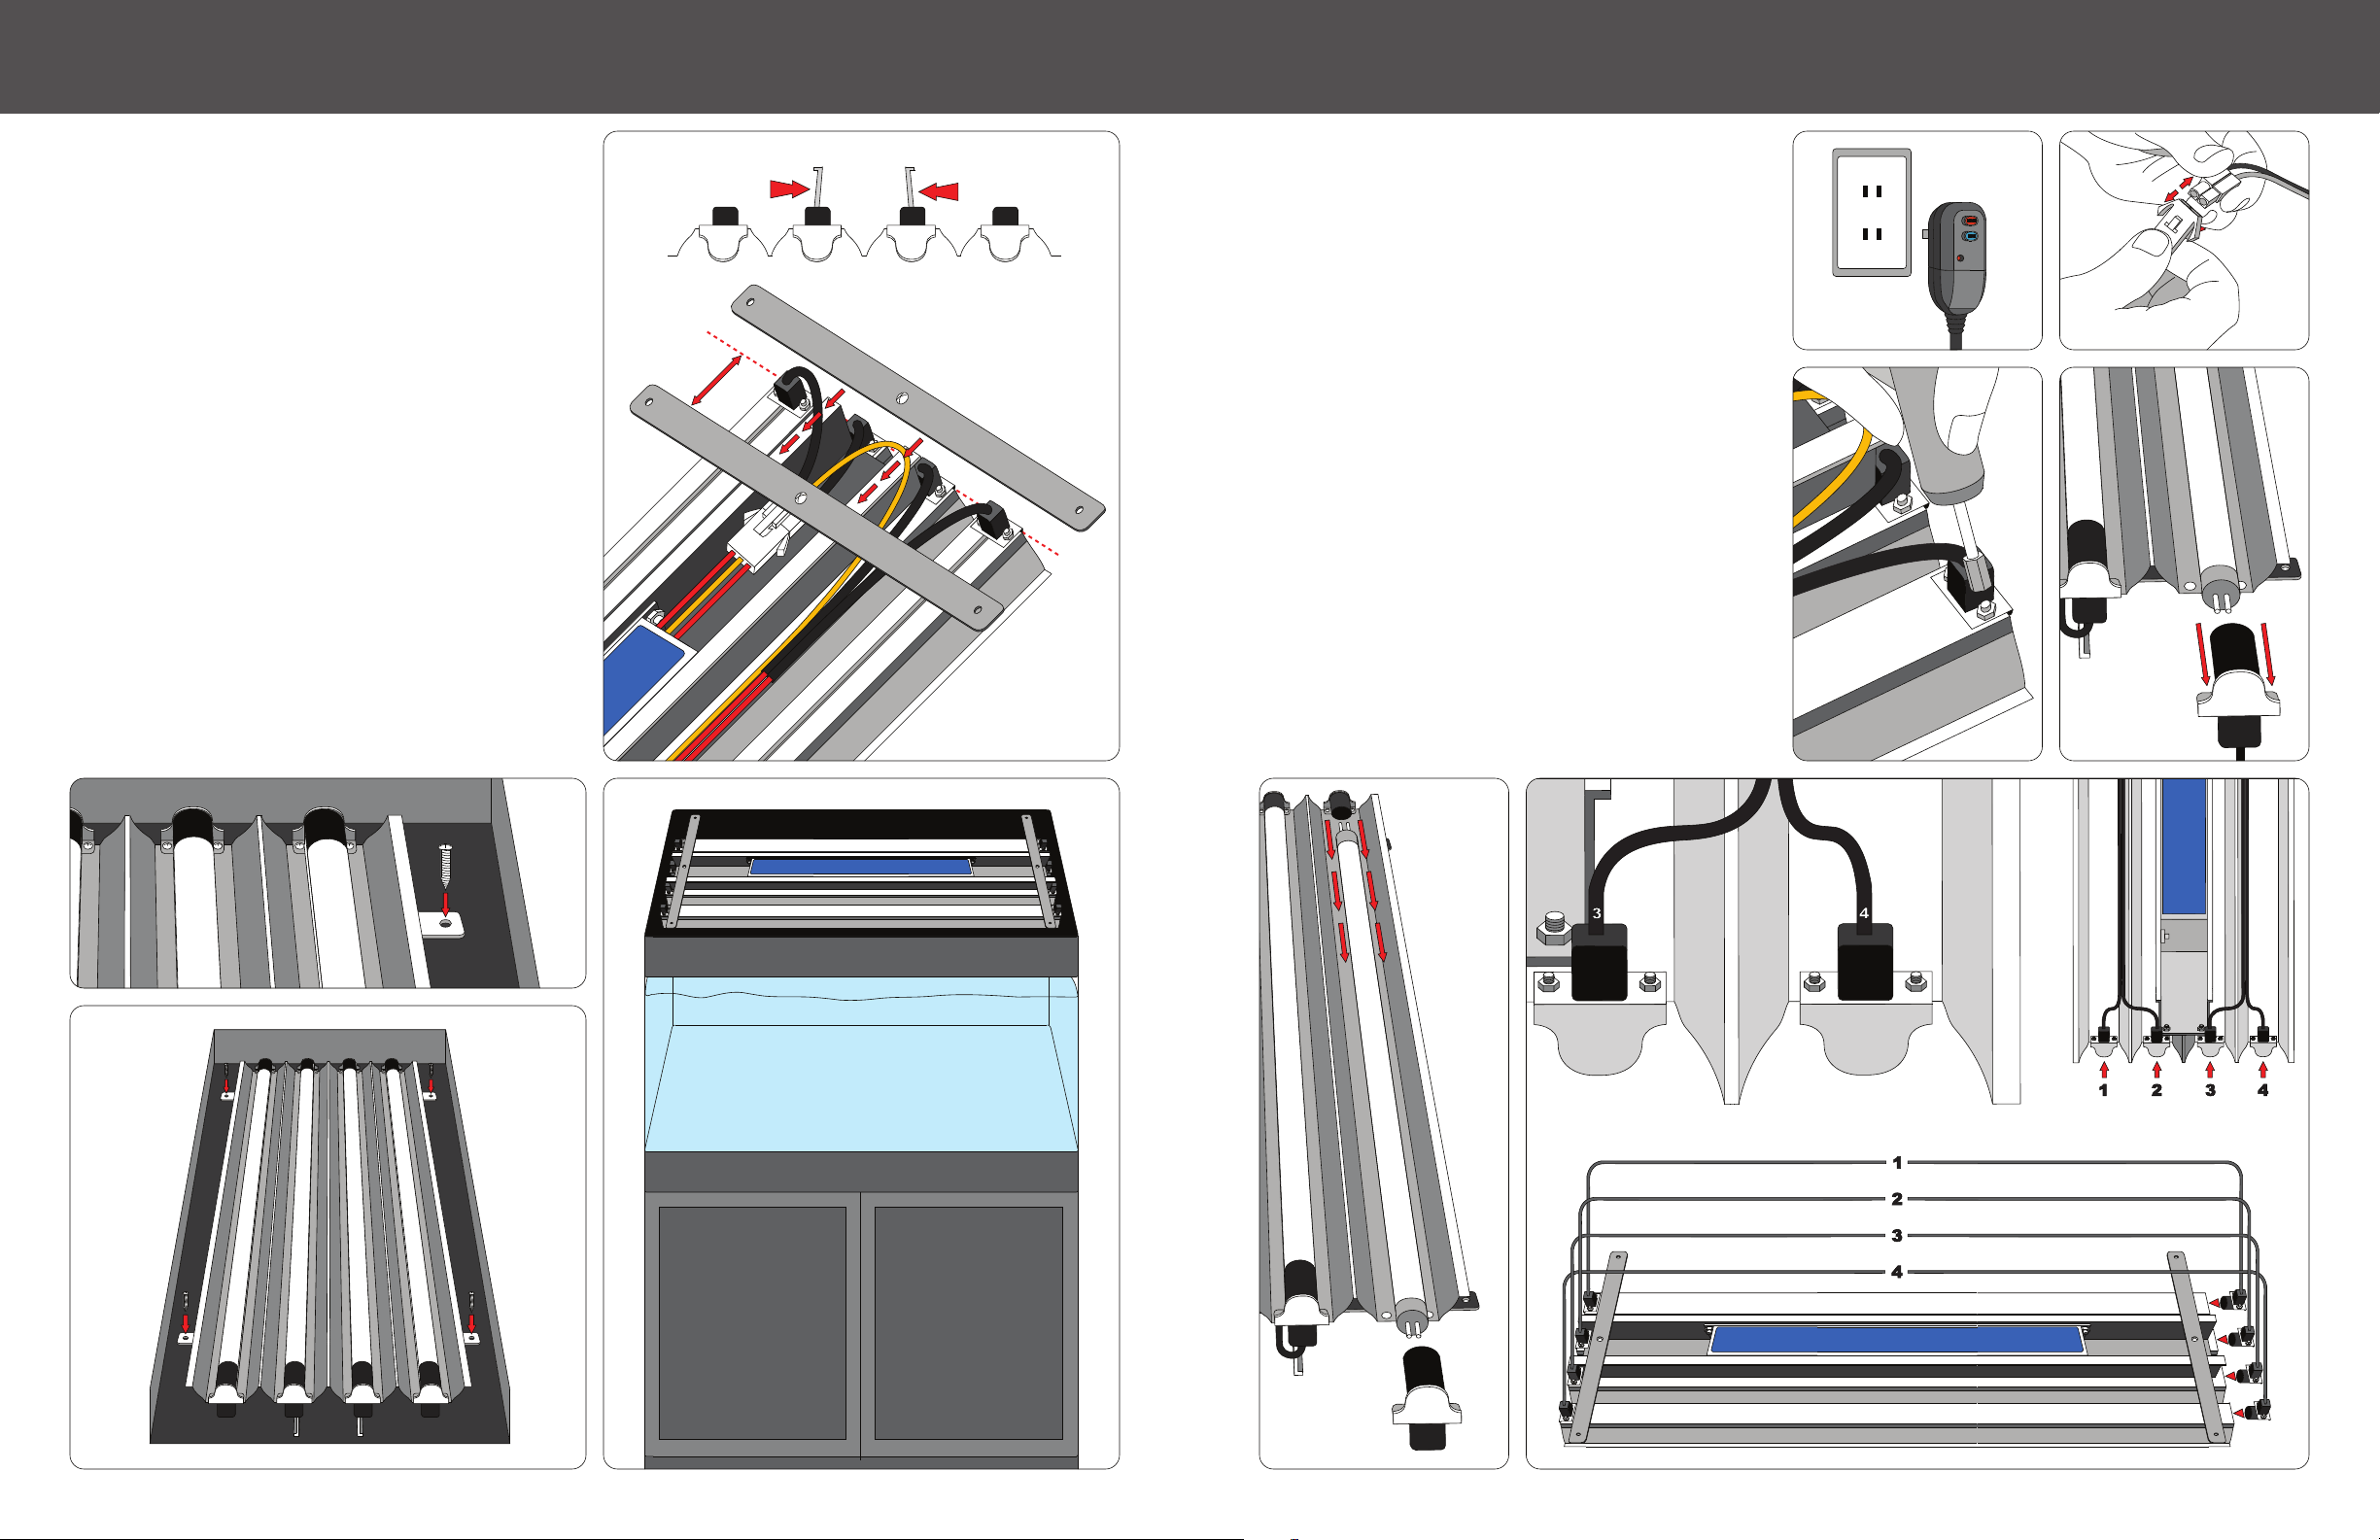
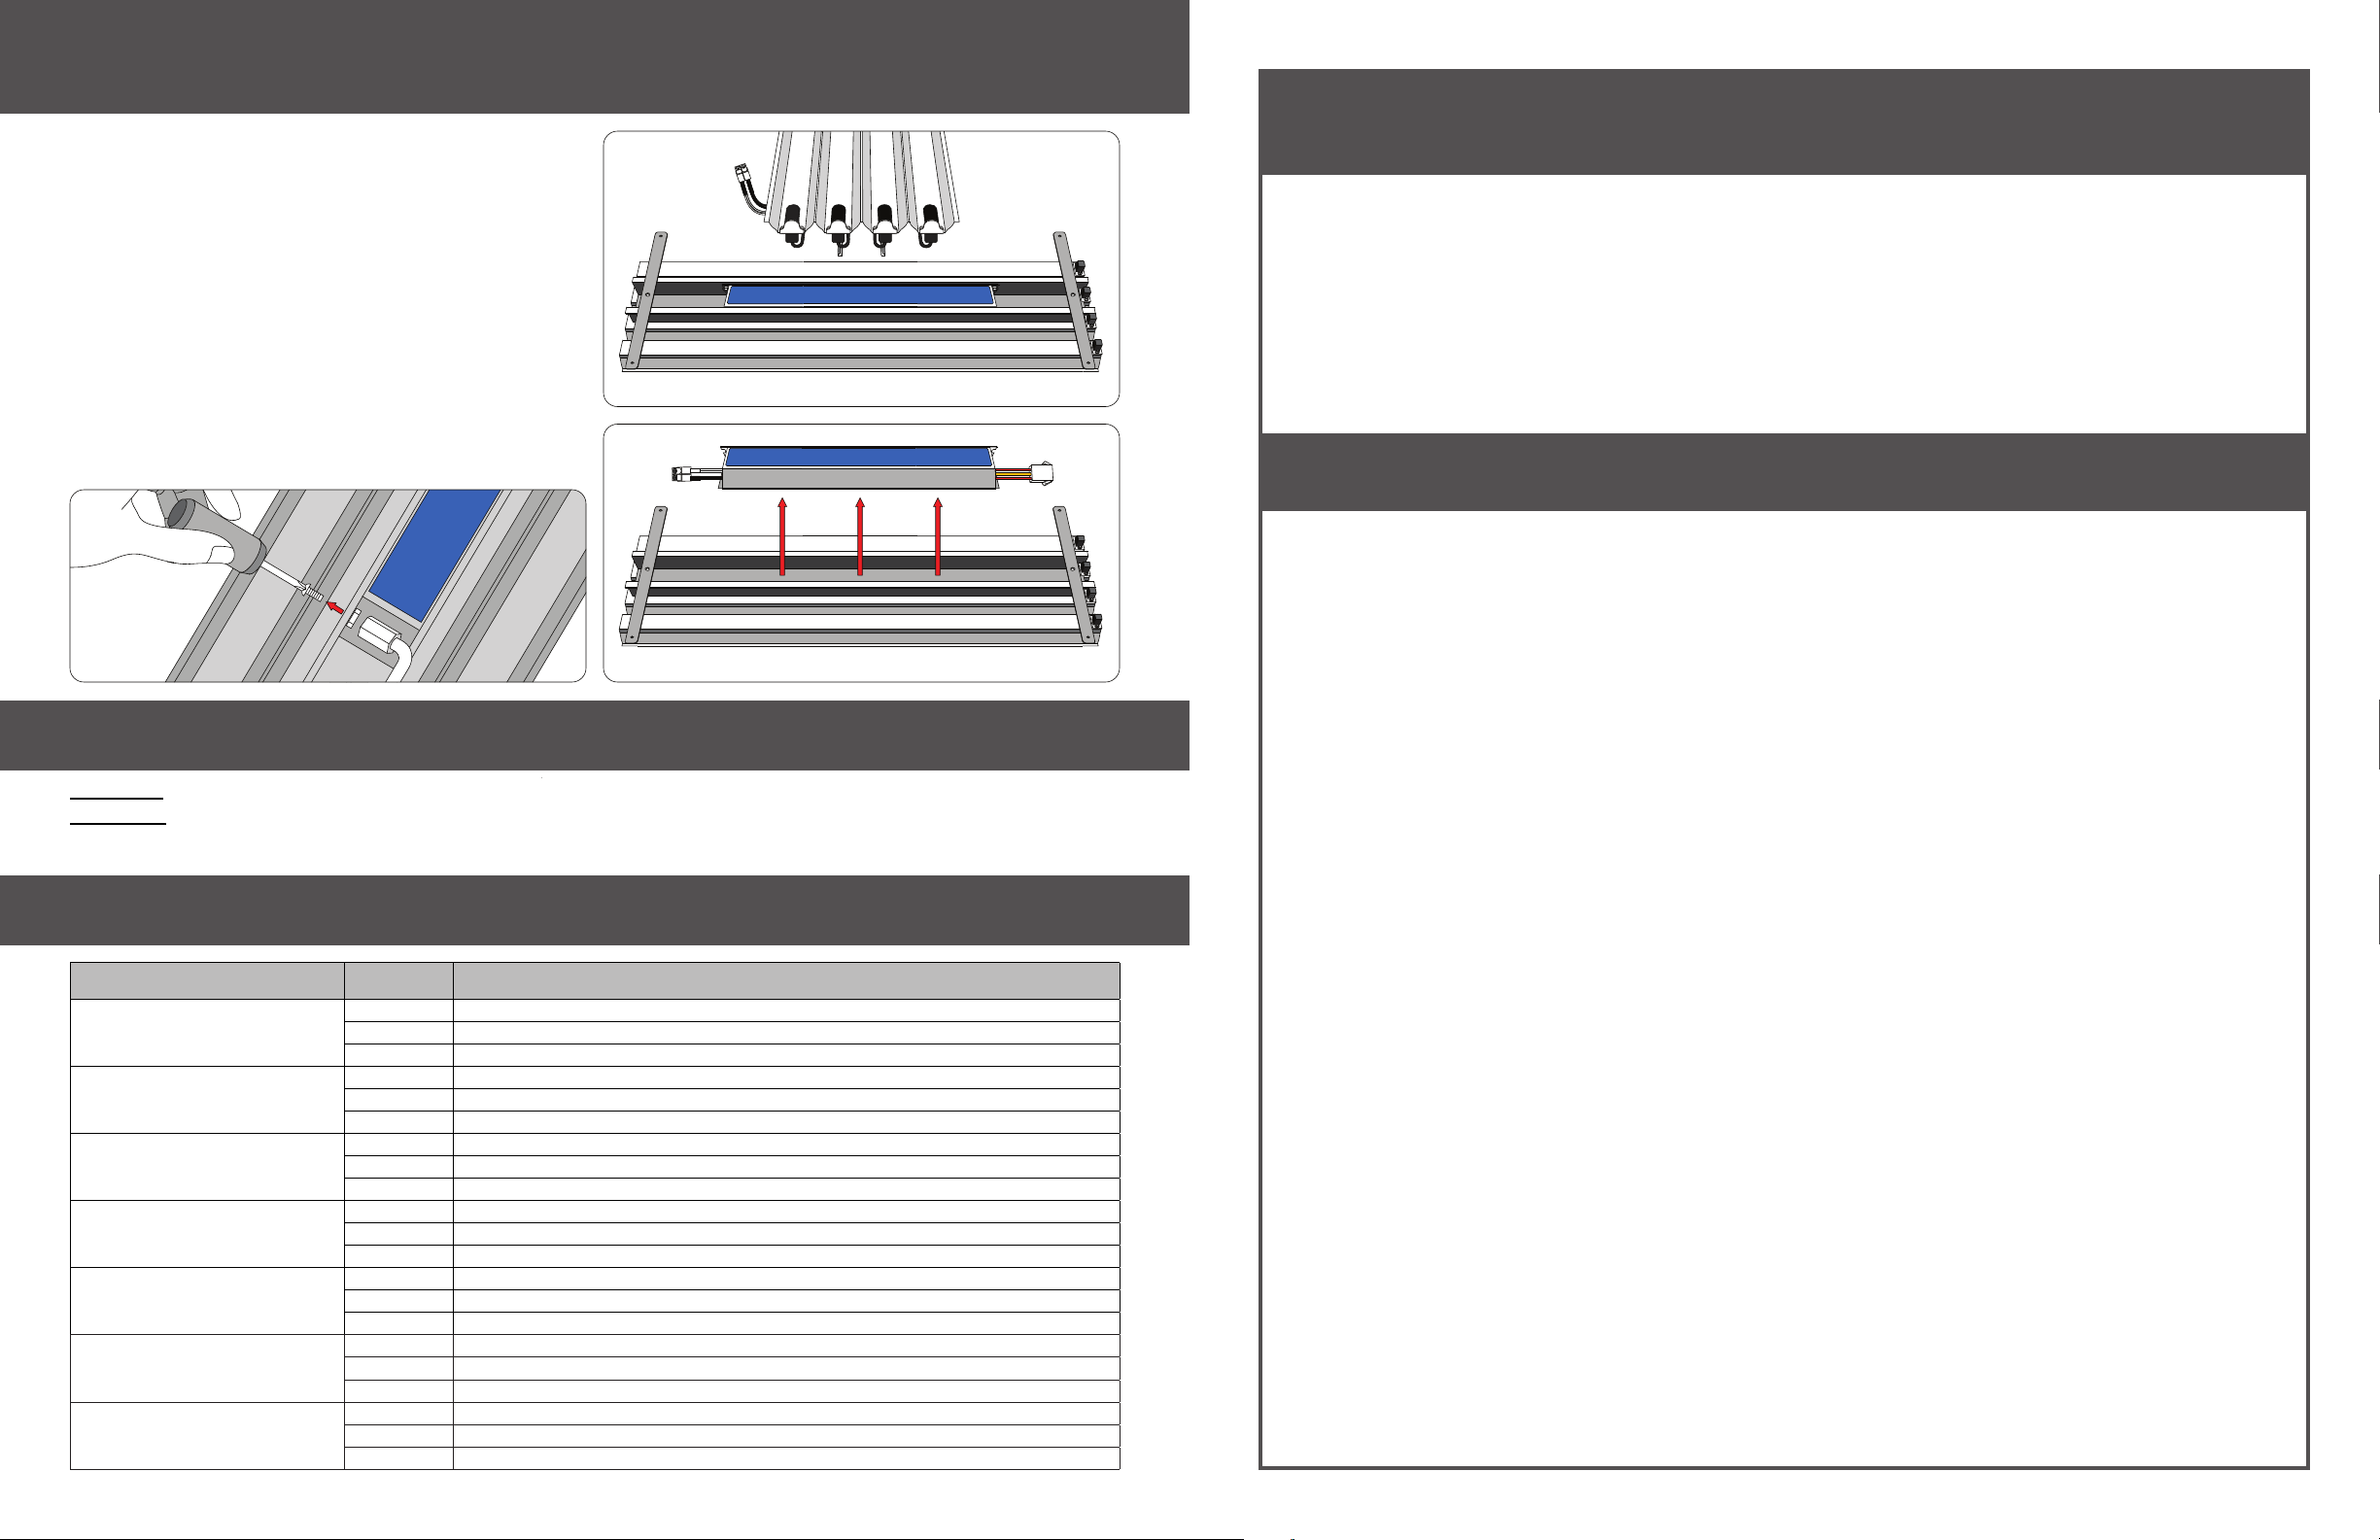
MAINTENANCE (CONTINUE)
BALLAST REPLACEMENT:
Tools required: Phillips screwdriver and 7mm hex driver
1. Unplug the unit from the receptacle.
2. Take out all lamp on the Retrot Kit to avoid
damaging the lamp and position the Retrot Kit so that the
ballast facing up. (A)
3. Disconnect the power supply.
4. Use 7mm hex driver to loosen both nuts and
remove the ballast. (B)
5. Replace new ballast and reinstall lamps (C)
6. Verify the ballast and lamps are properly installed and
are securely in place before reinstalling the Retrot Kit.
30 DAY PRODUCT GUARANTEE
• If within 30 days of purchase you experience any problems with this Wave Point® Technology
product, return it to the retailer where purchased for replacement. Product must be returned in its
original box, with all original parts and must be accompanied by the original receipt as proof of purchase.
• Products beyond the 30 days of purchase that experience problems should NOT be returned
to the retailer, supplier, or distributor.These Wave Point® products fall under the auspices of the
Wave Point® Technology 1 year limited direct manufacturer warranty. All such problems must be addressed
directly with Wave Point® by the warranty holder (see below).
1 YEAR DIRECT MANUFACTURER LIMITED WARRANTY
• Wave Point® Technology Inc. products are warranted to all registered warranty product owners to be free of
defect in materials and workmanship for one (1) year from date of purchase.
• URGENT: Fill out the warranty registration card included in this box to activate registration
in the Wave Point® limited warranty program. Warranty card must be completed and returned to Wave Point®
Technology within thirty (30) days of purchase (see Warranty Card in page 11 ).
• Under this program, Wave Point® Technology will, at its election, repair, replace or make appropriate
adjustment where inspection by the Wave Point® company discloses any such defects occurring in normal
usage within one (1) year after consumer purchase.
• Only properly registered Wave Point® products are eligible for this warranty service.
• After the 30 ( thirty ) day guarantee has expired, contact Wave Point® Technology directly for warranty
product repair. Do NOT return such Wave Point® products to the retailer, distributor or supplier for repair or
replacement.
• Wave Point® Technology is not responsible for any removal, installation or shipping costs incurred in the
warranty process.
• Lamps are not covered under the 1 Year limited warranty.
• Warranty is void if the failure of Wave Point® product or system or any part, sealant or component thereof
is found to be caused by misuse, tampering, negligence, abuse, misapplication, failure to properly maintain
the product, failure to keep dry (not to come in contact with water), salt build up, or use without Ground Fault
Circuit Interrupter.
• This warranty is non-transferable.
• This warranty is limited to possible parts replacement and labor connected therewith. Wave Point® Technology
is not liable for any incidental or consequential damages including but not limited to loss of life, personal
injury, property damage, damage to equipment, or lost wages, income, prots or savings.
Note: some US states do not allow liability limitations or exclusions on incidental or consequential
damages to the extent listed in the above disclaimer. Check your local state regulations for details on
regulations specic to your state.
NOTE: WAVE POINT® TECHNOLOGY’S WARRANTY POLICY IS SUBJECT TO CHANGE WITHOUT NOTICE.

PAGE 9
8.5in x 11in8.5in x 11in
OPTIONAL 3 YEAR PREMIUM EXTENDED WARRANTY
is available for purchase online at www.wave-point.com/extendedwarranty.html
• Wave Point® Technology product owners may purchase our 3 Year Premium Extended Warranty online on our
web site within 30 days of purchase prior to the expiration of the 30 Day Product Guarantee. This warranty
covers all major parts and labor for 3 years from date of purchase.
• Costs are based on the equipment being placed under extended warranty. The costs for all extended warranty
plans are available online on the web site.
• Lamps are not covered under 3 year extended warranty.
• For complete details and enrollment go to www.wave-point.com/extendedwarranty.html
NOTE: WAVE POINT® TECHNOLOGY’S WARRANTY POLICY IS SUBJECT TO CHANGE WITHOUT NOTICE.
RETURNING PRODUCTS FOR WARRANTY REPAIR
Contact Wave Point® Customer Support at www.wave-point.com/helpdesk.html for all trouble shooting, warranty
verication and return authorization numbers.
NOTE: Products returned without Return Authorization Numbers will be refused.
Procedures:
I HAVE A COPY OF MY ORIGINAL COMPLETED WARRANTY CARD:
Wave Point® product owners seeking warranty resolution should return their Wave Point® product directly to the
manufacturer along with:
1. Return Authorization Number clearly written on outside of box
2. Copy of warranty card with attached copy of original receipt as proof of purchase
3. Warranty holder’s address, phone number and email address if different than listed on warranty card
4. Written explanation of problem
I DO NOT HAVE A COPY OF MY ORIGINAL COMPLETED WARRANTY CARD:
In the event you do NOT have a copy of your original completed Warranty Card you may choose instead to
forward your full customer contact information and proof of purchase as listed below:
1. Return Authorization Number clearly written on outside of box
2. Copy of original receipt as proof of purchase
3. Warranty holder’s name, address, phone number and email address
4. The Wave Point® serial number as listed on the product being returned
5. Written explanation of the problem
SEND TO:
Warranty Repair Desk
300 South Lewis Rd. Unit J
Camarillo, CA 93012
In the event Wave Point® products are returned for warranty work and are found to be outside the parameters of
the warranty or otherwise caused by other than normal usage, the warranty holder will be contacted by phone
or email and offered the option of (a) repair and return at the owner’s expense, (b) return of the product to the
owner “as is” at the owner’s expense, or (c) disposal of the product.
Only prepaid freight returns will be accepted. All freight is the responsibility of the warranty holder.
NOTE: WAVE POINT® TECHNOLOGY’S WARRANTY POLICY IS SUBJECT TO CHANGE WITHOUT NOTICE.
RETURNING PRODUCTS FOR OUT-OF-WARRANTY REPAIR
Wave Point® owners experiencing problems with a Wave Point® product no longer under warranty may send
their Wave Point® product to Wave Point® Technology for repair.
For help with, or repair of, products no longer under warranty, contact Wave Point® Customer Support at
www.wave-point.com/helpdesk.html for trouble shooting tips and/or return authorization numbers. Products
returned without a return authorization number will be refused.
Procedures:
Wave Point® product owners seeking product repair should return their Wave Point® product directly to the
manufacturer along with:
1. Return Authorization Number clearly written on outside of box
2. Owner’s name, address, phone number and email address
3. The Wave Point® serial number as listed on the product being returned
4. Written explanation of problem
SEND TO:
Repair Desk
300 South Lewis Rd. Unit J
Camarillo, CA 93012
All repair and shipping costs are the responsibility of the owner. Depending on the problem and/or cost,
products are not always repairable. In such instances all shipping costs remain the responsibility of the owner.
If a Wave Point® product returned for repair is found to be either non-repairable or beyond a reasonable cost to
repair, the owner will be contacted by Wave Point® and offered the option of either disposal of the product or
return to the owner at the owner’s expense.

PAGE 10
8.5in x 11in8.5in x 11in
1 YEAR LIMITED WARANTEE OWNER REGISTRATION CARD
T5 4 Lamp Retrot Kit
• Wave Point® product owners MUST register their purchase with Wave Point® Technology Inc. for their warranty
benets to be in effect. Unregistered products are not eligible for warranty.
• This warranty card must be completed and submitted within 30 days of product purchase.
• Send this completed form along with a copy of the original retail receipt as proof of purchase to:
Wave Point® Technology *Email us at [email protected] for the updated address
Warranty Submissions Desk
300 South Lewis Rd. Unit J
Camarillo, CA 93012
OWNER INFORMATION
Date
Name:
Address:
City: State/Province: Postal Code:
Country
Email: Cell Phone:
Work Phone: Home PHone:
PRODUCT INFORMATION
Product Serial Number: Model No.
(NOTE: This is the digit number located on the PIN tag afxed to the unit)
Date of Purchase:
Seller (Retail Outlet):
Seller’s Location: Seller’s Phone Number:
*Afx a copy of your original purchase receipt here
IMPORTANT: Please make a copy of this warranty card and retain it for your records.
Wave Point® Technology
www.wave-point.com
©2010 Wave Point® Technology
Photo: ©Wave Point®
Made in China. All rights reserved
SPECIFICATIONS ARE SUBJECT TO CHANGE WITHOUT NOTICE

8.5in x 11in
Wave Point® Technology
www.wave-point.com
©2010 Wave Point® Technology
Photo: ©Wave Point®
Made in China. All rights reserved
SPECIFICATIONS ARE SUBJECT TO CHANGE WITHOUT NOTICE
This manual suits for next models
2
Table of contents
Other Wave Point Aquarium manuals
Popular Aquarium manuals by other brands

biOrb
biOrb LIFE 30 quick start guide

Pacific Sun
Pacific Sun CalcFeeder PRO user manual

Hozelock Cyprio
Hozelock Cyprio Cascade 450 Installation and operating instructions

Casa Del Vetro
Casa Del Vetro Acquario Milo 30 Cubik Ekoline Black instructions

Sera
Sera Precision FP 350 manual

GNC
GNC SilverMoon Universal Installation, operating and maintenance manual