Webasto Telestart T70 User manual
Ident-Nr. 9000825A 3/0008
Operating Instructions
Telestart T70
Thermo Top and Thermo Top T
Tele Thermo Top T
General Information
Maintenance and Safety Information
Dear Webasto Customer !
We assume that the workshop / service center that carried out the installion explained to
you the operation and principle of functioning of your new heater to your complete
satisfaction. With these operating instructions we would like to provide you with an
overview of the use of the Thermo Top, Thermo Top T and Tele Thermo Top T heaters as
well as the hand-held transmitter Telestart T70.
Within the scope of the StVZO (Road Traffic Licensing Act) "General Design Approvals"
laid down by the Federal Office for Motor Traffic exist for the water heaters.
The installation of the units must be carried out in accordance with the enclosed
installation instructions. The installation must be checked in accordance with the Legal
Provisions for Installation. For details refer to the installation instructions.
The year of the initial operation must be durably marked on the heater's nameplate by
removing the non-applicable years.
Thermo Top
n
n
n
at filling stations and tank farms.
in locations where flammable vapours or dust may
accumulate (e.g. in the vicinity of fuel-, coal-, sawdust or
grain depots).
in enclosed spaces (e.g. garages). This should also be
considered when pre-setting heater operating times or
using the Telestart remote control.
n
n
exposed to temperatures greater than 120°C (storage
temperature). Exposure to such temperatures may cause
damage to the electronic components.
operated without a minimum level of 20% of good quality
antifreeze in the water of the heating circuit.
The heater must be switched :off
Danger of explosions
and asphyxiation
The heater must benot
D
!
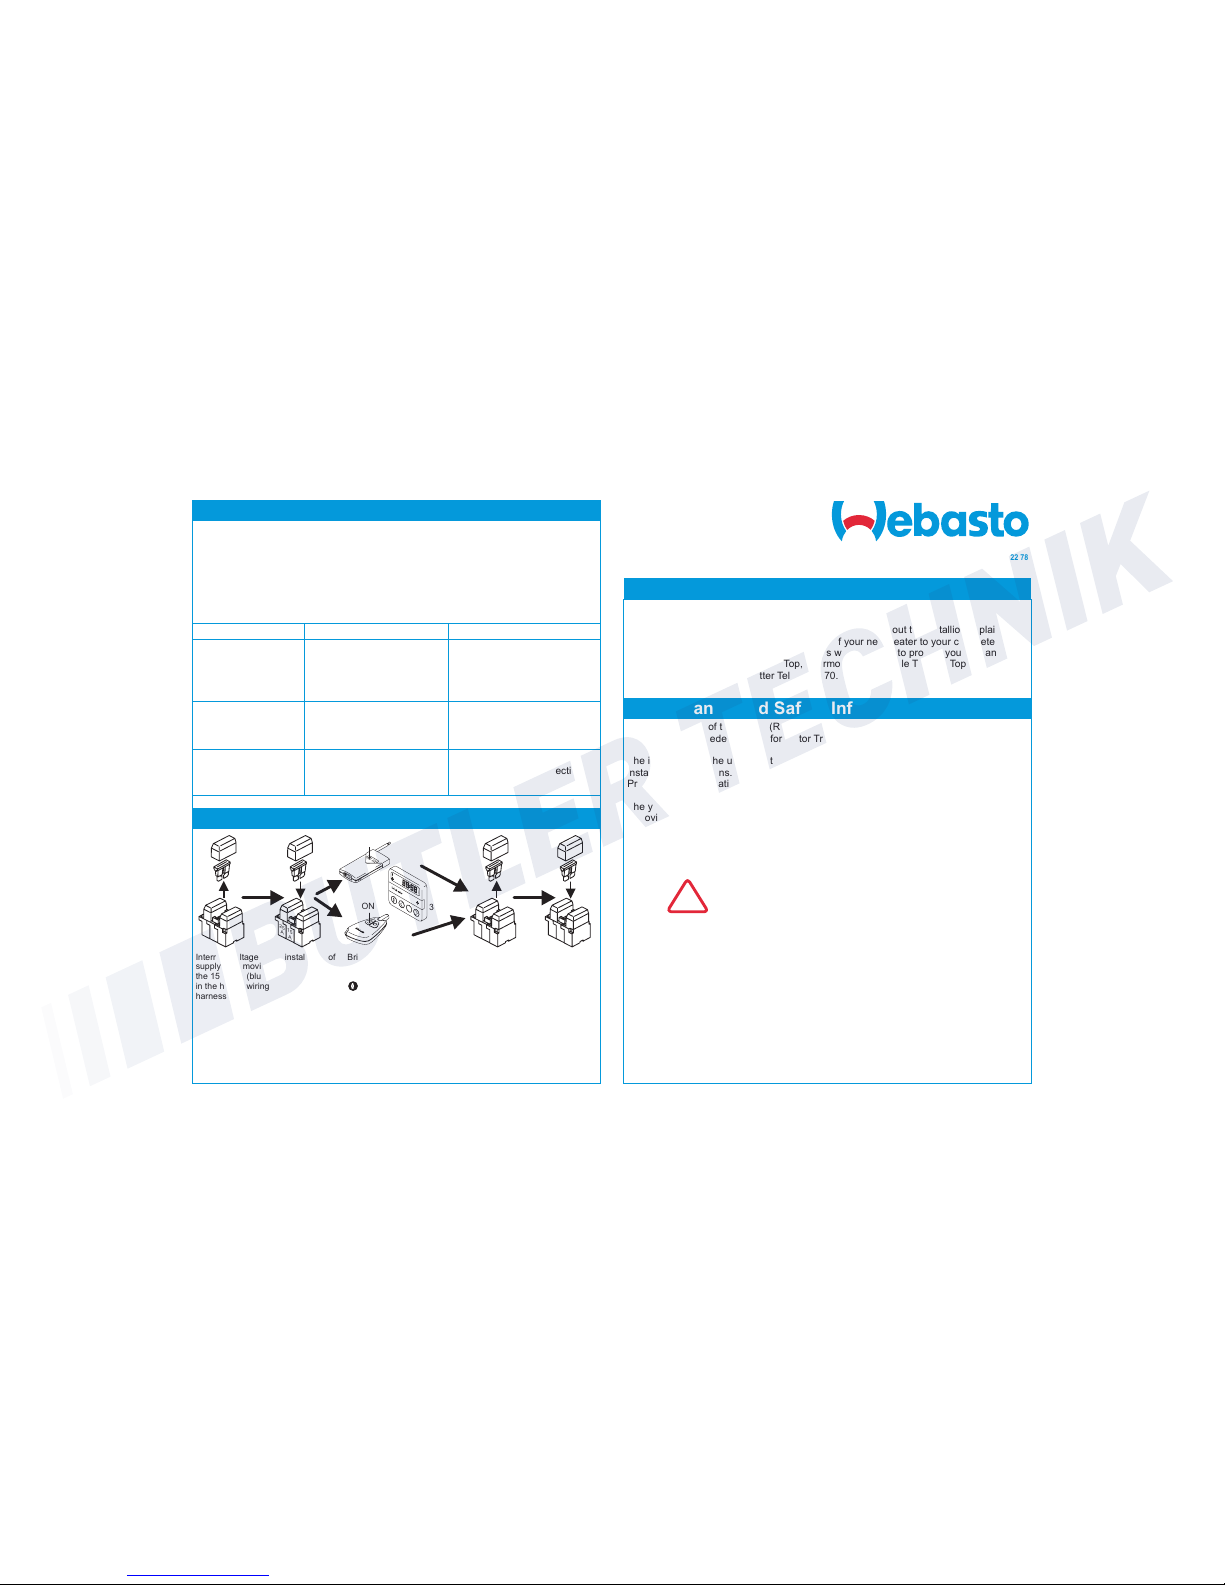
Troubleshooting
Fault lock-out deactivation
In the event of a malfunction, fuses and electrical connections should be checked for
condition and security.
In the event of a malfunction, the heater will shut down in its "fault lock-out" mode, no
visual indication will occur on the display of the timer.
Before consulting an authorised Webasto dealer, try to deactivate the fault lock-out
condition.
The following malfunctions can be eliminated by the owner:
B
Z
T
G108
T6
480D
FW
1
2
3
SET
15
A
1
A
25
A
15
A
1
A
25
A
15
A
1
A
25
A
15
A
1
A
25
A
Fault description Possible cause Remedy
Heater turns itself off
automatically
(= fault lock-out)
Combustion is neither esta-
blished during the start-up
sequence nor during the
repeated start-up; flame
extinguishes during operation
Heater fails to turn on No power is supplied
to heater
Check power supply to heater
as well as earthing terminals
Turn off heater and then back
on again (max. 2 times)
Heater turns off during
heating operation
(= fault lock-out
Heater overheats due to
lack of coolantl
Top up coolant in accordance
with manufacturer's directions
If this action does not correct the malfunction, consult your authorised Webasto dealer
Note:
The heater will start operating as soon as the fuse is replaced!
!
Interrupt voltage
supply by removing
the 15A fuse (blue)
in the heater wiring
harness
Interrupt voltage
supply by
removing the 15A
fuse (blue) in the
heater wiring
harness
Reinstallation of
fuse
Reinstallation of
fuse.
The heater will
be turned on.
Briefly press the ON
button on the left of the
transmitter, or press the
button on the digital
timer.
ON
ON
or
wait
ca.
3 sec.
wait
ca.
3 sec.
wait
ca.
3 sec.
Webasto Thermosysteme International GmbH
Postfach 80 - D-82132 Stockdorf - Hotline (01805) 93 22 78
Hotfax (0395) 55 92-353 - http://www.webasto.de

Operation
Depending on the type of heater control installed, the heater can be operated by a digital
timer or Telestart.
Prior to switching on the heater, the vehicle's heating system is to be turned to "warm".
In the case of 3-speed blower fans, the vehicle's blower fan is to be set to the lowest
speed, in the case of 4-speed blowers to the second speed. In the case of infinitely
variable fans adjust to at least 1/3 of the fan capacity.
NOTE:
We recommend that the heating time be set in accordance with the driving time.
heating time = driving time
Example: With a driving time of approx. 20 minutes (one way), we recommend
setting an operating time of 20 minutes.
!
n
n
n
be operated with the fuel specified on the namplate.
In the case of a severe build-up of smoke, unusual
combustion noises or fuel smell, the heater is to be put out
of operation by removing the fuse and may only be
restarted after it was inspected by Webasto-trained
personnel.
be operated at least once a month for 10 minutes, with the
vehicle engine cold and at the lowest fan setting. The
heater should be checked annually by a qualified expert,
preferably prior to the heating season commencing.
nWebasto will not assume any liability if the installation
instructions and the notes contained therein are not
observed. The same applies to improperly performed
repairs or those where others than genuine replacement
parts have been used. In those cases, the heater's General
Design Certification and thus the General Operating Permit
(homologation) will be invalidated as a consequence.
The heater :must
Liability claims:
G
Notes:
After an operating period of 30 minutes the fuel supply of the heater will be exhausted.
Allowing the vehicle engine to run for two minutes will replenish the fuel supply.
heaters are equipped with an additional thermostat control resulting in
a higher water outlet temperature during the heating-up phase.
Application: Vehicles with a cubic capacity of more than 1800 cm³.
Thermo Top T
!
If the heater is equipped with the summer/winter switch option, the switch is to be set in
accordance with the respective season. In the "winter" position, the heater will
deliver normal heating output and in the "summer" position only the vehicle's fan for
ventilation of the vehicle's interior will be put into operation.
Setting the Operating Time
Returning to the Default Setting
Checking the Batteries
Press the ON or OFF button. or
Batteries LED Action
okay after 1 sec.
lights up for
0.5 sec.
in red (heating) or in
green (ventilation)
low charge after 1 sec. flashes
in orange for 3 sec.
- Warm up batteries to above 0°C
- Replace batteries at the next
opportunity
discharged after 1 sec.
lights up for
5 sec. in orange
- Warm up batteries to above 0°C
- Replace batteries
Press the OFF button to call up the next operating time.
To store the setting:
- do not actuate any button for 10 seconds, or
- actuate the ON button.
Press the ON and OFF buttons simultaneously for approx. 10
seconds until the LED extinguishes.
Default setting: heating mode, 30 minutes.

OFF
ON
LED
Telestart T70
General
for Thermo Top
and Thermo Top T optional
with Tele Thermo Top
and Tele Thermo Top T
part of the delivery volume
NOTE:
A minimum distance of 2 m must be maintained between the Telestart
hand-held transmitter and the antenna in the vehicle in the following
cases:
- teaching the codes of the Telestart hand-held transmitter
- switching the heater on and off
- switching the vehicle fan on and off.
Or else, cover the antenna at the hand-held transmitter with your hand
during the transmitting operation.
!
min. 2 m
antenna
The wireless Webasto Telestart T70 enables Webasto heating units
- Thermo Top, Thermo Top T, Thermo Top Z/C and Thermo Top E -
or the vehicle fan to be switched on and off from a distance of up to 600 m.
To switch on the vehicle fan for ventilating the vehicle interior requires a mode change on
the transmitter to be carried out.
The receiver limits the operating time once the heater has been switched on by the
transmitter. The maximum range can be achieved in open country. In built-in areas the
range is likely to be reduced.
Programming Telestart Transmitters
Checking the Mode
Mode setting
Depress the ON and OFF buttons simultaneously twice within
one second.
The newly selected mode (heating or ventilation) will be set in
the receiver the next time a signal is transmitted.
Upon the second actuation, the LED will change its
colour and illuminate until the buttons are released.
Simultaneously depress and hold down the ON and OFF buttons.
LED illuminates:
in : heating mode
in : ventilating mode
LED extinguishes:
- when the buttons are released, or
- after 10 seconds
red
green
2x
1. Place batteries into the battery compartment of the transmitter.
2. Remove fuse 1A (black) from the heater's fuse holder (voltage interruption).
3. Wait at least 5 seconds.
4. Replace fuse in heater's fuse holder and within 5 seconds press the OFF button
on the transmitter for at least 1 second.
5. "Learning" is completed.
A second or third hand-held transmitter can be programmed in the same manner.
min. 1 sec.
OFF
1A 1A
25A
15A 1A
25A
15A 1A
min. 5 sec. max. 5 sec.
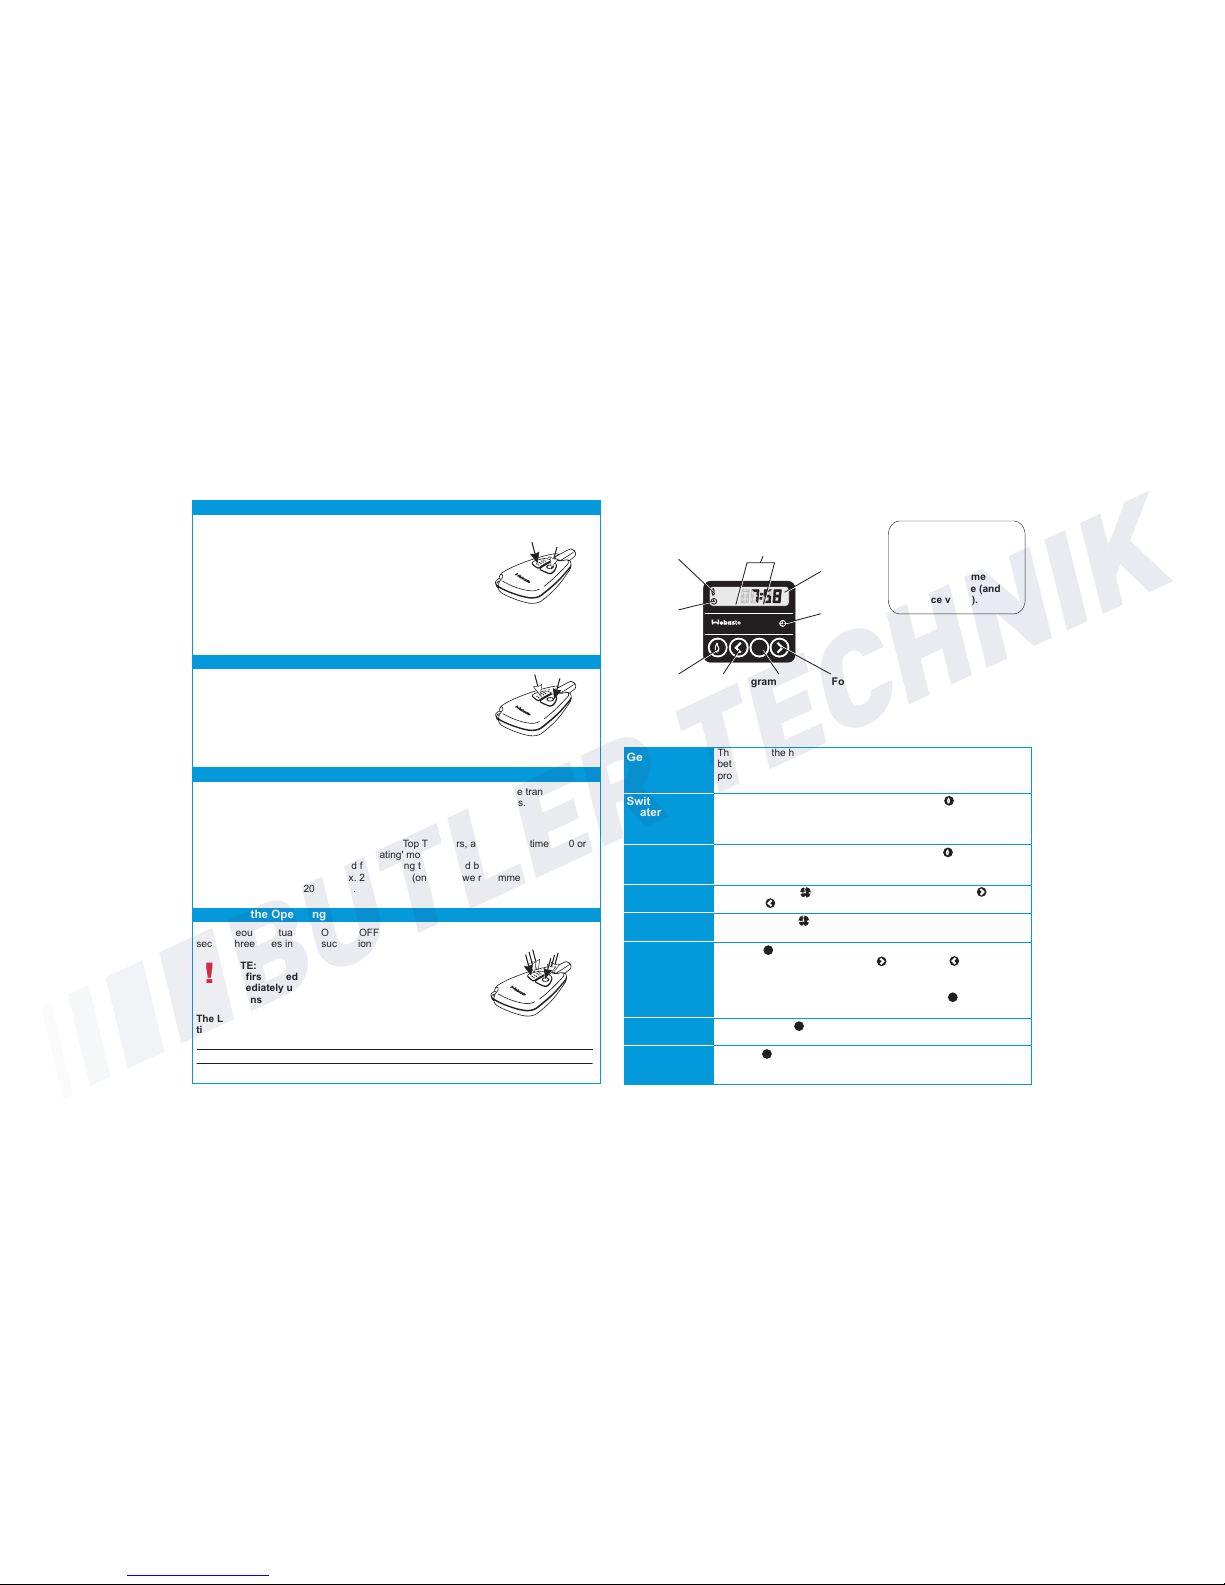
Digital Timer with 3 Time Settings
Instant heat Reverse Program selection Forward
Symbol for
setting/
viewing
the time
Program
number
display
Clock button
Heater operation
indicator
Display illumination
1
2
3
SET
Note:
Be sure to take
into account the
switching from
summer time to
winter time (and
vice versa).
!
General
Switching the
heater on
Setting the
time of the day
Viewing
the time
Programming
heater starting
time
Erasing pro-
grammed times
Selecting
preset starting
time
Switching the
heater off
SET
SET
SET
SET
The start of the heating operation can be precisely preset anywhere
between "1 minute" up to "24 hours". Three starts may be
programmed only one of which, however, can be activated.
Manually: by pressing the "instant heating" button
Automatically: by programming the heater starting time
The program number is shown on the display and the display is
illuminated.
Manually: by pressing the "instant heating" button
Automatically: after the programmed operating time has elapsed
The display field is no longer illuminated.
Press the "Clock" button and subsequently "Forward" or
"Reverse" .
Press the "Clock" button
Press the button
Within 10 sec. press the "Forward" or "Reverse" button until the
desired time for the start of the heating operation is shown on the
display.
If a different program number is required, press the button.
Briefly press the button.
Press the button within 10 sec. periods until the program number
associated with the desired preset time is displayed
Hold the hand-held transmitter with the antenna in upright
position and push the ON button for 1 to 2 seconds.
NOTE:
In the 'heating' mode, the vehicle's heating system is to
be set to "warm" prior to leaving the vehicle.
In the 'heating' and 'ventilation' modes, the vehicle's fan
switch is to be turned to position 1 in the case of 3-
speed blower fans, and to position 2 in the case of 4-
speed blowers. In the case of infinitely variable fans
adjust to at least 1/3 of the fan's capacity.
with hand-held transmitter:
with digital timer:
Hold the hand-held transmitter with the antenna in upright
position and press the OFF button for 1 to 2 seconds.
instant heat button to be pressed twice.
!
Switch on heater or ventilation
Switch off heater or ventilation
Checking and Setting the Operating Time
Checking the Operating Time
NOTE:
In the case of Thermo Top and Thermo Top T heaters, an operating time of 20 or
30 minutes has to be set in the 'heating' mode.
Example: The vehicle is used for travelling to work and back.
With a driving time of approx. 20 minutes (one way), we recommend setting an
operating time of 20 minutes.
The operating time of the heater or the vehicle's fan can be preset on the transmitter in
increments of 10 minutes. The operating time is factory-set at 30 minutes.
NOTE:
The first coded flashing signal that is emitted
immediately upon the third actuation of both
buttons has to be included into the count.
The LED flashes in accordance with the preset operating
time.
Simultaneously actuate the ON and OFF buttons within one
second three times in rapid succession.
No. of coded flashing signals
Operating time
1
10 min.
4
40 min.
2
20 min.
5
50 min.
3
30 min.
6
60 min.
3x
!
!
Other manuals for Telestart T70
4
This manual suits for next models
3
Table of contents
Popular Car Alarm manuals by other brands

DEI
DEI 800ESP owner's guide

Bulldog Security
Bulldog Security 2002 Installation and owner's guide

Directed Electronics
Directed Electronics Python 880XP installation guide

Directed Electronics
Directed Electronics Python 990 owner's guide

Directed Electronics
Directed Electronics Intelliguard 950 owner's guide

Code Alarm
Code Alarm CA 510 owner's manual


