Wecan SKY FURY SG-F88 User manual

SKY FURY
14 +
AGES
SG-F88
MANUAL
Contents
1
2
3
4
5
6
7
8
9
10
11
12
FOREWORD
PRECAUTIONS
STANDARD ACCESSORIES
PARTS OF AIRCRAFT
PARTS OF CONTROLLER
CONTROLLER BATTERY INSTALLATION
BATTERY AND CHARGING AIRCRAFT
BATTERY A
BINDING OF RADIO TRANSMITTER AND RECEIVER
FLIGHT ADJUSTMENT AND SETTING
RULE OUT TROUBLEDURING FLIGHT
PARTS LIST
1. FOREWARD
2. PRECAUTIONS
IMPORTANT NOTES
Please read manual before flight.
The product is a sophisticated hobby product but not a toy. Although small, it still poses certain risk factors that
should not be over looked. Please follow safety and operation recommendations to ensure correct operation of this
drone. The use of this drone beyond it’s intended purchases and disassembly may cause unforeseen danger and
should be avoided.
The manufacturer and dealer assume no liability for accidental damages by abnormal wear of parts improper
assembly, or operation in unsafe manners. This product is intended for use by age 14 years or older. Please
ensure the product is operated under a safe environment.
We recommend that you seek the assistance of an experienced pilot before attempting to fly our products for the
first time. A local expert is the best way to properly assemble, setup, and fly your model for the first time. This
drone requires a certain degree of skill to operate, and is an item subject to normal wear and tear. Any damage or
dissatisfaction as a result of accidents or modifications are not covered by warranty and cannot be returned for
repair or replacement.
Fly only in safe areas away from other people. Do not operate stunt aircraft within the vicinity of crowds. Stunt
aircrafts are prone to accidents, failures, and the operator is responsible for any and all damage occurred by this
aircraft.
CAUTION
1

3. STAANDAR ACCESSORIES
4. PRATS OF AIRCRAFT
INDOOR AND OUTDOOR USE
PREVENT MOISTURE
While this aircraft is specially designed for indoor and outdoor use, operator MUST keep
away from obstacles of any kind at all time.
This aircraft is comprised of a number if sophisticated electronic components; user must
absolutely prevent aircraft from coming into contact with water/moisture of any kind.
CAUTION
CAUTION
PROPER OPERATION
To insure safety and proper function the user must not remove or modify the aircraft in any
form. Should a repair be needed the user should only utilize the original spare parts that
came with the aircraft at time of purchase.
CAUTION
SAFETY NOT FOR NI-MH BATTERIES
Make sure the batteries are installed based on polarity indicated in the case and do not
mix batteries of different chemistry/spec. Please take out the batteries if you are not going
to use for a long time to avoid potential leakage which may damage the transmitter.
Please dispose depleted batteries according to local laws and ordinances. Do not dispose
improperly.
CAUTION
SAFETY NOTE ON LI-PO BATTERIES
Polymer batteries poses higher operational risks compared to other battery chemistry,
thus it is imperative to follow its usage instructions. Manufacturer and dealer assume no
liability for accidental damages caused by improper usage.
CAUTION
KEEP AWAY FROM HEAT
R/C models are made of various forms or plastic. Plastics are very susceptible to damage
or deformation due to extreme heat and cold climate. Make sure not to store the model
near any source of heat such as an oven, or heater. It is best to store the model indoors,
in a climate-controlled, room temperature environment.
CAUTION
Shell
Styrofoam Shell
Blade A
Blade B
Receiver
board
Carbon fiber
Motor block
Blade D
Blade C
Holder

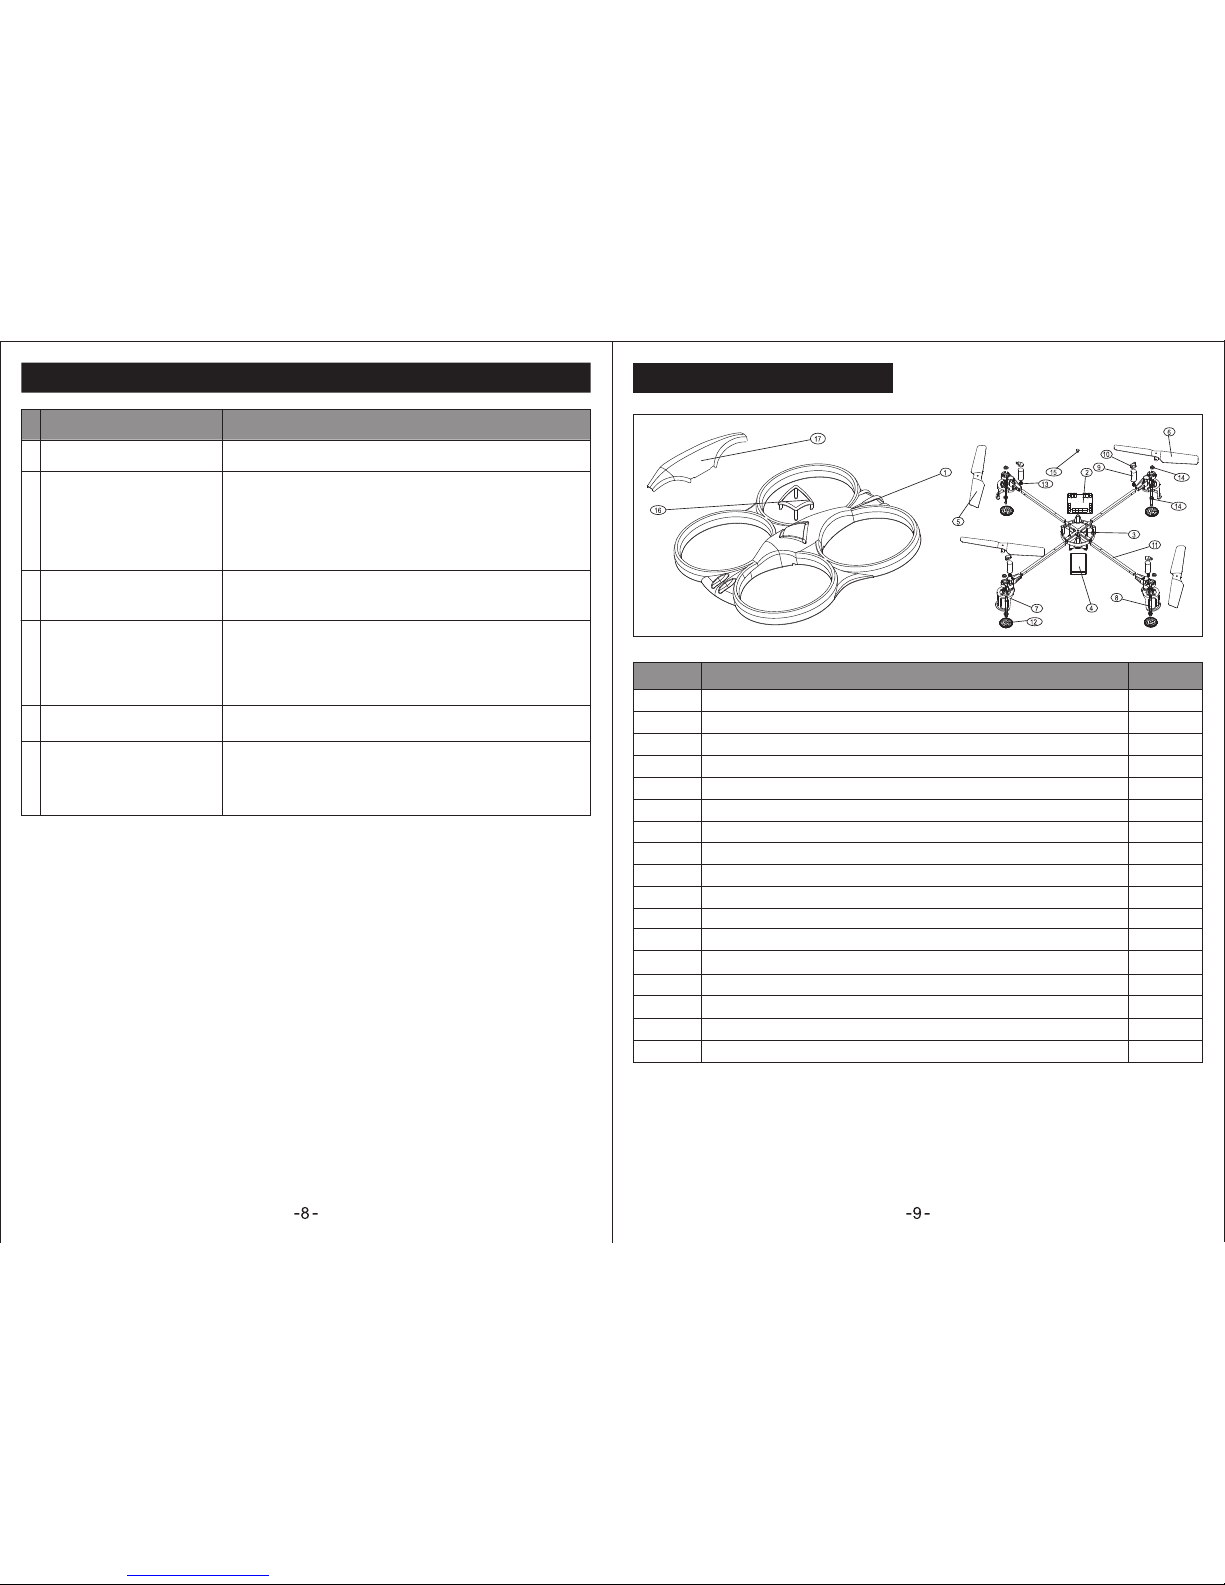
5. PARTS OF CONTROLLER 7. BATTERY AND CHARGING AIRCRAFT
8. BATTERY A
6. CONTROLLER BATTRY INSTALLATION
Charge the aircraft with the charger that is included with the unit. Unplug battery to aircraft cord, and plug battery to
USB cord into computer. Full charge in roughly 60-70minutes.
For safety concerns, battery charging must be done under supervision at all times.
A.The aircraft battery is shipped from the manufacturer with a protective insulator; remove the
insulator before use.
B.The aircraft battery is not replaceable.
Do not disassemble
Throttle Trim
Single Eversion
Speed slow
30%/Quick 60%/Fast 100%
Pitch forward/reverse Trim
Directional control trick
forward/reverse left/right
Throttle left/right
Rotation Trim
Left/right Rotation Trim Left/Right roll trim
Power switch
Step 1 Step 2
Open battery cover Use 6 AA sized batteries, install based
on polarity indicated. Do not mix
batteries of different chemistry/spec.
CAUTION RISK OF EXPLOSION IF BATTERY
IS REPLACED BY AN INCORRECT TYPE.
DISPOSE OF USED BATTERIES ACCORDING
TO THE LAW.
Battery lid
Not included.
WARNING
USB
Polymer Battery
3.7v 650mAh
①
②
WARNING
CAUTION
Red light
Battery type
Do not mix old and new batteries.
Do not mix alkaline, standard (carbon zinc)
or rechargeable (nickel cadmium) batteries.
Ne pas mélanger les piles usées avec des neuves.
Ne pas mélanger les piles alcalines, les piles standard
(au carbone-zinc) ni les piles rechargeables
(au nickel-cadmium).
Battery specification Usage duration Chagr time
Polymer battery 3.7V 650mAh Aircraft flight time 6-8mins 60-70mins
Carbon-Zinc
(Non Rechargeable)
1.5V
(GP 15G R6P)
Thansmitter operation time 18 hours Non rechargeable
Red light out Input Charging Current Full Voltage
110-240V 600mAn 4.25±0.3VChargingUnit charged
Charger SpecificationsLED Indicator LED

9. BINDING OF RADIO TRANSMITTER AND RECEIVER 10. FLIGHT ADJUSTMENT AND SETTING
Place the aircraft in a flat position. Connect the
batteries per the attached diagram; connect the
red light will illuminate.
Turn the remote controller on and set the throttle
stick to the lowest power position on the remote
controller.
At end of use, unplug the power cord.
Turn off the remote controller.
Polymer Battery
3.7V 650mAh
Step 1
Step 2
Step 3
Step 4
Set throttle stick
to lowest point
ON/OFF
ON/OFF
PLEASE PRACTICE SIMULATION FLIGHT BEFORE ACTUAL FLIGHT
Mode
Aileron Throttle
Move left
Move right Descent
Turn left
Turn right
Ascent
Elevator Rudder
Illustration Mode Illustration
Fly forward Fly backward

11. RULE OUT TROUBLE DURING FLIGHT 12. PARTS LIST
1
2
3
4
5
6
Situation
The receiver light keeps flashing Unable to bind to transmitter Repeat the power on initializing process.
The aircraft has no reaction
Motor does not respond to throttle stick,
receiver LED flashes.
The aircraft battery is not fully charged. Fully charge the battery, or replace
with a fully charged battery.
Main rotor spins but unable to takeoff.
Strong vibration of slight vehicle 1.Deformed main blades. 1. Replace main blades
Tail still off trim after tab adjustment,
or inconsistent speed during left/right
pirouette.
1. Danaged tail rotors 1.Replace main blades
2.Danaged tail drive motor 2. Replace the main motor
3.Aircraft detects unit is not in a
horizontal position. 3. Place in a flat position and reboot.
Cause Solue
1.Lost poer to transmiter and receiver 1.Turn on transmulter and ensure flight
vehicle battery is inserted properly.
2.Check transmitter and receiver voltage. 2. Use fully charged batteries.
3. Poor contact on battery terminals. 3.Reset the battery and ensure good
contact between battery contacts.
1.Deformed main bladed. 1.Replace main blades.
2.Flight vehicle battery depleted. 2. Charge or replace with fully
charged battery.
3. Aircraft detects unit is not in a
horizontal position. 3. Place in a flat position and reboot. No
1Styrofoam Shell
Receiver board
Frame
Battery
Blade A
Blade B
Motor Blok
Tube
Motor
Motor cover
Carbon fiber
Motor pinion gear
Copper Gear
Copper set
LED Light
Holder
Shell
2
3
4
5
6
7
8
9
10
11
12
13
14
15
16
17
1
1
1
1
2
2
4
4
4
4
4
4
4
8
1
1
1
Name Quantity

FCC Caution:
Any Changes or modifications not expressly approved by the party responsible for
compliance could void the user's authority to operate the equipment.
This device complies with part 15 of the FCC Rules. Operation is subject to the following two
conditions: (1) This device may not cause harmful interference, and (2) this device must
accept any interference received, including interference that may cause undesired operation.
Table of contents