weha LS-001 Service manual

OPERATING INSTRUCTIONS
AND PARTS MANUAL
Thanks for your purchasing our airhopper gun
and please read this Instruction Manual carefully
and thoroughly before operating the tool to do your best jobs.
AIR SPLITTER
(Model: LS-001)

TABLE OF CONTENTS
2
Safety Information ............................................................................................... 3
Package Contents ............................................................................................... 5
Preparation .......................................................................................................... 5
Assembly Instructions .......................................................................................... 6
Operating Instructions ........................................................................................ 7
Care and Maintenance ....................................................................................... 9
Troubleshooting .................................................................................................. 10
Warranty ............................................................................................................. 10
Replacement Parts List ...................................................................................... 11

3
SAFETY INFORMATION
Please read and understand this entire manual before attempting to operate
the product.
Improper operation or maintenance of this product could result in serious injury
and property damage. Read and understand all warnings and operation
instructions before using this equipment. When using this equipment, basic safety
precautions should always be followed to reduce the risk of personal injury.
WARNING
Some dust created by power sanding, sawing, grinding, drilling and other related
activities contains chemicals to cause cancer, birth defects or other reproductive
harm. Some examples of these chemicals are:
Lead from lead-based paints
Crystalline silica from bricks, cement and other masonry products
Arsenic and chromium from chemically-treated lumber
Users of these tools should review the chemical composition of the work surface
and any products in conjunction with the operation of these tools for any such
chemicals prior to engaging in any activity that creates dust and/or microscopic
particles.
Users should obtain the material safety data sheets from all identified chemicals,
either from the manufacturer or their employer, and proceed to study, understand,
and follow all instructions and warnings for exposure to such chemicals. Your risk
from these exposures varies depending on how often you do this type of work.
To reduce your exposure to these chemicals, work in a well-ventilated area and
work with approved safety equipment, such as dust masks that are specially
designed to filter out microscopic particles.
WARNING
For your own safety, read the air compressor instruction manual before using any
accessory. Failure to follow these warnings may result in personal injury and
serious damage to the air compressor and the accessory. When servicing this
equipment, use only identical replacement parts.
WARNING
This product contains one or more chemicals to cause cancer and birth defects or
other reproductive harm. Wash hands after handling.
WARNING

PRODUCT SPECIFICATIONS
WARNING
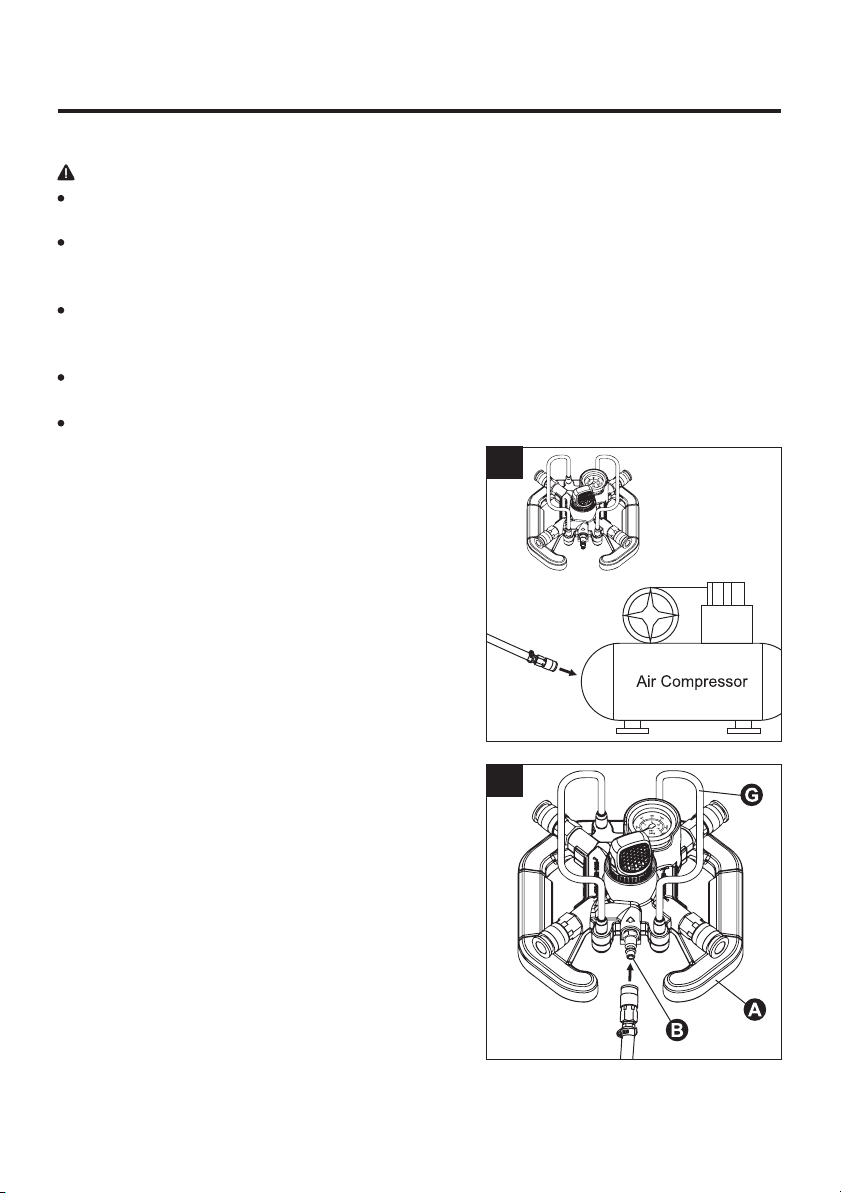
THE AIR SPLITTER IS DESIGNED TO BE USED WITH MANY DIFFERENT TYPES
OF AIR TOOLS. ALWAYS REFER TO THE USER MANUAL OF THE TOOL BEING
USED TO ENSURE THE PROPER PSI RATING IS NEVER EXCEEDED. NEVER
EXCEED THE MAXIUM PSI RATING FOR THE TOOL WHICH IS BEING USED.
Be aware of the air splitter tipping over while in use. If the air splitter would tip over, it
will continue to operate. If the unit does tip over for safety, please return the unit to its
designed work position having the air splitter in an upright position and having the
weight of the item supported by the bottom housing.
Avoid working alone. If an accident happens, an assistant can bring help.
Keep work area clean. Never operate the product near flammable substances like
gasoline, naphtha, cleaning solvents, etc. Work in a clean, well-ventilated area free
of combustible materials. Cluttered areas invite injuries.
Observe work area conditions. Don't expose to rain. Keep work area well lit.
Keep children away. Children must never be allowed in the work area. Do not let
them handle equipment, tools, or air hoses.
Dress properly. Do not wear loose clothing or jewelry as they can be caught in
moving parts. Protective, electrically nonconductive clothes and nonskid footwear
are recommended when working. Wear restrictive hair covering to contain long hair.
Protect your eyes. Wear safety glasses or a face shield when using this product.
Protect your hearing – Noise can harm your hearing. Always wear ear protection
to safeguard your hearing.
Use the right tool for the job. Do not modify this product and do not use this
product for a purpose for which it was not intended.
Stay alert. Watch what you are doing. Use common sense. Do not operate any tool
when you are tired.
Check for damaged parts. Before each use, check all parts and determine that the
product will operate properly and perform its intended function. Check for alignment
of air hoses and binding of any moving parts at work site. Any part that is damaged
should be properly repaired or replaced by a qualified technician.
Do not operate tool if under the influence of alcohol or drugs. Your judgment
or reflexes will be impaired if you are under the influence of alcohol or drugs. If
there is any doubt, do not operate the tool.
4
SPECIFICATIONS
3/8 IN.
1/4 IN.
125 PSI MAX.
OO
-10 F - 160 F
200 PSI MAX.
+/- 5 PSI
COMPONENT
AIR INLET
AIR OUTLET
OPERATING PRESSURE
OPERATING TEMPERATURE
INLET AIR PRESSURE
GAUGE ACCURACY

5
This product is designed to be used with air compressors having a regulated air
supply that CANNOT exceed 200 PSI. This product IS NOT designed to be used with
air compressors without an adjustable regulated output or are capable of exceeding
outlet pressures greater than 200 PSI.
Before operating this equipment, make sure that all parts are present. Compare parts
with package contents list. If any part is missing or damaged, do not attempt to
operate this equipment.
Estimated Assembly Time: 5 - 10 minutes
PACKAGE CONTENTS
PREPARATION
DESCRIPTION
Air Splitter
3/8 in. Air Inlet
1/4 in. Air Outlet (Regulated)
1/4 in. Air Outlet (Unregulated)
Pressure Gauge
Regulating Knob
Handle
QUANTITY
1
1
2
2
1
1
2
PAR T
A
B
C
D
E
F
G
A
B
C
E
D
FG
The warnings, cautions, and instructions discussed in this instruction manual cannot
cover all possible conditions and situations that may occur. It must be understood by
the operator that common sense and caution are factors which cannot be built into
this product, but must be supplied by the operator.
WARNING
Use proper size and type of air connection hose. Any air connection hose must
be of the proper size and type to supply the correct current to the tool.
Always use clean and dry compressed air. Compressed air which is not filtered
clean and dry will result in possible air passage block and/or parts rust.

ASSEMBLYINSTRUCTIONS
6
Risk of bursting: Can cause serious injury or death. Maximum 200 PSI inlet air
pressure. Never operate tools or accessories above marked maximum pressure.
Risk of unsafe operation: Reduce air pressure to 60 PSI maximum in air
compressor tank before removing or connecting this air splitter to air compressor or
connecting accessory hoses to unregulated 1/4 in. air outlets (D).
Risk of unsafe operation: Reduce air pressure by adjusting the regulating
knob (F) to 60 PSI maximum before removing or connecting air hoses to the
regulated air outlets (C). Regulator was factory set at 20 - 40 PSI.
Risk of unsafe operation: Firmly grasp hose in hand when installing or
disconnecting to prevent hose whip.
Risk of unsafe operation: Do not use damaged or worn accessories.
1. Reduce air pressure in air compressor tank to
60 PSI maximum.
Attach one end of air connection hose (not
included) with 3/8 in. quick-connect coupler
(not included) to air compressor air outlet.
WARNING
NOTE: This air splitter allows remote air regulation closer to the work area.
1
2
2. Attach other end of air connection hose with
3/8 in. quick-connect coupler (not included) to
air inlet (B).
NOTE: The air splitter (A) can be brought closer
to the work site and placed on flat surface.
NOTE: The air splitter (A) can also be temporarily
mounted with handles (G). Whatever way is used
to mount the air splitter (A) to a stable place,
make sure that the air splitter is secure and safe.

1
7
ASSEMBLYINSTRUCTIONS
3. Attach air hoses and accessories (not included)
to air outlets (C or D).
NOTE: Air outlets (C and D) are 1/4 in. universal
quick-connect couplers which accept the three
most popular styles of quick-connect-plugs:
Industrial, automotive, and ARO. One hand push-
to-connect operation makes connections simple
and easy.
NOTE: The available air pressure at the regulated
air outlets (C) is adjusted/controlled by regulating
knob (F) of air splitter (A). The available air
pressure at the unregulated air outlets (D) is
adjusted/controlled by air compressor regulator.
Inlet air pressure MUST NOT exceed 200 PSI.
OPERATING INSTRUCTIONS
1. Attach your air tool to air hose connected with
air outlets (C or D).
WARNING: Before attaching air tool to air hose
connected with air outlets (C or D), reduce air
pressure to 60 PSI maximum in air compressor
tank.
Adjust regulator at air compressor to desired
setting of air pressure. See air compressor
instruction manual.
3

OPERATING INSTRUCTIONS
2. When you attach air tool to air hose connected
with regulated air outlets (C), make sure that
air pressure can be read on pressure gauge
(E) by adjusting the regulating knob (F) of air
splitter (A). Turn the regulating knob (F)
clockwise to increase pressure and
counterclockwise to decrease pressure.
NOTE: Before turning the regulating knob (F),
you must first pull the knob upward and then turn
clockwise or counterclockwise. Finally you have
to lock the regulating knob (F) into position by
pushing the knob down.
NOTE: The correct working pressure of air tool
can be obtained in air tool manual.
3. When you attach air tool to air hose connected with unregulated air outlets (D),
make sure that the working pressure for air tool is adjusted/controlled by air
compressor regulator.
WARNING: Never exceed 200 PSI at air inlet (B) when you use unregulated air
outlets (D) for air tool operation.
NOTE: The correct working pressure of air tool can be obtained in air tool manual.
NOTE: When using this air splitter, it is important to be sure that your compressor is
sized to handle the increased load created by connecting multiple tools to air splitter
simultaneously. Please be aware of the following:
2
8
Use with Pneumatic Nailers:
Do not exceed the maximum recommended pressure (PSI) for your pneumatic nailer.
Air hoses may cause up to 15 PSI drop in pressure, so you may need to set the
compressor and/or regulator to a higher output to maintain the required pressure
at the tool.
The airflow (CFM) required to power multiple nailers simultaneously is dependent
on the number of nailers and the rate at which they are being used. For example,
a smaller portable compressor rated at 3 - 4 CFM may be able to sufficiently operate
up to three nailers that are only being used occasionally. However, a much larger
compressor with a CFM rating of 14 or higher may be required to simultaneously
operate four nailers being used steadily at rapid production rates.
Consult the owner's manuals included with your pneumatic nailers for specific
details on airflow and air pressure requirements.

OPERATING INSTRUCTIONS
CARE AND MAINTENANCE
1. Always operate the product with care by following all the warnings and instructions
in this manual.
2. Always place the product on a flat surface or have it fixed safe and secure to a
stable place for operation.
3. Always disconnect air connection hose and air supply when the product is
not in use.
4. Inspect the product periodically and, if damaged, have it repaired by an authorized
technician. When servicing, use only identical replacement parts. Use of any other
parts will void the warranty. Only use accessories intended for use with this
product. For your safety, maintenance should be performed regularly by a qualified
technician.
5. When you are not using the product for a long time, disconnect it from air hoses,
wipe it clean with a dry cloth and store it in a dry and safe place out of reach
of children.
9
Use with Other Pneumatic Tools:
Other pneumatic tools such as impact wrenches, grinders, sanders and spray guns
typically have much higher airflow requirements than pneumatic nailers due to their
longer operating cycles and run times.
Air hoses may cause up to 15 PSI drop in pressure, so you may need to set the
compressor and/or regulator to a higher output to maintain the required pressure at
the tool.
The airflow (CFM) required to power multiple pneumatic tools simultaneously is
dependent on the number of tools connected and the rate at which they are being
used. For example, a compressor rated at 8 - 12 CFM may be able to sufficiently
operate two pneumatic tools that are only being used occasionally. However, a much
larger compressor with a CFM rating of 20 or higher may be required to
simultaneously operate two or more pneumatic tools being used frequently or
continuously.
Consult the owner's manuals included with your pneumatic tools for specific details
on airflow and air pressure requirements.

WARRANTY
1. Replace seal gasket.
2. Check air inlet and air
outlets for any damage
and/or any block. Replace
if damaged.
3. Use proper size and type of
air connection hoses for
tool operation.
Air splitter will not
supply enough
compressed air for
tools.
1. Seal gasket between top
manifold and bottom housing
is out of life, which results in
air leakage.
2. Air inlet or air outlets are
possibly damaged and/or
partially blocked.
3. Air connection hoses are not
of the proper size and type.
PROBLEM
TROUBLESHOOTING
CORRECTIVE ACTION
POSSIBLE CAUSE
This tool is warranted by the manufacturer to the original purchaser from the original
purchase date for one (1) year subject to the warranty coverage described herein.
This tool is warranted to the original user to be free from defect in material and
workmanship. If you believe that a tool is defective, return the tool, with proper proof
of purchase to the point of purchase. If it is determined that the tool is defective and
covered by this warranty, the distributor will replace the tool or refund the
purchase price.
This warranty is void if: defects in materials or workmanship or damages result from
repairs or alterations which have been made or attempted by others or the
unauthorized use of nonconforming parts; the damage is due to normal wear,
damage is due to abuse (including overloading of the tool beyond capacity),
improper maintenance, neglect or accident; or the damage is due to the use of the
tool after partial failure or use with improper accessories or unauthorized repair or
alteration.
This warranty gives you specific legal rights, and you may also have other rights that
vary from state to state.
10
1. Replace pressure gauge.
2. Replace regulating knob.
3. Replace seal gasket
between top manifold
and bottom housing.
Pressure gauge
will not read or
read incorrectly.
1. Pressure gauge is damaged.
2. Regulating knob has lost its
function.
3. There is air leakage at air
splitter.

REPLACEMENT PARTS LIST
11
2
3
5
6
13
1
27
28
29
24
22
11
9
10
32
31
30
21
20
19
18
17
16
14
12
33
23
34
4
15
8
7
26
25
25
Part No.
Description Qty.
1
2
3
4
5
6
7
8
9
10
11
12
13
14
15
16
17
Bottom housing
Stem valve
Spring
6x 2x2 O-ring
16x 12x2 O-ring
Nut
14x 11x1.5 O-ring
Plug screw
Plastic grip
Decoration bar (L)
Decoration bar (R)
M4x12 Screw
M6x28 Screw
M5x22 Screw
11x 7.8x1.6 O-ring
Plug screw
27x 21x3 O-ring
1
1
1
1
1
1
1
1
2
2
2
4
4
4
1
1
1
18
19
20
21
22
23
24
25
26
27
28
29
30
31
32
33
34
7x 2.4x2.3 O-ring
Piston
Spring
regulating nut
Regulating shaft
33x 28x2.5 O-ring
Regulating base
Seal gasket
seal base
Topmanifold
Handle seat
Handle
Regulating knob
Knob cover
Gauge
1/4" air outlet
3/8" air inlet
1
1
1
1
1
1
1
2
1
1
4
2
1
1
1
4
1
Part No.
Description Qty.
Table of contents
Popular Media Converter manuals by other brands

Densei-Lambda
Densei-Lambda ZWS150PAF Series instruction manual

Pepperl+Fuchs
Pepperl+Fuchs PCV-USB-RS485 quick start guide

ZowieTek
ZowieTek LiveV400 Series user manual

TR-Electronic
TR-Electronic LMP-30-500 PB Assembly instructions

YATO
YATO YT-09910 Original instructions

Cabletron Systems
Cabletron Systems MCC-16 user guide