Wehncke Olympic Series User manual

3
Betriebsanleitung für
aufblasbare Boote nach
ISO 6185-1 Kategorie I
friedola®, Gebr. Holzapfel GmbH
Helgoländer Str. 1 + 3
37269 Eschwege · Germany
www.wehncke.de
Tel.: +49(0)9001- 463648
(info4u) 0,64 €/min.
Руководство по эксплуатации наду-
вных лодок, соответствующих
требованиям стандарта ISO 6185-1,
категория I
RUS
Operating Instructions for inflatable
Boats according to ISO 6185-1 Category I
GB
Notice d’utilisation pour canots gonfla-
bles selon ISO 6185-1, catégories I
F
Instrucciones de utilización para botes
inflables según ISO 6185-1 categoría I
E
Gebruiksaanwijzing voor opblaasbare
boten conform ISO 6185-1 categorie I
NL
Istruzioni per l’uso del battello pneumati-
co secondo la normativa ISO 6185-1
categorie I
I
Instrukcja użytkowania pontonów zgod-
nych z ISO 6185-1, kategoria I
PL
Návod k použití pro nafukovací
čluny vyhovující požadavkům ISO
6185-1 kategorie I
CZ
Felfújható csónakok (ISO 6185-1, I.
kategória) kezelési útmutatója
H
Navodila za uporabo napihljivega
čolna v skladu s I. kategorijo ISO
6185-1
SLO
Naudojimo instrukcija pripučia-
moms valtims pagal ISO 6185-1 I
kategorija
LT
Керівництво по експлуатації на-
дувних човнів згідно ISO 6185-1,
категорія I
UA
» Olympic «
Olympic 270
Návod na použitie pre nafukovacie
člny vyhovujúce požiadavkám ISO
6185-1 kategórie I
SK

4

5
Inhalt / content
Deutsch (D)................................................. 06
English (GB) ................................................ 12
Français (F).................................................. 18
Español (E).................................................. 24
Italiano (I) ................................................... 30
Nederlands (NL)......................................... 36
Polski (PL).................................................... 42
Русский (RUS)............................................. 48
Česky (CZ) ................................................... 54
Magyar (H).................................................. 60
Slovenščina (SLO) ...................................... 66
Slovensky (SK)............................................ 72
Lietuviškai (LT)........................................... 78
Українська (UA) ........................................ 84

6
Betriebsanleitung für aufblasbare Boote nach ISO 6185-1
Kategorie I »Olympic«
Diese Betriebsanleitung ist vor dem Benutzen des Bootes aufmerksam durchzulesen! Die darin
enthaltenen Anweisungen sind zu befolgen! Das Nichtbefolgen kann zu erheblichen Ge-
fahren führen! Die Befolgung der Warnhinweise ist von besonderer Wichtigkeit! Die richtige
Reihenfolge des Aufpumpens und des Zusammenbauens ist zu beachten! Der Bootsführer ist
verpichtet, die örtlichen Schifffahrtsbestimmungen zu beachten und die Anweisungen der
Wasserschutzpolizei zu befolgen!
Warnhinweise
• Vorsicht bei ablandigem Wind und Strömungen!
• Die Vorgaben des Typschildes nicht überschreiten!
• Das aufblasbare Boot grundsätzlich nur in geschützten Uferzonen bis ca. 300 m benutzen!
• Beachten Sie, dass Ihre Muskelkraft beim Paddeln ausreichen muss, dass Sie die gefahrene
Strecke wieder zurückpaddeln können!
• Achten Sie darauf, dass Sie nicht an steiniges Ufer oder Untiefen gelangen, da ansonsten
Beschädigungen an der Folie auftreten könnten.
• Nicht benutzen bei Windstärken größer 4 und/oder einer Wellenhöhe größer 0,3 Meter!
• Beim Aufkommen eines Sturmes sofort aches Wasser oder Strand aufsuchen!
• Kinder dürfen das Boot nur in Begleitung eines Erwachsenen benutzen!
• Kinder und Nichtschwimmer sollten ständig eine Schwimmweste tragen!
• Bei ungleichmäßiger Gewichtsverlagerung von Personen oder Beiladung besteht Kenter-
gefahr!
• Nicht mit der Unterseite nach oben als schwimmendes Sprungbrett benutzen!
• Keine Veränderungen am Boot durchführen, die die Sicherheit gefährden!
• Falls Ihr Boot während der Benutzung auf dem Wasser beschädigt wird, das Boot bitte nicht
verlassen. Falls eine Luftkammer ausfällt, wird das Boot mit den Insassen aufgrund seiner
starken Auftriebskraft immer noch über Wasser gehalten werden. Das Doppelkammer-Sys-
tem garantiert ein sicheres Manövrieren!
• Ein- und Wiedereinsteigen im tiefen Wasser sollte immer über das Heck des Bootes erfol-
gen, da das seitliche Einsteigen ein Kentern verursachen kann!
• Während der Benutzung achten Sie bitte darauf, dass die Paddel immer mitgeführt wer-
den, da sich ansonsten das Boot nicht richtig manövrieren lässt.
Technische Daten
Typ „Olympic 190“:
Max. Zuladung: 80 kg
zulässige Personen: 1 Erwachsener
Typ „Olympic 230“:
Max. Zuladung: 160 kg
zulässige Personen: 2 Erwachsene
Typ „Olympic 270“:
Max. Zuladung: 200 kg
zulässige Personen: 2 Erwachsene / 1 Kind
D

7
Vorbereitung zum Aufblasen des Bootes
• Den Untergrund von allen spitzen oder scharfkantigen Gegen ständen säubern.
• Das Boot in voller Länge und Breite auf dem vorher gesäuberten Untergrund ausbreiten.
Dabei Temperaturen unter 15 ºC vermeiden.
• Bei erstmaliger Verwendung die Schraubventile mit Gefühl fest in die dafür vorgesehenen
Sockel der nummerierten Luftkammern einschrauben.
• Das noch nicht aufgeblasene Boot nicht betreten, um die Folie nicht zu beschädigen.
Aufblasen des Bootes
Zum Aufblasen am besten eine Luftpumpe aus dem WEHNCKE-Aufblaspumpenprogramm
verwenden. Verwenden Sie niemals einen Kompressor oder Pressluft!
Zum Aufblasen wie folgt vorzugehen:
Verschluss des Schraubventils der Kammer 1 aufschrauben und die Pumpe anschließen. Bei
Verwendung einer Doppelhubpumpe den Verbindungssschlauch an den mit der Aufschrift
‚Inate’ versehenen Pumpenstutzen anschließen und den Adapter in das geöffnete Ventil
fest einstecken. Nach dem Befüllen den Adapter herausziehen und den Schraubverschluss
wieder auf das Ventil aufschrauben.
Zum Aufblasen der Kammer 2 ist nach der gleichen Methode vorzugehen. Das Aufblasen
ist solange auszuführen, bis der vorgegebene Betriebsdruck der jeweiligen Luftkammer er-
reicht ist. Die Betriebsdrücke der einzelnen Luftkammern sind der unten stehenden Tabelle zu
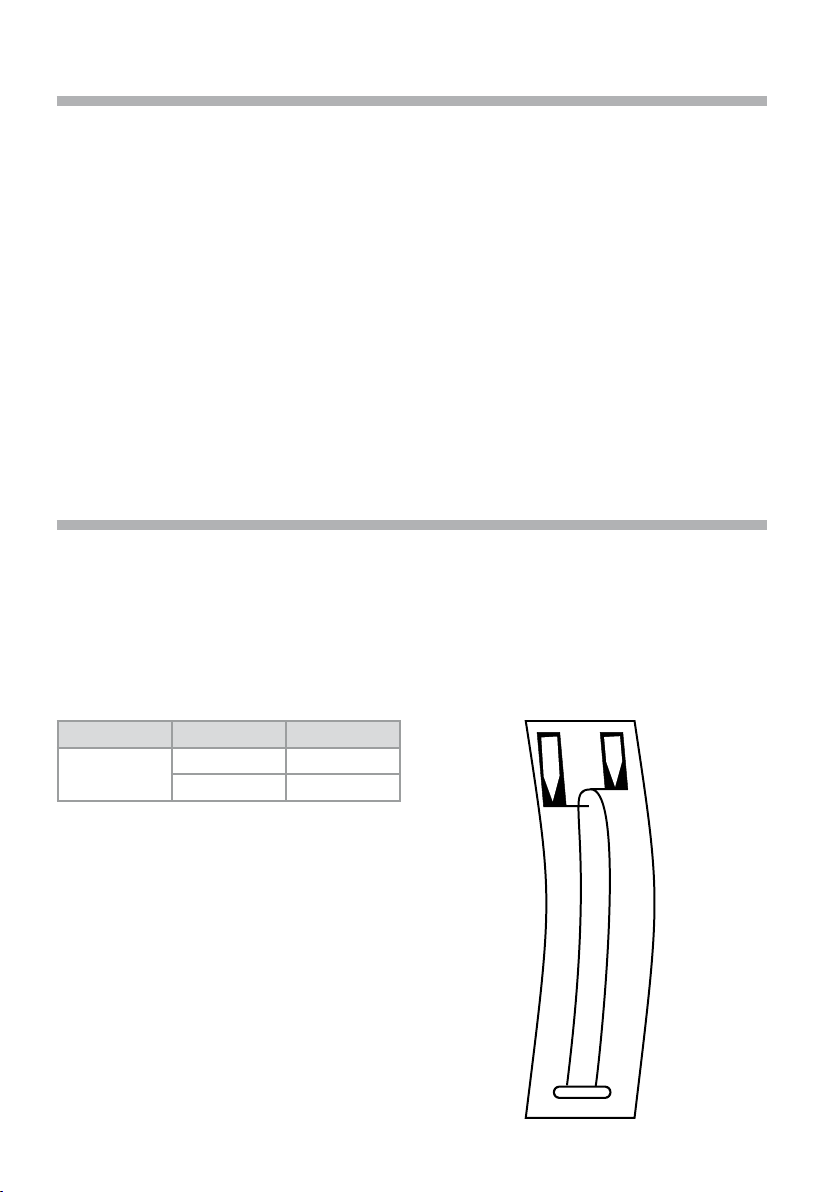
entnehmen. Zur Kontrolle des vorgesehenen Luftdrucks sind auf den beiden Hauptkammern
Kontrollanzeigen angebracht. Der Betriebsdruck ist erreicht, wenn die Spitze des Anzeige-
bandes auf den der Umgebungstemperatur entsprechenden Markierungsstrich zeigt (siehe
Abbildung 1).
Weitere Luftkammern mit Schraubventilen, soweit vorhanden, sind ebenfalls in der vorste-
hend beschriebenen Weise aufzublasen. Das Erreichen des erforderlichen Betriebsdruckes
ist durch Eindrücken mit dem Daumen im Vergleich mit den Hauptkammern zu überprüfen.
Die Folie muss sich dann bei mäßiger Kraft noch ca. 1 cm tief eindrücken lassen. Die Boden-
kammern sind unter Verwendung eines mit der Pumpe mitgelieferten geeigneten Adapters
über das Stöpselventil aufzublasen. Dazu muss das Ventil vollständig herausgezogen und der
Stöpsel abgenommen werden. Bei Verwendung einer Doppelhubpumpe ist wie oben be-
schrieben zu verfahren und nach dem Aufblasen und Abziehen des Adapters das Ventil mit
dem Stöpsel wieder zu verschließen. Anschließend ist das Ventil soweit wie möglich in die
Luftkammer einzudrücken. Bitte beachten Sie, dass das Boot Typ „Olympic 190“ nur mit Stöp-
selventilen (keine Schraubventile) ausgestattet ist.
Entleeren der Luftkammern
Zum Entleeren der Luftkammern muss das gesamte Schraubventil herausgeschraubt werden.
Zur Unterstützung des Entleerens benutzen Sie die beiliegenden Röhrchen, die dazu in den
Ventilsockel eingesteckt werden.
Zur kontrollierten Verringerung des Luftdrucks der Auftriebskammern den Verschluss des
Schraubventils öffnen, kurzzeitig den dann sichtbar werdenden Stift zum Öffnen des Rück-
schlagventils eindrücken bis der gewünschte verringerte Luftdruck erreicht ist. Zum Entleeren

8
Dder Bodenkammern Ventil aus der Luftkammer und Stöpsel aus dem Ventilhals herausziehen.
Mit zwei Fingern den Ventilhals so zusammenpressen, dass die Luft entweichen kann. Zum
vollständigen Entleeren die Luftkammern dabei zusätzlich zusammendrücken.
Vorbereitung zur Benutzung
Nach dem Aufblasen ist folgendermaßen vorzugehen: Die Halteleine durch die Seilösen zie-
hen. Die Enden mit einem Knoten verbinden. Vor dem Ablassen des Bootes ins Wasser die
Entwässerungsventile schließen. Zum Ablassen des aufgeblasenen Bootes ins Wasser muss
das Boot bis zum Ufer getragen werden. Nicht über den Boden ziehen, da sonst die Folie be-
schädigt werden kann. Beim Ein- und Aussteigen das Boot nicht auf Grund setzen.
Anleitung zur Benutzung
Die Beladung darf erst erfolgen, wenn das Boot zu Wasser gelassen ist, jedoch vor dem Ein-
steigen der benutzenden Personen. Ebenfalls vor dem Einsteigen muss sichergestellt sein,
dass sich alle Mittel zur Fortbewegung (Paddel oder Ruder) entweder im Boot oder in Reich-
weite des Bootes benden, damit sie vor dem Abstoßen vom Ufer ergriffen werden können.
Ungeübte Benutzer sollten sich vorher von einer erfahrenen Person in der Verwendung der
Antriebsmittel unterweisen lassen. Während des Tages kann sich in Folge direkter Sonnenein-
strahlung die Luft im Innern der Kammern erhitzen, wodurch ein zu hoher Innendruck entste-
hen kann, der möglicherweise die Beschädigung einer Luftkammer zur Folge hat. Um dies zu
vermeiden, muss der Luftdruck immer überwacht und ggf. durch kurzzeitiges Lösen des
Schraubventils wie oben beschrieben reguliert werden. Wenn sich die Außentemperatur
wieder abgekühlt hat, ist ggf. Luft in der ebenfalls oben geschilderten Weise in die Luftkam-
mern nachzufüllen. Bei unbekanntem Gewässer sollte man vor der Benutzung immer die örtli-
chen Gegebenheiten erfragen.
Reinigen und Lagern
Das Boot muss nach der Benutzung durch Abspritzen mit sauberem Wasser von anhängen-
den Verunreinigungen gesäubert werden. Dies ist besonders wichtig, wenn es Salzwasser,
Dieselkraftstoff oder anderen Mineralöl-Verschmutzungen ausgesetzt war. Gegebenenfalls
ist ohne zu Scheuern ein mildes Spülmittel zur Reinigung zu verwenden. Anschließend gut an
der Luft trocknen lassen, bevor die Luft komplett aus allen Kammern abgelassen wird, um
es zusammenzulegen und an einem trockenen, frostfreien Ort aufzubewahren. Beim Zusam-
menlegen ist darauf zu achten, dass sich in der Folie keine scharfen Knicke bilden. Einpud-
ern mit Talkum ist nicht erforderlich. Unterhalb einer Temperatur von +15°C darf das zusam-
mengelegte Boot nicht auseinander gefaltet werden, da sonst die Folie beschädigt werden
kann.

9
Reparatur
Obwohl das Boot aus einem verstärkten und widerstandsfähigen Material gefertigt wurde,
können bei unsachgemäßer Nutzung doch Löcher oder Risse auftreten. Zur Reparatur
dieser kleinen Schäden ist ein Reparatur-Set beigefügt. Dazu wie folgt vorgehen:
1. Rund um die Beschädigung die Oberäche mit sauberen Wasser und einem milden Spül-
mittel säubern. Klebestelle gut trocknen lassen.
2. Von dem beigefügten Reparaturmaterial einen runden oder ovalen Fleck ausschneiden,
der die Beschädigung etwa 3 cm überdeckt.
3. Eine dünne Schicht des Klebstoffes sowohl auf dem Fleck als auch auf der zu reparieren-
den Fläche aufbringen. Kleberauftrag ca. 10 Minuten ablüften lassen.
4. Spezialkleber erneut auf beide Seiten auftragen und Kleberauftrag wieder ca. 10 Minu-
ten trocknen lassen.
5. Klebeeck auf Reparaturstelle auegen und fest andrücken.
6. Nach weiteren 10 Minuten Flickenrand mit Kleber nachstreichen.
7. Erst nach 24 Stunden Aushärtezeit das Boot wieder aufblasen.
Den Spezialkleber von Kindern fernhalten!
Recycling
Sollte ein WEHNCKE-Aufblasartikel einmal ausgedient haben, bitte nicht zum Hausmüll ge-
ben! Unsere Produkte sind alle vollständig wiederverwertbar. Schicken Sie dazu den Artikel
frei (Versandkosten zu Lasten des Versenders) an uns zurück, Sie leisten damit einen wertvol-
len Beitrag für den Schutz der Umwelt.
Bootstyp Luftkammer Betriebsdruck
Olympic
190 – 270
1 0,03
2 0,03
30ºC
20ºC
Tabelle 1 Abbildung 1

10
Konformitätserklärung
Hiermit bestätigen wir, dass die unten aufgeführten Artikel mit der Richtlinie 94/25/EG des Eu-
ropäischen Parlaments und des Rates zur Angleichung der Rechts- und Verwaltungsvorschriften
über Sportboote übereinstimmen.
Bootsbezeichnung: Art. 10506, 10562, 10567 Boot Olympic 270
Bootstyp: ausblasbares Sportboot, Kategorie I
Hauptabmessungen: ca. 264x122 cm
Seriennummer des Rumpfes: DE-GHMO2L70 _ _ _ _
(Siehe Bootsaufdruck)
Entwurfs-Kategorie: D
Zertifizierungsmodul: A
Prüfgrundlage: EN ISO 6185-1:2001 aufblasbare Boote
Datum/Unterschrift des Bevollmächtigten in der EU
friedola® Gebr. Holzapfel GmbH Meinhard-Frieda, 05.10.2011
(Désirée Derin-Holzapfel, Geschäftsführerin/General Manager)
D

11

12
GB Operating Instructions for inatable Boats according to ISO
6185-1 Category I ”Olympic”
These Operating Instructions must very carefully and completely be read before the utiliza-
tion of the boat is started! The instructions given must closely be followed! Non-observance
of these instructions may entail considerable risks! The observance of the warning hints is of
particular importance! Take special care to observe the correct sequence of inating and
of the assembling procedure! The boat driver is obliged to comply with the local navigation
regulations and to observe the instructions of the harbour and river police!
Warning
• Take special precautions during off-shore winds and when there are currents!
• Observe the statements on the Type Board attached and do not exceed them!
• Use this inatable boat on principle only in protected areas near the shores up to 300 m!
• Take into consideration that you must have enough physical strength to paddle the dis-
tance back to the point of departure.
• Pay attention that you do not land on a stony shore or get into shallow water as this might
cause damages of the lm of the boat.
• Do not use this boat at wind forces greater than 4 and/or a height of waves higher than
0.30 meters (1 foot)!
• When a storm is coming up, move immediately to at waters or to the beach!
• Children are allowed to use the boat only when accompanied by an adult person!
• Children and non-swimmers are urgently advised to constantly wear swimming aids!
• When the weight of persons or cargo is not uniformly distributed across the boat, there is
the risk that the boat may capsize!
• Do not use the boat with its bottom side upwards as a oating diving board!
• Do not effect any changes at the boat that may impair the safety and that may cause, as
a consequence, any risks!
• Do not leave the boat when it is damaged during use on the water. In case one air cham-
ber fails, the boat will still stay above water with all passengers thanks to its strong buoy-
ancy force. The double-chamber system guarantees a safe manoeuvrability.
• In deep water always enter the boat via the stern as the boat may capsize if you enter
from the sides.
• Pay attention that you always carry the paddles with you during use of the boat as other-
wise the boat cannot be manoeuvred correctly.
Technical information
Model „Olympic 190“:
Max. loading capacity: 80 kg
Admitted persons: 1 adult
Model „Olympic 230“:
Max. loading capacity: 160 kg
Admitted persons: 2 adults
Model „Olympic 270“:
Max. loading capacity: 200 kg
Admitted persons: 2 adults / 1 child

13
Preparations for inating the boat
• Clean the underground of all sharp edged and pointed objects.
• Spread the boat in its full length and width on the previously cleaned underground. Avoid,
in this connection, temperatures below 15 °C.
• When using the boat for the rst time, screw in the screw valves with tender feeling rmly
into the bases of the numbered air chambers.
• Do not yet step onto the boat as long as it has not yet been inated, in order to avoid
damaging the plastic sheet.
Inating the boat
For inating the boat please take a pump out of the WEHNCKE inating pump collection.
Never use a compressor or compressed air!
The procedure for inating is as follows:
Unscrew the closure of the screw valve of Air Chamber No. 1 and connect the pump. When
using a dual stroke pump, connect the connecting hose to the pump socket marked with
“Inate” and rmly insert the adapter in the opened valve. Remove the adapter after lling
has been completed and screw again the screw closure onto the valve.
The inating procedure is to be continued until the nominal operation pressure of the respec-
tive air chamber has been achieved. The operation pressures of the individual air chambers
are stated in the Table shown below. For checking the nominal operating air pressure, check-
ing devices have been installed on the two main air chambers. The operating pressure
has been achieved as soon as the top of the display ribbon points onto the marking stroke
corresponding to the environmental temperature (see Illustration 1).
Additional air chambers with screwed valves are, as far as existing, also to be inated in the
manner described above. Whether the required operating pressure has been achieved can
be determined by pressing in with one’s thumb in comparison with the main chambers. The
plastic sheet must allow itself to be pressed with medium force still approximately 1 cm deep.
The oor chambers are to be inated via the plug valve by utilizing a suitable adapter that
is accompanying the pump. For this purpose, the valve must be completely pulled out and
the plug must be removed. When using a dual stroke pump, the procedure is as described
above, and the valve is to be closed again by means of the plug, subsequent to the inating
procedure and after the adapter has been removed. Subsequently, press the valve inwards
as far as possible into the air chamber. Pay attention that the boat type “Olympic 190” is
equipped with stopper valves only (not screw valves).
Deating the air chambers
For the deating procedure of the air chambers, the complete screwed valve must be re-
moved by screwing it out. In order to assist the deating process, utilize the little tubes at-
tached, which have to be inserted in the valve socket for this purpose. For a controlled
reduction of the air pressure of the buoyancy chambers, open the closure of the screwed
valve, press in briey the pin that will become visible for opening the check valve until the
required reduced air pressure has been achieved. For the deating procedure of the oor
chambers, pull out the valve from the air chamber and pull out the plug from the valve neck.

14
GB Press the valve neck by means of two ngers in such a way that the air can escape. When
the complete evacuation of air from the air chambers is intended, press the air chambers
forcefully in addition.
Preparation for utilization
After the inating procedure has been completed, continue as follows: Pull the handling line
through the rope eyes. Connect the ends by means of a knot. Close the draining valves be-
fore the boat is launched. For launching the inated boat, it is necessary to carry the boat to
the shore. Do not drag the boat along the beach; otherwise the plastic sheet may get dam-
aged. When boarding the boat or when leaving it, do not ground the boat.
Instructions for utilization
Loading is allowed to be carried out only after the boat has been launched and is in the
water, however prior to any people boarding the boat. Prior to boarding it must be ensured
that all tools for moving the boat (paddles or oars) are located either in the boat or within
reach of the boat so that they can easily be seized before leaving. Inexperienced users
should ask an experienced person for advice regarding the utilization of the driving engine.
In the course of the day, it may happen that as a consequence of the sun shine the air in the
inside of the chambers gets heated up which causes an excessive interior pressure that may
cause the damaging of the air chambers. In order to prevent this, the air pressure must con-
stantly be monitored and, if required, be regulated by briey opening the screwed valve, as
described above. After the outside temperature has cooled off again, air has to be added
again to inate the air chambers again, as also described above. In unknown waters it is
strongly advisable to make inquiries about the local conditions before launching the boat
and making use of the waters.
Cleaning and storage
The boat must be cleansed after utilization by rinsing and spraying with clean water from soil
on the surface. This is particularly important when salt water, diesel fuel or other mineral oil
soiling is involved. When necessary, use a mild detergent for cleaning without scouring. Sub-
sequently, allow the boat to dry at the open air, before the air is completely evacuated. Then
fold it up and store the boat at a frost-free location. When folding the boat up, take care
that there are no sharp folds in the plastic sheet. Powdering with talcum is not necessary. The
folded up boat is not allowed to be unfolded below a temperature of +15 °C as otherwise
the plastic sheet may get damaged.

15
Repairs
Although the boat has been manufactured of a reinforced and tough material, it is still pos-
sible to cause holes or ssures and cracks when the boat is handled improperly. For the re-
pair of a small damage, a Repair Set is included in the delivery. For carrying out repair work,
proceed as follows:
1. Clean the surface around the damaged spot by means of clean water and a mild deter-
gent. Allow the spot to be repaired to dry well.
2. Cut a round or oval patch from the repair material supplied. The patch should cover the
damaged spot by about 3 cm over its size.
3. Apply a thin layer of the adhesive agent both on the patch and on the location to be
repaired. Allow adhesive agent to air for about ten minutes.
4. Apply again special adhesive agent on both sides and allow again adhesive agent to
dry for about ten minutes.
5. Place the patch with adhesive agent on the spot to be repaired and press them rmly
together.
6. After another ten minutes, apply adhesive agent all along the edges of the patch.
7. Inate the boat again only after 24 hours hardening time.
Keep the adhesive agent away from children!
Recycling
Please do not discard a WEHNCKE inatable article in the domestic waste once such an arti-
cle is no longer used. Our products can all completely be recycled. Please send the article
to us, freightage prepaid. You will in this way render a valuable contribution for the protec-
tion of the environment.
Type of boat Air chamber Working presure
Olympic
190 – 270
10.03
20.03
30ºC
20ºC
Table 1 Figure 1

16
GB
Declaration of conformity
We hereby confirm that the articles listed below are in compliance with the Guideline 94/25/EC of
the European Parliament and of the Council for the Adjustment of the Legal and Administrative
Regulations covering Sport Boats.
Boat name: Art. 10506, 10562, 10567 Boot Olympic 270
Boat type: Inflatable sport boat, Category I
Principal dimensions: approx. 264 x 122 cm
Hull serial number: DE-GHMO2L70 _ _ _ _ (See boat print)
Design category: D
Certification module: A
Basis of the tests: EN ISO 6185-1:2001 Inflatable Boats
Date / signature of the authorised person in the EU
friedola® Gebr. Holzapfel GmbH Meinhard-Frieda, 05.10.2011
(Désirée Derin-Holzapfel, Geschäftsführerin/General Manager)

17

18
FNotice d‘utilisation pour canots gonables selon ISO 6185-1,
catégories I »Olympic«
Veuillez lire attentivement et entièrement cette notice d‘utilisation avant d‘utiliser le canot!
Veuillez respecter les instructions qu‘elle contient ! Le non-respect de son contenu peut en-
gendrer des risques considérables ! Le respect des avertissements revêt une grande impor-
tance ! Respectez la chronologie correcte de gonage et d‘assemblage ! Le conducteur du
canot s‘engage à respecter les dispositions locales régissant la navigation, et à respecter les
instructions données par la police uviale ou maritime!
Avertissements
• Prudence lorsque le vent et le courant vont de la rive/plage vers le large!
• Ne dépassez pas le paramétrage indiqué sur la plaque signalétique !
• N‘utilisez ce canot gonable que dans des zones protégées proches de la rive/plage
jusqu’à 300 m!
• Faites attention que vous devez avoir assez de force musculaire pour pagayer retour au
point de départ.
• Faites attention que vous n’arrivez pas à une plage pierreuse ou à un bas-fond parce qu’il
y a le risque d’endommager l’enveloppe du canot.
• N‘utilisez pas le canot en présence de vents d‘une force supérieure à 4 et/ou de vagues
d‘une hauteur supérieure à 30 cm!
• Si une tempête s‘annonce, retournez immédiatement en eau calme ou sur la plage !
• L‘emploi de ce canot est interdit aux enfants non accompagnés d‘un adulte !
• Les enfants et passagers ne sachant pas nager devront porter un gilet de sauvetage en
permanence !
• Le canot risque de chavirer si les passagers ne se répartissent pas uniformément ou si vous
rajoutez des charges !
• Ne retournez jamais le canot pour vous servir de son fond comme d‘un plongeoir !
• N‘apportez au canot aucune modication susceptible de préjudicier à la sécurité !
• Ne quittez pas votre canot quand il est endommagé pendant l’usage sur l’eau. Si une
chambre à air fait défaut, le canot reste encore à la surface de l’eau avec tous les occu-
pants grâce à sa force ascensionnelle considérable. Le système double-chambre garantit
une manoeuvrabilité en sécurité.
• Dans l’eau profonde il faut monter dans le canot via l’arrière parce que le canot risque de
chavirer si on monte via les bandes.
• Pendant l’usage il faut emporter les pagaies parce que vous ne pouvez pas manoeuvrer
le canot correctement sans pagaies.
Caractéristiques techniques
Type „Olympic 190“ :
Charge max. : 80 kg
Nombre de personnes autorisées : 1 adulte
Type „Olympic 230“ :
Charge max. : 160 kg
Nombre de personnes autorisées : 2 adultes
Type „Olympic 270“:
Charge max. : 200 kg
Nombre de personnes autorisées :
2 adultes / 1 enfant

19
Préparatifs au gonage du canot
• Sur le sol, retirez tous les objets pointus ou à arêtes vives qui pourraient s‘y trouver.
• Etalez le canot sur toute sa longueur et toute sa largeur sur le sol préalablement nettoyé.
Veillez si possible à ce que la température ne soit pas inférieure à 15°C.
• Lors de la première utilisation, prenez les valves letées livrées séparément et vissez-les
complètement mais pas trop fort dans l‘embase à cet effet que comporte chaque cham-
bre à air numérotée.
• Pour ne pas endommager l‘enveloppe, ne marchez pas sur le canot non encore goné.
Gonage du canot
Pour goner le canot, utilisez de préférence une pompe à air puisée dans la gamme de
pompes de gonage WEHNCKE. N’utilisez jamais de compresseur ni d’air comprimé!
Pour goner le canot, veuillez procéder comme suit :
Dévissez le bouchon de la valve vissée sur le chambre à air 1 puis raccordez la pompe. Si
vous utilisez une pompe à double course, raccordez le exible de liaison à l‘orice de la pom-
pe comportant la mention „Inate“, puis enchez fermement l‘adaptateur dans la valve
ouverte. Après avoir goné la chambre, débranchez l‘adaptateur puis revissez le bouchon
sur la valve.
Pour goner la chambre 2, procédez de la même manière. Poursuivez ces opérations de
gonage jusqu‘à ce que chaque chambre ait atteint la pression de service prescrite. Les
pressions de service des différentes chambres à air gurent dans le tableau ci-dessous. Pour
pouvoir contrôler la pression d‘air prévue, les deux chambres principales comportent des
indicateurs de contrôle. La pression de service est atteinte une fois que la pointe du ruban
indicateur se trouve sur le trait de graduation correspondant à température ambiante
(voir gure 1).
Si le canot comporte d‘autres chambres à air avec valves à visser, il faudra les goner de
la manière précédemment décrite. Pour vérier que ces chambres ont atteint les pressions
de service requises, il faut appuyer dessus avec le pouce et comparer l‘enfoncement avec
celui des chambres principales. L‘enveloppe de la chambre doit se laisser enfoncer d‘env.
1 cm en appliquant une force modérée. Il faut goner les chambres du fond en utilisant un
adaptateur approprié livré avec la pompe et à brancher sur chaque valve à bouchon. Pour
ce faire, sortez complètement la vanne puis retirez le bouchon. Si vous utilisez une pompe à
double course, procédez comme décrit précédemment, gonez, retirez ensuite l‘adapta-
teur puis réobturez la vanne avec le bouchon. Ensuite, enfoncez autant que possible la valve
dans la chambre. Notez que le bateau de type „Olympic 190“ est équipé uniquement
de valves-bouchons (pas de valves à visser).
Dégoner les chambres à air
Pour dégoner les chambres à air, il faut dévisser l’ensemble de la valve. Pour faciliter le dé-
gonage, utilisez le tube ci-joint que vous introduirez dans l’embase de la valve. Pour réduire
de façon contrôlée la pression de l’air dans les chambres de ottement, ouvrez le bouchon
de la valve vissée, appuyez brièvement sur la petite tige devenue visible pour forcer le cla-
pet anti-retour à s’ouvrir, jusqu’à ce que la pression soit revenue sur le niveau voulu.Pour

20
Fdégoner les chambres du fond, extrayez la valve hors de la chambre à air concernée puis
défaites le bouchon du col de la valve. Avec deux doigts, comprimez le col ce qu’il faut
pour que l’air s’échappe. Pour dégoner entièrement les chambres à air, comprimez-les en
même temps.
Préparatifs à l‘utilisation
Après avoir goné le canot, veuillez procéder comme suit : Faites passer le cordon de rete-
nue par les oeillets. Reliez les extrémités en faisant un noeud. Avant mettre le canot à l’eau,
fermez les vannes de purge d’eau. Pour mettre le canot à l’eau, vous devrez le porter jusque
sur la rive. Ne le faites pas frotter sur le sol car cela endommagerait l’enveloppe gonable.
Au moment de quitter le canot, veillez à ce qu’il ne touche pas le fond.
Instructions d‘utilisation
Le chargement du canot ne peut avoir lieu qu’une fois celui-ci à l’eau, mais avant que les
personnes qui l’utilisent ne montent à bord. De même, avant de monter à bord, assurez-vous
que tous les moyens d’entraînement (pagaies, rames) soit se trouvent déjà dans le canot,
soit à portée de celui-ci an de pouvoir les saisir avant de vous éloigner de la rive. Les utilisa-
teurs inexpérimentés devront auparavant demander à une personne expérimentée de leur
monter comment utiliser les moyens d’entraînement. Dans la journée, l’air présent à l’inté-
rieur des chambres peut s’échauffer sous l’effet de l’ensoleillement direct, ce qui accroît la
pression dans les chambres et risque de les endommager. Pour éviter cela, il faut surveiller
en permanence la pression de l’air et la stabiliser le cas échéant en desserrant brièvement,
comme décrit ci-dessus, la valve vissée. Une fois que la température extérieure a baissé, il
faudra le cas échéant rajouter de l’air dans les chambres, selon la procédure décrite plus
haut. Avant d’utiliser le canot sur une étendue d’eau inconnue, renseignez-vous au préala-
ble sur les particularités locales.
Nettoyage et rangement
Après utilisation, passez le canot au jet d’eau propre pour en détacher les salissures adhé-
rentes. C’est très important si le canot a été exposé à l’eau salée, au gazole ou à d’autres
salissures à base d’hydrocarbures. Il faudra le cas échéant utiliser un produit à vaisselle doux
et nettoyer sans récurer. Ensuite, faites bien sécher le canot à l’air avant de dégoner com-
plètement ses chambres. Repliez-le ensuite puis rangez le dans un endroit sec à l’abri du gel.
Lors du repliage, veillez bien à ce que l’enveloppe ne présente pas de pliure vive. Le saupou-
drage de talc n’est pas nécessaire. En dessous d’un température de +15°C, ne dépliez pas
la feuille du canot pliée, car vous risqueriez de l’endommager.

21
Réparation:
Bien que ce canot ait été fabriqué dans un matériau renforcé et résistant, il risque de se per-
forer ou de se ssurer en cas d‘utilisation incorrecte. Pour réparer ces petits dégâts, le canot
a été livré avec un kit de réparation. Pour réparer, procédez comme suit :
1. Tout autour de la zone abîmée, nettoyez la surface avec de l‘eau propre additionnée
d‘un produit à vaisselle doux. Faites bien sécher la zone de collage.
2. Dans la feuille de réparation, découpez une rustine circulaire ou ovale qui dépasse
d‘env. 3 cm la zone endommagée.
3. Appliquez une couche mince de colle tant sur la rustine que sur la surface à réparer. Lais-
sez les couches de colle s‘aérer pendant env. 10 minutes.
4. Appliquez à nouveau de la colle sur la rustine et la zone à réparer, et laissez ces nouvelles
couches de colle sécher elles aussi env. 10 minutes.
5. Posez la rustine sur la zone à réparer puis appuyez fermement dessus.
6. 10 minutes plus tard, enduisez les bords de la rustine avec de la colle.
7. Ne regonez le canot qu‘après avoir laissé sécher pendant 24 heures.
Rangez cette colle spéciale hors de portée des enfants!
Recyclage
Une fois qu’un article gonable WEHNCKE est en arrivé en n de carrière, ne le jetez pas aux
ordures ménagères ! Nos produits sont entièrement recyclables. Pour cette raison, renvoyez-
nous l’article (frais de port à la charge de l’expéditeur). Vous fournirez ainsi une contribution
précieuse à la protection de l’environnement.
Type de
bateau
Chambre
à air
Pression
de service
Olympic
190 – 270
1 0,03
2 0,03
30ºC
20ºC
Tableau 1 Figure 1

22
F
Déclaration de conformité
Nous confirmons que les articles mentionnés ci-dessous sont conformes à la Directive 94/25/CE du
Parlement Européen et du Conseil de compensation des dispositions juridiques et réglementaires
concernant les bateaux de sport.
Désignation du bateau : Art. 10506, 10562, 10567 Olympic 270
Type de bateau : bateau de sport gonflable, catégorie I
Dimensions principales : env. 264x122 cm
Numéro de série de la coque : DE-GHMO2L70 _ _ _ _
(Voir étiquette du bateau)
Catégorie de conception : D
Module de certification : A
Base de contrôle : EN ISO 6185-1 :2001 bateaux gonflables
Date / Signature du fondé de pouvoirs de l’U.E.
friedola® Gebr. Holzapfel GmbH Meinhard-Frieda, 05.10.2011
(Désirée Derin-Holzapfel, Geschäftsführerin/General Manager)
This manual suits for next models
6
Table of contents
Languages:
Other Wehncke Boat manuals
Popular Boat manuals by other brands

Gardasolar
Gardasolar GOGO4 Use and maintenance manual

Blackfin
Blackfin 302 Center Console owner's manual

BRIG
BRIG Eagle Series owner's manual

NW Explorations
NW Explorations Grey Lady operating manual

Blackfin
Blackfin 222 Center Console owner's manual

Pro-Line Boats
Pro-Line Boats 32 Express 2008 owner's manual