welldana DRYDEN AQUA SPACE User manual

1| Page Instructions for use [short]
SPACE
www.drydenaqua.com
EN
Installation guide

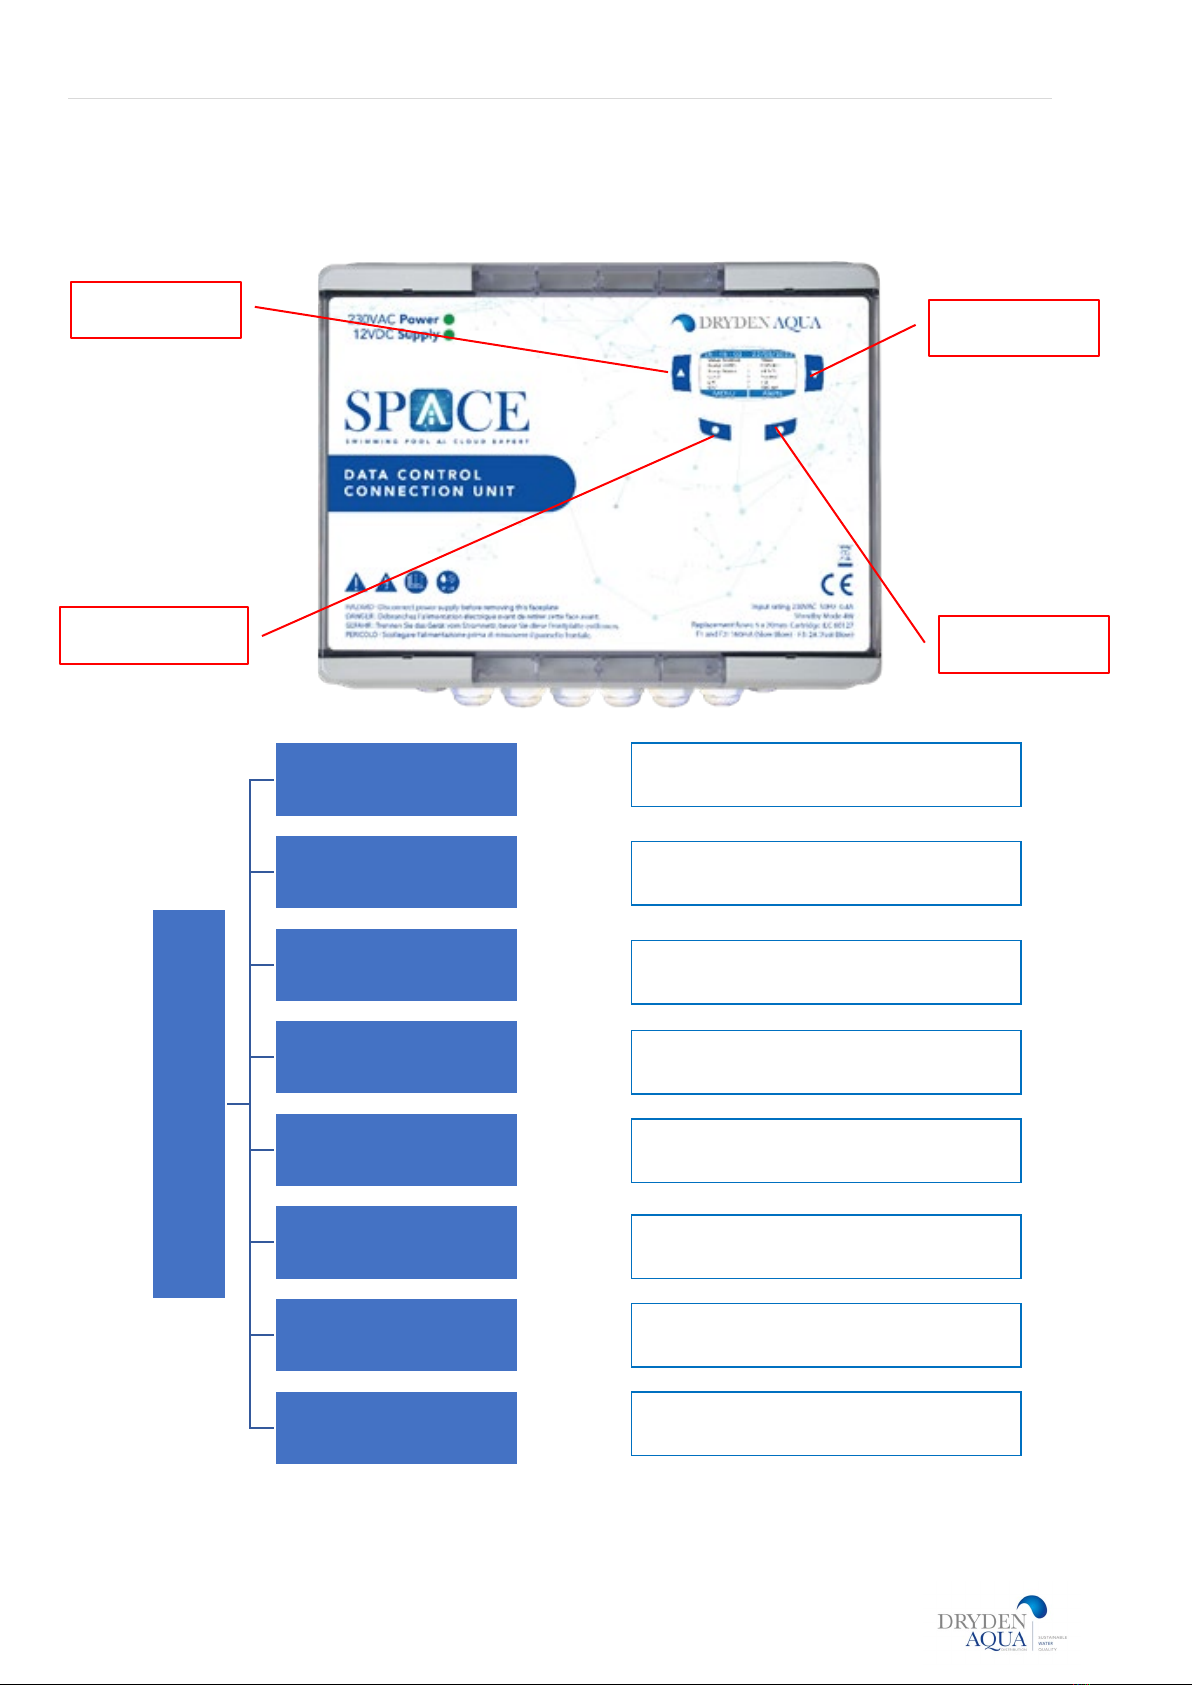
2| Page Instructions for use [short]
SPACE
www.drydenaqua.com
SECTION 1 INSTALLATION GUIDE
1.0 USING AND SETTINGS.................................................................................................................. 3
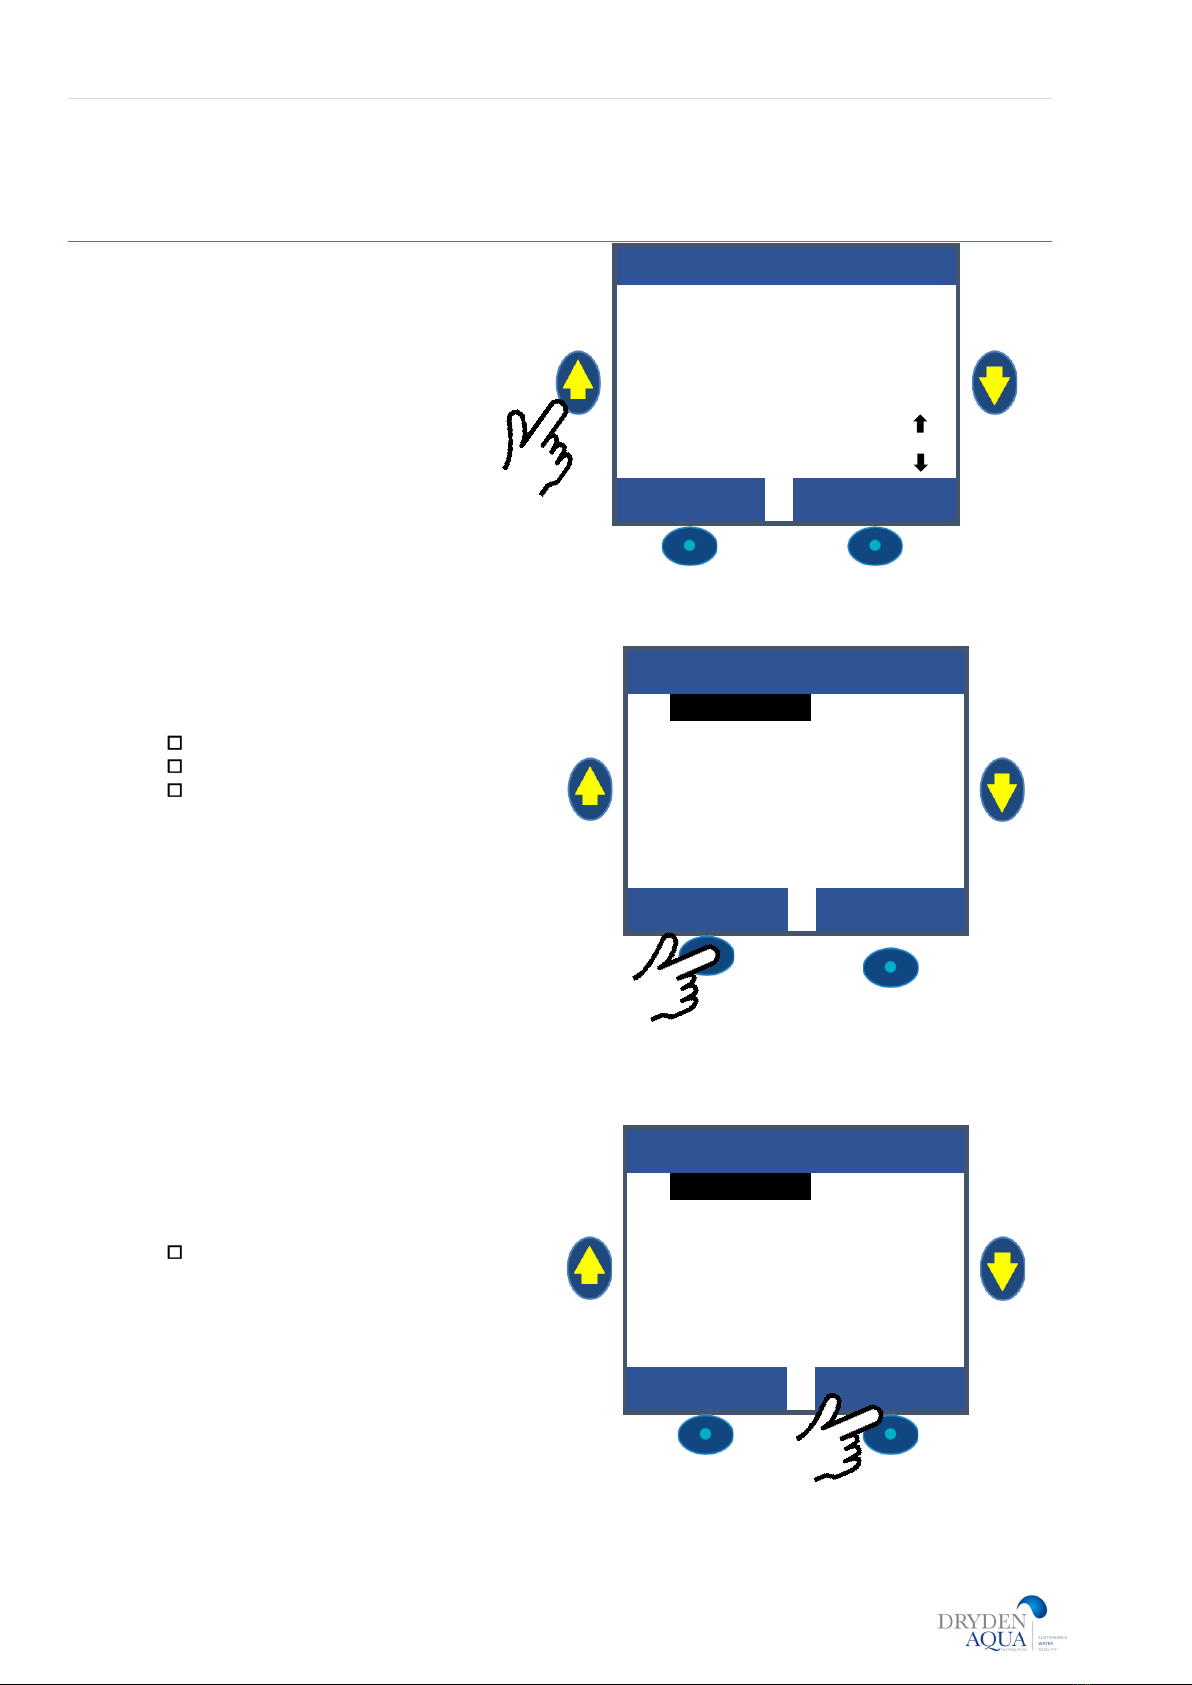
2.0 MENUS ..................................................................................................................................... 4
3.0 MANUAL CONTROL ..................................................................................................................... 5
4.0 FILTRATION MODES .................................................................................................................... 6
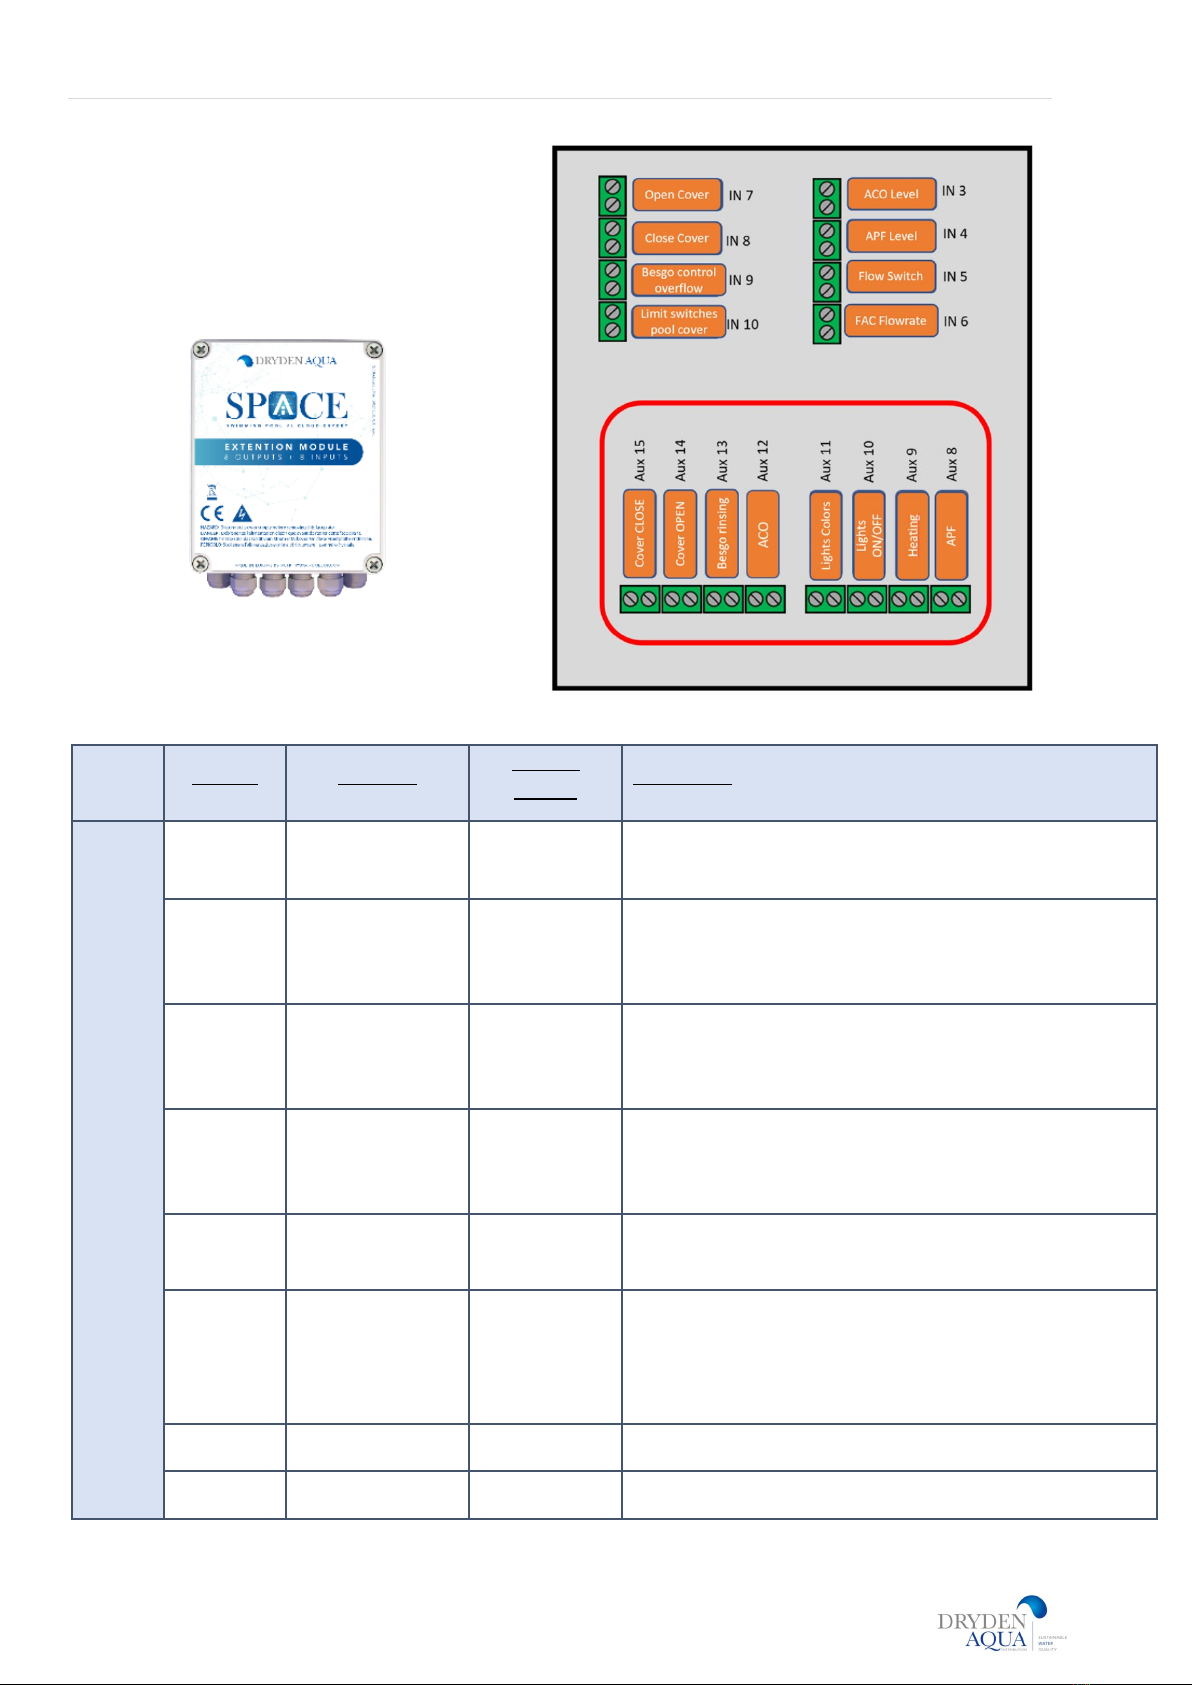
5.0 AUXILIARIES .............................................................................................................................. 7
6.0 WATER AND TREATMENT........................................................................................................... 11
7.0 MAINTENANCE......................................................................................................................... 12
8.0 CONFIGURATION ...................................................................................................................... 13
9.0 SPACE CLOUD......................................................................................................................... 14
10.0 CIRCULATION MODE (WITH AUTOMATIC SUCTION VALVE)..............................................................14
Section 2 PROGRAMMING GUIDE
4.1 FILTRATION MODES MENU ......................................................................................................... 15
5.1 AUXILIARIES MENU ............................................................................................................. 16
6.0 WATER AND TREATMENT ................................................................................................... 18
6.1 WATER LEVEL CONTROL ......................................................................................................... 18
6.2 PHCONTROL ........................................................................................................................... 22
6.3 ORP CONTROL ........................................................................................................................ 23
6.4 REMNANT INJECTION (H2O2) .................................................................................................... 24
6.5 ACO INJECTION ................................................................................................................... 25
6.6 FREE CHLORINE PROBE CONFIGURATION .........................................................................26
7.0 MAINTENANCE .................................................................................................................... 27
7.1 MAINTENANCE TOOLS ...................................................................................................................
7.2 pH, Free chlorine, Conductivity Calibration...........................................................................
7.3 SENSORS REPLACEMENT ...............................................................................................................
8.0 CONFIGURATION MENU ..................................................................................................... 32
8.1 Pool data .............................................................................................................................. 32
8.2 Pump configuration............................................................................................................. 33
8.3 Filter data ............................................................................................................................. 35
8.4 CONFIGURING INPUTS ........................................................................................................ 37
8.5 FACTORY SETTINGS............................................................................................................. 39
8.6 EQUIPMENT.......................................................................................................................... 40
8.6.1 POOL COVER ........................................................................................................................ 40
8.6.2 JETSTREAM........................................................................................................................... 41
9.0 SPACE Cloud......................................................................................................................... 42
10.0 CIRCULATION MODE (WITH AUTOMATIC SUCTION VALVE).............................................44
11.0 SCHEMATIC DIAGRAMS FOR SKIMMER &OVERFLOW POOLS………………………………….46

3| Page Instructions for use [short]
SPACE
www.drydenaqua.com
1. Using and settings
BACKLIGHT
Pressing any button illuminates the backlight.
The backlight remains on for 3 minutes.
12:46:01 01/06/2014
Valve
:
Filter
Pump STOP
:
0.00
Bar
Water Temp
:
28
°C
Level
:
Normal
ph
:
7.2
ORP
:
690mV
MENU
Navigate the SPACE menu
Press the MENU button.
SPACE MENU is displayed.
Use the UP and DOWN buttons to choose
the submenu (in this case Manual
Control), then press SELECT to go to that
submenu.
Repeatedly pressing QUIT to return to the
main display.
SPACE MENU
>
Manual control
Filtration modes
Auxiliaries
Water and Treatment
Maintenance
Configuration
SELECT
QUIT
Return to Main Display
When viewing any menu screen:
Press QUIT to go up one menu level.
Every display has a 15 second timeout to
go back to the previous menu. The
display will timeout to the main
display within approximately 1
minute.
SPACE MENU
>
Manual control
Filtration modes
Auxiliary
Water and treatment
Maintenance
Configuration
SELECT
QUIT

4| Page Instructions for use [short]
SPACE
www.drydenaqua.com
2. Menus
QUIT
UP
DOWN
MENU / SELECT
Menu
Manual Control
Filtration Modes
Auxiliaries
Water and
Treatment
Maintenance
Configuration
SPACE Cloud
Circulation Modes
More information
see Page 5
More information
see Page 6
More information
see Page 7 - 10
More information
see Page 11
More information
see Page 12
More information
see Page 13
More information
see Page 14
More information
see Page 14

5| Page Instructions for use [short]
SPACE
www.drydenaqua.com
3. Manual control:
(1) Not available of Filtration set in NOPUMP Mode
(2) Not available when cleaning valve is not configured
(3) Not available when rinse valve is not configured
Manually switch the pump ON or OFF at any time (if
no freeze conditions).
The programmed pump speed can be changed
manually for the rest of the filtration cycle.
Programmed speed will revert for the next cycle
APPLICABLE TO VARIABLE SPEED PUMP TYPE.
Manually switch auxiliary equipment ON or OFF at
any time
Manual Control
Pump (1)
Switch Pump
ON or OFF
Change
Pump Speed
Auxiliaries Switch
ON or OFF
Level Adjust Get water level
Clean Filter (2) Command Cleaning
Cycle
Valve Position (2)
Filter
Backwash
Rinse
Equipment Command Equipement
Ask for water level update which can lead to water
refill or a level reduction. Will stop refilling when
refill in ON.
APPLICABLE IF LEVEL CONTROL
Carries out a cleaning cycle (backwash) at any time.
Manually sets the valve to RINSE position at any
time.
Manually sets the valve to FILTER position at any
time.
Manually sets the valve to BACKWASH position at
any time
Manually command equipment such as Pool Cover
or JetStream pump

6| Page Instructions for use [short]
SPACE
www.drydenaqua.com
4. Filtration modes :
Filtration Modes
Stopped
Cycle1 =00:00-
00:00
Cycle2 =00:00-
00:00
Timer
Cycle1 =xx:xx-xx:xx
Cycle2 =xx:xx-xx:xx
ECO+
Cycle1 =xx:xx-xx:xx
Cycle2 =xx:xx-
CALC
Volume
Cycle1 =xx:xx-xx:xx
Cycle2 =xx:xx-
CALC
Continuous
Cycle1 =xx:xx-
CALC
Cycle2 =CALC-
CALC
Force 24H
Cycle1 =CALC-
CALC
Cycle2 =xx:xx-
yy:yy
Force 48H
Cycle1 =CALC-
CALC
Cycle2 =xx:xx-
yy:yy
Force 72H
Cycle1 =CALC-
CALC
Cycle2 =xx:xx-
yy:yy
24/24
Cycle1 =00:00-
00:00 V1
Cycle2 =00:00-
00:00 - V2
NO PUMP
Filtration is stopped. Both Cycle1 and Cycle2 timers are set to
00:00-00:00.
Filtration will run 23 hours per day for 24 hours and then revert
to normal filtration times. Cycle1 timer settings will be changed
when entering the forced mode and restored at the end of
period.
Cycle1 is free to be set at any value you may choose.
Choose Cycle2 start time, duration is calculated in accordance
with pool needs based on turnovers. Cycle1 duration is taken into
account.
Filtration will run 23 hours per day for 48 hours and revert to
normal filtration times. Cycle1 timer settings will be changed
when entering the forced mode and restored at the end of
period.
Pump is not controlled by SPACE. When the pump is detected as
running features will function automatically.
Pump is controlled and will run continuously except if priming is
lost.
The pH will be read once every hour.
Waterlevel every 20 minutes
Cycle1 is free to be set at any value you may choose.
Choose Cycle2 start time, duration is calculated in accordance
with pool needs based on temperature. Cycle1 duration is taken
into account.
Choose Cycle1 start time. Cycle1 and Cycle2 duration are
11:30min fixed value allowing a 23 hour per day filtration
duration.
Cycle1 and Cycle2 are free to be set at any value you may choose.
Make sure there is at least 30 min break between Cycle1 and
Cycle2.
Filtration will run 23 hours per day for 72 hours and then revert
to normal filtration times. Cycle1 timer settings will be changed
when entering the forced mode and restored at the end of
period.
See page 15

7| Page Instructions for use [short]
SPACE
www.drydenaqua.com
5. Auxiliaries
SPACE DCCU
Auxiliaries
Aux 1
Id
Mode
ON
OFF/Dur
Slave
Day of Week
Speed Ctrl
Aux 2
See Aux1
Speed Ctrl
Aux 3
See Aux1
Speed Ctrl
Aux 4
See Aux1
Suction valve
Aux 5
Besgo valve
Backwash
Aux 6
See Aux1
ORP
AUX 2 functionality is the same as AUX 1
If SPACE controls a multi-speed pump, AUX 2 is not available
(is reserved for speed 2)
See, Configuration - Filter data – (backwash setting)
(is reserved for the backwash valve)
See, Configuration – ORP regulation
(is reserved for ORP regulation)
Set ID
Set Mode
Set ON time HH:MM in timer and pulse modes
Set OFF time HH:MM in timer mode, or duration in pulse mode
Slave AUX to filtration; the auxiliary will only be ON if the pump is
primed
Set AUX to operate on selected days of the week
If SPACE controls a multi-speed pump, AUX 1 is not available.
PUMP
See, Configuration – pH regulation
(is reserved for pH regulation)
AUX 3 functionality is the same as AUX 1
If SPACE controls a multi-speed pump, AUX 3 is not available.
(is reserved for speed 3)
AUX 4 functionality is the same as AUX 1
If a suction valve is configured, AUX 4 is not available.
(is reserved for the Suction valve)
Aux 7
See Aux1
pH

8| Page Instructions for use [short]
SPACE
www.drydenaqua.com
SPACE DCCU - Auxiliaries (outputs)
Output Function
Default
setting
Standard Outputs
Pump
Relay pump
Pump
Single speed pump configured by default. If a multi-speed
pump is declared in the settings, the AUX1, AUX2, AUX3
outputs are
automatically assigned to speed control;
otherwise AUX1, AUX2, AUX3 are free to use.
AUX1
Speed 1
Free
AUX2
Speed 2
Free
AUX3
Speed 3
Free
AUX4 Besgo 3-way
Suction valve
Free
If a suction valve is declared in the settings, it is
automatically assigned to Aux4, otherwise Aux4 is free to
use.
AUX5 Besgo 5-way
Backwash valve Backwash
If a backwash valve is declared in the settings it is
automatically assigned to Aux5. Otherwise, Aux5 is free to
use.
AUX6 Disinfection Disinfection
If ORP disinfection is declared in the settings, the dosage
is automatically assigned to Aux6. Otherwise Aux6 is free
to use.
AUX7
pH
pH Minus
AUX7 is reserved in all cases.

9| Page Instructions for use [short]
SPACE
www.drydenaqua.com
Auxiliaries Extension Modules:
Auxiliaries
Aux 8
See Aux1
APF
Aux 9
See Aux1
Heating
Aux 10
See Aux1
pool Light
Aux 11
See Aux1
colour change
Aux 12
See Aux1
ACO
Aux 13
See Aux1
Jet Stream
Rince valve
Aux 14
See Aux1
Pool Cover
Aux 15
See Aux1
Pool Cover
AUX 8 functionality is the same as AUX 1
If the APF pump is configured, AUX 8 is not available.
(is reserved for APF pump)
AUX 9functionality is the same as AUX 1
If “heating”is configured, AUX 9 is not available.
(is reserved for heating)
AUX 10 functionality is the same as AUX 1
If “lighting”is configured, AUX 10 is not available.
(is reserved for Pool lighting)
AUX 11 functionality is the same as AUX 1
If “color change” is configured, AUX 11 is not available.
(is reserved for pool lights color change)
AUX 12 functionality is the same as AUX 1
If “ACO” is configured, AUX 12 is not available.
(is reserved for the ACO pump)
AUX 13 functionality is the same as AUX 1
If the Jet Stream or Rinse valve is configured, AUX 13 is not available.
(is reserved for Jet Stream or Besgo Rinsing valve)
AUX 14 functionality is the same as AUX 1
If the Pool Cover is configured, AUX 14 is not available.
(is reserved for opening the pool cover)
AUX 15 functionality is the same as AUX 1
If the Pool Cover is configured, AUX 15 is not available.
(is reserved for closing the pool cover)

10 | Page Instructions for use [short]
SPACE
www.drydenaqua.com
SPACE Extension module
AUX (outputs)
Output Function
Default
setting Comments
SPACE Extension Module
AUX8 Dosage APF APF
If APF is declared in the settings it is automatically
assigned to Aux8, otherwise Aux8 is free to use.
AUX9 Heating Heating
The heating system can be assigned to any available Aux.
It will be assigned to Aux9 by factory setting but can be
reassigned.
AUX10 Pool lights Pool lights
ON/OFF
The lights can be assigned to any available Aux. It will be
assigned to Aux10 by factory setting but can be
reassigned.
AUX11 Pool lights Colour change
The colour change can be assigned to any available Aux. It
will be assigned to Aux11 by factory setting but can be
reassigned.
AUX12 ACO ACO
If ACO dosing is declared in the settings, it is automatically
assigned to Aux12. Otherwise, Aux12 is free to use.
AUX13 Besgo 3-way
rinsing valve
Free
If a Besgo rinsing valve is declared in the settings it is
automatically assigned to Aux13, in which case Aux13 can
no longer be assigned to manage countercurrent
jetsteams.
AUX14
Pool cover
Free
AUX15
Pool cover
Free

11 | Page Instructions for use [short]
SPACE
www.drydenaqua.com
6. Water and treatment:
View and adjust various water level and treatment options available.
Water and Treatment
Water Level
Installed
Refill Mode
Refill Continuous
Max duration
Draining
Priming
Régulation
pH
Installed
pH Mode
Alerts
Setpoint
Max dosing
Priming
ORP Control
Installed
Disinfectant type
Setpoint
BOOST day
BOOST to
Priming
Remnant
Injection
(H2O2)
Installed
Aux Channel
Injection rate
Temp adjust
Extra adjust
Priming
ACO Injection
Installed
Injection rate
Priming
Free Available
Cl
Installed
Status
Value (ppm)
Low Alert
High Alert
Protect. free Cl
Set parameters for water level regulation.
See page 18
Set parameters for ORP-control
See page: 23
Set parameters for remnant
Injection (H2O2)
See page: 24
Set parameters for ACO injection.
See page: 25
Installed and set alerts for Free Available Chlorine
(if SPACE Chlorine Sensor FAC is installed)
See page : 26
Set parameters for pH regulation.
See page : 22

12 | Page Instructions for use [short]
SPACE
www.drydenaqua.com
7. Maintenance :
Activate/deactivate service mode.
Measure pH
Calibrate pH
Read FAC (if SPACE Chlorine Sensor FAC is
installed)
Calibrate FAC (if SPACE Chlorine Sensor FAC
is installed)
Calibrate conductivity
(if Space DA-GEN is installed).
Air temperature to start antifreeze
protection
Low water temperature to stop water
treatment
Adjust Water Temperature
Maintenance
Service Mode
Measure pH
Calibrate pH
Value FAC
Calibrate FAC
Calibrate
Conductivity
Air Antifrz
Stop Water
Treatmt
Calibrate water
temperature

13 | Page Instructions for use [short]
SPACE
www.drydenaqua.com
8. Configuration:
Set filter data parameters used to configure
functions.
See page 35
Firmware version
View Network settings
Set date and time
Select the language
Select display units
Reset your SPACE with the default settings.
See page 39
Set the Pool Cover control
See page 40
Configuration
Pool Data
Volume
Flow rate
Turnovers
Antifreeze prot.
Cover Reduction
Cover Speed
Pool Type
Pump Data
Pump Type
Alarm Pressure
Protection Pressure
Pump Protection
Default speed
Cyc1/Cyc2 speed
Cleaning speed
Filter Data
Type
Pressure
Frequency
Time
Cleaning valve
Cleaning Mode
Backwash Duration
Rinse valve
Rinse Duration
Suction Valve
Suction Via
APF Injection
Inputs Digital Inputs
Analog Inputs
Factory Settings
Firmware
Network
Date/Time
Language
Units
Reset
Equipment
Pool Cover
Jet Stream
Set pump data parameters, used for alerts
and pump protections.
See page 33
Set inputs settings
See page 37
Set pool data parameters used to calculate
filtration duration
See page 32
Set the Jetstream control
See page 41
For a much easier and faster configuration, we
recommend you to do it on pro.dryden-space.com

14 | Page Instructions for use [short]
SPACE
www.drydenaqua.com
9. SPACE Cloud :
10.Circulation mode: (if suction valve is present)
Specific parameters dedicated to circulation mode.
SPACE is connected to the cloud.
SPACE is associated to a swimming pool.
One-time password.
Unique identifier of the device.
Activate/deactivate ECO Mode
Air temperature setpoint
to trigger ECO Mode
User selected surface (skimmer or balance
tank) circulation cycles (up to 4 per day).
User selected bottom circulation mode
SPACE Cloud
Connected
Registered
OTP Code
UUID
circulation modes
ECO Mode
Setpoint
Bottom Cycle
Surface Cycles
See page 40

15 | Page Instructions for use [short]
SPACE
www.drydenaqua.com
4.1 FILTRATION MODES MENU
Set the duration and daily filtration times.
The filtration programmer has two cycles over a 24-hour period,
Cycle 1 and Cycle 2, these cycles have predefined values or are freely accessible
according to the filtration mode chosen.
The filtration programmer has 8 operating modes.
In STOP Mode, filtration timers are set to 00:00 and will remain OFF as long as there is no filtration
cycle or no manual command to start the pump. The filtration will never run in automatic mode.
In TIMER Mode,Cycle 1 and Cycle 2 are set by the user. SPACE will use fixed programmed
timer settings to start and stop the filtration.
Note: It is recommended to keep at least 2x30 minutes of free time (no filtration) per day.
This allows pH measurement, periodic filter cleaning, automatic filling of the pool if installed.
In ECO+ Mode SPACE adjusts the filtration duration based on measured water temperature,
filtration rates, and other factors. This mode allows SPACE to automatically adjust the filtration
duration based on changing seasonal and weather conditions and thus protect water when
temperature is high and save energy if temperature is low.
•Set Cycle 1 as desired. Duration will be taken into account when calculating Cycle 2 duration.
•Set the Cycle 2 Filtration ON time. SPACE calculates and sets the OFF time, with Xindicated.
•The duration is automatically calculated based on the average measured temperatures during
filtration in the last 24-hour period.
Note: ECO+ Mode uses the average water temperature, observed over the day. After a
reset, the default filtration time is about 8 hours, based on an assumed temperature of 20°C.
The first time ECO+ mode is selected, the duration of cycle 2 will be set by default to 8 hours.
After about 10 minutes of operation, an accurate measurement of the pool water temperature
will allow SPACE to assess the adequate filtration time.
An update will be made automatically at 17:00.
VOLUME mode is based on the same model as ECO+ Mode with a noticeable difference:
•In ECO+ Mode, the filtration duration is calculated is made using the pool temperature.
•VOLUME Mode does not take temperature into account, but simply use the turnover rate defined
in the Pool data menu to estimate the filtration time.
In CONTINUOUS mode, Cycle1 and Cycle 2 have the same 11:30 duration time so that the global filtration is 23/24.
The only available setting is the starting time of Cycle1.
In FORCE Mode (24H, 48H or 72H), the filtration will operate 23 hours a day for the selected period and will then
revert back to the previous mode. Forced mode is achieved by temporarily setting Cycle 1 timer value so that, added
to Cycle 2, the filtration duration is 23 hours. No timer settings are available in Forced mode.
In the 24/24 mode, the pump operates continuously, as long as it is primed and the pressure remains ABOVE
Protection Pressure. (pH measurements are done 1x per hour and level measurements every 20min.)
In NO PUMP mode, SPACE does not control the filtration pump, it is supposed to be controlled externally.
Priming and flow control are still monitored.

16 | Page Instructions for use [short]
SPACE
www.drydenaqua.com
5.1 AUXILIARIES MENU
Operation Modes of auxiliaries are related to auxiliary names (for those which are free)
Auxiliary timers have one cycle in any 24-hour period.
When quitting the AUXILIARIES menu, SPACE checks the status of the auxiliaries, and switches them ON or OFF as
required to match programmed running times.
Auxiliary ID
The default identification is Free. Each auxiliary can be renamed for ease of use and tracking. The following 15
predefined names are available for auxiliaries:
NOTE:
On "infinity" pools, an auxiliary whose identifier is
"Transfer pump" is considered to be the means of moving the water from the buffer tank to the pool.
The pump controlled by this auxiliary will be set ON automatically during the water level control phases in order to
produce a change on the water level in the buffer tank.
NOTE:
To change the auxiliary ID, use the up arrow to place the cursor in the title area.
Then use the up and down arrows to select the ID text and confirm with SELECT.
NOTE:
Each auxiliary can be renamed on the web application for ease of use and identification via remote interfaces.
The name is unchanged on SPACE.
"Aux" Mode
Manual mode allows manual ON/OFF commands only. No automatic function will apply.
Timer mode allows to define a start time and a stop time.
Pulse mode allows to manage the ON duration. When the Aux is set ON
(manually or automatically) it will revert to OFF after the defined duration.
When auxiliary is set as heating, 3 additional modes are available:
In Filtration mode, the heater can only operate during programmed filtration hours. This is
our recommendation.
In Priority mode, the filtration pump is forced on for priority heating which will
accelerate the increase of water temperature.
In Schedule the operation of the heater is limited within the period defined by its own timers.
Heating will then only be possible within the defined ON/OFF time range and if the filtration
is running.
Default: Free
Entries: Available
Pool Light
Pool Cleaner
Pool Heating
Disinfection
Electrolyzer
Remnant
Trans./by-pass pump
UV
Spa
Fountain
Bore Hole
Pool House
Garden 1
Garden 2
Garden 3
Used for :
Values: Used for backwash valve
Used for speed control
Used for ORP control
Used for Remnant (H2O2 dosing)
Used for pool cover
Used for jet stream
Used for alarm signaling
Used for cleaning valve
Used for Rinsing valve
Used forum APF dosing
Used forum ACO dosing
Used for Suction Valve

17 | Page Instructions for use [short]
SPACE
www.drydenaqua.com
The table below summarizes the available modes according to the auxiliary’s identifier:
"AUX" Times (Timer mode)
In Timer mode, set fixed duration with ON and OFF times.
Setting any timer to 00:00-00:00 deactivates that timer.
"Aux" Time and Duration (Pulse Mode)
In Pulse mode, define the ON time.
ON time set to 00:00 suppresses automatic pulse generation. Aux must be set ON
manually and will fall back to OFF automatically after pulse duration.
When in Pulse mode, define the duration, up to 99 minutes and 59 seconds.
"Aux" heating temperature (Filtration/Priority/Schedule modes)
Set the desired temperature of water.
The temperature will be maintained ±0.1 °C (±0.18°F) of the set point.
"Aux" Slave
Auxiliaries can be set to run only if:
The pump is primed (SLAVE: PUMP). This is essential for equipment
requiring a water flow, such as a robot, water treatment, etc.
The cover is open (SLAVE: COVER). This function only applies to the pool
light and JetStream.
"Aux" days of the week
Auxiliaries can be set to run only on selected days of the week.
This is ideal for equipment such as pool cleaners and irrigation,
which can be run on specific days of the week.

18 | Page Instructions for use [short]
SPACE
www.drydenaqua.com
6.0 Water and treatment:
6.1 Water Level Control
Set water level control parameters.
SPACE can be configured to automatically refill water level.
Installed:
Select this checkbox if a water level sensor is connected. This will allow the measurement and indication of the water
level. This will also allow manual control to fill the pool. Manually controlled filling stops automatically when the water
level is detected HIGH.
Mode:
In Timer mode: Water level control is performed only when the pump is stopped and updated every 15 minutes. The
change of a parameter setting will be considered during the update, within a maximum of 15 minutes after the change.
Automatic Refill or Mode=REFILL:
Check the "automatic refill" box or choose "mode=REFILL" to enable automatic refills.
The water level is checked within 15 minutes after pump is stopped at the end of the filtration cycles, an automatic refill
is activated if the level is LOW.
In 24/24 mode :
The level is checked and controlled every 20 minutes outside of disinfection dosing periods. Water refill can start
immediately but will be interrupted after 30 minutes. If the set water level has not been reached during this time
period, refill will start again in the next 20 minutes. Multiple refill periods can be used to reach the set level. The
adjustable maximum refill time is always in place to protect against leakage.
A water level/refill control will be carried out systematically after every filter backwash (and rinsing).
At the end of a filter backwash, the water level is checked and readjusted (if water refill is possible). To take into
account infinity pools and possible level fluctuations in the buffer tank, water refill can be repeated up to 6 times with a
delay of 20 seconds between each water level measurement. Refills stop as soon as the level stays at its set point.
The frequency of water level reading will be increased after backwashing and repeated several times.
The logic that immediately follows a filter backwash is as follows:
1. Launch water level adjustment
2. If the level is LOW, suction is done via the bottom drain
3. Refills if necessary
4. At the end of refill, the suction valve can be switched back to the surface (skimmer or buffer tank)
5. At the end of the refill wait 20 seconds.
6. Steps 2,3,4,5 can be repeated up to 6 times.
To obtain a good repeatability of the final water level, it is recommended to:
Skimmer pools
Do not place the level sensor in the skimmer but on the water line (because the water level is always a bit dropping
while skimming). You could place the sensor in the cover niche). This way, the level is independent of the state of
filtration (on or off).
Infinity / overflow pools
Leave sufficient space between the target level and the safety-overflow of the buffer tank to accept the excess water
that will flow into the buffer tank when the filtration stops.

19 | Page Instructions for use [short]
SPACE
www.drydenaqua.com
Continuous mode: (not necessary in 24/24 mode)
Normally, water refill stops when the pump starts. The goal is to avoid overfilling the pool due to incorrect detection of
water level due to the movement of water generated by the pump, especially if the sensor is installed inside the
skimmer. In some pools, the refill time is longer than the period during which filtration is not in operation, especially in
summer time. In this case, and if the water level is not affected by the pump, selecting the continuous mode allows you
to keep refilling the pool even if the filtration restarts.
Careful! Check with your installer that this option is appropriate to avoid excessive pool refills, flooding and excessive
water consumption.
Maximum duration:
The maximum duration is a method of limiting the duration of each individual refill.
If water refill is not completed by the end of the maximum time, it is stopped and an alarm is triggered.
This is an indication of a possible leak in the system.
Note :
In 24/24 mode: the system will restart refill at 00:00, and this 3 times in a row, if the alarm is not deleted in the
meantime. Deleting the alarm allows another 3 successive refills attempts.
Automatic level reduction or Mode=REDUCE:
When the level is VERY HIGH, level reduction cycles (up to a maximum of three per day) are automatically controlled to
reduce the water level.
The reduction will be done by cleaning the filter (if the filter cleaning mode is on "Automatic"), but can also be done by
directing the water to the sewer (cleaning mode "Manual" or "Inhibited" in the case where a rinse valve is configured).
The reduction of the level is not immediate and depends on the type of pool declared in the pool data:
•With "classic" pools, the level must be detected VERY HIGH during 15 minutes before the reduction is
activated.
•With "infinity" pools, the detection of the VERY HIGH level causes the filtration to start and to overflow. If,
after 15 minutes, the level remains VERY HIGH, then the reduction is activated.
If the level is HIGH, the filtration continues to work. If the level remains HIGH after 3 hours then the
reduction is activated. At any time, as soon as the level becomes NORMAL or LOW, filtration is stopped or
go to Eco Mode in a 24/24 operation.
Note:
The "Mode=Auto" combines the actions of "Mode=REFILL" and "Mode=REDUCE".
Priming (Solenoid valve Test)
Ensure Solenoid valve is correctly connected and powered. Commanding priming ON will activate the solenoid valve for
60 seconds allowing the water to flow. Priming is stopped when quitting the menu or after 60 seconds.
Refill rate:
Set the actual or estimated average refill rate in cubic meters per hour per minute to allow the calculation of water
consumption, displayed in the statistics.

20 | Page Instructions for use [short]
SPACE
www.drydenaqua.com
Setpoint
Define the targeted level during refill.
Installation of the water line version, with 4 Terminals
Secure the water level sensor (using stainless steel
self-tapping screws, or appropriate adhesive) at the correct
height on the inside of the skimmer or on the waterline.
If the level sensor is fitted in the skimmer, make sure that
the skimmer basket and lid can easily be removed and replaced
without damaging the sensor or cable.
Normal water level must be between WL (HIGH) and WL (LOW).
WL (HIGH) must be below pool overflow level and at an
appropriate level with regards to the skimmer.
WL (PROT) is the V.HIGH level, at maximum pool water level.
Water line level sensor
Normal: the second slot of the sersor is targeted
High: the third slot of the sensor is targeted
Table of contents
Other welldana Control Unit manuals
Popular Control Unit manuals by other brands

Zodiac
Zodiac Jandy Pro Series Installation and operation manual

Jumper
Jumper JP4IN1 user manual

Moxa Technologies
Moxa Technologies V2400 Series user manual

VXI
VXI VT1419A Multifunction Plus user manual

Digikeijs
Digikeijs DR 4088LN Series instruction manual

Watts
Watts 919 Series Installation, maintenance & repair

SMC Networks
SMC Networks VM1000 Series instruction manual

Emerald
Emerald K3 operating manual

HETRONIC
HETRONIC CSM2400FH user manual

Speedaire
Speedaire 4ZL03 Operating instructions & parts manual

YASKAWA
YASKAWA CANopen SI-S3/V installation manual

Besenzoni
Besenzoni BUC Instructions for installation and use