IMPORTANT NOTICES Wellness
Shower™
Usage &
Care Guide
Wellness®
healthier water naturally
Welcome To Wellness
Thank you for buying a Wellness ShowerTM. It delivers the
purest and most natural water available, and effectively
reduces harmful contaminants, while at the same time
enhancing your water with delicate ions and minerals.
Did you know your body can absorb up to 100 times more
contamination in a single 10-minute shower than drinking the
same water for an entire day? The Wellness Shower protects
you by reducing chlorine, chloramines, radon, trihalomethanes,
and foreign tastes for 18 to 24 months - two or three times
longer than any other shower filtration system on the market.
Ever notice how dry your skin is after you shower and the
negative effect it has on your hair? The Wellness Shower
utilizes proprietary enhancement media to create the optimal
showering experience. The patented magnetic treatment
stage introduces a large amount of negative ions into your
water, creating an affect similar to showering at the base of
a waterfall. Bakuhan®, one of the enhancement media used
in all Wellness Filter products, imparts a wide range of trace
minerals into the water. These minerals assist in several bodily
functions, and for this reason, Bakuhan is the first and only
natural stone classified as a medicinal mineral by the Japanese
Ministry of Health. These technologies combine to produce a
spa experience in every shower!
The Wellness Kitchen S-IIITM is
the perfect compliment to your new
Wellness Shower. It combines premium
carbon block filtration with our
proprietary enhancement technology
to produce what many refer to as The
Best Source of Water on Earth®.
You’ll love the enhanced flavor in your
gourmet cooking. It is for this reason
that some of the world’s best
restaurants use Wellness Filter
systems.
The Wellness MG-IIITM & MG-IVTM
Home Systems offer the ultimate in water purification and
enhancement. Imagine having better-than-bottled-quality
water flowing from every tap in your home – including the
bath, kitchen, and garden. Because the water is treated as it
enters your home or business, you will have peace of mind
knowing that all of your water is purified and enhanced. Find
out for yourself why hundreds of thousands of users including
physicians, athletes and health-conscious individuals make
Wellness Filter their choice for a lifetime.
Limited Warranty
The manufacturer warrants the Wellness Shower to be free from material
defects and workmanship under the condition which the Wellness Shower
was installed, operated and maintained according to this Usage & Care Guide.
· Wellness Shower body is warranted for one (1) year from the date of
purchase. Receipt is required for the warranty.
· Wellness Shower cartridge is warranted for ninety (90) days from
purchase date.
A receipt is required for the warranty. The manufacturer will replace or repair (at
manufacturer’s discretion) any shower filter that fails to perform due to material
defects and workmanship. There are no warranties under situations of product
misuse, improper installation, improper maintenance and/or misapplication.
This warranty does not assume, explicitly or implicitly, any responsibilities or
consequential damages caused by product misuse, improper installation,
improper maintenance and misapplication of the product.
Wellness Enterprises, LLC
418 SW 140th Terrace Newberry, FL 32669 USA
Tel: 1-352-333-0480 • Fax: 1-352-333-0490
Version 1.1105
For updates see: wellnessfilter.com/support/downloads/
Read this data sheet in conjunction with the specifications and
operating instructions herein and compare the capabilities to
your actual water treatment needs before installing.
WARNING — For correct operation of The Wellness Shower it is
essential to follow these instructions.
CAUTION — Do not use water that is micro biologically unsafe
or of unknown quality without adequate disinfection. The
Wellness Shower is designed as a shower/bath filter and is not
designed as a drinking water filter.
Wellness Shower (WS-SF2) Filter Specifications
Temperatures range: 40°-110° F (5º C - 43º C)
Operating pressure: 20-100 psi (1.38 - 6.89 bar)
Chlorine, chloramines reduction: Up to 99%
Material: Black ABS Plastic
Total rated capacity: 24,000 Gallons (90,850 Liters)
Micron Rating: 50 Microns
Shower Filter: 26 oz. / 9.2" x 3.75" (235mm x 95mm)
Cartridge: 23 oz. / 7.25" x 2.65" (185mm x 70mm)
Media: Wellness Filter®Volcanic Media & KDF-55®
The Wellness Shower must be installed in accordance with all state and
local laws and plumbing regulations for water treatment devices.
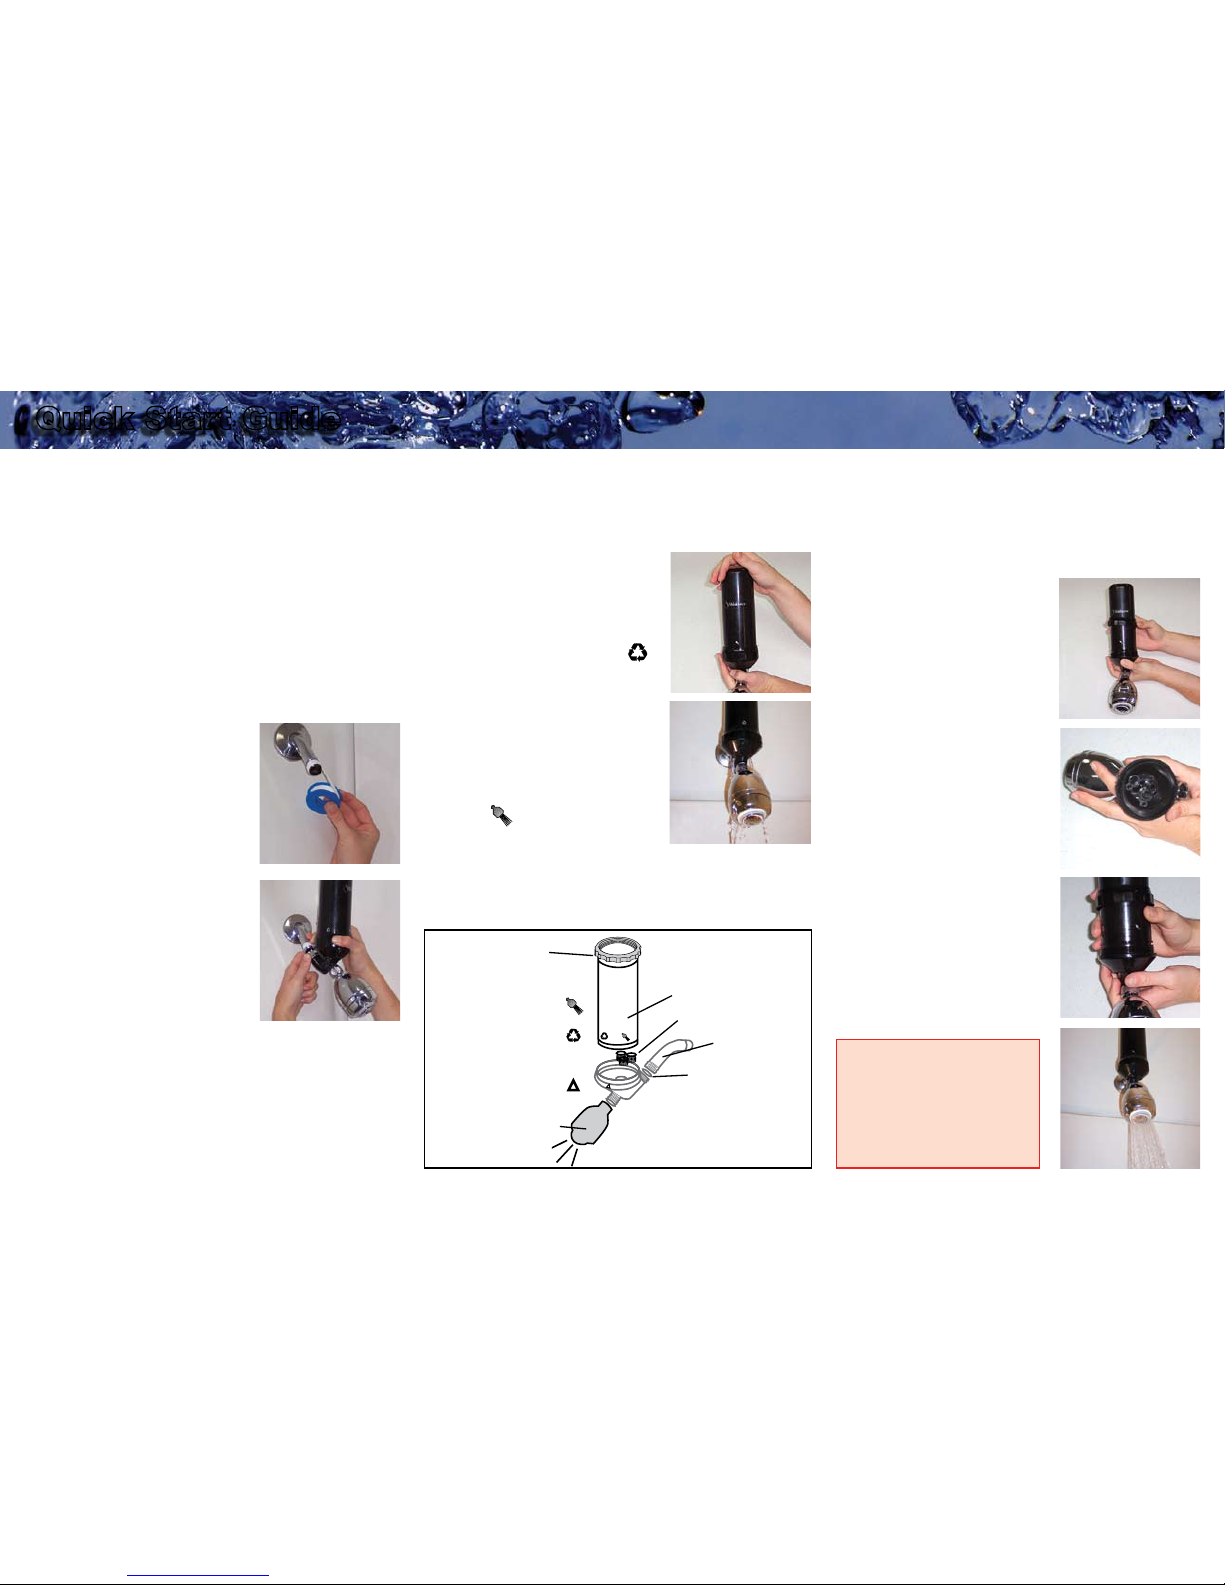
Note: Should water flow through your Wellness Shower
decline over time, the pre-filter screen may be partially
clogged with dirt or sediment. To clean the pre-filter,
backwash your Wellness Shower.