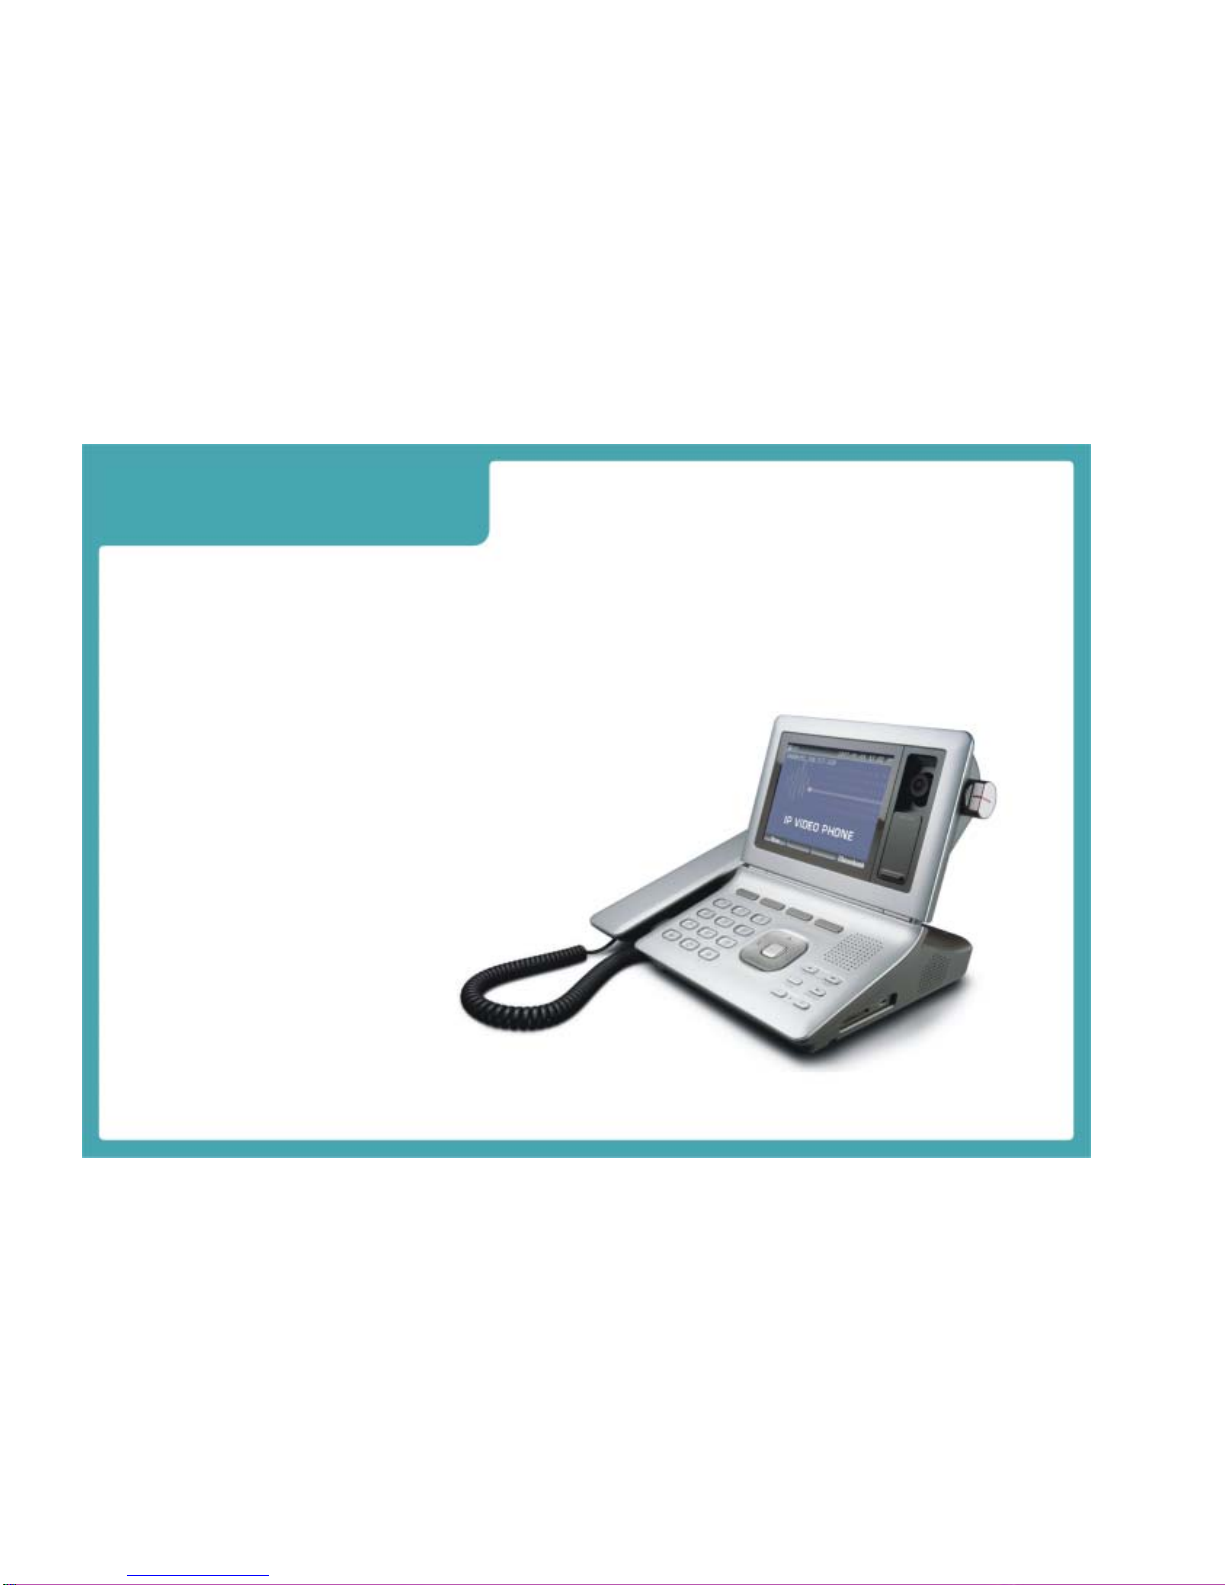
WELLTECH IP VIDEO PHONE User manual

Video Phone User Guide
1
IP VIDEO PHONE
User Guide

Video Phone User Guide
1
Contents
Chapter 1: Introduction 1
Welcome 1
The Concept of VoIP 2
What is SIP 3
Chapter 2: Installing 4
Package Contents 4
Assembling the Phone 5
Connecting to the Network 6
Power on the Phone 7
Chapter 3: Using the Phone 8
Knowing Your IP Video Phone 8
Keys/Buttons Layout 9
Making Telephone Calls 10
Receiving a Call 11
Muting a Call 11
Ending a Call 11
Chapter 4: Setting Up the Phone 12
Phonebook 13
Call Records 17
System Settings 19
SIP Services 26
Call Services 28
Appendix A: Regulatory Information 31

Video Phone User Guide
1
Chapter 1 : Introduction
Welcome
Thank you for choosing the IP Video Phone. This product provides many extraordinary features:
zStreaming Video and Voice over IP networks (VoIP).
zSupport SIP (Session Initiation Protocol) telephony services.
zFriendly graphical user interface with four interactive soft buttons provide most easy-to-use operations.
zIntegrated 5 inches LCD panel and camera provide outstanding video quality.
zErgonomically adjustable camera and screen
position.
zMulti-function keypad for telephony operations and
configurations.
zHandset and speaker-phone modes.
zWeb User Interface for online configuration from web
browser on your computer
Please read this user guide carefully before taking any
installation action. Please contact your dealers or system
integrators if you have questions.

Video Phone User Guide
2
The Concept of VoIP
The initial of Voice/Video over Internet Protocol, is the advanced technologies
that provide digital voice/video conversations over the Internet or through any
other IP-based network.
Few significant benefits of VoIP are:
zCost saving. By utilizing a single network to carry voice/video and data
where
zusers have existing network capacity that can carry VoIP at no extra
cost.
zAble to transmit multiple telephone calls down the existing IP network. It
makes
zVoIP a simple way to add an extra services to home or office.
zReceiving incoming calls anywhere you are connected to IP network or
Internet. User can work from anywhere with a sufficiently fast and stable
Internet connection.
The diagram on right side provides an example of a VoIP network structure.
Figure 1 : VoIP Network Structures

Video Phone User Guide
3
What is SIP
SIP is the initial of Session-Initiation-Protocol; it is an application-layer control
(signaling) protocol for creating, modifying, and terminating sessions with one
or more participants. These sessions include Internet telephone calls,
multimedia distribution, and multimedia conferences. Simply say, SIP is a most
commonly used protocol that used to interconnect SIP Enabled PBXes and/or
SIP UserAgents to each other to establish voice and video sessions between
each other over an IP Network.
This IP Video Phone implemented with advanced SIP technologies that is able
to provide outstanding voice and video quality over the IP network.
The diagram on right side provides an example of a SIP infrastructures.
Figure 2 : SIP Infrastructures

Video Phone User Guide
4
Chapter 2 : Installing
Package Contents
The following items are included in your
IP Video Phone package. Check this list
before installation to ensure that you
have received all items.
nPhone Base Unit
oHandset
pHandset Cradle and Fixing Plate
qHandset Cord
rUSB Cable
sEthernet Cable
tPower Adapter
uQuick-Installation-Guide and CD
Please contact your dealer immediately
in case you are missing items.
Figure 3 : Package Contents

Video Phone User Guide
5
Assembling the Phone
zLocate the longer straightened end of the handset cord, and plug
this end into the back of the phone base unit.
zPlug in short straightened end of the handset cord into the jack
at the bottom of the handset. Please refer to Figure 3.
zYou may fix the Handset Cradle with Phone Unit by using the
bundled Fixing Plate. Please follow this procedure. Please refer
to Figure 4.
Figure 5 : Mounting the Fixing Plate
Figure 4 : Assembling the Handset

Video Phone User Guide
6
Connecting to the Network
Please identify which IP Video Phone model you have before
installation. Standard model comes with only Power and LAN
connectors on the back panel.Advanced model comes with
extra WAN and four video/ audio ports. Please follow these
steps to connect your IP Video phone:
zTo connect to Ethernet network, plug in one end of Ethernet
cable into LAN port of the phone base unit, and then plug in
the other end to a Ethernet switch or Hub.
zPlug audio and video cables to proper ports to connect to
externalA/V devices such as:
Video Outpu – TV, VCR, etc.
Audio Output – peakers,Audio Recorder, etc.
Audio Input – Microphone, CD Player, etc.
Video Input – Camcorder, CCTV Camera,
DVD Player, etc.
(For advanced model)
zConnect the power cord of the power adapter at last. After you have
made the correct connections, then plug in the AC power adapter to an
electrical outlet. Use only the adapter that came with the phone.
Figure 6 : Cabling Diagram

Video Phone User Guide
7
Power on the Phone
After this phone is properly installed, you may power on it by plug in the power adapter
connector. Following boot-up sequences will take place:
zAWelcome message will show on the LCD first. This screen will last for about 5
seconds. Please refer to the first picture from the left below.
zThen you will see a System Loading message on the LCD screen.Avivid color ring is
circling during this stage, please refer to second picture from the left below. This
screen will last for about 25 seconds.
After boot up sequences are completed, the main page will show on the LCD screen,
please refer to the third picture from the left. Now this Phone is ready to use.
Figure 7 : Booting Up Screens

Video Phone User Guide
8
Chapter 3 : Using the Phone
Knowing Your IP Video Phone
5 Inches LCD Screen
Camera Lens
Camera Knob
Sliding Lens Cover
Soft-Function Key
Indicators
Speaker
USB Port
SD Card Slot
Microphone
Fixin
g
Plate
Handset
Handset Cradle

Video Phone User Guide
9
Keys/Buttons Layout
Soft
-
Function Key Indicators
Soft-Function Ke
y
Dedicated Function Keys
FUNCTION (LED Indicator)
MUTE (LED Indicator)
FLASH
SPEAKER (LED Indicator)
:VolumeUp
:VolumeDown
Navigation Key Pad
Dial Key Pad

Video Phone User Guide
10
Making Telephone Calls
After this phone has booted up, you may place a call by following
ways:
zLift the handset and key in the preferred phone number on the
dialing field, then press Dial button to make a call.
zPress the SPEAKER button and key in the preferred phone
number on the dialing field, then press Dial button to make a call.
This phone is able to remember your last called phone number. So if
you have made a call before, you will see last called phone number on
the dialing field when you lifting the handset or pressing the SPEAKER
button. You can press the Dial button to call same number again, or
press the numeric keys to cancel pervious number.
You may also make a call from several other locations of the User
Interface:
zTo dial from the Phonebook. Enter the Phonebook and find the
preferred number, then press the Dial button or Enter key (R) of the
Navigation Keypad to make a call.
zTo dial from the Call Records. Find the preferred phone number in
the Call Records, then press the Dial button or Enter key (R) of the
Navigation Keypad to make a call.
Figure 8 : Making Calls

Video Phone User Guide
11
Receiving a Call
When a call is come in, the phone will ring, and you will see the screen
on the right side appeared. You may receive this call by following ways:
zPick up the handset.
zPress the SPEAKER button.
Muting a Call
You may press the MUTE button to cut the outgoing video and voice
when using handset or speaker-phone. This feature allows you to
prevent the persons on the other end from hearing what you or
someone else at this end is saying.
You can cancel the mute function by pressing the MUTE button again.
Ending a Call
You may end the call by following ways:
zHang up the handset if you are using the handset.
zPress the SPEAKER button if your are using the speaker phone.
Figure 9 : Receiving Calls

Video Phone User Guide
12
Chapter 4 : Setting up the Phone
This chapter describes how to use and setup your IP Video Phone. You may press the Menu
soft-function key to enter this mode. There are 5 major sections in this mode:
zPhonebook
zCall Records
zSystem Settings
zSIP Services
zCall Services
zPhoto Album
You may use [ Å] and [ Æ] keys to select preferred
section, then press Enter key [ 9] to enter the sub
pages. Then use [ Ç] and [ È] keys to select
preferred item, and then press Enter key [ 9] to take
further actions.
Figure 10 : Phonebook

Video Phone User Guide
13
Phonebook
Phonebook main page includes five options: Search, List,Add New Contact,
Import and Export.
Search
This is a smart searching feature, it will show all related contacts while you
are keying first few characters. When you see the preferred contact, you may
use [ Ç] and [ È] keys to highlight the target contact, and then press Enter
key [ 9] to view details.
There are 4 soft-function keys in this page:
Edit
Press this button to edit the details of selected person.
There are 5 items in this page: Group, Name, PSTN,
Mobile and IP-URI (Uniform Resource Identifier). You
may update person or object data here.
Backspace Press this button to cancel last inputted character.
[ABC]/[123] Press this button to switch key pad between input
characters or numbers.
Exit Press this button to back to last screen.
Figure 11 : Search Mode

Video Phone User Guide
14
List
You will see all contacts list in this page by alphabetical sequence. You may
use [ Ç] and [ È] keys to highlight preferred target, and then press [ Group ],
[ Edit ], [ Delete ] and [Exit ] to proceed further actions.
There are 4 soft-function keys in this page:
Group You may switch the group to show phone list of selected
group by pressing this button. There are total 10 groups
and “All Numbers”.
Edit
Press this button to edit the details of selected person.
There are 5 items in this page: Group, Name, PSTN,
Mobile and IP-URI (Uniform Resource Identifier). You
may update person or object data here.
Delete You may delete selected person or object by pressing this
button.
Exit Press this button to back to last screen.
Add New Contact
You may add new contact phone number in this page. You will see five items:
Group - Select preferred group for this new contact by using [ Å]
and [ Æ] keys.
Name - You may input name of new contact here.
PSTN No - You may input PSTN phone number of new contact here.
Mobile No - You may input mobile phone number of new contact here.
Figure 12 : List Mode
Figure 13 : Add New Contact

Video Phone User Guide
15
IP-URI - You may input Domain Name or IP address of of new
contact here. The format usually like this:
<Domain>@xxx.xxx.xxx.xxx.
There are 3 soft-function keys in this page:
Backspace Press this button to cancel last inputted character.
[ABC]/[123] Press this button to switch key pad between input
characters or numbers.
Exit Press this button to back to last screen.
Edit Group
You may rename group in this page. You will see a list of groups when you
enter this page. There are total 10 groups, from Group 1 to Group 10. Use
[ Ç] and [ È] keys to select preferred group, and then go to right side to
change the name.
There are 3 soft-function keys in this page:
Backspace Press this button to cancel last inputted character.
[ABC]/[123] Press this button to switch key pad between input
characters or numbers.
Exit Press this button to back to last screen.
Figure 14 : Edit Group Mode

Video Phone User Guide
16
Import & Export
You may import and export the phone book in this page. Exported phonebook
is you stored in text file format. You can use WordPad to edit the phonebook,
and then import it back to IP Video Phone. Phonebook is able to store
maximum 200 records.
You have to attach a USB disk before you take Import or Export actions. You
will see 2 selections when you enter this page: Import and Export. Use [ Å]
and [ Æ] keys to select preferred item, then press [ 9] to execute selected
action.
There is 1 soft-function key in this page:
Export Press this button to export Phonebook to USB Disk.
Import Press this button to import Phonebook from USB Disk.
Clear Press this button to delete all records on the Phonebook. This
feature is able to prevent duplication data on Phonebook.
Exit Press this button to back to last screen.
Phonebook File Format
Exported Phonebook data is stored in “CSV” format. CSV format is common
used file format for Internet and network applications. You may Notepad to
edit this file. There are 4 columns in this file: Name, IP-URI, PSTN, and
Mobile. Please note, DO NOT delete the comma “,” between columns.
Figure 16 : Import and Export Mode

Video Phone User Guide
17
Call Records
Find Call Records by using [ Å] and [ Æ] keys. There are 3 options:
Missed Calls, Dialed Calls and Answered Calls.
Missed Calls
In this page, you will see a list of all missed calls. This phone keeps maximum
20 missed call records.
You may use [ Ç] and [ È] keys to select preferred record, then you may
press [ 9] to dial out this number. There are 4 soft-function keys in this page:
Enter Press this button to dial out selected number.
Clear Press this button to delete all missed call records.
Delete Press this button to delete this missed call.
Exit Press this button to back to last screen.
Dialed Calls
In this page, you will see a list of all dialed calls, this phone keeps maximum
20 dialed call records.
You may use [ Ç] and [ È] keys to select preferred record, then you may
press [ 9] to dial out this number. There are 4 soft-function keys in this page:
Enter Press this button to dial out selected number.
Clear Press this button to delete all dialed call records.
Figure 17 : Call Records
Figure 18 : Missed Calls

Video Phone User Guide
18
Delete Press this button to delete this dialed call.
Exit Press this button to back to last screen.
Answered Calls
In this page, you will see a list of all missed calls, this phone keeps maximum
20 answered call records.
Use [ Ç] and [ È] keys to select preferred item, then you may press [ 9] to
dial selected number or you may user one of 4 soft-function keys in this
mode:
Enter Press this button to dial out selected number.
Clear Press this button to delete all answered call records.
Delete Press this button to delete this answered call.
Exit Press this button to back to last screen.
Figure 19 : Answered Calls
Table of contents
Other WELLTECH Telephone manuals

WELLTECH
WELLTECH LAN PHONE 101 H.323 - VERSION 112 & 502 User manual

WELLTECH
WELLTECH 101 Instruction Manual

WELLTECH
WELLTECH ASTERISK - Instruction and safety manual

WELLTECH
WELLTECH LAN PHONE 101 H.323 - VERSION 111A &... User manual

WELLTECH
WELLTECH LP600N User manual

WELLTECH
WELLTECH SIP PHONE LP101 User manual

WELLTECH
WELLTECH LAN PHONE 101 H.323 - VERSION 113 & 503 User manual

WELLTECH
WELLTECH LAN PHONE 101 H.323 - VERSION 111A &... User manual

WELLTECH
WELLTECH 399 User manual

WELLTECH
WELLTECH LAN PHONE 101 H.323 - VERSION 114 & 504 User manual