WeP BP 1100 JOY User manual

U S E R M A N U A L
BP 1100 JOY
C0000XXX
Vr 1.0.0
Dec’21
C0000XXX

Dear Customer,
Congratulations !
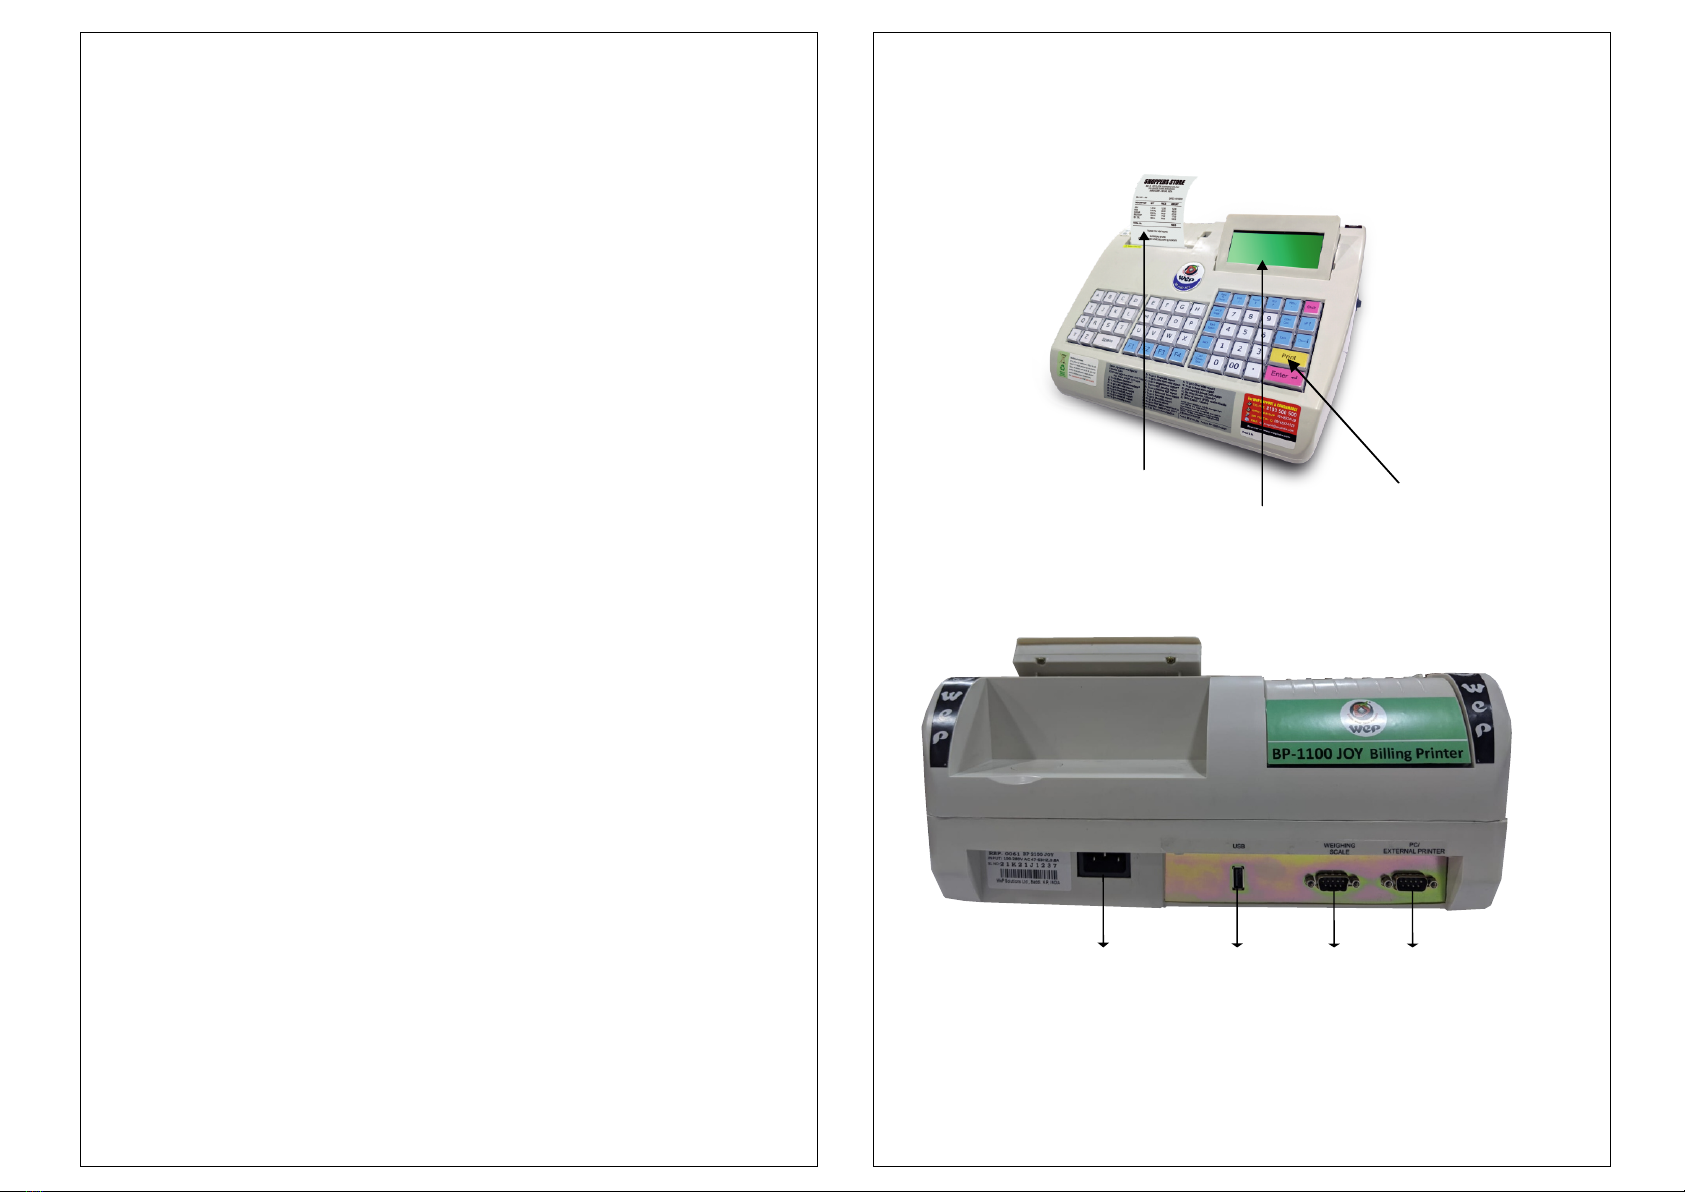
You are now a proud owner of BP-1100 JOY. Billing has never been
more of a pleasure, designed at the cutting edge of technology
BP-1100 Joy is easy to operate,effortless to maintain with low
running costs.
Enjoy our fantastic service spread across the country through well
networked Authorised Service Providers. To unlock the tech
fantasy inside your BP-1100 JOY, use this guide and
harness the maximum your personal prroduct has to offer.
Should you need usage clarification, or perhaps have a suggestion
for us,do e-mail us at [email protected]
Note : Product visual shown on this User Manual is for
general reference only. Product may vary in some of its details.
WARNING:
1. Shut down your equipment immediately if it produces smoke, a strange
odor, or unusual noise. Continued use may lead to fire or electric shock.
Immediately unplug the equipment.
2. Get serviced from authorized and qualified service personal. Do not make
modifications to the unit. Tampering with this product may result in injury,
fire, or electric shock.
3. To avoid risk of electric shock, do not set up this product or handle cables
during a thunderstorm in order.
4. Be sure to use the specified power source. Connection to an improper
power source may cause fire or shock.
5. Never insert or disconnect the power plug with wet hands. Doing so may
result in severe shock.
6. Do not allow foreign matter to fall into the equipment. Penetration by
foreign objects may lead to fire or electric shock.
7. If water or other liquid spills into this equipment, turn off the power supply
switch and unplug the power cable immediately. Continued usage may
lead to fire or electric shock.
8. Do not place multiple loads on power outlet. Overloading the outlet may
lead to fire. Always supply power directly from a standard 240VAC
domestic power outlet.
9. Handle the power cable with care. Improper handling may lead to fire or
electric shock.
10. Do not modify or attempt to repair the cable.
11. Do not place any heavy object on top of the cable.
12. Do not place the cable near heating equipment.
13. Check that the plug is clean before plugging it in.
CAUTION:
1. Be sure to set this equipment on a firm, stable horizontal surface. Product
may break or cause injury if it falls.
2. Do not use in locations subject to high humidity or dust levels. Excessive
humidity and dust may cause equipment damage, fire or shock.
3. Do not place heavy objects on top of this equipment. Never stand or lean
on this equipment. Equipment may fall or collapse, causing breakage and
possible injury.
4. To ensure safety, unplug this equipment prior to leaving it unused for an
extended period.
5. Parts on the circuit board may become hot during operation. Wait approximately
10 minutes after turning the power off before touching them.
6. To avoid injury, take care not to insert fingers or any part of the hand in the roll
paper opening where the manual cutter is installed. When using compressed
air products; such as air dusters, for cleaning during repair and maintenance,
the use of such products containing flammable gas is prohibited

CONTENTS
1.0 Your BP-1100 JOY at a glance
1.1 Features
1.2 Product highlights
2.0 Let's get started
2.1 Unpacking your BP-1100 JOY
2.2 Site selection and site preparation
2.3 Power conditioning equipment
2.3.1 Product with direct power supply
2.3.2 Product used with battery pack
2.3.3 Operation of product in battery mode
2.3.4 Safety precautions for lithium ion battery pack
2.3.5 Li-ion battery specification
2.4 Installing paper roll
3.0 Safety precautions
4.0 Keyboard and Functions
5.0 Operations
5.1 Download database/header-footer/settings/stock/
from utility from computer
5.2 User login mode
5.3 How to operate?
5.3.1 Billing options
# Return Merchandise
# Item Search
# Browse/Edit Through
# Kot printing
# Kot Bill Printing
6.0 Menu Options
6.1 Item database
6.2 Bill settings
6.3 Machine settings
6.4 Configuring Header Footer
6.5 Configure User Information
6.6 Firmware Info
7.0 Report option
8.0 Shortcut Keys
9.0 Product specification
10.0 Do's and Dont’s
11.0 Limitation
1.0 YOUR BP-1100 JOY AT A GLANCE
TOP VIEW
1
Page No
1
2
3-4
4
4
4-5
5
5
5
5
6
6
7-9
10
10
11
11
11-12
13
13
14-16
16
17-18
19-23
23-45
45-52
52-53
54
54-56
63-64
64-65
65
65
INTERFACES
8 Line LCD
59 Keys KEYPAD
THERMAL PAPER ROLL
AC Inlet 2X Serial PortUSB Host Interface
4
4-5
4.1 List of Peripherals compatible with our Printer 9
14
53
6.7 Upload to USB
56-63
12.0 Troubleshooting 66

1.1 FEATURES
LCD Module :
Displays all transactional entries & data keyed in.
Key Pad :
It contains alphanumeric and function keys required for item
entries, modification and search items in data base.
ON / OFF Switch :
To power ON/OFF the unit.
Serial Interface :
This interface is used normally during data download / data upload.
Cable from this interface has to be connected to Computer serial port.
USB Interface :
This interface is used normally for standard Pen drive during data
download / data upload.
AC Power Inlet :
Used for AC supply to the printer.
2
1.2 PRODUCT HIGHLIGHTS
Download Items. Header/Footer (Shop name, address etc) to Product from utility.
• Item wise search for billing and bill editing
• 10000 item database
• Sales return(Return merchandise)
• Generation of Calculator report
• 5 Digit secured password protection
• BP-1100 Joy Utility for convenient item creation
• Round off/Discount/Price change/other charge (Service tax)/VAT
options available.
• Weighing scale interface is possible (Essaeteraoka, Digi point, eagle,
sansui, Prince,Phoenix, Giritronics, Omni interprix)
• Maximum 15 users are allowed and configured through USER ID -1
• Stock management option
• Return merchandise option during billing
• Table splitting option for KOT
• Barcode reader interface(Malacrity 2806,Posiflex CD-3860,
• Report Uploading option to pen drive(CSV format)
• Total 365 days(1 year data storage)
• Settings and Database can also be downloaded from utility
(Serial interface)
• Logo printing
• Two copy bill
• Units like kg, liter etc user configurable through the machine.
• Modify price/Tax/Discount of existing item
• Automatic Tax & Discount calculation
• On LCD, Time/Date/Day is displayed
• On Bill printouts, Date/Time is printed
• Browsing through the items in bill using PLU
• Automatic bill number generation
• 59 HOT keys
Note: by using different key combination hot keys can be increased.
• Generation of Reports like:
• Detailed Reports like
• Bill wise Report (1Year)
3
•
Honeywell MSS145-Eclipse,TVSE BS-L101
TVSE BS-C101 STAR, TVS Bl105)
,
One bill with max 250 items
•
• Item wise Report (1Year)
• Void bill Report ( Present Day)
• User billed Report (1Year)
• Hourly Report (1Year)
• Duplicate bill Report (1Year)
• UDF item wise Report (1Year)
• KOT pending Report (Present day)
• Delete KOT Report (Present day)
• Return item Report (1Year)
• Tax wise day Report(1 year)
• Profit Report
• Calculator Bill Report
• Item Bill Report (1 Year)
• Payment Report

Summary Reports like
• Day wise Report (500 Days)
• Monthly Report (100 Months)
• Yearly Report (8 Years)
• UDF wise Report
• User wise Report
• Rate wise Report
2.0 LET'S GET STARTED
2.1 Unpacking your BP-1100 JOY
As you unpack the BP-1100 JOY, check that you have all the parts mentioned below
that none have been damaged during transportation.
1. BP-1100 JOY Product
2. Paper roll 2 inch and roll paper holder (Stationery)
3. AC power cord
4. Warranty Manual
After removing the parts, save the packing materials in case you need to
transport your product.
2.2 Site selection and Site preparation
While selecting a place to set up your product, keep the following in mind.
• Place the product on a flat surface.
• Leave adequate space around the product for easy operation, maintenance,
and proper ventilation.
4
2.3 Power Conditioning Equipment
• Product can be used with the direct power supply or
• Product can be used with WeP Battery pack.
2.3.1 Product with Direct power supply:
• Product comes with AC cable which can be plugged into the AC mains
and switched ON.
• Ensure that the input supply to product is within the specified limits as given below
a. Voltage range : 150 to 270VAC
b. Ground to Neutral Voltage: Less than 3VAC.
c. Frequency: 47 – 53 Hz.
d. Use of Voltage stabilizer/CVT UPS to ensure regulated supply of Voltage to your
product.
2.3.2 Product used with Battery Pack:
• Product can be used with the battery Pack alone,
• When mains off automatically control will switch to battery mode.
• Battery backup time: 90 Minutes with 100% duty cycle approx.
2.3.3 Operation of product in Battery Mode :
When battery voltage is dropped to 60% then buzzer will start beeping at regular interval of
5 minutes. If battery voltage drops below 50% then machine will go to power saving mode
and stop working till power is retained or battery is charged.
2.3.4 Safety Precautions for Lithium Ion Battery Pack
1. Replace the batteries with the same rating as present in the unit. The Battery type and
rating is mentioned on the Battery Cover under the unit.
2. Do not remove the battery from the Machine.
3. Do not remove the battery seal.
4. Never dispose the batteries in a fire,they may explode. Never short-circuit the Battery
5. In the event battery fluid leaks and get in to eye, do not rub the eye. Rinse well with
water and immediately seek medical care. If left untreated otherwise the battery fluid
can cause
2.3.5 Li-Ion Battery Specification:
Comes with shrink-wrapped re-chargeable battery pack
Capacity: 2 cells 7.4V, 2200mAh.
Dimension: 69.5 x 37.5 x 19.5 (W x H x T) in mm with protection.
5
damage to eye.
• Tax Report
• Bill Data
• Avoid outlets on the same circuit with large motors, A/c's or other appliances
that might cause fluctuations in line voltage.
• It is advised to place the product where the dust level is minimum.

2.4 Installing Paper Roll
· Open the paper cover as shown in below figure.
· Remove the Groove shaft
· Hold the paper roll in hand and place it into shaft holder using groove
shaft.
· Drag the paper little and insert it into Paper cover slot.
· Close the paper cover firmly and ensure that it has locked properly.
· Now your Product is ready to print.
Note: Ensure coated side of paper is facing you (Refer picture shown above)
3.0 SAFETY PRECAUTIONS
1 Please read the manual before using the product.
2 Ensure that the protective materials are removed before installation.
3 Do not expose to direct sunlight, excessive heat, moisture or dust.
4 In case of printing abnormality, do not dismantle any part from product. Call your
nearest Authorised Service Provider listed in Warranty Booklet.
5 Keep Key Pad Module intact to avoid dust collection.
6 Do not insert or remove the interface cable when the product is in ON condition during
program download.
6
4.0 Key Board & Function
7
LCD MODULE : Displays all transactional entries & data keyed in.
KEY BOARD : It contains alphanumeric & function keys required for item/
customer entries, modification and other special functions.
KEY Functionality
# Use to print bill or report
# Hold PRINT BUTTON and switch on
the printer for self test printing
(Till 2 beeps).
# In Billing window press print to make
duplicate bill.
To confirm entry and go to next mode
Input Numeric :
To enter numbers like rate etc.
Input Alphabets and Special
Function Like
NOTE:After login first Press SHIFT key,
then Press SHORT CUT keys.
A: To Add Item database
C: To go to Bill wise report
D: To go to Item wise report
E: To go to Void bill report
F: To go to User bill report
G: To go to Item bill report
H: To go to Hourly report
I: To go to Duplicate report
J: To go to UDF item wise report
L: To go to KOT pending report
M: To go to Deleted KOT report
N: To go to Returned Item report
O: To go to Day wise report
P: To go to Monthly report
Q: To go to Yearly report
R: To go to UDF wise report and In
Itemno entry mode Press SHIFT then R
for Return merchandise
S: To go to User wise report
T: To go to Rate wise report
U: To go to Tax report
PRINT
ENTER
ABD
C
E
F
K
J
I
H
G L
M N O
P
Q
R
S T U
V
W
X
Y Z
7 8
9
4 5
6
1 2
3
000
.
V: Tax slab Enable/Disable
W: POS Enable/Disable
X: HSN Enable/Disable
2 Inch Paper Roll Loading Method
2

Press SHIFT + total key when printer
is in credit/retail billing mode for view the total
transaction.
Feed is to provide one line feed of Paper
advance. At the time of printing if PAUSE
is pressed, it will pause the printing.
HOT KEYS (For Fast billing)
Keys from A-Z can be configured and used as
HOT keys for an item selection during billing
Provides a blank character used to separate
successive words or characters only
2. During billing Press F1 key after items entry
for KOT Print
1. Press SHIFT then F2 for Data Downloading
from Utility in Login mode
2. During billing Press F2 key after items entry
for KOT SAVE
Press F3 key after UDF1 entry for Delete
KOT ITEM
1. For calculator rechecking in Calculator mode
Space
F1
F2
F3
F4
Cancel\
Clear
FEED / PAUSE
%
Void
/
Report
X
To erase the character one by one
To exit from the present mode
To clear the alphanumeric entry
1. To void the Bills
2. To do the division operation in
the Calculator mode
1. To get detailed and summary reports
2. To do the multiplication operation
in the Calculator mode
To go back to previous mode screen
Back
Space
Back
CASH DRAWER
/ TOTAL
NOTE: Above shortcuts only for manager login
NOTE: Hot key configuration mode provided
in the Machine settings.
1. Press Shift+F4 in the login mode for Firmware
Upgrade mode[For Service Personal Only]
2. Press F4 key after UDF1 entry to merge KOT.
To go to item search mode while billing/
To select addition in calculator mode
To switch to Menu selection mode from
To select subtraction in calculator mode
To enable/disable selection of
multiple function of other keys
To scroll down
To go to price change while billing
To scroll up
To go to item browsing while billing
PLU
+
Menu
-
Shift
Down
UP
To switch to User login mode from
billing mode
User/Calc
billing mode
To save a bill without printing
Save
To enter into calculator mode.
(When shift pressed in Billing mode)
Editing
8
9
Shift+F1 - Module testing serially
Shift+F3 - Diagnosis mode(Login window)
Bar code scanner Weighing scale
MALACRITY 2806, DIGI POINT
POSIFELX CD-3860, CONTECH
HONEY WELL MS5145- ECLIPSE ESSAE TERAOKA
TVSE BS-L101 SANSUI
TVSE BS-C101 STAR EAGLE
TVS BL105 PRINCE
PHONEIX
GIRITRONICS
4.1 List of peripherals compatible with our printer

5.1 DOWNLOAD HEADER-FOOTER/SETTINGS/STOCK
HEADER-FOOTER from utility from computer:
• Connect Serial interface cable.
•When control is at User login Mode press SHIFT and F2 LCD will display like
• press ENTER LCD will display like
5.0 Operations
• Ensure BP-2100 Series printer drivers are installed and should be selected as default.
• Create an item database and download it using BP-1100 JOY utility. Save Item
• Now Product is ready to use.
•Repeat above steps for downloading Bill settings etc.
NOTE 1 : The serial interface cable should be removed from printer after the data
transfer only.
NOTE 2 : Before any data is downloaded to Product, the following settings are required
in PC.
1. Default printer driver port : Serial port
2. Baud rate: 2400 / 9600 / 19200 / 38400 / 57600 / 115200 select anyone
3. Data bits: 8
4. Parity: None
5. Stop bits : 1
6. Flow control : None
NOTE 3 : Before starting the billing settings like Item database,should be
downloaded from the PC (Utility).
Instruction to use the USB to SERIAL Port Converter in BP-1100 Joy
1. Comport Configuration: Automatically it will select some com port. But we need
to change it to com1 & the following settings are required in PC:
i. The default printer driver port: Serial port (com1)
ii. Baud Rate: 2400/9600/19200/38400/57600/115200 Bits per second (Any one)
iii. Data bits: 8
iv. Parity: None
v. Stop bits: 1
vi. Flow control: None
NOTE: Works only with Windows 8 & above.
Caution : Do not switch off the printer while Firmware downloading
10 11
WAITING FOR DATA
RESTART MACHINE TO STOP
SHIFT
PROGRAM DOWNLOAD MODE
PRESS ENTER TO CONTINUE
SHIFT
PRESS CANCEL TO EXIT
database in Pen Drive & download in BP-1100 JOY machine.
•User need to enter user ID (1 to 15) and press ENTER Cursor will shift to Password entry.
•After power ON, LCD will display
LOGIN ID :
NAME :
PASSWORD :
ENTER LOGIN ID
5.2 User login mode
o 1 Manager
o 2 -15 Clerks (Common users)
•Type the password(Default password is 00000) and press ENTER LCD will display
•To Enter billing mode select REGISTER and press ENTER button LCD will display like
14/106/10 THU 19:24
REGISTER
CALCULATOR
NOTE: In default billing mode press User\Calc Button to switch over different users.
•To Enter billing mode select Retail Bill and pr ess ENTER button
UDFI NO :
ITEM NO :
QUANTITY :
PRICE :
14/10/10 THU 19:24
Bill Modes
1. RETAIL BILL
2. CALCULATOR BILL
3. TOKEN PRINT
5.3 HOW TO OPERATE?
5.3.1 Billing options
Billing option 1: Billing by quantity option
14/10/10 THU 19:24
ITEM NO : 1
QUANTITY : 1 K. GRAM
PRICE : 25
UDFI NO : 1
RICE
• Enter the UDF1 number and press ENTER Cursor will shift to Item no entry mode.
• Enter Item no. Item name will be displayed in next line and press ENTER Cursor will shift to
Quantity entry mode.
NOTE1: If Bar code reader is connected and scanned for an item then item number and
name will be displayed.

NOTE 2: If HOT keys are configured then in item no press HOT key for item selection.
• If you want to modify the item number before pressing ENTER Use Backspace and if
already ENTER Is pressed use CANCEL\CLEAR to cancel the entry.
• When control is at Quantity entry (Max 9999.999), Enter the Quantity.
NOTE 2: If weighing scale interfaced with the BP-1100 JOY machine then the Quantity
is read from weighing machine.
• To change the price press Down arrow key or else press ENTER to proceed further
• Cursor will be blinking at first position, it is ready to accept the next item.
NOTE 3: Changing the price in bill/cash reception/other tax/ options can be enabled or
disabled through MENU
Different type of Round off/Discount options can be selected through MENU .
For Quantity 1, 2, 3 digits can be configured through user utility.
NOTE 4: If in Database, discount is entered, while printing Bill it prints real value on the
bill & shows discount separately, also VAT will be after discount.
Billing option 2: Rupee billing option:
1Enter the UDF1 number and press ENTER Cursor will shift to Item no entry mode.
2Enter Item no, Item name will be displayed in next line and press ENTER Cursor will shift to
Quantity entry mode.
3Now press SHIFT button for Rupee Billing, on pressing shift button Quantity changes to amount like
14/10/10 THU 19:24
ITEM NO : 1
QUANTITY : __ K.GRAM
PRICE :
UDFI NO : 1
RICE
14/10/10 THU 19:24
ITEM NO : 1
AMOUNT : __
PRICE : 20
UDFI NO : 1
RICE
In billing it will show the real value.
For item with price 10Rs, Discount 10%, and VAT 10%, if we billed for 1 Qty it will
display amount 10 Rupee only but TOTAL amount it will show value including
TAX and discount.
4Enter amount in Rupee at cursor & Press ENTER On entering the amount, it is
ready to accept the next item or the cursor moves to 'Price' Field (If price change
is enabled) or Press Down arrow key .
5Now you can edit the price if required or just press ENTER .
6Repeat the above steps for required number of items.
7Press PRINT to take Print out of the bill.
13
12
14/10/10 THU 19:24
ITEM NO : 1 RET
QUANTITY : 1
PRICE : 100
UDFI NO : 1
SHIRT
2Enter required item to be returned and press ENTER cursor will shift to Quantity
mode.
3Enter Quantity to be returned and press ENTER and then press PRINT for
Bill printing.
# RETURN MERCHANDISE:
1In billing mode when cursor is at Item number entry press SHIFT button then R
LCD will display like
ºWhen cursor is at Item no entry press PLU button LCD will display all the items.
# Search an Item by Item name (Alphabets):
14/10/10 THU 19:24
ITEM NO : _
QUANTITY :
PRICE :
UDFI NO : 1
NOTE1: In bill returns Returned item detail will be printed with Negative sign
NOTE2: If purchasing of a new items and return merchandise is done in the single
bill, then total bill amount will be
Total bill amount = Billed amount – returned amount
To search for an item starting with a specific alphabet or enter the specific string
through key board
º
SEARCH BY ITEM NAME
S_
SOAP
SUGAR
SALT
º The first item starting with that particular alphabets/string would be displayed in
LCD which can be scrolled down or up using arrow keys
º Select required item for billing and press ENTER

# Browse/Edit through Bill :
¨
Browsing and editing the item in bill is possible only after adding item to bill and
before printing the bill.
¨
Press Up arrow key when cursor is on Item number entry mode, LCD will display
like
¨
Press Up and Down arrow key to browse through all items entered in the bill.
14/10/10 THU 19:24
ITEM NO :
RICE
QUANTITY : 50
PRICE : 20
UDFI NO : 1
1
15
14
NOTE1: Item name can not be edited.
NOTE2: To change the Quantity/rate/discount, move the cursor correspondingly then
follow the same steps as billing mode.
NOTE 3: After the modification of a complete item i.e. after entering the Quantity/
price/discount,it goes back to browsing mode (cursor will disappear again)
NOTE 4: To delete an item completely, keep the item name position and press
CANCEL/CLEAR Warning message appears like
¨Press ENTER button to delete the item. or Cancel button to abort deleting.
# KOT (Kitchen order token)/Restaurant Billing and PRINTING:
¨When KOT and UDF is enabled (UDF name eg. Table no.) LCD will display like
14/10/10 THU 19:24
UDFI NO : 1
ITEM NO : 1
RICE
QUANTITY : 50 K.GRAM
PRICE : 20
ARE U SURE ENTER/CANCEL
14/10/10 THU 19:24
ITEM NO : 1
IDLI
QUANTITY : 1 NO
PRICE : 20
TABLE NO : 1
¨Enter the table number you want to give kitchen order token (KOT) (eg.1).
¨Press ENTER and type item number you want to give KOT(eg 1-IDLI)
¨Press ENTER to choose quantity and type quantity and press ENTER to add
different item.
¨After adding item to bill and when cursor is at Item number entry press F1
to print KOT
NOTE 1: After adding an item to bill, when cursor is at item number entry press F2
to save KOT. (Message will appear like KOT saved)
NOTE 2: If you want to split the single table (eg 1 table can be split into 4 chairs),
During billing, after entering UDF press Down arrow key that time below
LCD will display like Sub UDF(table 1,2,3,4 like below).
14/10/10 THU 19:24
ITEM NO :
QUANTITY :
PRICE :
SUB TABLE NO : 2
UDFI NO : 1
NOTE3: Delete KOT possible only after printing KOT or after saving the KOT.
DELETE KOT:
·Type the UDF(Table) no, for which KOT is printed or saved and press F3 LCD
will display like
· Select required item to be deleted by arrow keys and Press CANCEL/CLEAR
and ENTER button to delete the item (message will display item deleted) or
BACK button to exit from the mode.
NOTE : When you are doing KOT billing if bill is not printed and power is lost, after
power comes, if you switch ON the printer and after log in LCD will display like.
1
14/10/10 THU 19:24
UDFI NO : 1
ITEM NO :
IDLI
QUANTITY : 1 PLATE
PRICE : 15
CANCEL:DEL BACK:EXIT
1

16 17
SOME KOT BILLS ARE
PENDING
KOT OPTION
SELECT YOUR OPTION
1.PRINT KOT DETAIL
2.KEEP KOT
3.CLEAR KOT
· Select 1st option to print detail of UDF nos. for which KOT details are pending.
· Select 2nd option for retain KOT for particular UDF No.
· Select 3rd option for clearing all pending KOT for particular UDF No.
·Enter Required UDF and press ENTER cursor will shift to Item no entry mode.
·Press F4 LCD will display like
# KOT BILL PRINTING:
NOTE: KOT billing possible only if KOT printed or saved.
Enter Required UDF and press PRINT key, automatically bill will get generated
·
NOTE: If you want to merge different UDF's KOT in a single bill then press
ENTER
14/10/10 THU 19:24
TABLE NO : 1
ITEM NO :
QUANTITY :
PRICE :
14/10/10 THU 19:24
MERGE KOT
UDF1 No
ENTER: ADD PRINT:BILL
3. Enter the UDF no. on which KOT is billed then press F1 key, it will go to the
check KOT mode.In that particular mode if Print key is pressed then it will
again print the KOT details.
Enter Table Number (UDF) and press ENTER
NOTE: 1. All selected different UDF items will be printed in a single bill.
2. Press F3 key in the billing window, it will print the Engaged UDF report.
ITEM DATABASE
ØAdd Item
ØEdit Item
ØStock Management
v
o New Stock
o Add Stock
o Delete Stock
o Print Stock Report
oView Stock
ØPrint Item Data base
ØRound Off.
No Round Off.
Round Off To 0.25
Round Off To 0.50
Round Off To 1
6.0 Menu Option are given below:
Ø
§No Discount
§Item wise Discount %
§Pre Tax Disc %
§Post Tax Disc %
§
§
Post Tax Discount Amount
Post Tax Item Disc %
Stock Option
Bill with Stock
Bill without Stock
Bill Number Type
Continuous
Daily reset
UDF2 Option
Enable (Name/Range)
Disable
Rupee Symbol Option
Enable
Disable
§
§
§
§
Ø
Ø
Ø
Ø
Reports for Clerks
Print Customer Name
§ Enable
§ Disable
§ Enable
§ Disable
KOT Option
Enable
Disable
Rate Slabs
Enable
Disable
Ø
Ø
UDF1 Option
Enable (Name & Range)
Disable
Ø
Ø
Ø
Ø
Ø
Ø
§
§
Enable Price Change
§
§
Disable Price Change
Dynamic Price Change
Cash Reception
Other Charge
§Enable (Name & %age)
§Disable.
Item Name Print Option
Print Partial Item Name
Print Full Item Name
§ Enable
§ Disable
§
Ø
Tax Type Option
Forward Tax
Reverse Tax
Time Print Option
Enable
Disable
Ø
Ø
Ø Base Price Option
Enable
Disable
ØSub UDF option
Enable
Disable
ØView Total Option
Enable
Disable
ØLogo Print Option
Enable
Disable
v
BILL SETTINGS
Discount Option
Price Change
ØTwo copy bill Option
Enable/Disable
Ø
Enable/Disable
HSN Enable
POS Enable
Enable/Disable
Ø

18 19
Bill Style option
Big font
Small font
Ø
§
2400 Baud Rate
Ø Weighing Machine Baud Rate
MACHINE SETTINGS
¨ Set Time & Date
¨ Machine ID
¨ Machine Baud Rate
· 2400 Baud Rate
· 9600 Baud Rate
· 19200 Baud Rate
· 38400 Baud Rate
· 57600 Baud Rate
· 115200 Baud Rate
§ 19200 Baud Rate
§ 38400 Baud Rate
§ 57600 Baud Rate
§115200 Baud Rate
ØBuzzer Setting
Buzzer ON
Buzzer OFF
ØFactory Setting
ØRestore Defaults
ØHOT Key Configuration
External Print option
Disable
KOT on Ext
KOT on both
All print on EXT
All print on Both
§
9600 Baud Rate
¨
Upload To Usb
Self Test
¨
HEADER/FOOTER
§ Edit Header
§ Edit Footer
¨Firmware Information
¨User Configuration
External Auto Cutter
1 Enable
2 Disable
Ø
Ø
NOTE: USER ID-1 will have full rights and USER ID 2 to 15 will have access for billing & reports.
Coupon Print
Ø
Enable/Disable
Payment mode Option
Disable
Direct Payment
Split Payment
Calculator Bill Option
Qty and Rate
Rate and Qty
UTGST Option
Enable/Disable
Tax Slab Indication
Enable/Disable
Ø
Ø
Ø
Ø
§
§
¨
Token Time Set
Ø
Digits After Decimal
Ø
Enable/Disable
Cumulate Item Option
Ø
Enable/Disable
Tax Table Option
Ø
Enable/Disable
Discount Print Option
Ø
Enable/Disable
Reset Bills & Reports
§
Reset all Settings
§
v
6.1 Item Database :
¨When control is at billing mode press Menu Button, LCD will display like
¨Select Item data base and Press ENTER LCD will display like
¨ Select ADD ITEM option and Press ENTER LCD will display like
ITEM DATABASE
2. EDIT ITEM
3. STOCK MANAGEMENT
4. PRINT ITEM DATABASE
SELECT YOUR OPTION
1. ADD ITEM
NOTE1: If bar code reader is connected, then when cursor is at Name entry mode read
the bar code and configures required item name and other detail as below.
¨Type Item rate3 (Max: 999999.99) and press ENTER Cursor will shift Tax entry mode.
¨Type Item name (Max 20 char) and press ENTER Cursor will shift to unit type mode.
¨Select required unit type by up and down arrow keys and press ENTER Cursor will
shift to ITEM RATE mode (Unit types are : Liter, M.liter, K.Gram, Gram and Packet,
Bag, Box, Number, Jar, Dozen, Sachet, Sheet, Bottle, Plate, Piece)
¨Type Item rate1 (Max:999999.99) and press ENTER Cursor will shift Item rate2 entry mode
¨Type Item rate2 (Max:999999.99) and press ENTER Cursor will shift Item rate3 entry mode
ITEM DATABASE MODE
NAME :
UNIT :
RATE 1 :
RATE 2 :
RATE 3 :
MENU
2. BILL SETTINGS
3. MACHINE SETTINGS
4. HEADER/FOOTER
1. ITEM DATABASE
¨Type Item TAX & CESS(Max: 99.99 & 325 respectively) and press ENTER Cursor
¨Type Item Discount (Max: 99.99) and press ENTER Cursor will shift to Dept. selection mode.
¨Enter Stock(max 99999.999) and press ENTER key.
will shift to Discount entry mode.
ITEM DATABASE MODE
SAVE&EXITSAVE & CONT
IGST % :
DISC % :
STOCK :
SGST % :
COST :

21
20
¨Select to add more items.
¨Select to save present item and to come out of database mode.
NOTE: Maximum 10000 items can be added in the item database.
Save & Cont
Save & Exit
¨When control is at billing mode press Menu Button, LCD will display like
Edit Item Database through Panel :
MENU
2. BILL SETTINGS
3. MACHINE SETTINGS
4. HEADER/FOOTER
1. ITEM DATABASE
¨Select Item data base and Press ENTER LCD will display like
¨Select EDIT ITEM option and Press ENTER LCD will display like
ITEM DATABASE MODE
ITEM NO :
NAME : RICE
UNIT : K.GRAM
RATE 1 : 26.00
RATE 2 : 28.00
RATE 3 : 30.00
ITEM DATABASE
1. ADD ITEM
3. STOCK MANAGEMENT
3. PRINT ITEM DATABASE
2. EDIT ITEM
SELECT YOUR OPTION
¨Type Item No and press ENTER Cursor will shift to unit type entry mode.
¨Select required unit type by up and down arrow keys and press ENTER . Cursor will
ITEM RATE mode (Unit types are : Liter, M.liter, K.Gram, Gram and Packet,
Number, Jar, Dozen, Sachet, Sheet, Bottle, Plate, Piece).
¨Edit Item rate1 (Max: 999999.99) and press ENTER Cursor will shift Item rate2 entry mode.
¨Edit Item rate2 (Max: 999999.99) and press ENTER Cursor will shift Item rate3 entry mode.
¨Edit Item rate3 (Max: 999999.99) and press ENTER Cursor will shift Tax entry mode.
¨Edit Item TAX & CESS (Max: 99.99 & 325 respectively) and press ENTER Cursor
¨Edit Item Discount (Max: 99.99) and press ENTER Cursor will shift to Dept. selection mode.
¨Enter Stock(max 999999.99) & press ENTER key.
shift to
Bag, Box,
will shift to Discount entry mode.
¨Select to Edit next items.
¨Select
to save present item and to come out of Edit database mode.
Save & Cont
Save & Exit
NOTE: Item name can not edit.
STOCK MANAGEMENT:
Replace stock\Add stock\Delete stock through Panel:
¨When control is at Billing mode press Menu Button, LCD will display like
ITEM DATABASE MODE
SAVE&EXITSAVE & CONT
CESS % :
DISC % :
STOCK :
CGST % :
COST :
¨Select Item data base and Press ENTER LCD will display like
¨Select Stock management option and Press ENTER LCD will display like
ITEM DATABASE
1. ADD ITEM
2. EDIT ITEM
4. PRINT ITEM DATABASE
SELECT YOUR OPTION
3. STOCK MANAGEMENT
STOCK MANAGEMENT
1. NEW STOCK
2. ADD STOCK
3. DELETE STOCK
4. PRINT STOCK RPT
5. VIEW STOCK
SELECT YOUR OPTION
MENU
2. BILL SETTINGS
3. MACHINE SETTINGS
4. HEADER/FOOTER
1. ITEM DATABASE
¨Select required stock option and Press ENTER LCD will display like

22 23
¨Enter item no, item name will be displayed and press ENTER cursor will shift to
New stock entry mode.
¨Enter Required stock and press ENTER LCD will display below messages;
¨Select to add more items.
¨Select to save present item and to come out of item database mode.Save & Exit
NOTE: Replace Stock: Use to replace from old stock to new stock.
Add stock : Use to add the stock for Existing stocks.
Delete Stock: Use to reset the stock to Zero.
Save & Cont
ITEM NO :1
ITEM NAME :RICE
AVAIL STOCK :10KG
NEW STOCK :100_
SAVE&EXITSAVE & CONT
STOCK MANAGEMENT
ITEM DATABASE
1. ADD ITEM
2. EDIT ITEM
4. PRINT ITEM DATABASE
SELECT YOUR OPTION
3. STOCK MANAGEMENT
¨Select Item data base and Press ENTER LCD will display like
Stock View/Print through Panel
¨When control is at Billing mode press Menu Button, LCD will display like
¨Select Stock management option and Press ENTER LCD will display like
MENU
2. BILL SETTINGS
3. MACHINE SETTINGS
4. HEADER/FOOTER
1. ITEM DATABASE
¨Select Print Stock report option and then select Itemwise stock report option &
STOCK MANAGEMENT
SELECT YOUR OPTION
3. DELETE STOCK
4. PRINT STOCK RPT
1. NEW STOCK
2. ADD STOCK
5. VIEW STOCK
press ENTER for Stock report printing Or
¨Select view Stock option and Press ENTER LCD will display like
¨Type FROM to TO item number and press ENTER LCD will display like
STOCK MANAGEMENT
STOCK FROM :
STOCK TO :
ITEM FROM:
ITEM TO :
1
STOCK MANAGEMENT
¨Press Up/Down Keys to see the Next/prev item stocks.
¨Press CANCEL/CLEAR to come out of that mode.
NOTE1: Selection of item number is valid only for the available numbers in the
database and also can be printed by pressing PRINT button.
Print Database through Panel:
¨When control is at billing mode press Menu Button, LCD will display like
¨Select Item database and Press ENTER LCD will display like
¨Select Print database option and Press ENTER for database print.
ITEM DATABASE
1. ADD ITEM
2. EDIT ITEM
4. PRINT ITEM DATABASE
SELECT YOUR OPTION
3. STOCK MANAGEMENT
MENU
2. BILL SETTINGS
3. MACHINE SETTINGS
4. HEADER/FOOTER
1. ITEM DATABASE
6.2 BILL SETTINGS
¨ When control is at billing mode press Menu Button ,LCD will display like
MENU
1. ITEM DATABASE
3. MACHINE SETTINGS
4. HEADER/FOOTER
2. BILL SETTINGS

24 25
¨ Select Bill setting and Press ENTER LCD will display like.
¨ Select Round off setting and press ENTER LCD will display like.
¨ Select required round off option by up and down arrow key and press ENTER to activate
the setting
NOTE:
No Round Off: Total amount in the bill will be printed without any round off. Round Off to
0.25 Paise: This option allows rounding off the total amount to the nearest 25 paise.e.g.,
if the Total Amount is 12.30, on selecting this option, Total amount will be rounded to
12.25. Round Off to 0.50Paise: This option allows rounding off the total amount to the
nearest 50 paise. e.g., if the
will be rounded to 12.50 Round Off to 1: This option allows rounding off the total amount
to the nearest 1 Rupee. e.g.,if the Total Amount is 12.30, on selecting this option, Total
amount will be rounded to 12.00.
Total Amount is 12.30, on selecting this option, Total amount
ROUND OFF SETTING
2. ROUND OFF TO 0.25
3. ROUND OFF TO 0.50
4. ROUND OFF TO 1
SELECT YOUR OPTION
1. NO ROUND OFF
Configure DISCOUNT through Panel:
¨When control is at billing mode press Menu Button, LCD will display like
¨Select Bill setting and Press ENTER LCD will display like
¨Select Discount setting and press ENTER LCD will display like
2. DISCOUNT OPTION
3. PRICE CHANGE OPTION
4. OTHER CHARGES
5. ITEM NAME PRINT OPTION
7. REPORTS FOR CLERKS
1. ROUND OFF OPTION
BILL SETTING
6. CASH RECEPTION
3. PRICE CHANGE OPTION
4. OTHER CHARGES
5. ITEM NAME PRINT OPTION
7. REPORTS FOR CLERKS
1. ROUND OFF OPTION
BILL SETTING
6. CASH RECEPTION
2. DISCOUNT OPTION
MENU
1. ITEM DATABASE
3. MACHINE SETTINGS
4. HEADER/FOOTER
2. BILL SETTINGS
Select the required option by using the UP and DOWN key and press the ENTER key to ¨
enable that particular settings.
¨Select required Discount option by up and down arrow key and press ENTER to activate the setting
NOTE: If the DATABASE discount is entered and if the machine any of the DISCOUNT is enabled
then double discounting will not happen. If pre/post discount in% or RS enabled RS billing mode will
not work.
DISCOUNT SETTING
2. ITEM WISE DICOUNT %
3. PRE TAX DICOUNT %
4. POST TAX DICOUNT %
5. POST TAX DICOUNT AMOUNT
1. NO DISCOUNT
Enable / Disable Price change through Panel :
¨When control is at billing mode press the MENU button LCD will display like
¨Select the Bill settings and press the ENTER LCD will display like
BILL SETTINGS
1. ROUND OFF OPTION
2. DISCOUNT OPTION
3. PRICE CHANGE OPTION
4. ITEM NAME PRINT OPTION
¨Select the Price change option and press the ENTER LCD will display like
PRICE CHANGE SETTINGS
1. DISABLE
2. ENABLE
3. DYNAMIC
6. POST TAX ITEM DICOUNT %
MENU
1. ITEM DATABASE
3. MACHINE SETTINGS
4. HEADER/FOOTER
2. BILL SETTINGS
Configure OTHER CHARGE through Panel:
¨When control is at billing mode press Menu Button, LCD will display like
MENU
1. ITEM DATABASE
3. MACHINE SETTINGS
4. HEADER/FOOTER
2. BILL SETTINGS

26 27
When control is at billing mode press the MENU button LCD will display like¨
Select the Bill settings and press the ENTER LCD will display like¨
Item name Print option through panel :
·
¨Select the Item name print option and press the ENTER. LCD will display like
ITEM NAME OPTIONS
1. PRINT PARTIAL ITEM NAME
2. PRINT FULL ITEM NAME
SELECT YOUR OPTION
¨Select the required option by using the UP and DOWN key and press the ENTER key to
enable that particular option.
BILL SETTINGS
1. ROUND OFF OPTION
2. DISCOUNT OPTION
3. PRICE CHANGE OPTION
4. ITEM NAME PRINT OPTION
MENU
1. ITEM DATABASE
3. MACHINE SETTINGS
4. HEADER/FOOTER
2. BILL SETTINGS
¨Select Bill setting and Press ENTER LCD will display like
¨Select Other charge option and Press ENTER LCD will display like
PERCENT
OPTION :
NAME :
:
SELECT YOUR OPTION
ENABLE
OTHER CHARGE SETTING
¨After selecting Enable options press ENTER Control will shift to Name entry mode.
¨Configure the required name (Max 20 alpha numeric characters) and press ENTER
Cursor will shift to percentage entry mode.
¨Enter required other charge value (Max 99.99) and press ENTER to save the setting.
3. PRICE CHANGE OPTION
5. ITEM NAME PRINT OPTION
7. REPORTS FOR CLERKS
1. ROUND OFF OPTION
BILL SETTING
6. CASH RECEPTION
2. DISCOUNT OPTION
4. OTHER CHARGES
Enable/Disable CASH RECEPTION through Panel:
¨When control is at billing mode press Menu Button, LCD will display like
MENU
1. ITEM DATABASE
3. MACHINE SETTINGS
4. HEADER/FOOTER
2. BILL SETTINGS
¨Enable or Disable the option by up and down arrow key and press ENTER to activate the setting.
¨Select Bill setting and Press ENTER LCD will display like
¨Select Cash reception option and press ENTER LCD will display like
Enable/Disable REPORTS FOR CLERKS through Panel:
¨ When control is at billing mode press Menu Button, LCD will display like
OPTION : ENABLE
SELECT YOUR OPTION
CASH RECEPTION OPTION
3. PRICE CHANGE OPTION
5. ITEM NAME PRINT OPTION
7. REPORTS FOR CLERKS
1. ROUND OFF OPTION
BILL SETTING
2. DISCOUNT OPTION
4. OTHER CHARGES
6. CASH RECEPTION
MENU
1. ITEM DATABASE
3. MACHINE SETTINGS
4. HEADER/FOOTER
2. BILL SETTINGS
¨Select Bill setting and Press ENTER LCD will display like
1. ROUND OFF OPTION
2. DISCOUNT OPTION
3. PRICE CHANGE OPTION
4. OTHER CHARGES
5. ITEM NAME PRINT
7. REPORTS FOR CLERKS
BILL SETTING
6. CASH RECEPTION

28 29
¨Select Reports for clerks option and press LCD will display like
SELECT YOUR OPTION
REPORTS FOR CLERKS OPTION
ENTER
ENABLE OPTION :
¨Enable or Disable the option by up and down arrow key and press ENTER to activate the setting.
Enable/Disable PRINT CUSTOMER NAME through Panel:
¨When control is at billing mode press Menu Button, LCD will display like
¨Select Bill setting and Press ENTER LCD will display like
¨Select Print Customer name option and press ENTER LCD will display like
¨Enable or Disable the option by up and down arrow key and press ENTER to activate
the setting.
NOTE: 1. Customer name supports up to 20 characters.
2. Customer name can be both alphanumeric and special characters are not allowed
Configure UDF1 through Panel:
¨When control is at billing mode press Menu Button, LCD will display like
3. PRICE CHANGE OPTION
5. ITEM NAME PRINT OPTION
BILL SETTING
2. DISCOUNT OPTION
4. OTHER CHARGES
6. CASH RECEPTION
8. CUSTOMER NAME PRINT
7. REPORTS FOR CLERKS
SELECT YOUR OPTION
CUSTOMER NAME PRINT OPTION
OPTION : ENABLE
MENU
1. ITEM DATABASE
3. MACHINE SETTINGS
4. HEADER/FOOTER
2. BILL SETTINGS
¨Select Bill setting and Press ENTER LCD will display like
MENU
1. ITEM DATABASE
3. MACHINE SETTINGS
4. HEADER/FOOTER
2. BILL SETTINGS
¨ Select UDF1 option and press ENTER LCD will display like
OPTION : ENABLE
NAME : _
RANGE-1 TO:
SELECT YOUR OPTION
UDF1 MODE
¨After selecting Enable options press ENTER Control will shift to Name entry mode.
¨Configure the required name and press ENTER Cursor will shift to UDF range entry mode.
¨Enter required Range in numbers (Range: 1-250) and press ENTER to save the setting.
NOTE1: If UDF1 is disabled KOT will be disabled automatically.
NOTE2: Latest UDF string will be taken for all the transaction.
Configure RATE SLABS through Panel:
¨ When control is at billing mode press Menu Button, LCD will display like
¨Select Bill setting and Press ENTER LCD will display like
3. PRICE CHANGE OPTION
5. ITEM NAME PRINT OPTION
BILL SETTING
4. OTHER CHARGES
6. CASH RECEPTION
9. UDF 1 OPTION
7. REPORTS FOR CLERKS
8. CUSTOMER NAME PRINT
9. RATE SLABS
5. ITEM NAME PRINT OPTION
BILL SETTING
4. OTHER CHARGES
6. CASH RECEPTION
10. RATE SLABS
7. REPORTS FOR CLERKS
8. CUSTOMER NAME PRINT
9. UDF 1 OPTION
MENU
1. ITEM DATABASE
3. MACHINE SETTINGS
4. HEADER/FOOTER
2. BILL SETTINGS

¨Select Rate slabs option and press ENTER LCD will display like
¨Enter UDF FROM number and press ENTER cursor will shift to UDF to entry mode.
¨Enter UDF TO number and press ENTER Cursor will shift to Rate slab entry mode
¨Rate slabs can be entered like 1,2,3 and press ENTER LCD will display like
¨Select
¨Select
configuration mode.
Enable/Disable KOT through Panel:
¨When control is at billing mode press Menu Button, LCD will display like
¨Select Bill setting and Press ENTER LCD will display like
UDF1 FROM :1_
UDF1 TO :10
SELECT YOUR OPTION
RATE SLAB :1
RATE SLAB CONFIGURATION
to save and continue.
to save present UDF and Rate slab and to come out of Rate slab
Save & Cont
Save & Exit
30
¨ Select KOT option and press ENTER LCD will display like.
¨Enable or Disable the option by up and down arrow key and press ENTER to activate
the setting.
NOTE: 1. KOT can be enabled only if UDF is enabled.
2. KOT(Kitchen order token) option is for restaurant billing.
OPTION : ENABLE
SELECT YOUR OPTION
KOT OPTION
Enable/Disable STOCK OPTION through Panel:
¨When control is at billing mode press Menu Button, LCD will display like
¨Select Bill setting and Press ENTER LCD will display like
¨Select Stock option and press ENTER LCD will display like
¨Enable Bill with stock or Bill without stock option by up and down arrow key and press
ENTER to activate the setting.
STOCK OPTION
OPTION :
SELECT YOUR OPTION
BILL WITH STOCK
Select BILL NUMBER TYPE OPTION through Panel:
¨When control is at billing mode press Menu Button, LCD will display like
31
9. RATE SLABS
BILL SETTING $
6. CASH RECEPTION
12. STOCK OPTION
7. REPORTS FOR CLERKS
8. CUSTOMER NAME PRINT
9. UDF 1 OPTION
10 .RATE SLABS
11. KOT OPTION
5. ITEM NAME PRINT OPTION
BILL SETTING
6. CASH RECEPTION
11. KOT OPTION
7. REPORTS FOR CLERKS
8. PRINT CUSTOMER NAME
9. UDF 1 OPTION
10 .RATE SLABS
MENU
1. ITEM DATABASE
3. MACHINE SETTINGS
4. HEADER/FOOTER
2. BILL SETTINGS
MENU
1. ITEM DATABASE
3. MACHINE SETTINGS
4. HEADER/FOOTER
2. BILL SETTINGS
MENU
1. ITEM DATABASE
3. MACHINE SETTINGS
4. HEADER/FOOTER
2. BILL SETTINGS

32 33
¨Select Bill setting and Press ENTER LCD will display like
¨Select Bill number type option and press ENTER LCD will display like
¨Select Continuous or Daily reset option by up and down arrow key and press ENTER
to activate the setting.
NOTE: New bill number can not be set, if any bill been made in that particular day.
STOCK OPTION
OPTION :
SELECT YOUR OPTION
CONTINUOUS
Configure UDF2 through Panel:
¨When control is at billing mode press Menu Button, LCD will display like
¨Select Bill setting and Press ENTER LCD will display like
BILL SETTING
12. STOCK OPTION
7. REPORTS FOR CLERKS
8. CUSTOMER NAME PRINT
9. UDF 1 OPTION
10 .RATE SLABS
11. KOT OPTION
13. BILL NUMBER TYPE
8. PRINT CUSTOMER NAME
9. UDF 1 OPTION
10 .RATE SLABS
11. KOT OPTION
12. STOCK OPTION
13. BILL NUMBER TYPE
BILL SETTING
14. UDF 2 OPTION
MENU
1. ITEM DATABASE
3. MACHINE SETTINGS
4. HEADER/FOOTER
2. BILL SETTINGS
¨Select UDF2 option and press ENTER LCD will display like
¨After selecting Enable options press ENTER Control will shift to Name entry mode.
¨Configure the required name and press ENTER Cursor will shift to UDF range entry mode.
¨Enter required Range in numbers (Range: 1-250) and press ENTER to save the setting.
OPTION :
NAME : _
RANGE-1 TO:
SELECT YOUR OPTION
UDF2 MODE
ENABLE
NOTE1: If UDF2 is disabled KOT will be disabled automatically.
NOTE2: Latest UDF string will be taken for all the transaction.
Select RUPEE SYMBOL through Panel:
¨When control is at billing mode press Menu Button, LCD will display like
¨Select Bill setting and Press ENTER LCD will display like
¨Select Rupee symbol option and press ENTER LCD will display like.
¨Enable or Disable the option by up and down arrow key and press ENTER to activate the
setting.
RUPEE SYMBOL OPTION
OPTION : ENABLE
SELECT YOUR OPTION
BILL SETTING
15. RUPEE SYMBOL OPTION
9. UDF 1 OPTION
10 .RATE SLABS
11. KOT OPTION
12. STOCK OPTION
13. BILL NUMBER TYPE
14. UDF 2 OPTION
MENU
1. ITEM DATABASE
3. MACHINE SETTINGS
4. HEADER/FOOTER
2. BILL SETTINGS

35
34
Select TAX TYPE through Panel:
¨When control is at billing mode press Menu Button, LCD will display like
¨Select Bill setting and Press ENTER LCD will display like
¨ Select Tax Type Option and press ENTER LCD will display like
¨Select Forward or Reverse Tax option by up and down arrow key and press ENTER to activate the setting.
TIME PRINT on bill option through Panel:
¨When control is at billing mode press Menu Button, LCD will display like
¨Select Bill setting and Press ENTER LCD will display like
RUPEE SYMBOL OPTION
OPTION :
SELECT YOUR OPTION
FORWARD TAX
BILL SETTING
16. TAX TYPE OPTION
10 .RATE SLABS
11. KOT OPTION
12. STOCK OPTION
13. BILL NUMBER TYPE
14. UDF 2 OPTION
15. RUPEE SYMBOL OPTION
BILL SETTING
11. KOT OPTION
12. STOCK OPTION
13. BILL NUMBER TYPE
14. UDF 2 OPTION
15. RUPEE SYMBOL OPTION
16. TAX TYPE OPTION
17. TIME PRINT OPTION
MENU
1. ITEM DATABASE
3. MACHINE SETTINGS
4. HEADER/FOOTER
2. BILL SETTINGS
MENU
1. ITEM DATABASE
3. MACHINE SETTINGS
4. HEADER/FOOTER
2. BILL SETTINGS
¨Select Time On bill option and press ENTER LCD will display like
TIME ON BILL OPTION
OPTION :
SELECT YOUR OPTION
ENABLE
¨Enable or Disable the option by up and down arrow key and press ENTER to activate the setting.
Select BASE PRICE option through Panel:
¨When control is at billing mode press Menu Button, LCD will display like
¨Select Bill setting and Press ENTER LCD will display like
¨Select Base price option and press ENTER LCD will display like
¨Enable or Disable the option by up and down arrow key and press ENTER to activate the setting.
Select the Sub UDF option through Panel:
When control is at billing mode press the MENU button LCD will display like
¨
¨Select the Bill settings option and press the ENTER LCD will display like
BASE PRICE OPTION
OPTION : ENABLE
SELECT YOUR OPTION
BILL SETTING
12. STOCK OPTION
13. BILL NUMBER TYPE
14. UDF 2 OPTION
15. RUPEE SYMBOL OPTION
16. TAX TYPE OPTION
18. BASE PRICE OPTION
17. TIME PRINT OPTION
BILL SETTING
13. BILL NUMBER TYPE
14. UDF 2 OPTION
15. RUPEE SYMBOL OPTION
16. TAX TYPE OPTION
19. SUB UDF OPTION
17. TIME PRINT OPTION
18. BASE PRICE OPTION
MENU
1. ITEM DATABASE
3. MACHINE SETTINGS
4. HEADER/FOOTER
2. BILL SETTINGS
MENU
1. ITEM DATABASE
3. MACHINE SETTINGS
4. HEADER/FOOTER
2. BILL SETTINGS
Table of contents
Other WeP Cash Register manuals