WERKAPRO TC2155 User manual

Français
Toutes nos félicitations pour l’achat de ce produit de haute qualité. Veuillez lire ce mode
d’emploi attentivement, avant de prendre l’appareil en fonctionnement. Il donne des
indications importantes pour la sécurité, l’utilisation et l’entretien de l’appareil. Si vous
avez d’autres questions, veuillez communiquer avec notre service à la clientèle.
Visserie :
1. 14 x M8 x 16 : Boulons / Ecrous / Rondelles
2. 2 x M8 x 16 : Boulons à six pans / Ecrous / Rondelles
3. 3 Rondelles Diam. 8
4. 5 Goupilles
5. 1 x M8 x135 : Boulon / Ecrou / Rondelle
6. 1 x M112 x 115 : Tube
7. 1 x M8 x 60 : Boulon / Ecrou / Rondelle
8. 4 Rondelles Diam 16
Pièces détachées :
1. Benne (1 Pc)
2. Verrouillage (1 Pc)
3. Châssis avant (1 Pc)
4. Support Axe Arrière (1 Pc)
5. Bras Axe Arrière (2 Pcs)
6. Roues (4 Pcs)
7. Support Axe Avant (1 Pc)
8. Support Central (1 Pc)
9. Support Direction (1 Pc)
10.Connexion Direction (1 Pc)
11.Bras de traction (1 Pc)
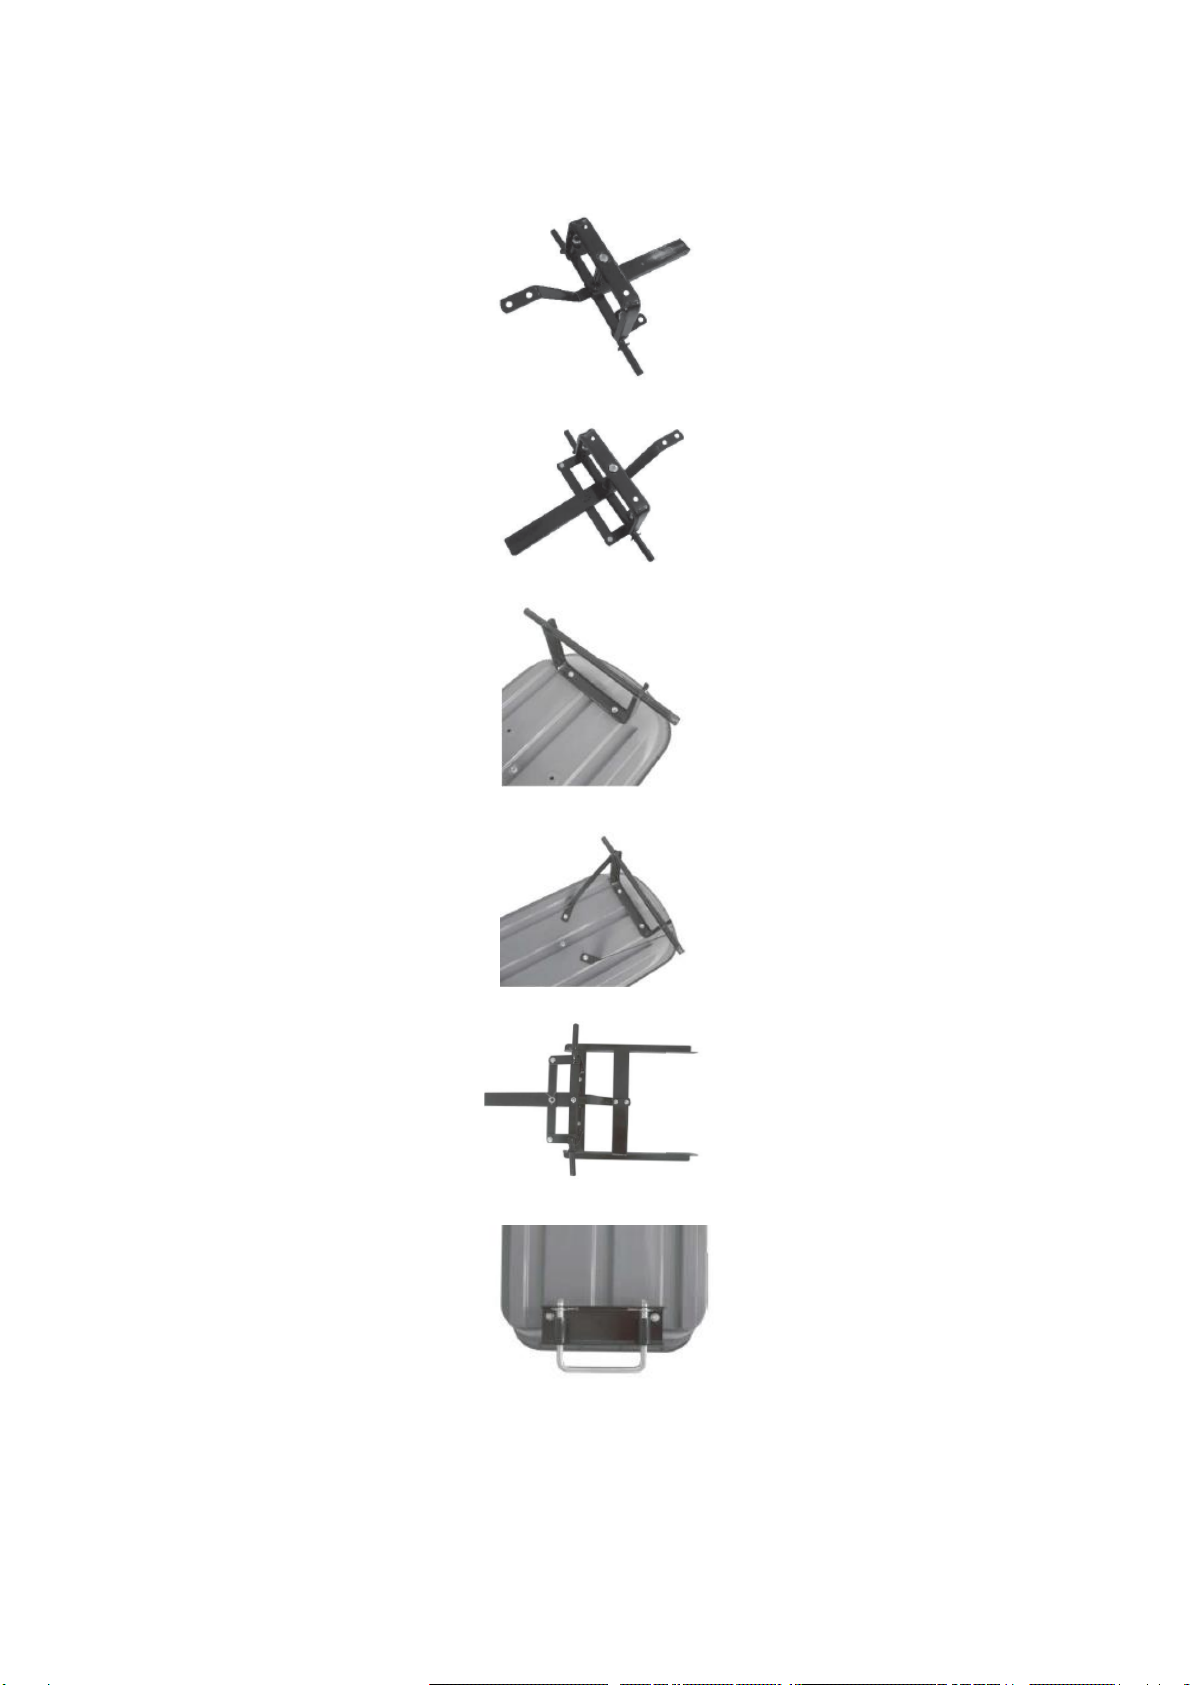
Montage :
1. Fixer le support central au support axe avant.

2. Fixer le support central sur le support de direction ainsi que sur le support axe
avant (5)
3. Monter la connexion de direction au support axe avant (2) (3) (4)
4. Fixer le support d’axe arrière à la benne (1)
5. Fixer le bras d’axe arrière à la benne (1)
6. Assemble le support d’axe avant et le support central au châssis (1)
7. Fixer le verrouillage à la benne (1)
8. Réunir le châssis avant et la benne en utilisant (1)

9. Monter les roues en utilisant (4) et (8)
10.Fixer le bras de traction à la direction en utilisant (7)

English
Congratulations on the purchase of this high quality product. Please read these operating
instructions carefully before using the appliance. It contains important information on
safety, operation and maintenance of the appliance. If you have any further questions,
please contact our customer service.
Screws and bolts:
1. 14 x M8 x 16: Bolts / Nuts / Washers
2. 2 x M8 x 16: Hexagon bolts / Nuts / Washers
3. 3 Washers Diam. 8
4. 5 Pins
5. 1 x M8 x 135: Bolt / Nut / Washer
6. 1 x M112 x 115: Tube
7. 1 x M8 x 60: Bolt / Nut / Washer
8. 4 Washers Diam 16
Spare parts:
1. Tipper (1 Pc)
2. Lock (1 Pc)
3. Front frame (1 Pc)
4. Rear Axle Support (1 Pc)
5. Rear Axle Arm (2 Pcs)
6. Wheels (4 Pcs)
7. Front Axle Support (1 Pc)
8. Central Support (1 Pc)
9. Steering Support (1 Pc)
10.Steering connection (1 Pc)
11.Traction arm (1 Pc)
Installation:
1. Attach the center bracket to the front axle bracket.

2. Attach the centre support to the steering support and to the front axle support (5)
3. Mount the steering connection to the front axle bracket (2) (3) (4)
4. Attach the rear axle support to the body (1)
5. Attach the rear axle arm to the body (1)
6. Assemble front axle support and central support to chassis (1)
7. Attach lock to body (1)
8. Join front frame and body using (1)

9. Mount the wheels using (4) and (8)
10.Attach the trailing arm to the steering using

Español
Enhorabuena por la compra de este producto de alta calidad. Lea atentamente este
manual antes de utilizar el aparato. Contiene información importante sobre la seguridad,
el funcionamiento y el mantenimiento del aparato. Si tiene más preguntas, póngase en
contacto con nuestro servicio de atención al cliente.
Tornillos y pernos:
1. 14 x M8 x 16: Pernos / Tuercas / Arandelas
2. 2 x M8 x 16: tornillos hexagonales / tuercas / arandelas
3. 3 Arandelas Diam. 8
4. 5 Clavijas
5. 1 x M8 x135: Perno / Tuerca / Arandela
6. 1 x M112 x 115: Tubo
7. 1 x M8 x 60: Perno / Tuerca / Arandela
8. 4 Arandelas Diam 16
Piezas de recambio:
1. Volquete (1 Pc)
2. Cerradura (1 Pc)
3. Marco frontal (1 Pc)
4. Soporte del eje trasero (1 unidad)
5. Brazo del eje trasero (2 piezas)
6. Ruedas (4 piezas)
7. Soporte del eje delantero (1 unidad)
8. Soporte Central (1 Pc)
9. Soporte de dirección (1 unidad)
10.Conexión de la dirección (1 Pc)
11.Brazo de tracción (1 Pc)
Montaje:
1. Fije el soporte central al soporte del eje delantero.

2. Fijar el soporte central al soporte de la dirección y al soporte del eje delantero (5)
3. Monte la conexión de la dirección en el soporte del eje delantero (2) (3) (4)
4. Fijar el soporte del eje trasero a la carrocería (1)
5. Fijar el brazo del eje trasero a la carrocería (1)
6. Montar el soporte del eje delantero y el soporte central al chasis (1)
7. Fijar la cerradura al cuerpo (1)
8. Unir el bastidor delantero y la carrocería con (1)

9. Montar las ruedas con (4) y (8)
10.Fijar el brazo de arrastre a la dirección mediante

Deutsch
Herzlichen Glückwunsch zum Kauf dieses hochwertigen Produkts. Bitte lesen Sie diese
Bedienungsanleitung sorgfältig durch, bevor Sie das Gerät in Betrieb nehmen. Sie
enthält wichtige Hinweise für die Sicherheit, den Gebrauch und die Pflege des Geräts.
Wenn Sie weitere Fragen haben, wenden Sie sich bitte an unseren Kundenservice.
Schrauben und Muttern :
1. 14 x M8 x 16: Bolzen / Muttern / Unterlegscheiben.
2. 2 x M8 x 16: Sechskantschrauben / Muttern / Unterlegscheiben.
3. 3 Unterlegscheiben Diam. 8
4. 5 Stifte
5. 1 x M8 x135: Bolzen / Mutter / Unterlegscheibe.
6. 1 x M112 x 115: Rohr.
7. 1 x M8 x 60 : Bolzen / Mutter / Unterlegscheibe.
8. 4 Unterlegscheiben Diam 16
Ersatzteile:
1. Kipper (1 Stck.)
2. Verriegelung (1 Pc)
3. Vorderes Fahrgestell (1 Pc)
4. Hintere Achshalterung (1 Pc)
5. Hinterer Achsarm (2 Pcs)
6. Räder (4 Pcs)
7. Vorderer Achshalter (1 Stck.)
8. Zentrale Halterung (1 Pc)
9. Halterung Lenkung (1 Pc)
10.Anschluss Lenkung (1 Pc).
11.Zugarm (1 Pc)
Zusammenbau:
1. Befestigen Sie die Mittelstütze an der Vorderachshalterung.

2. Befestigen Sie die Mittelstütze an der Lenkradstütze sowie an der
Vorderachsstütze (5).
3. Montieren Sie die Lenkverbindung an der Halterung Vorderachse (2) (3) (4).
4. Befestigen Sie die Hinterachshalterung an der Schaufel (1).
5. Befestigen Sie den Hinterachsarm an der Schaufel (1).
6. Montiere die Vorderachshalterung und die Mittelstütze am Rahmen (1).
7. Befestige die Verriegelung an der Mulde (1).
8. Verbinde den vorderen Rahmen und die Mulde mit (1).

9. Montieren Sie die Räder mithilfe von (4) und (8).
10.Befestigen Sie den Zugarm an der Lenkung mithilfe von

Italiano
Congratulazioni per l'acquisto di questo prodotto di alta qualità. Si prega di leggere
attentamente queste istruzioni prima di utilizzare l'apparecchio. Contiene informazioni
importanti sulla sicurezza, il funzionamento e la manutenzione dell'apparecchio. Se
avete altre domande, contattate il nostro servizio clienti.
Viti e bulloni :
1. 14 x M8 x 16: Bulloni / Dadi / Rondelle
2. 2 x M8 x 16: Bulloni esagonali / Dadi / Rondelle
3. 3 Rondelle Diam. 8
4. 5 Perni
5. 1 x M8 x135: Bullone / Dado / Rondella
6. 1 x M112 x 115 : Tubo
7. 1 x M8 x 60 : Bullone / Dado / Rondella
8. 4 rondelle Diam 16
Pezzi di ricambio :
1. Ribaltabile (1 Pc)
2. Serratura (1 Pc)
3. Telaio anteriore (1 pezzo)
4. Supporto dell'asse posteriore (1 pezzo)
5. Braccio dell'asse posteriore (2 pezzi)
6. Ruote (4 pezzi)
7. Supporto dell'asse anteriore (1 pezzo)
8. Supporto centrale (1 pz)
9. Supporto dello sterzo (1 pezzo)
10.Collegamento dello sterzo (1 pz.)
11.Braccio di trazione (1 Pc)
Montaggio :
1. Fissare la staffa centrale alla staffa dell'asse anteriore.

2. Fissare il supporto centrale al supporto dello sterzo e al supporto dell'asse
anteriore (5)
3. Montare il collegamento dello sterzo sulla staffa dell'asse anteriore (2) (3) (4)
4. Fissare il supporto dell'asse posteriore al corpo (1)
5. Fissare il braccio dell'asse posteriore al corpo (1)
6. Assemblare il supporto dell'asse anteriore e il supporto centrale al telaio (1)
7. Fissare la serratura al corpo (1)
8. Unire il telaio anteriore e il corpo usando (1)

9. Montare le ruote usando (4) e (8)
10.Fissare il braccio di traino allo sterzo usando

Nederlands
Gefeliciteerd met de aankoop van dit product van hoge kwaliteit. Lees deze
gebruiksaanwijzing zorgvuldig door alvorens het toestel in gebruik te nemen. Het bevat
belangrijke informatie over veiligheid, bediening en onderhoud van het toestel. Als u
nog vragen heeft, kunt u contact opnemen met onze klantenservice.
Schroeven en bouten:
1. 14 x M8 x 16: Bouten/ Moeren/ Sluitringen
2. 2 x M8 x 16: Zeskantbouten/ Moeren/ Sluitringen
3. 3 Sluitringen Diam. 8
4. 5 Pinnen
5. 1 x M8 x135: Bout/ Moer/ Ring
6. 1 x M112 x 115: Buis
7. 1 x M8 x 60: Bout/ Moer/ Sluitring
8. 4 Sluitringen Diam 16
Onderdelen:
1. Kipper (1 stuks)
2. Slot (1 Pc)
3. Voorlijst (1 stuks)
4. Achteras Steun (1 Pc)
5. Achteras arm (2 stuks)
6. Wielen (4 stuks)
7. Vooras Steun (1 Pc)
8. Centrale ondersteuning (1 Pc)
9. Stuursteun (1 Pc)
10.Stuur aansluiting (1 Pc)
11.Tractie arm (1 Pc)
Monteren:
1. Bevestig de middensteun aan de voorassteun.

2. Bevestig de middensteun aan de stuursteun en aan de voorassteun (5)
3. Monteer de stuurverbinding aan de voorassteun (2) (3) (4)
4. Fixer Bevestig de achterassteun aan de carrosserie (1)
5. Bevestig de achterasarm aan de carrosserie (1)
6. Monteer de voorassteun en middensteun aan het chassis (1)
7. Bevestig het slot aan de behuizing (1)
8. Verbind voorframe en carrosserie met elkaar met behulp van (1)

9. Monteer de wielen met behulp van (4) en (8)
10.Bevestig de draagarm aan de stuurinrichting met
This manual suits for next models
1
Table of contents
Languages:
Other WERKAPRO Outdoor Cart manuals