English
ENG
ORIGINAL INSTRUCTIONS
5
immediately and proceed to replace the dust bag.
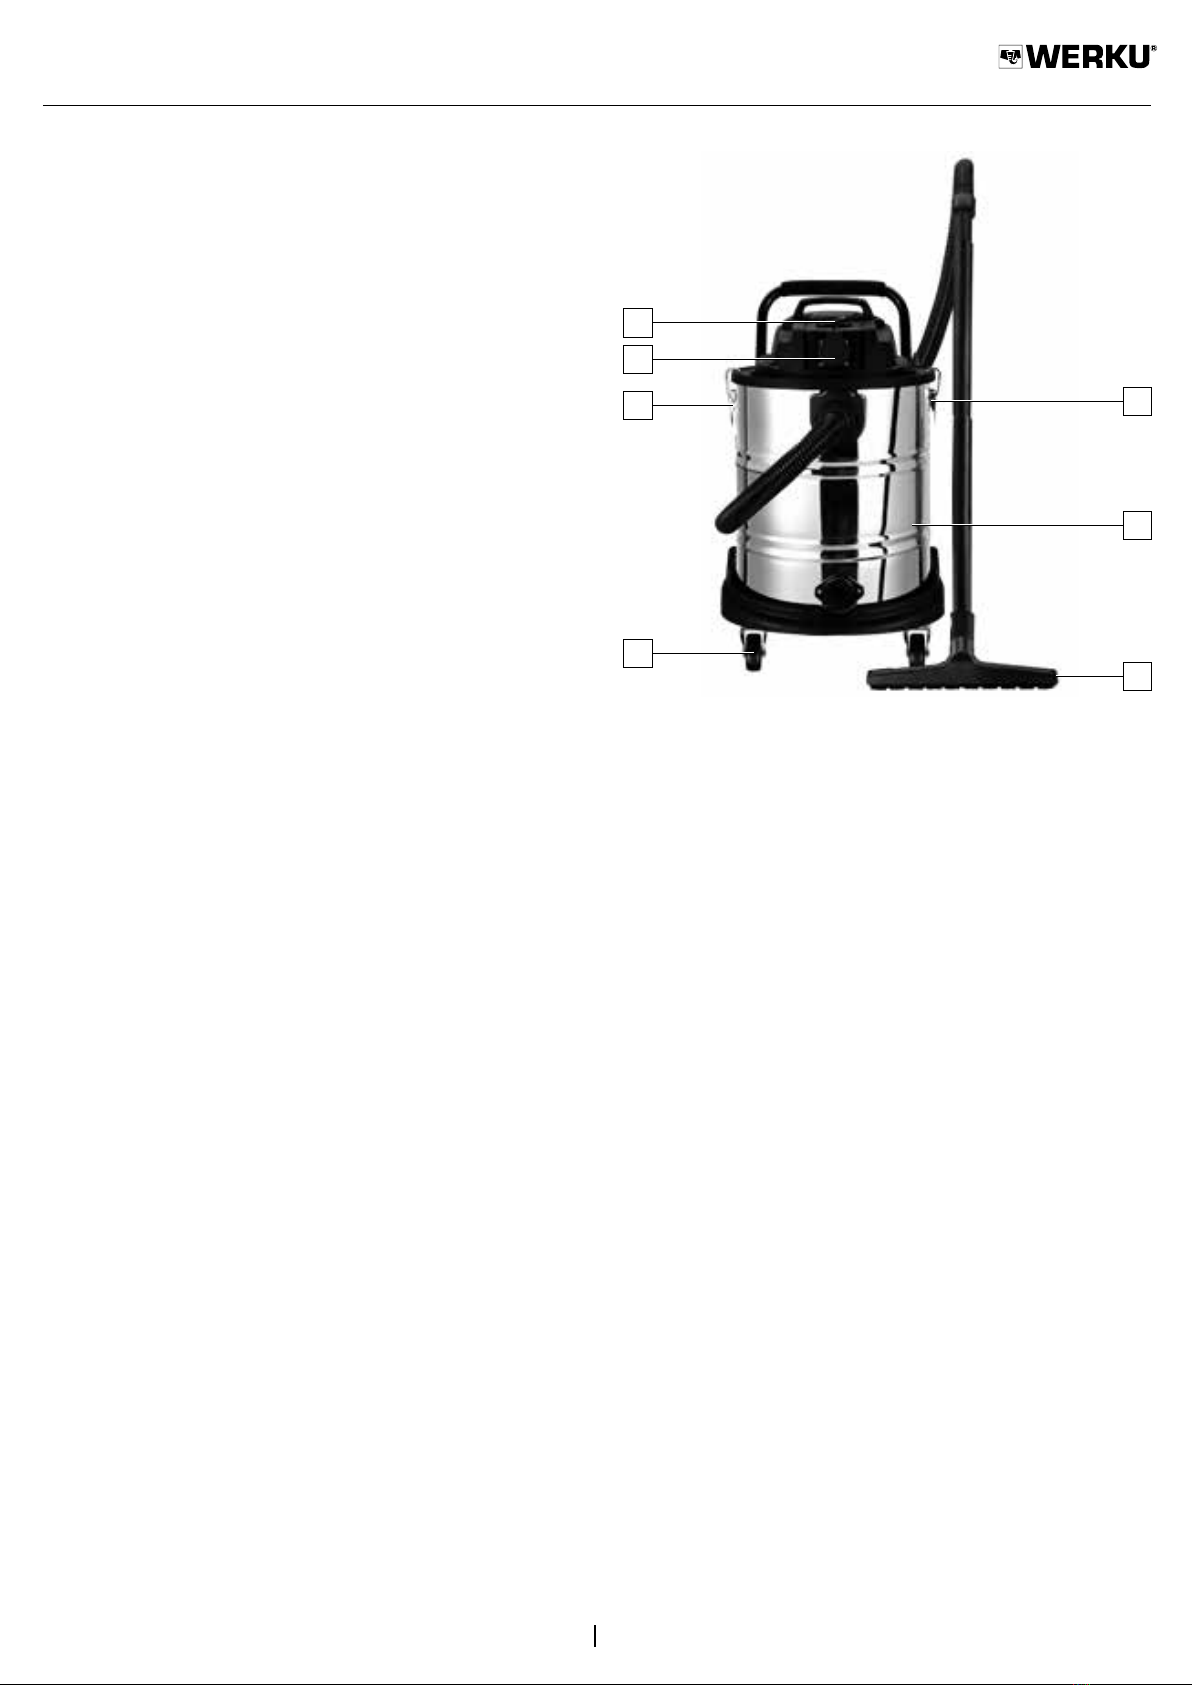
Disconnect the vacuum cleaner from the mains.
Open the container latches on either side of the
vacuum clean and remove the motor unit (2). Slide
the full dust bag o the socket on the inside of the
dust container and empty it (5). Fit again the dust
bag to the socket. Replace the motor unit and fasten
the latches.
FITTING THE FILTERS.
Attention! Never use the wet and dry vacuum
cleaner without a lter. Check that the lter is
securely tted at all times. Disconnect the vacuum
cleaner from the mains. Ensure that the lter
is clean and dry. Open the container latches on
either side of the vacuum cleaner and remove the
motor unit (2). For dry-vacuuming, slip the HEPA
lter over the lter basket (7). Attention! The HEPA
lter is suitable for dry-vacuuming only. For wet
vacuuming, slip the supplied foam lter over the
lter basket (8). Attention! The HEPA lter (already
tted) is not suitable for wet vacuuming. Take care
not to damage the lter. To remove the lter, gently
slide it o the lter basket. Replace the motor unit
and fasten the container latches.
CONNECTING THE HOSE.
The hose can be connected to either the suction
socket or the blower socket. The vacuum socket
is located in the side of the dust container (9).
Line up the notches on the hose end connector
with the slots in the socket (10). Insert the hose
end connector into the socket and rotate until it is
xed in place (11). The blower socket is located at
the rear of the vacuum cleaner (12). Line up the
notches on the hose end connector with the slots
in the socket (13). Insert the hose end connector
into the socket and rotate until it is xed in place
(14). Rotate and retract the hose end connector to
disconnect the hose (15).
ASSEMBLING AND FITTING THE EXTENSION TUBES.
Either one or both of the extension tubes can be
used to if additional length is required. To use both
extension tubes together, connect the tubes by
inserting the narrow end of one tube into the ared
end of the other tube (16). Subsequently, slide the
ared end of the extension tube over the nozzle
at the end of the cleaner’s handle (17). Slide the
remaining narrow end of the extension tube into
the socket in the brush or the crevice nozzle (18).
To disconnect the tubes, pull the parts gently apart.
FITTING BRUSHES AND NOZZLES.
Slide the end of the vacuum handle or the extension
tube into the socket in the brush or the crevice
nozzle. To disconnect pull the parts gently apart.
CONNECTING TO A POWER TOOL DUST
EXTRACTION OUTLET.
The adapter can be connected to power tools with
a 26, 32, 35 or 45 mm dust extraction outlet. It
may be necessary to cut the power tool adapter
to t your power tool dust extraction outlet. Slide
one end of the adapter on to the vacuum handle
and the other end of the adapter to your power tool
dust extraction outlet (19). To disconnect pull the
parts gently apart.
DRY VACUUMING - BEFORE SWITCHING ON.
Ensure that the HEPA lter is clean. Using a
dirty HEPA lter for dry vacuuming can lead to
reduced suction and/or permanent damage to the
HEPA lter. To prevent the HEPA lter becoming
unnecessarily soiled, to maintain suction
performance and to facilitate easy emptying, we
recommend that a dust bag is always tted when
dry vacuuming. Ensure that the vacuum cleaner
is correctly assembled. Check that the container
latches are securely fastened.
WET VACUUMING - BEFORE SWITCHING ON.
Attention! For wet vacuuming, use only the
supplied foam lter (8). Remove the dust bag.
Attention! The dust bag must not be used for wet
vacuuming. Ensure that the foam lter is clean
and dry. Wash out if necessary. Using a dirty or
wet foam lter can lead to reduced suction and/
or permanent damage to the lter. Ensure that the
vacuum cleaner is correctly assembled. Check
that the container latches are securely fastened.
SWITCHING ON/OFF.
To switch on, move the switch to position “I” (20).
The vacuum cleaner starts immediately. To switch
o, move the switch to position “O” (21). The
vacuum cleaner stops immediately. For automatic
operation in conjunction with a power tool, to switch
on, plug your power tool into the power take o
socket. Move the switch to position “II” (22). Start
your power tool. The vacuum cleaner starts after
a delay of approximately 5-10 seconds. To switch
o, stop your power tool. The vacuum cleaner
stops. Move the switch to position “O” (21).