Wessex VMOP 3045M Service manual

WessexLiftCompanyLimited
Darren Windibank
Phone: 0044(0) 1794 830303
Fax: 0044(0) 1794 512621
Page 1of 4
Technical Bulletin
In addition to our current range of VM Homelift call station options, we are now offering a Wireless
Call Station Option for the UK market. Wireless call stations can be fitted in place of, or alongside,
hard-wired call stations. These will be available for despatch from July 22nd.
Below are the Wessex part numbers. Subsequent pages provide installation, set-up, testing, operation
and maintenance detail. Electrical connection detail and dip switch settings are also provided on
drawing VM30 8105 VM Schematic Wiring Diagram.
Part Numbers
Part No. Description
VMOP 3045M Wireless Call Stations Option
This option is made up of the following:
Part No. Description Quantity
EC14 0018 Wireless Call Station Kit 1
VM30 8079 Loom Call Station Wireless 2
VM10 1608 90 Bracket Handset Fixing 2
Please note the Wireless Call Station Kit includes:
•Two handsets (with three AAA batteries fitted to each)
•One receiver with attached loom
Additional Wireless Handsets are also available.
Part No. Description Quantity
VMOP 1111NM Additional Wireless Handset 1
Documentation
The following relevant documentation has been up-issued:
VM30 8105 VM Schematic Wiring Diagram (now issue D)
VM00 7105 Wessex Homelift User Manual (now issue C)
VM01 5121 UK Technical Sales Specification (now issue D)
From:
Darren Windibank
To:
Wessex UK Agents, Installations, Service
Cc:
CP, PH, DJ, KA, TP, SF, MJ, SP
Date:
13th June 2013
Subject:
VM Wireless Call Stations
Bulletin Reference:
Wireless_13062013_1

WessexLiftCompanyLimited
Darren Windibank
Phone: 0044(0) 1794 830303
Fax: 0044(0) 1794 512621
Page 2of 4
The Wireless Call Station Handset
There is one type of wireless call station handset. This meets the needs of all VM Homelift models
and door types. The handset clips to a bracket attached to the wall (see Fig.1). For new installations,
where the wireless call station option has been ordered, two handsets, two handset wall brackets, one
receiver and two wireless call station looms are supplied. Both handsets are supplied paired to the
receiver. One handset and bracket must be fitted at each level by the lift installer. The estimated
range of the handset within buildings is 20 to 40 metres.
If desired, the handset can be unclipped from its bracket and used as a portable handset. Key
switches on wireless call stations are not available. However, once unclipped, the user can place the
handset in a secure location to prevent unauthorised use. If call station key switches are required, we
recommend the hard-wired call station option is installed. In the interest of safety, we recommend the
handset is retained on its wall bracket while the lift is in use.
Further wireless handsets can be added (see page 4).
Note 1: The Green LED illuminates only when a button is pressed.
When the batteries are low, the Red LED will flash for 5 seconds after a button is pressed.
Figure 1: Overview of the Wireless Call Station
Battery Replacement
Each wireless call station handset requires three AAA batteries. We recommend the batteries are
replaced annually by the service provider, or another competent person. To replace the batteries,
remove all six screws on the rear of the handset for access to the battery holder. Then remove the
two screws from the battery holder (see Fig. 2). When reassembling, take care not to pinch any wires
between the casings.
Figure 2: Battery replacement

WessexLiftCompanyLimited
Darren Windibank
Phone: 0044(0) 1794 830303
Fax: 0044(0) 1794 512621
Page 3of 4
Receiver Installation
The lift installer must fit
the receiver. The
receiver mounts to three
threaded studs at the
top of the PCB tray
using M4 nylon insert
nuts and plain washers
supplied in the fixing
boxes.
The receiver loom
connects to PLK on the
main PCB (see Fig. 3).
Figure 3: Receiver installation
Wireless Call Station Looms
Wireless Call Station Looms are
15-way Molex shorting plugs that
replace the hard-wired call station
looms ‘stop’ circuit. Two are
required for each lift. Ensure the
mains power is off. Connect the
wireless call station looms into the
two call station sockets on the right
hand side of the PSU PCB (see
Fig. 4).
Note: If hard-wired call stations are
fitted also, then the wireless call
station looms are not used.
Connect the call station looms in
the usual manner.
Figure 4: PSU PCB showing both Wireless Call Station Looms connected.
Set-up
On the main PCB, move dip switch
SW3 A to the lower position to enable
the stop button on wireless handsets.
Leave dip switch SW4 A in the upper
position for both manual and power
doors. This enables the door lock
solenoid to release for both door types
(see Fig. 5).
Figure 5: Dip switch setting

WessexLiftCompanyLimited
Darren Windibank
Phone: 0044(0) 1794 830303
Fax: 0044(0) 1794 512621
Page 4of 4
Adding a handset
To add a handset to an existing system:
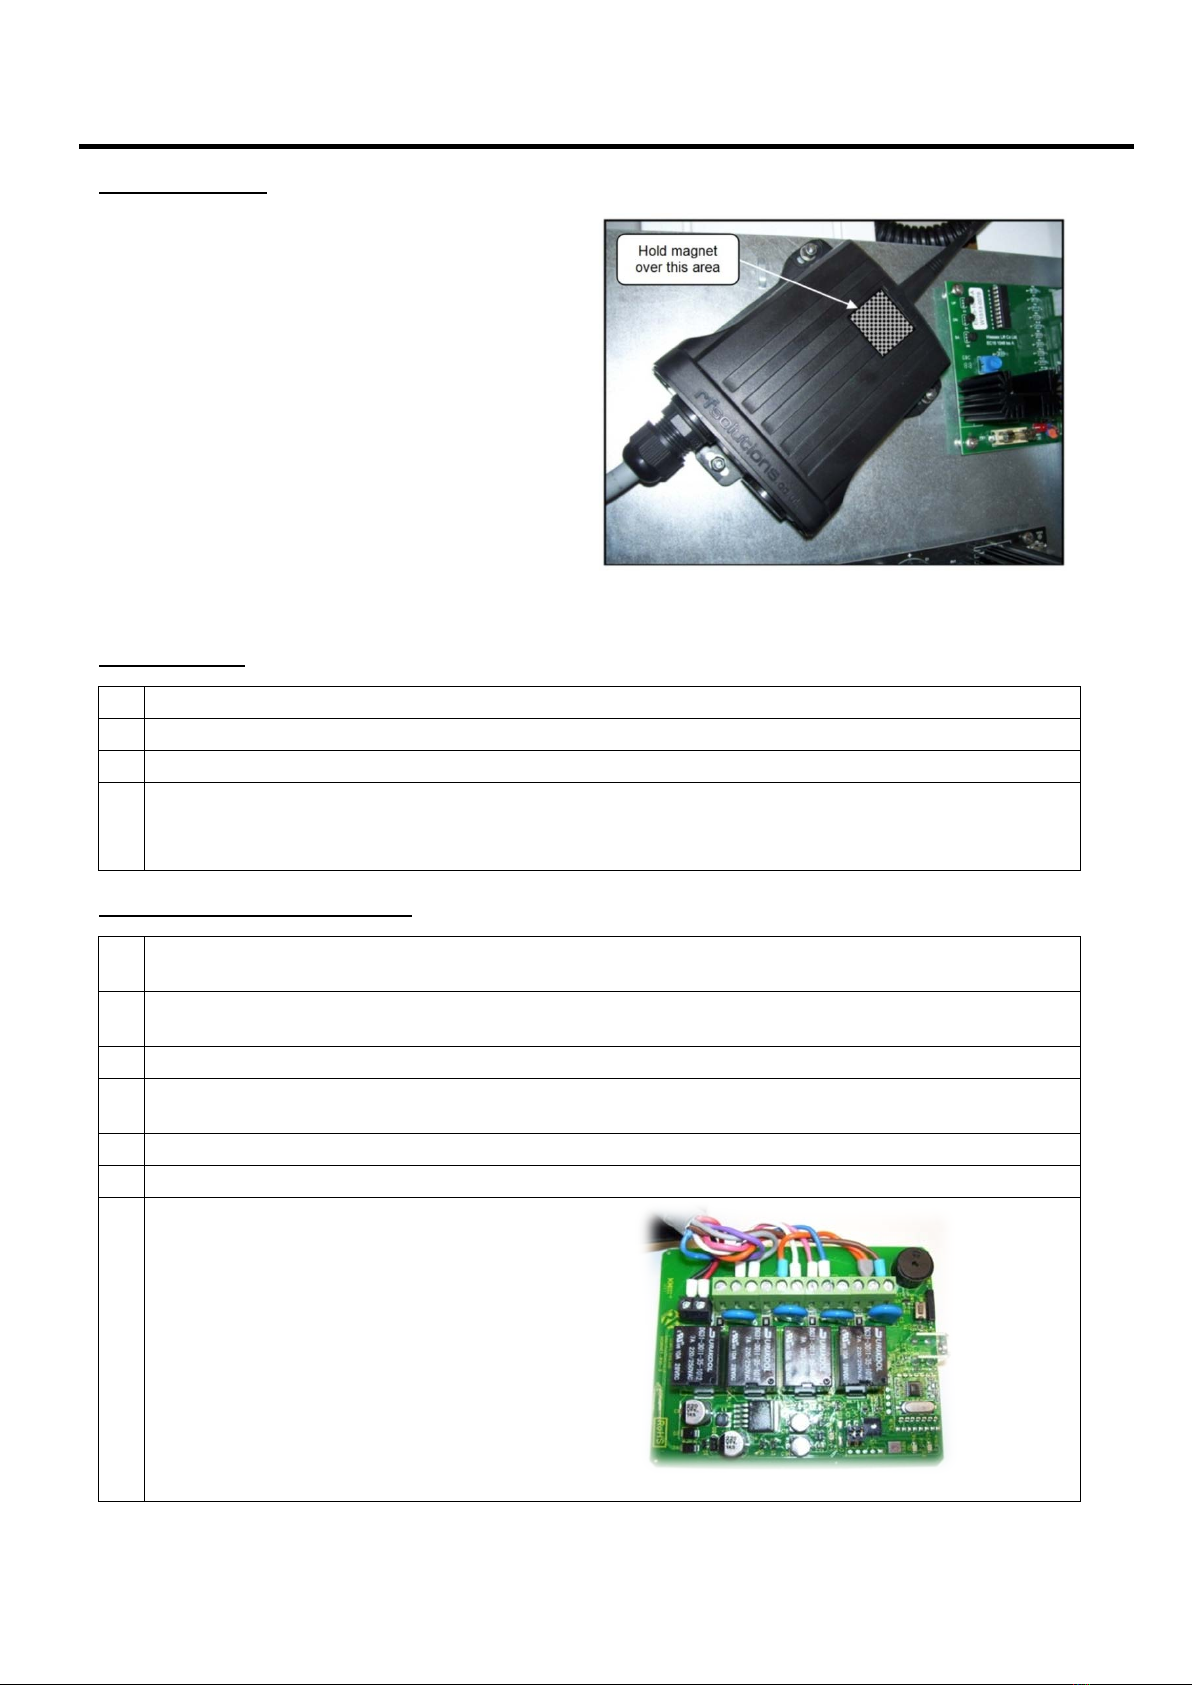
Figure 6: Receiver
1.
Hold a magnet over the area indicated in
Figure 6. You may need to move the magnet
around slightly.
2.
You will hear a short bleep. The bleep
indicates the start of a ten second period in
which a handset can be added.
3.
Press and release the Up arrow button on the
handset to be added. Ensure the Green LED
on the handset illuminates.
4.
At the end of the ten second period you will
hear two long bleeps. This indicates the
system has returned to its normal operating
condition.
5.
Test all handset buttons function correctly.
Test Procedure
1. Test the Up direction button on all handsets. Ensure the Green LED on the handset illuminates.
2. Test the Down direction button on all handsets. Ensure the Green LED illuminates.
3. Test the Stop button on all handsets. Ensure the Green LED illuminates.
4. Test the Door button on all handsets. Ensure the Green LED illuminates.
•For power doors, the door should open and close.
•For manual doors, the lock should release.
Checks in the event of a problem
1. If the Red LED on the handset flashes after a button is pressed, this indicates a low battery. Replace
the AAA batteries.
2. Check the Green LED on the handset illuminates when a button is pressed. If the Green LED fails to
light, check the AAA batteries.
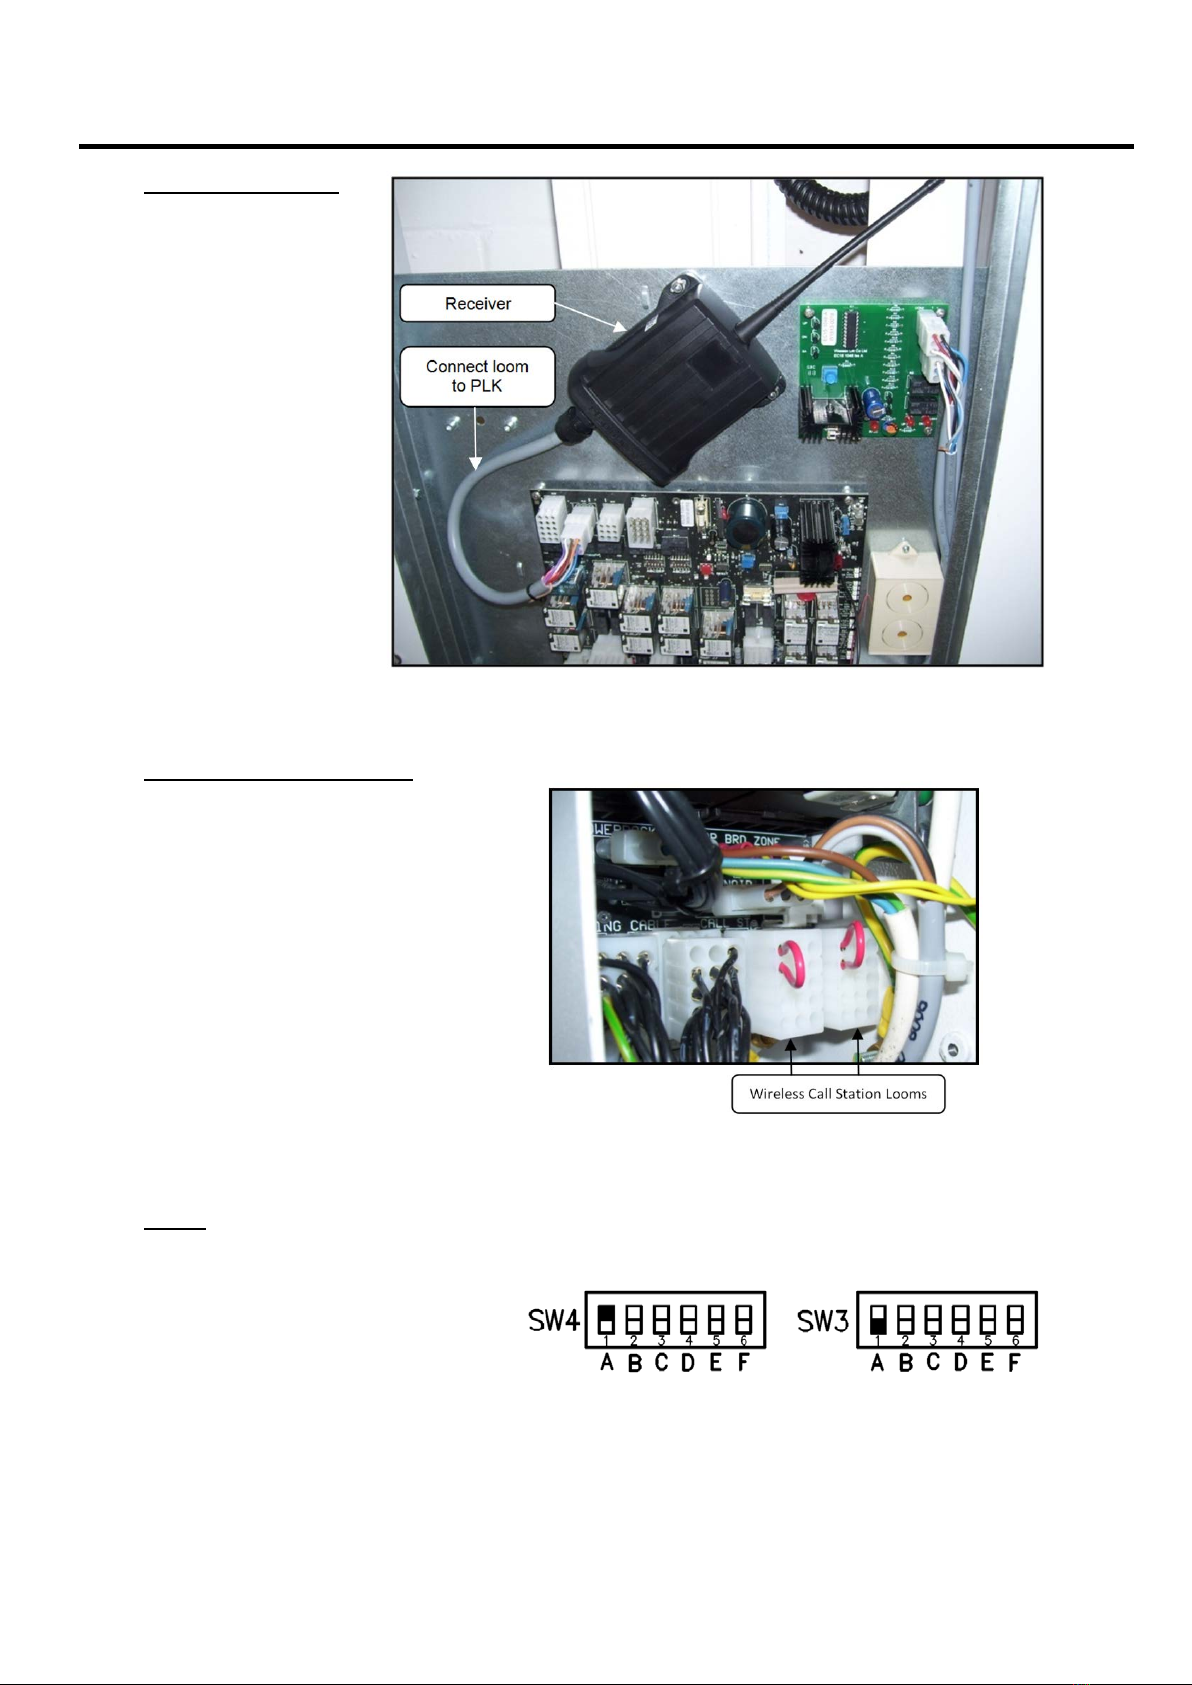
3. Check the dip switches are correctly set (refer to drawing VM30 8105).
4. Check the Wireless Call Station Looms are correctly wired and connected. The link wire connects from
pin 1 to pin 4 (see Fig. 4).
5. Check the receiver loom wiring to PLK is correct (refer to drawing VM30 8105).
6. With all connections made, check there is 24V DC on the Red wire (pin 8) on the receiver loom at PLK.
7. If all the above checks are sound,
check all wiring to the receiver PCB
(refer to drawing VM30 8105).
Remove the receiver, unscrew and
remove the antenna, remove the two
screws at the base of the receiver
casing and slide out the receiver PCB.
When reassembling, note that the PCB
locates into slots moulded into the
receiver casing.
Figure 7: Receiver PCB
Table of contents
Popular Controllers manuals by other brands

Sentera
Sentera STR-4 series Mounting and operating instructions

Vaillant
Vaillant sensoCOMFORT VRC 720f Operating and installation instructions

Geco
Geco G-202-P05 Installation, operating and maintenance manual

Seg
Seg System A2 H15 General information

Chauvet
Chauvet Obey 70 user manual

BLEMO
BLEMO ER41 manual