West Bend Chris Freytag 86604CF User manual

Instruction Manual
Register this and other Focus Electrics products through our website:
www.focuselectrics.com
Important Safeguards...............................................................................................2
Operating Precautions..............................................................................................3
Assembling Your Steamer........................................................................................4
Using Your Steamer.................................................................................................4
Cleaning Your Steamer............................................................................................7
Cooking Tips ............................................................................................................7
Steaming Guide .......................................................................................................8
Recommended Cooking Temperatures..................................................................12
Warranty.................................................................................................................13
SAVE THIS INSTRUCTION MANUAL FOR FUTURE REFERENCE
©2008 West Bend®, a Brand of Focus Electrics, LLC.
www.focuselectrics.com

IMPORTANT SAFEGUARDS
To prevent personal injury or property damage, read and follow all instructions
and warnings.
When using electrical appliances, basic safety precautions should always be
followed including the following:
•Read all instructions, including these important safeguards and the care and use
instructions in this manual.
•Do not touch hot surfaces. Use handles or knobs.
•To protect against electric shock, do not immerse cord, plugs, or other electric
parts in water or other liquids.
•Close supervision is necessary when this appliance is used by or near children.
•Unplug the appliance from outlet when not in use and before cleaning. Allow to
cool before putting on or taking off parts.
•Do not operate any appliance with a damaged cord or plug or after the
appliance malfunctions or if the appliance is dropped or damaged in any
manner. If you experience any problems with your appliance, unplug it
immediately from the electrical outlet. For service information see warranty
page.
•The use of accessory attachments not recommended by Focus Electrics, LLC
may cause injuries.
•Do not use this appliance outdoors.
•Do not let cord hang over the edge of a table or counter, or touch hot surfaces.
•Do not place on or near a hot gas or electrical burner, or in a heated oven.
•Extreme caution must be used when moving an appliance containing hot oil or
other hot liquids.
•To disconnect, turn unit to “OFF”, then remove plug from wall outlet.
•Do not use appliance for other than intended use.
•This appliance has a polarized plug (one blade is wider than the other). To
reduce the risk of electric shock, this plug is intended to fit into a polarized outlet
only one way. If the plug does not fit fully into the outlet, reverse the plug. If it
still does not fit, contact a qualified electrician. Do not attempt to modify the plug
in any way.
•Do not preheat the heating base.
•For household use only.
2

To prevent personal injury or property damage, read and follow all instructions
and warnings.
3
OPERATING PRECAUTIONS
•Use hot pads or oven mitts if you lift or carry the electrical base, baskets or
cover when it is hot.
•Be extremely cautious of steam when removing cover. Lift cover slowly,
directing steam away from you and let water drip into steamer.
•Do not operate appliance while empty or without water in the reservoir.
•A short power-supply cord is provided to reduce risks resulting from becoming
entangled in or tripping over a longer cord.
•Longer detachable power-supply cords or extension cords are available and
may be used if care is exercised in their use. While use of an extension cord is
not recommended, if you must use one, the marked electrical rating of the
detachable power-supply cord or extension cord should be at least as great as
the electrical rating of the appliance. If the appliance is of the grounded type,
the extension cord should be a grounding-type 3-wire cord. The cord should be
arranged so that it will not drape over the counter top or tabletop where it can be
pulled by children or tripped over.
•Do not attempt to repair this appliance yourself.
SAVE THESE INSTRUCTIONS

ASSEMBLING YOUR STEAMER
Cover
Rice Bowl
Separator Ring
Food Basket
Drip Tray
Heating Base
USING YOUR STEAMER
Before using for the first time, wash baskets, rice bowl, drip tray, separator rings and
cover using warm, soapy water. Rinse thoroughly and dry. Wipe the surfaces of the
heating base with a damp cloth and dry thoroughly. Do not use abrasive cleaning
products.
Cook Time – Maximum 90 minutes cooking time and 12 hour delay cycle.
STEAMER ICONS
“OFF” “START/STOP” “STEAM” “STEAM TIME” “WARM”
The
display
when first
plugged in.
Starts and
stops the
steamer.
Indicates
the
steaming
time.
Adjust the
steaming
time up.
Adjust the
steaming
time down.
Indicates
steamer is
in keep
warm
mode.
4

“SET DELAY” “SET” “HOURGLASS” “ADD WATER”
Press to set
the delayed
steaming time.
Indicates the
delayed
steaming time.
Indicates how long the
timer has to count
down to 0:00
Indicates the steamer
does not have enough
water to complete the
steaming cycle.
STEAMING
1. Place the heating base on a dry, level, heat resistant surface, away from any
edge. Note: As food cooks, steam will come out of appliance. To prevent
possible damage, do not place steamer directly under cabinets.
2. Add cold water to the desired level or as shown in the cooking chart. Note:
Never start the steamer without water or with water below the “MIN” line or
above the “MAX” line.
3. Place the drip tray in the heating base. Note: The drip tray must always be
used when steaming foods or cooking rice.
4. Place food items in the food baskets or rice bowl. Place the food basket on top
of the drip tray making sure the drip tray and food basket are aligned properly. If
you are using multiple food baskets, lay a separator ring on top of the bottom
food basket and snap the second food basket in place. Make sure the separator
ring is completely snapped on to the upper basket and all baskets line up
properly. If using the second and third baskets repeat this procedure. If you are
using the rice bowl, place the rice bowl inside any of the food baskets being
used. Always place the cover on the top basket being used.
5. Plug the cord into a 120 volt, AC electric outlet only. The appliance
will beep and display a cooking time of 10 minutes and the display
will read “OFF.” Note: If the steamer is left idle for 5 minutes or
more, the digital display will turn off. Press any button on the
steamer to reactivate the display.
Pressing the “STEAM TIME” buttons will adjust the steaming time up or down
between 00 and 90 minutes. Note: Hold either button down to scroll quickly.
See the steaming chart for approximate cooking times.
6. When the timer is at the desired steaming time, press the
“START/STOP” button to begin steaming. The “STEAM” icon will
appear in the display to indicate steaming has begun. To cancel
steaming, press the “START/STOP” button again.
5

KEEP WARM - After the steaming time has elapsed, an audible
beep will sound 5 times and the “STEAM” icon will disappear. The
steamer will enter a 1 hour keep warm mode indicated by a
“WARM” icon and “00” in the display. During the keep warm mode,
the steamer will periodically turn off and on to maintain food at serving
temperature. When the keep warm mode is finished, the steamer will beep and
“OFF” and “10” will appear in the display.
If you want to cancel the “WARM” cycle, press the “START/STOP” button.
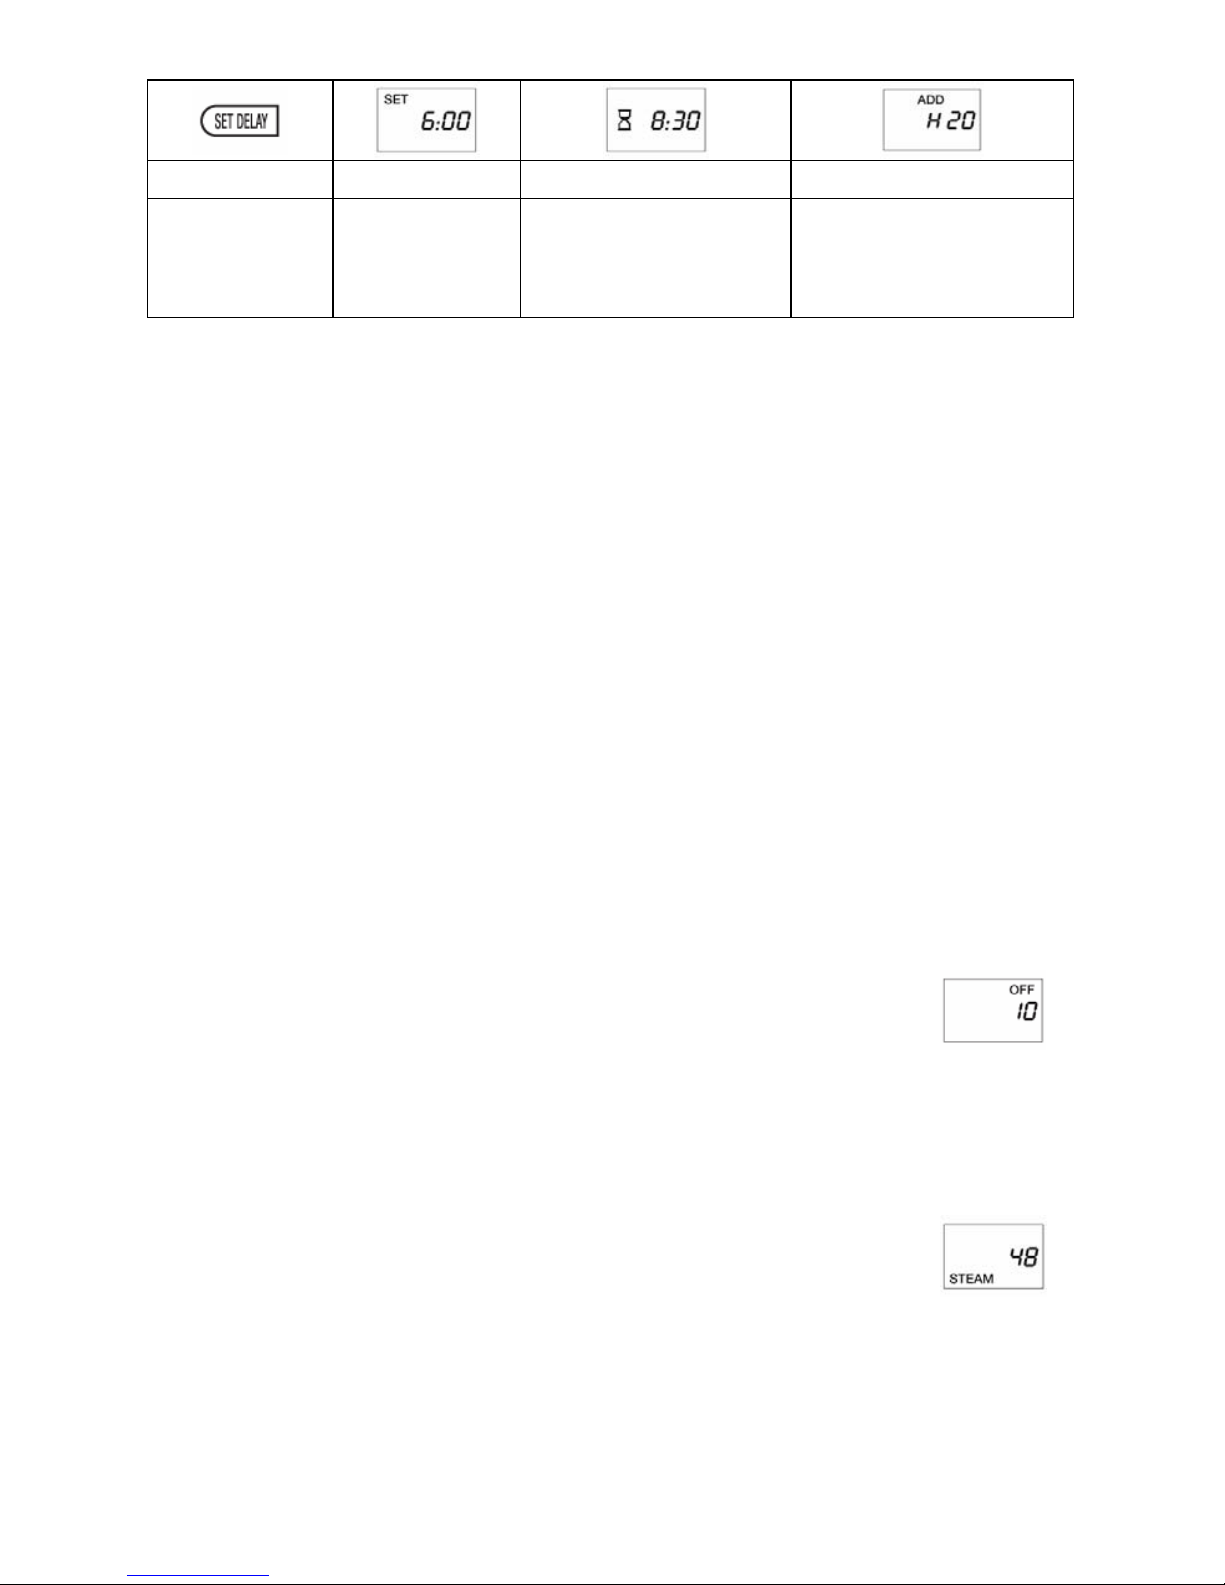
DELAY COOKING
1. Follow steps 1 - 4 from the “STEAMING” directions. Note: Do not
press the “START/STOP” button.
2. Press the “SET DELAY” button. The “SET” icon and 6:00 will be
displayed.
3. Pressing the “STEAM TIME” buttons will adjust the delay time up or down
between 00 and 12 hours. Note: Hold either button down to scroll quickly.
4. Press the “SET DELAY” button to accept the delay time. Once the
button is pressed, the hourglass icon will be displayed which
means the timer is counting down to 0:00. When the timer reaches
0:00, the unit will beep once and start the steaming cycle.
•If you decide to change the delay time after it has been set, press the “SET
DELAY” button and you will be back in “SET” mode. After changing the delay
time, be sure to press “SET DELAY” again to start the timer.
•If you decide to change the steam time when in the delay mode, press the
“START/STOP” button and you will be back in the steam timer mode. Note:
The delay timer will have to be reset after you change the steam time.
ADD WATER ALARM – when the steamer is out of water or the water
level is too low to complete the steaming cycle, the steamer has a self-
protection feature that will stop the steaming operation. An audible
beep will sound for 50 seconds and the “ADD WATER” icon will appear in the
display.
If this happens, push any button to stop the alarm. The steam time and “OFF” will
appear in the display. Add cold water through the drip tray handles or remove the
drip tray and add cold water directly into the heating base. Allow a few seconds for
the heater to cool down. Start the steamer up again by pushing “START/STOP”
button; the steamer will resume the cycle. If the steamer goes back into the alarm
mode, let the steamer cool down for a longer period of time and push the
“START/STOP” button again.
6

7
CLEANING YOUR STEAMER
1. Unplug the cord from the electrical outlet. Allow the steamer and all accessories
to cool completely before cleaning. Note: Never immerse the heating base,
cord or plug in water or in a dishwasher.
2. Wash the food baskets, rice bowl, drip tray, separator rings and cover using
warm, soapy water. Rinse thoroughly and dry. These parts may also be cleaned
in a dishwasher, top rack only. Note: Do not use the heat setting to dry.
3. Clean the inside and outside of the heating base with a damp cloth and dry
thoroughly. Note: Do not use abrasive cleaning products.
4. Mineral deposits may build up on the steamer heater over time. When you see a
white coating on the heater, perform the following steps to descale and extend
the life of your steamer.
1. Fill the heating base with two cups of vinegar and one cup of cold water.
2. Put the drip tray in place, set the timer for twenty minutes and press
“START/STOP” to begin steaming.
3. When the steamer turns off, let it cool completely and rinse the water
reservoir with cold water being careful not to get water on the outside or
bottom of the heating base.
4. Dry thoroughly.
STORAGE – Your steamer’s food baskets nest for easy storage. Remove the
separation rings between the baskets and place baskets inside one another.
COOKING TIPS
•Altitude and water type affect the temperature at which water boils which affects
cooking time. As you cook with this appliance, adapt times and measurements
to your own personal tastes.
•Cut food into uniform pieces and arrange evenly in food baskets for even
cooking.
•Do not thaw frozen vegetables before steaming. Stir halfway through the
steaming time for best results.
•Items will continue to cook slightly during the “Warm” mode, so adjust
accordingly.
•Do not pack food into the baskets as this limits the flow of steam.
•If steaming items for more than 60 minutes, you may have to add water during
the steaming cycle.

8
STEAMING GUIDE
These steaming times are for the bottom basket filled to the capacity listed in the
chart. Items will cook faster in the bottom basket. If you are cooking with multiple
baskets, or putting more food into the baskets than suggested, you may have to add
extra steaming time. The water level does not have to be precise. The following
levels are suggested to provide enough water for the recommended steaming times.
Note: The drip tray must always be used.
Fresh
Vegetables Amount Approximate
Time (minutes) Water
Level Preparation
Artichokes,
whole 4 whole. 30-34 MAX Trim stem; remove
loose outer leaves, cut
1 inch off top.
Asparagus,
spears 1 lb. 13-17 Middle Place evenly in basket.
Beans,
green/wax 1 lb. 16-20 Middle Place evenly in basket.
Beets 1 lb. 24-28 Middle
Cut and place evenly
in basket.
Broccoli,
spears 1 lb. 16-20 Middle Place evenly in basket.
Brussels
Sprouts 1 lb. 20-24 Between
Middle
and MAX
Remove outer leaves
and place evenly in
basket.
Cabbage 1 head 23-27 Between
Middle
and MAX
Cut whole head into 8
equal pieces.
Carrots,
sliced or
whole 1 lb. 25-29 Between
Middle
and MAX Place evenly in basket.
Cauliflower 1 lb. 16-20 Middle Place evenly in basket.
Celery 1 lb. 17-21 Middle Cut into ¼ inch pieces.
Corn on the
Cob
Up to 6
ears per
basket 28-32 MAX
Remove husk. Place
evenly in basket.
Mushrooms,
whole 1 lb. 11-15 Middle Place evenly in basket.

9
Fresh
Vegetables Amount Approximate
Time (minutes) Water
Level Preparation
Okra 1 lb. 18-22 Middle Place evenly in basket.
Onions,
quartered 1 lb. 12-16 Middle Place evenly in basket.
Parsnips 1 lb. 10-14 Middle Place evenly in basket.
Peas in pod 1 lb. 12-16 Middle Place evenly in basket.
Peppers,
green or red 1 lb. 12-16 Middle Place evenly in basket.
Potatoes, red,
baking or
sweet 1 lb. 38-42 MAX Cut in half and place
cut side down or cut in
¼ inch slices.
Potatoes,
whole 6 potatoes 50-54 MAX Pierce skin with fork
several times and place
evenly in basket.
Rutabaga 1 lb. 28-32 Between
Middle
and MAX
Dice and place evenly
in basket.
Spinach 1 lb. 10-14 Middle Place evenly in basket.
Squash,
Summer,
Yellow,
Zucchini
1 lb. 14-18 Middle Cut into ¼ inch pieces.
Turnips 1 lb. 20-24 Middle
Slice and place evenly
in basket.
Frozen
Vegetables
All – Corn,
Carrots,
Green Beans,
Broccoli,
Peas, Brussel
Sprouts
1 lb. 16-20 Middle Place evenly in basket.
Stir halfway through
steaming cycle.
Vegetables in
sauce 1 lb. 16-20 Middle
Put in rice bowl with
recommended water
stated on package.
Mix halfway through
steaming cycle.

10
Rice/Grains/
Pasta Amount Approximate
Time (minutes) Water
Level Preparation
White, 1 cup dry 33-37 MAX Mix 1 cup rice with 1½
cups water and desired
seasoning in rice bowl.
Brown, 1 cup dry 40-44 MAX Mix 1 cup rice with 1½
cups water and desired
seasoning in rice bowl.
Barley 1 cup dry 40-44 MAX Mix 1 cup barley with
1½ cups water in rice
bowl.
Pasta 1 cup dry 38-42 MAX Mix 1 cup pasta with
1½ cups water in rice
bowl.
Eggs
Hard Boiled Up to 12 16-20 Middle Place evenly in basket.
Soft Boiled Up to 12 8-10 Middle Place evenly in basket.
Seafood and
Fish
Clams, Fresh
in shell 1 lb. 12-16 Middle Clean, soak shells.
Cook until shells are
open.
Crab legs,
claws
(cooked) 1 lb. 15-19 Middle Steam until hot.
Lobster tails
(uncooked) 1 lb. 18-22 Middle
Remove underside of
shell. Place in steam
basket shell side down.
Steam until flesh is
opaque and shell is
reddish in color.
Mussels, in
shell 1 lb. 16-20 Middle
Clean shells. Cook
until shells are open
and flesh turns tannish
in color.
Oysters, in
shell 1 lb. 13-17 Middle Clean shell. Cook until
shells are opened and
juices bubble.
Scallops,
thawed 1 lb. 13-17 Middle Rinse scallops. Steam
until opaque in color.

11
Seafood and
Fish Amount Approximate
Time (minutes) Water
Level Preparation
Shrimp, in
shell frozen 1 lb. 13-17 Middle
Place evenly in
basket. Cook until
shrimp is opaque in
color.
Shrimp in
shell, thawed 1 lb. 10-14 Middle
Place evenly in
basket. Cook until
shrimp is opaque in
color.
Fish Fillets 1 lb. 18-22 Middle
Season and place
evenly in basket –
cook until fish flakes
easily.
Fish Steaks 3 lbs. 23-27 Middle
Season and place
evenly in basket –
cook until fish flakes
easily.
Poached fish
in rice bowl 1 lb. 22-26 Middle
Place in rice bowl with
desired seasoning
and butter. Cover
rice bowl with foil.
Other Foods
Beans 1 cup dry
beans
60-120
depending on
type of bean
Max (you
may need
to add
water
during the
cooking
cycle)
Mix 1 cup beans with
1½ cups water in rice
bowl – cook until soft.
Oatmeal 1 cup dry 8-12 Middle Mix 1 cup oatmeal
with 1¾ cups water in
rice bowl.
Dinner Rolls Up to 6 2-4 Middle Place evenly in
basket.
Tortillas, soft Up to 6 2-4 Middle Place evenly in
basket.
Leftovers 1-2 cups 11-15 Middle
Place in rice bowl and
cover with foil until
warm.

Meat - Amount Approximate
Time (minutes) Water Level Preparation
When cooking meats always check the internal temperatures with a meat
thermometer. Make sure meat is thoroughly cooked to required temperature
before consuming. See recommended cooking temperatures on the following
chart.
Chicken
Breast,
boneless
1 lb. 20-24 Between
Middle
and Max
Steam until juices run
clear.
Chicken
Breast, split
with bone
1 lb. 39-44 Max Place flesh side
down, steam until
juices run clear.
Drumstick
and Thighs
with bone
1 lb. 30-34 Max Steam until juices run
clear.
Hot Dogs Up to 24 8-12 Middle Pierce skin and place
evenly in basket.
Precooked
Sausage Up to 12 10-14 Middle Pierce skin and place
evenly in basket.
RECOMMENDED COOKING TEMPERATURES
Food Type
Minimum Internal
Temperature
Beef, Veal, Lamb, Pork Ground 160°F (71°C)
Beef Veal, Lamb Roasts Legs, Chops –
Medium Rare 145°F (63°C)
Beef, Veal, Lamb Roasts Legs, Chops –
Medium 160°F (71°C)
Beef, Veal, Lamb Roasts Legs, Chops –
Well Done 170°F (77°C)
Chicken, Turkey Ground 165°F (74°C)
Whole Poultry All Types 180°F (82°C)
Poultry Breasts, Roasts 170°F (77°C)
Fresh Pork Medium 160°F (71°C)
Fresh Pork Well Done 170°F (77°C)
Ham Cooking Required 160°F (71°C)
Ham Fully Cooked 140°F (60°C)
Egg Dishes All Types 160°F (71°C)
Stuffing In Bird 165°F (74°C)
Leftovers All Types 165°F (74°C)
12

L5765 07/08 West Bend®, a Brand of Focus Electrics, LLC.Printed in China
13
PRODUCT WARRANTY
Appliance 1 Year Limited Warranty
Focus Electrics, LLC (“Focus Electrics”) warrants this appliance from failures in the material
and workmanship for one (1) year from the date of original purchase with proof of purchase,
provided the appliance is operated and maintained in conformity with the provided Instruction
Manual. Any failed part of the appliance will be repaired or replaced without charge at Focus
Electrics’ discretion. This warranty applies to indoor household use only.
This warranty does not cover any damage, including discoloration, to any non-stick surface of
the appliance. This warranty is null and void, as determined solely by Focus Electrics if the
appliance is damaged through accident, misuse, abuse, negligence, scratching, or if the
appliance is altered in any way.
THIS WARRANTY IS IN LIEU OF ALL IMPLIED WARRANTIES, INCLUDING WARRANTIES
OF MERCHANTABILITY, FITNESS FOR A PARTICULAR PURPOSE, PERFORMANCE, OR
OTHERWISE, WHICH ARE HEREBY EXCLUDED. IN NO EVENT SHALL FOCUS
ELECTRICS BE LIABLE FOR ANY DAMAGES, WHETHER DIRECT, INDIRECT,
INCIDENTAL, FORSEEABLE, CONSEQUENTIAL, OR SPECIAL, ARISING OUT OF OR IN
CONNECTION WITH THIS APPLIANCE.
If you think the appliance has failed or requires service within its warranty period, please
contact the Focus Electrics Customer Service Department at (866) 290-1851, or e-mail us at
[email protected]. A receipt proving the original purchase date will be required for all
warranty claims, hand written receipts are not accepted. You may also be required to return
the appliance for inspection and evaluation. Return shipping costs are not refundable. Focus
Electrics is not responsible for returns lost in transit.
Valid only in USA and Canada
REPLACEMENT PARTS
Replacement parts, if available, may be ordered directly from Focus Electrics, LLC several
phone by calling (866)290-1851, or by writing to:
Focus Electrics, LLC
Attn: Customer Service
P. O. Box 2780
West Bend, WI 53095
To order with a check or money order, please first contact Customer Service for an order total.
Mail your payment along with a letter stating the model or catalog number of your appliance,
which can be found on the bottom or back of the unit, a description of the part or parts you are
ordering, and the quantity you would like. Your check should be made payable to Focus
Electrics, LLC.
Your state/province’s sales tax and a shipping fee will be added to your total charge. Please
allow two weeks for processing and delivery.
This manual contains important and helpful information regarding the safe use and care of your
new Focus Electrics product. For future reference, attach dated sales receipt for warranty proof
of purchase and record the following information:
Date purchased or received as gift: _______________________________________________
Where purchased and price, if known: _____________________________________________
Item number and Date Code (shown bottom/back of product):___________________________

Mode d’emploi
Enregistrez ce produit et les autres produits Focus Electrics sur notre site Internet :
www.focuselectrics.com
Précautions Importantes ..........................................................................................2
Précautions D’utilisation...........................................................................................3
Assemblage de Votre Cuiseur Automatique.............................................................4
Utilisation de Votre Cuiseur Automatique.................................................................4
Nettoyage de Votre Cuiseur Automatique................................................................7
Astuces Pour la Cuisson..........................................................................................7
Guide de Cuisson à la Vapeur .................................................................................8
Températures de Cuisson Recommandées...........................................................12
Garantie .................................................................................................................13
CONSERVEZ CE MODE D’EMPLOI POUR UNE CONSULTATION ULTÉRIEURE
©2008 West Bend®, une Marque de Focus Electrics, LLC.
www.focuselectrics.com

PRÉCAUTIONS IMPORTANTES
Pour empêcher toute blessure physique ou tout dommage matériel, lisez et
suivez toutes les consignes et mises en garde.
Lorsque vous utilisez des appareils électriques, les précautions de sécurité
élémentaires devraient toujours être respectées, notamment les précautions ci-
dessous :
•Lisez toutes les instructions, notamment les présentes précautions importantes,
ainsi que les consignes pour l’entretien de ce manuel.
•Ne touchez pas les surfaces chaudes. Utilisez des poignées rectangulaires ou
rondes.
•Pour vous protéger contre tout choc électrique, n’immergez pas le cordon, les
fiches ni aucune autre pièce électrique dans l’eau ni dans tout autre liquide.
•Une surveillance étroite est nécessaire lorsque vous cet appareil est utilisé par
ou à proximité d’enfants.
•Débranchez l’appareil de la prise électrique lorsqu’il n’est pas utilisé et avant de
le nettoyer. Laissez l’appareil refroidir avant la mise en place ou le retrait de
pièces.
•N’utilisez pas cet appareil avec un cordon abîmé ou une fiche détériorée, si
l’appareil a connu un disfonctionnement ou si l’appareil est tombé ou a été
détérioré de quelque manière que ce soit. Si vous rencontrer un problème quel
qu’il soit avec votre appareil, débranchez-le immédiatement de la prise secteur.
Pour des informations sur les réparations, voir la page de garantie.
•L’utilisation de fixations accessoires non recommandées par Focus Electrics
risque de provoquer des blessures.
•N’utilisez pas cet appareil à l’extérieur.
•Ne laissez pas pendre le cordon du bord du plan de travail ou de la table et
assurez-vous qu'il ne touche pas de surface chaude.
•Ne placez pas cet appareil sur ou à proximité d’un brûleur à gaz ou électrique
chaud ou d’un four chaud.
•Soyez extrêmement prudent lorsque vous déplacez un appareil contenant de
l’huile chaude ou tout autre liquide chaud.
•Pour débrancher, régler l’interrupteur à « OFF » et retirer ensuite la fiche de la
prise murale.
•N’utilisez pas l’appareil pour une autre utilisation que l’utilisation indiquée.
•Cet appareil est pourvu d’une fiche polarisée (une lame est plus large que
l’autre). Pour réduire le risque d’électrocution, cette fiche est conçue pour
s’encastrer dans une prise secteur polarisée dans un sens uniquement. Si la
fiche ne s’insère pas complètement dans la prise secteur, retournez la fiche. Si
elle ne s’encastre toujours pas, contactez un électricien qualifié. Ne tentez pas
de modifier la fiche de quelque manière que ce soit.
•Ne préchauffez pas le socle chauffant.
•Pour une utilisation domestique uniquement.
2

Pour empêcher toute blessure physique ou tout dommage matériel, lisez et
suivez toutes les consignes et mises en garde.
PRÉCAUTIONS D’UTILISATION
•Utilisez des maniques ou des gants anti-chaleur si vous soulevez ou déplacez le
socle électrique, les bacs ou le couvercle lorsque ceux-ci sont chauds.
•Soyez extrêmement prudent avec la vapeur en retirant le couvercle. Soulevez
lentement le couvercle, en orientant la vapeur loin de vous et laissez l’eau
couler dans le cuiseur automatique.
•N’utilisez pas l’appareil lorsque celui-ci est vide ou lorsque le réservoir ne
contient pas d’eau.
•Le cordon d’alimentation fourni est court pour réduire les risques qu’une
personne se prenne les pieds ou trébuche sur un cordon plus long.
•Des cordons d’alimentations plus longs détachables ou des cordons de rallonge
sont disponibles et peuvent être utilisés à condition de faire preuve de prudence
lors de leur utilisation. Bien que l’utilisation d’un cordon de rallonge ne soit pas
recommandée, si vous devez en utiliser un, la puissance nominale indiquée
pour le cordon d’alimentation détachable ou pour le cordon de rallonge devrait
être au moins aussi importante que la puissance nominale de l’appareil. Si
l’appareil est de type raccordé à la terre, le cordon de rallonge devrait être relié
à la terre et composé de trois fils. Le cordon devrait être disposé de manière à
ne pas pendre depuis le plan de travail d’où il risque d’être tiré par des enfants
ou d’où quelqu’un pourrait s’y prendre les pieds.
•N’essayez pas de réparer cet appareil vous-même.
CONSERVEZ CES CONSIGNES
3

ASSEMBLAGE DE VOTRE CUISEUR AUTOMATIQUE
Couvercle
Bac à Riz
Anneau de Séparation
Bac à Aliments
Bac Vapeur
Socle Chauffant
UTILISATION DE VOTRE CUISEUR AUTOMATIQUE
Avant la première utilisation, lavez les bacs, le bac à riz, le bac vapeur, les anneaux
de séparation et le couvercle à l’aide d’une solution d’eau savonneuse chaude.
Rincez soigneusement puis séchez. Essuyez les surfaces du socle chauffant à l’aide
d’un chiffon humide et essuyez bien. N’utilisez pas de produits de nettoyage abrasifs.
Temps de cuisson – Temps de cuisson maximum de 90 minutes et déclenchement
différé de 12 heures maximum.
ICÔNES DE CUISSON À LA VAPEUR
ARRÊT MARCHE
ARRÊT VAPEUR TEMPS DE VAPEUR CHAUFFE
Ce qui
s’affiche au
départ quand
l’appareil est
branché.
Pour
démarrer et
arrêter
l’étuveuse
Indique le
temps de
cuisson à
la vapeur.
Pour
augmenter
le temps
de
cuisson.
Pour
diminuer
le temps
de
cuisson.
Indique
que
l’étuveuse
est en
mode de
maintien
de la
chaleur.
4

DÉLAI RÉGLAGE SABLIER AJOUTEZ DE L’EAU
Appuyez pour
régler le délai
pour la cuisson
différée.
Indique le
délai avant
la cuisson à
la vapeur.
Indique le
temps qui reste
pour arriver à
0:00
Indique que l’étuveuse
ne contient pas assez
d’eau pour finir le
cycle de cuisson à la
vapeur.
CUISSON À LA VAPEUR
1. Placez l’appareil sur une surface sèche, plane et résistante à la chaleur, loin de
tout bord. Remarque : L’appareil produit de la vapeur pendant la cuisson. Pour
éviter tout dégât, ne mettez pas l’appareil directement sous un placard.
2. Ajoutez la quantité d’eau froide souhaitée ou indiquée dans le tableau de
cuisson. Remarque : Ne mettez jamais l’appareil en marche sans eau ou si le
niveau d’eau se situe sous la ligne « MIN » ou au-dessus de la ligne « MAX ».
3. Placez le plateau de récupération des gouttes dans le socle chauffant.
Remarque : Il faut toujours utiliser le plateau à gouttes lors de la cuisson à la
vapeur ou pour cuire le riz.
4. Placez les ingrédients dans les paniers ou dans le bol à riz. Placez le panier au-
dessus du plateau à gouttes en vérifiant le bon alignement de ces deux
éléments. Si vous utilisez plusieurs paniers, placez un anneau de séparation sur
le panier du bas et enclenchez le second panier pour le mettre en place.
Assurez-vous que l’anneau de séparation est bien enclenché sur le panier qui
se trouve au-dessus et que tous les paniers sont bien alignés. Faites de même
pour les deux autres paniers si vous les utilisez. Si vous utilisez le bol à riz,
placez-le dans un des paniers que vous utilisez. Placez toujours le couvercle en
haut sur le dernier panier.
5. Branchez le cordon dans une prise secteur de 120 volts CA
uniquement. L’appareil émettra un signal sonore et affichera un
temps de cuisson de 10 minutes de même que « OFF ».
Remarque : Si l’étuveuse est laissée sans instructions pendant 5 minutes ou
plus, l'affichage numérique s'éteindra. Appuyez sur n’importe quelle touche de
l’étuveuse pour relancer l’affichage.
Appuyez sur les touches du temps de vapeur (STEAM TIME)pour régler le
temps de cuisson à la vapeur entre 00 et 90 minutes. Remarque : Maintenez la
touche enfoncée pour un déroulement rapide. Consultez le tableau pour les
temps de cuisson qui conviennent.
6. Quand le minuteur affiche le temps de cuisson souhaité, appuyez
sur le bouton « START/STOP » (arrêt/marche) pour commencer la
cuisson à la vapeur. L’icône « STEAM » (vapeur) s’affiche pour
indiquer que la cuisson à la vapeur est en route. Pour annuler la cuisson à la
vapeur, appuyez de nouveau sur le bouton « START/STOP »Lorsque vous avez
réglé le minuteur sur la durée de cuisson à la vapeur souhaitée, appuyez sur la
touche Start/Stop pour lancer la cuisson à la vapeur immédiatement pendant la
durée paramétrée. L’icône STEAM s’affiche à l’écran pour indiquer que la
cuisson à la vapeur a commencé. Pour annuler la cuisson à la vapeur, appuyez
sur la touche Start/Stop.
5

6
MAINTIEN DE LA CHALEUR - Après l'écoulement du temps de
cuisson à la vapeur, un signal sonore se fait entendre 5 fois et
l'icône de la vapeur (STEAM)disparaît. L’étuveuse se met alors en
mode de maintien de la chaleur pour une durée d’une heure. Ceci
est indiqué par l’affichage de l’icône « WARM » et de « 00 ». En mode de
maintien de la chaleur, l’étuveuse s'éteint et s'allume régulièrement pour
conserver la nourriture à la température de consommation. Après l'écoulement
du mode de maintien de la chaleur, l’étuveuse émet un signal sonore et affiche
« OFF » et « 10 ».
Pour annuler le cycle de maintien de la chaleur (WARM), appuyez sur la touche
« START/STOP ». CUISSON DIFFÉRÉE
1. Suivez les étapes 1 et 4 des instructions concernant la cuisson à la vapeur.
Remarque : N’appuyez pas sur la touche « START/STOP ».
2. Appuyez sur la touche de cuisson différée (SET DELAY). L'appareil
affichera alors l’icône « SET » et 6:00.
3. Appuyez sur les touches du temps de vapeur (STEAM TIME)pour régler le
délai avant la cuisson entre 00 et 12 heures. Remarque : Maintenez la touche
enfoncée pour un déroulement rapide.
4. Appuyez sur la touche de cuisson différée (SET DELAY)pour
accepter le délai. Une fois que vous avez appuyé sur la touche,
l’icône du sablier s’affiche pour indiquer que le décompte jusqu’à
0 :00 est lancé. Lorsque le minuteur arrive à 0 :00, l’appareil émet
un signal sonore et met en route le cycle de cuisson à la vapeur.
•Pour changer le délai après l’avoir déjà réglé, appuyez sur la touche « SET
DELAY » et vous reviendrez au mode de réglage du délai. Après avoir changé
le délai, n’oubliez pas d’appuyer de nouveau sur la touche « SET/DELAY » pour
relancer le minuteur.
•Pour changer le temps de cuisson à la vapeur pendant que l’appareil est en
mode de délai, appuyez sur la touche « START/STOP » et vous reviendrez au
mode de réglage du temps de cuisson. Remarque : Il faut régler le délai avant
la cuisson encore une fois après avoir changé le temps de cuisson.
ALARME DE NIVEAU D’EAU – Quand l’étuveuse n’a plus d’eau ou
que le niveau d’eau est trop bas pour finir le cycle de cuisson, la
fonction de protection de l’étuveuse provoque l’arrêt de la cuisson à la
vapeur. Un signal sonore se fait entendre pendant 50 secondes et
l'icône « ADD WATER » (ajoutez de l'eau) s'affiche.
Dans ce cas, appuyez sur n’importe quelle touche pour éteindre l’alarme sonore. Le
temps de cuisson à la vapeur et « OFF » s’afficheront. Ajoutez de l’eau fraîche par
les poignées du plateau à gouttes ou retirez ce plateau et versez l'eau directement
dans le socle chauffant. Attendez quelques secondes pour que l’élément chauffant
puisse refroidir. Pour remettre l’étuveuse en marche, appuyez de nouveau sur le
bouton « START/STOP » et l’étuveuse continuera le cycle. Si l’étuveuse se remet en
mode d’alarme, attendez un peu plus longtemps pour que l'étuveuse puisse refroidir
davantage avant d'appuyer de nouveau sur la touche « START/STOP ».

7
NETTOYAGE DE VOTRE CUISEUR AUTOMATIQUE
1. Débranchez l’appareil de la prise électrique. Laissez l’étuveuse et tous les
accessoires refroidir complètement avant de commencer à nettoyer.
Remarque : Ne plongez jamais le socle chauffant, le cordon électrique et sa
fiche dans de l’eau et ne les mettez jamais au lave-vaisselle.
2. Lavez les paniers, le bol à riz, le plateau à gouttes, les anneaux de séparation et
le couvercle à l'eau chaude savonneuse. Rincez et séchez complètement. Ces
pièces peuvent aussi se laver au lave-vaisselle à condition de les mettre en haut.
Remarque : N’utilisez pas le mode chauffant du lave-vaisselle pour sécher ces
pièces.
3. Nettoyez l’intérieur et l’extérieur du socle chauffant avec un chiffon humide, puis
séchez-le complètement. Remarque : N’utilisez pas de produits de nettoyage
abrasifs.
4. Des dépôts minéraux peuvent s'accumuler au bout d'un certain temps sur la
partie chauffante de l'étuveuse. Si vous voyez une couche blanche sur la partie
chauffante, suivez les étapes suivantes pour procéder au détartrage et pour
prolonger la durée de vie de votre étuveuse.
1. Versez deux tasses de vinaigre et une tasse d’eau fraîche dans le socle
chauffant.
2. Installez le plateau à gouttes, programmez vingt minutes de cuisson et
appuyez sur la touche « START/STOP » (arrêt/marche) pour commencer la
cuisson à la vapeur.
3. Quand l’étuveuse s’éteint, laissez-la refroidir complètement et rincez le
réservoir à l'eau fraîche en veillant à ne pas mettre d’eau sur l’extérieur ou
dans le fond du socle chauffant.
4. Séchez complètement l’appareil.
RANGEMENT – Les paniers de votre étuveuse s’emboîtent pour un rangement
facile. Retirez les anneaux de séparation qui se trouvent entre les paniers et
emboîtez les paniers.
ASTUCES POUR LA CUISSON
•L’altitude et le type d’eau ont une influence sur la température d’ébullition,
affectant par conséquent la durée de cuisson. Lorsque vous cuisinez avec cet
appareil, adaptez les durées et les mesures à vos goûts personnels.
•Pour une cuisson homogène, coupez les aliments en morceaux de même taille
et placez-les uniformément à l’intérieur des bacs à aliments.
•Ne décongelez pas les légumes congelés avant de les cuire à la vapeur. Pour
un résultat optimal, mélangez au milieu du temps de cuisson.
•Les aliments vont continuer à cuire en mode de Maintien au chaud, alors
effectuez vos réglages en conséquence.
•Ne placez pas des amas d’aliments dans les bacs car cela restreint la
circulation de la vapeur.
•Si vous cuisez des aliments à la vapeur pendant plus de 60 minutes, vous
devrez peut-être ajouter de l’eau pendant le cycle de cuisson à la vapeur.
This manual suits for next models
2
Table of contents
Languages:
Other West Bend Electric Steamer manuals
Popular Electric Steamer manuals by other brands

Masterbuilt
Masterbuilt 20010306 Operation manual & safety instructions

Tower Hobbies
Tower Hobbies T21002 manual

Back to Basics
Back to Basics NUTRI STEAMER L5725A 01/09 instruction manual

Russell Hobbs
Russell Hobbs 10211 Instructions and guarantee

Cleveland
Cleveland 42-CKEM-24 Specifications

Morgan
Morgan MDB-25CT user manual