West Wight Potter Cruising vessel User manual

1
Congratulations!
You have purchased one of the best
known trailerable cruising vessels
available.
We invite you to spend a few moments
with the following pages to become
better acquainted with your new West
Wight Potter.
If at any point in this process, we at the
factory can assist please give us a call.
1 (877) 674-8021
Best wishes for many pleasant sailing
adventures!
Sincerely,
West Wight Potter

2
1. Safety ...............................................................................................................................................1
A. US Coast Guard Requirements:...................................................................................................3
B. Safe Operation:...........................................................................................................................4
C. Safe Towing ...............................................................................................................................5
2. One-Time Rigging............................................................................................................................7
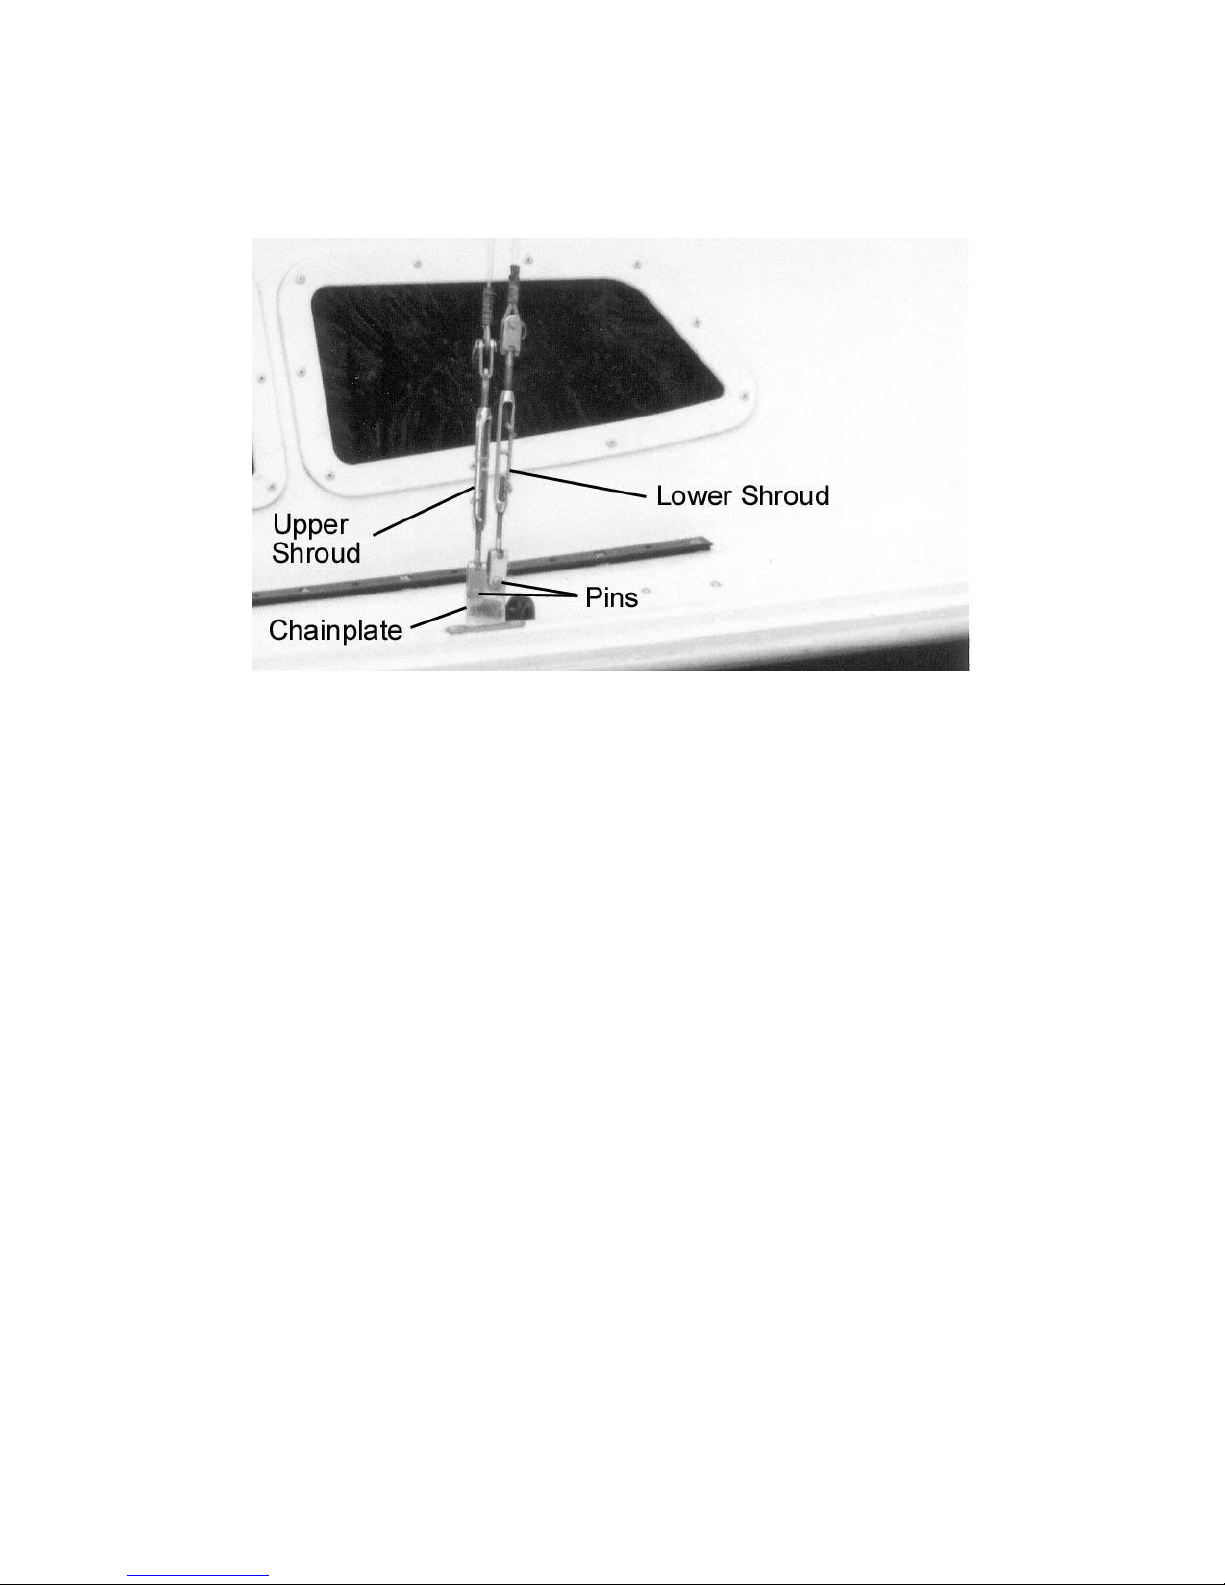
A. Connecting the Shrouds ..............................................................................................................7
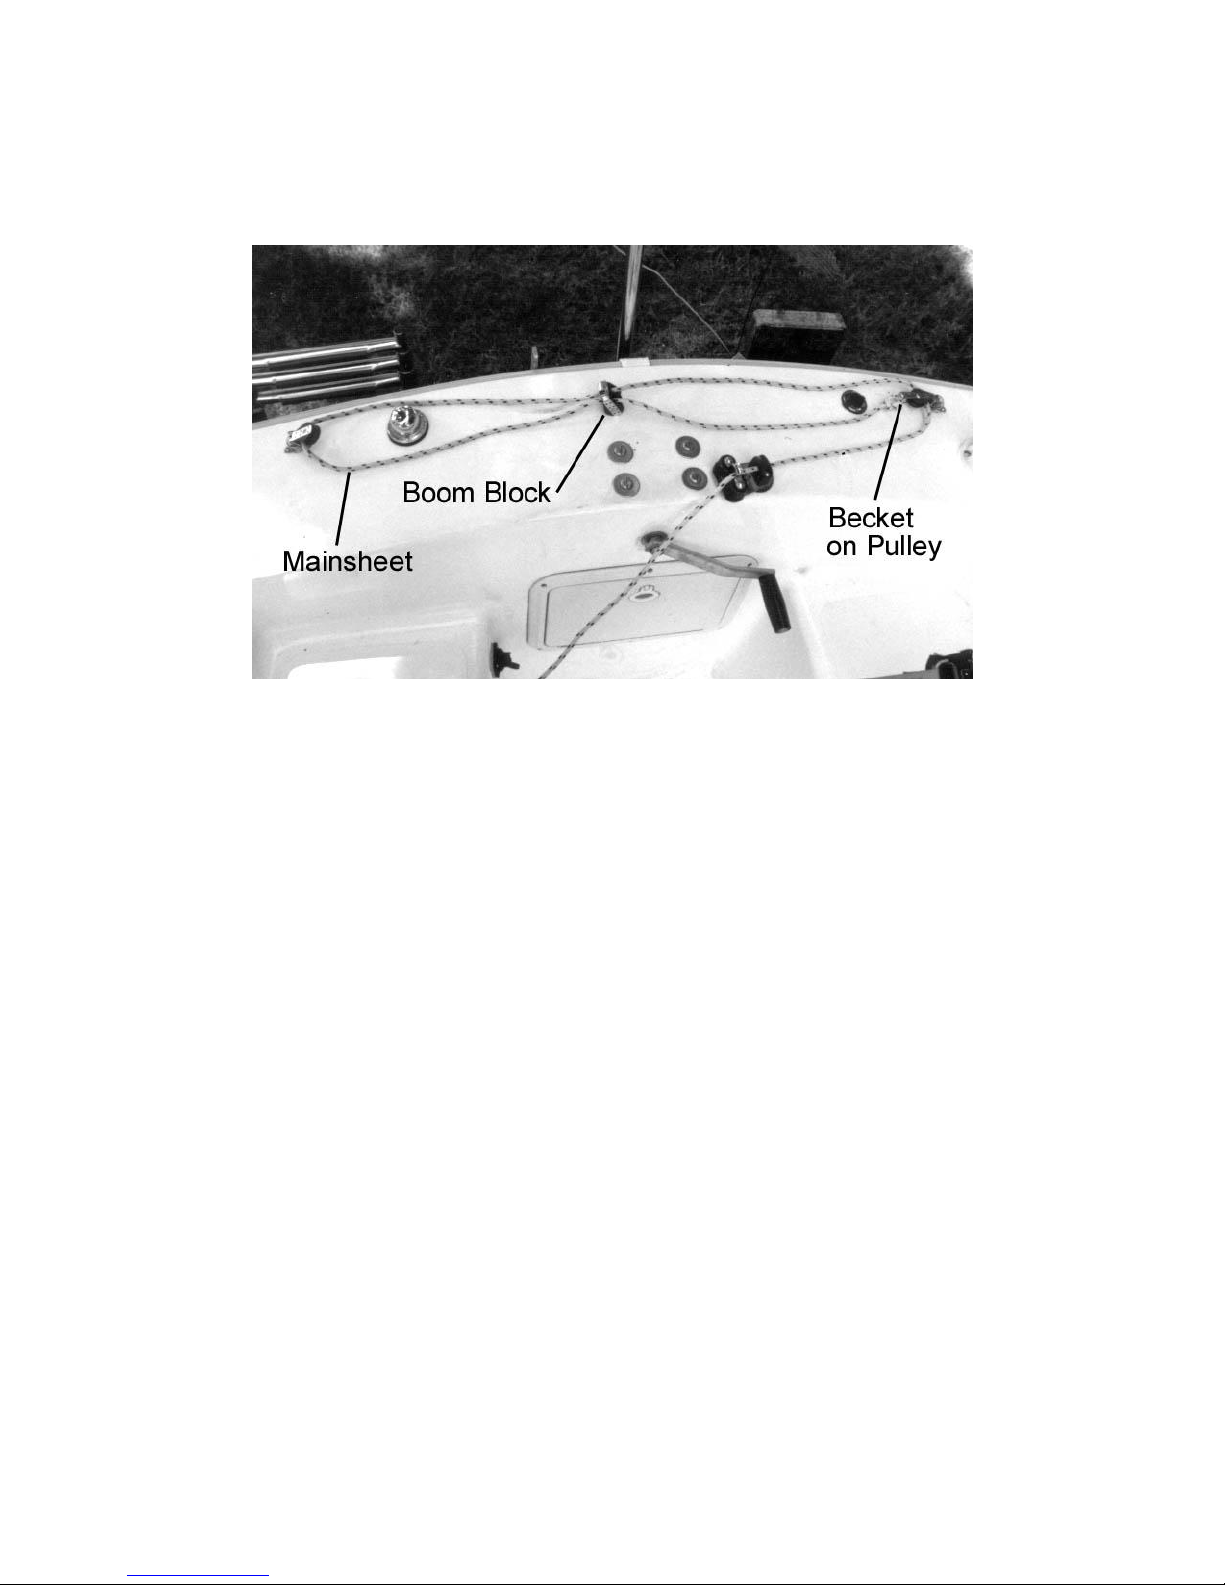
B. Installing the Main Sheet.............................................................................................................9
C. Installing the Furling Line and a Headsail on a CDI Roller Furler .............................................. 10
D. Initial Mast Tuning: .................................................................................................................. 13
3. Setup Before Launching.................................................................................................................. 16
A. Raising the Mast:...................................................................................................................... 16
B. Installing the Boom................................................................................................................... 23
C. Installing the Main Sail:............................................................................................................ 26
D. Installing a Hanked-on Headsail (Jib, Lapper, or Genoa): .......................................................... 29
4. Launching Your Boat...................................................................................................................... 32
A. Final checks before Launching.................................................................................................. 32
B. Launching the Boat:.................................................................................................................. 33
5. Setup After Launching.................................................................................................................... 35
A. Lowering the Dagger Board...................................................................................................... 35
B. Installing the Rudder................................................................................................................. 37
6. Preparing the Boat to Go Back on the Trailer................................................................................... 38
A. Raise the Daggerboard.............................................................................................................. 38
B. Remove the Rudder................................................................................................................... 40
7. Putting the Boat on the Trailer................................................................................................... 41
A. Putting the Trailer in the Water ................................................................................................. 41
B. Putting the Boat on the trailer:................................................................................................... 41
8. Packing the Boat Back Up......................................................................................................... 44
A. Removing the sails.................................................................................................................... 44
B. Removing the Boom ................................................................................................................. 46
C. Lowering the mast .................................................................................................................... 46
D. Securing the Mast, Shrouds, Stays, and Lines............................................................................ 50
9. Maintenance............................................................................................................................. 54
A. Trailer Maintenance.................................................................................................................. 54
B. Boat Maintenance..................................................................................................................... 55
10. Using Hatches, Ports, Lights, Etc. ............................................................................................. 57
A. Forward Hatch.......................................................................................................................... 57
B. Main Hatch............................................................................................................................... 57
C. V-Berth Hatches ....................................................................................................................... 57
D. V-Berth Filler board.................................................................................................................. 58
E. Under Sink and Under Stove Hatches........................................................................................ 58
F. Opening Ports (optional)........................................................................................................... 58
G. Interior Light ............................................................................................................................ 59
H. Navigation Lights ..................................................................................................................... 59
11. The Electrical System ............................................................................................................... 60
A. Options..................................................................................................................................... 60
B. Charging the Battery................................................................................................................. 60
C. Fuses........................................................................................................................................ 62
D. Wiring Diagram........................................................................................................................ 64
12. Using Accessories..................................................................................................................... 65
B. Built-in Fresh Water Tank, Filling and Cleaning........................................................................ 65
C. Using the Fresh Water Pump..................................................................................................... 66
D. Emptying the Holding tank (boats with a built-in marine head).................................................. 67
13. Links………………………………………………………………………………………………..69
14. Glossary................................................................................................................................... 70

3
1. Safety
A. US Coast Guard Requirements:
(1) The United States Coast Guard requires you to have the following safety
equipment on your boat. This is the minimum safety equipment you should
have. There may be other laws (state, local, etc.) that require additional safety
equipment. Check with park and recreation, or law enforcement agencies in
your area. Most have safety brochures that will help your determine what
additional safety equipment is required. Additionally, if you sail outside the
USA, there may be different requirements.
(a) Life jackets -- One Type I, II, III, or V wearable PFD (personal flotation
device) for each person on board. (must be USCG approved)
(b) Life Ring -- One Type IV (throwable) PFD. Some cushions meet this
requirement. The tag on the cushion will say if it qualifies.
(c) One orange distress flag or one electric distress light- or -Three hand-held
or floating orange smoke signals and One electric distress light- or -Three
combination (day/night) red flares: hand-held, meteor or parachute type.
(d) One fire extinguisher (USCG approved, rated B-I)
(e) Horn - Some means of making an "efficient" sound signal - audible for a
half mile for 4 to 6 seconds.
(f) Navigation Lights - Required to be displayed from sunset to sunrise and in
or near areas of reduced visibility.

4
B. Safe Operation:
WARNINGS: Carefully follow all of the following warnings. Failure to follow
these warnings can result in serious injury or death.
(1) Your Potter is a very safe boat, but all boats pose some dangers. Following
these warnings will help keep you safe as you use your boat.
(a) Do not raise the mast near power lines, or take the boat near power lines
when the mast is up. The mast can conduct electricity. If the mast
touches power lines, or even gets close to them, you could be electrocuted.
Electricity can jump through the air to the mast from very high voltage
power lines. While most power lines do not have this high voltage, play it
safe and keep the mast a minimum of 10 feet from all power lines.
(b) Always wear a lifejacket. While we recommend that everyone always
wear their lifejacket when out on their Potter, it is especially important for
children and non-swimmers to wear one. It is also very important to wear
one when operating in cold water, when operating in rough conditions,
and when you are sailing alone or with inexperienced crew. If you fall off
the boat, you will NOT be able to catch it by swimming. Unless someone
onboard can sail the boat back to you, you will be all alone in the water as
the boat sails merrily away from you.
(c) Only sail your boat with the daggerboard fully down and locked in that
position. Your Potter is a very stable boat, and part of this stability is due
to the weight of the daggerboard. Your boat can tip-over more easily if
the daggerboard is not locked in the down position. It is OK to motor (or
paddle) your boat with the daggerboard up. But, the sails need to be down
anytime the daggerboard is up.
(d) If you are motoring with the daggerboard up, your maneuverability will be
very poor. With the daggerboard up, your boat will slide sideways a lot.
This can make it difficult to control the boat when turning, or if there is a
wind blowing. Keep the daggerboard down as far as possible even when
motoring your boat. Even a few inches down helps with maneuverability.
If you must motor with the daggerboard up, then make sure you have lots
of room to make maneuvers.
(e) When raising the sails, raise the main sail first. If you raise the jib first, it
can make it impossible to keep your boat pointed into the wind. If the
wind is strong enough, it can turn your boat sideways to the wind and then
tip your boat oven on its side.

5
C. Safe Towing
(1) A normally equipped Potter 19 on a trailer will weigh about 2000 pounds
when empty. Adding things like water, anchors, coolers, supplies, etc will
increase the weight. Make sure your tow vehicle and hitch are rated to tow
the full weight of your boat, trailer, and gear.
(2) Before towing, make sure the following things are in good working order:
(a) Make sure the trailers hitch is properly seated on the trailer ball, and
latched and locked (see Fig 1-1). It is possible for the hitch to be latched,
but not actually gripping the trailer ball (see Fig 1-2). This usually
happens when you have the trailer too far forward when you try to attach it
to the trailer ball (even a 1/2 inch forward can cause this problem). It can
also happen when the hitch is not fully open as you lower it onto the trailer
ball. To avoid this problem, open the hitch fully and, most importantly,
make sure the trailer ball is slightly off-center to the FORWARD side of
the trailers hitch before you lower the hitch onto the ball (see Fig 1-3).
Figure 1-1

6
Figure 1-2
Figure 1-3
(b) Make sure the safety chains are attached to the tow vehicle.
(c) Make sure all the trailer lights -- turn signals, break lights, and running
lights (parking lights) -- work.
(d) If you have trailer brakes, make sure the break-away cable is attached to
the tow vehicle.

7
2. One-Time Rigging
A. Connecting the Shrouds
(1) Some people disconnect the shrouds from their chainplates every time they
tow their boat. Others leave them attached.
(2) When connecting the shrouds, the lower shroud connects to the forward hole
in the chainplate. The upper shroud connects to the aft hole in the chainplate.
Refer to Figure 2-1.
Figure 2-1

8
(3) To attach the shroud to the chainplate, install a pin and cotter ring at the
bottom of the turnbuckle. It is a good safety practice to tape cotter rings.
Refer to Figure 2-2.
Figure 2-2

9
B. Installing the Main Sheet
(1) Here’s how to route the main sheet (See Fig 2-3):
Figure 2-3
(a) If the two pulleys are not installed on the aft deck, then install them. The
pulley with the becket (the extension to tie the end of the line to) goes on
the port side.
Note: The pulley with the becket can be installed on the other side. But, in
order to get the correct main sheet arrangement (of 2 lines going up to the
boom from each side of the boat) the mainsheet must go from the cam-cleat to
the pulley with the becket first. If you mount the pulley with the becket on the
starboard side, then the mainsheet will have to run from the cam-cleat over the
hump of the stern deck.
(b) Take one end of the line and run it through these items in order: the cam-
cleat -- the port side pulley -- the aft sheave of the boom-block -- the
starboard pulley -- the forward sheave of the boom-block -- tie the end to
the becket on the port pulley. Look at the picture for a view of this
threading.

10
C. Installing the Furling Line and a Headsail on a CDI Roller
Furler
(1) The following procedure tells how to put the reefing line and a sail on the CDI
roller furler. If you need instructions for installing the roller furler on the
forestay, then refer to CDI’s instructions. Refer to Figure 2-4.
Figure 2-4
(2) To install reefing line on the CDI roller furler, follow these steps:
NOTE: The furling line is easiest to install with the mast up. But, before you put
the mast up, read the instructions below about installing the head sail. It has a few
things that you should check before you raise the mast.
(a) Put one end of the furling line in through the big hole on the side of the
cup.

11
(b) Poke the end of the line up through the small hole in the spool.
(c) Tie a knot in the end of the line so it will not go back down through the
hole in the spool.
(d) Route the other end of the furling line through its guides on the deck and
to its cleat. After it is routed, tie a stopper knot in the end of the line.
(e) Spin the furler around about 20 times to wrap 20 turns of the furling line
on the spool.
(3) Do the following steps with the mast down (to install a headsail for the first
time):
NOTE: Many of these steps are not necessary if the sail has already been fitted to
the roller furler.
(a) Examine the furler luff. The furler luff is the long plastic piece that runs
the length of the forestay. Near the bottom, you should find a cutout (the
feed cutout) in one of the slots of the furler luff. We will refer to the slot
with the cutout as the sail slot or the aft slot. We will refer to the slot
WITHOUT the cutout as the forward slot.
(b) Look for the halyard line, which should be running through the top of the
furler from the forward slot to the aft slot. In the forward slot, you should
find the ferrule (a small metal cylinder) on the halyard.
(c) Tie a messenger line (any line that is at least 20 feet long will work) to the
end of the halyard that is in the forward slot. This end of the halyard
should be the short end of the halyard when measured from the ferrule.
The messenger line will only be used temporarily to raise the headsail. It
is removed once the sail is up.
(d) Pull the sail end of the halyard (the long end without the extra line
attached) until the ferrule is at the top of the forward slot.
(e) You are now ready to raise the mast. Refer to the section of this manual
about raising the mast.
(4) Do these steps with the mast up (to install a headsail for the first time):
(a) If you have more than one headsail, select the one with the shortest luff
length.
(b) Tie the halyard to the head of your sail. Tie it such that the top of the sail
is just below the top of the feed cutout. Pull down on the sail-end of the
halyard before doing this to make sure the halyard is all the way down.
(c) Feed the top of the bolt rope on the sail into the feed cutout. Pull the sail
up by pulling down on the messenger line that you attached earlier to the
halyard. While you pull on the messenger line, you will need to help feed
the sail into the feed slot.
(d) Pull the sail up as for as it will go.

12
(e) Measure the distance from the tack of the sail (its lower forward corner) to
the tack tension shackle. Normally this distance should be 2 to 10 inches.
(f) If the distance is not in the suggested range, then lower the sail and adjust
the length of the halyard to adjust the height of the sail. Adjust the halyard
length by untying the halyard from the sail and re-tying it at a different
length.
NOTE: The 2 to 10 inches is not a critical dimension. If you are fitting a
genoa, you will probably be closer to the low end of this range because the
genoa’s luff is so long the head of the sail will hit the top of the furler. If you
are fitting a lapper or jib, you will have a larger gap, and will probably need to
lower the sail some.
(g) Re-hoist the sail, and see if it is in the right position. If it is, then continue,
if it is not at the right height, then lower it and adjust the halyard again.
(h) When the sail is at the correct height, untie the messenger line from the
halyard.
(i) Feed this end of the halyard through the halyard anchor shackle and tie it
to the shackle. A bowline or 3 half hitches work well for this knot.
(j) Take the tack tension line and loop it through the tack of the sail and the
tack tension shackle. Form two or three loops with this line. Then pull
the line tight (to tension the luff of the sail), and then tie the line off.
(5) Now that the sail is fully adjusted, you can cut the ends of the halyard line off.
You can trim any extra length from both ends of the halyard. After you cut
the line, melt the end so it doesn’t unravel. You want the ends of the halyard
short enough so that they don’t get tangled as you furl and unfurl the sail.
But, you want to leave enough length to allow you to easily re-tie the knots
should you remove and reinstall the sail. Also, if you might add a smaller sail
in the future, then you will need the sail end of the halyard longer to reach to
the shorter sail.
(6) Do these steps to get the correct number of turns of furling line on the spool:
(a) While holding tension on the clew (back corner) of the sail, pull on the
furling line. Pull the furling line until the sail is completely furled.
(b) Count the number of turns of furling line that are still on the drum.
Around six turns on the drum is good.
NOTE: The extra six turns is good for two things. First, if you roll your sail
up in a strong wind, it will roll tighter. This will require more turns to furl it
completely. Second, it’s a good idea to furl the sail until the sheets are
wrapped two times or so around the sail. This helps make sure the sail won’t
unfurl accidentally in a high wind.
(c) If you have more turns than this, just continue pulling on the furling line
until the correct number of turns of line remains. This needs to be done
when the sheets are NOT attached to the sail.

13
(d) If you have fewer than 6 turns, then grab the sail and wind more turns of
line on the spool. Make sure the sail stays furled as you do this. Again,
this must be done when the sheets are NOT attached to the sail.
D. Initial Mast Tuning:
(1) Do these steps to get the stays and shrouds to approximately the correct
length:
(a) Use the tongue jack to level the boat for and aft. Level the boat such that
the cockpit seats are level. Use a level if you have one.
(b) Raise the mast as explained in the “Raising the Mast” section of this
guide.
(c) Loosen all four side shrouds just loose enough so you can pull them about
3 inches sideways with a gentle pressure from two fingers hooked around
them. Refer to Figure 2-5.
Figure 2-5
(d) Get the mast vertical fore and aft: Lengthen or shorten the forestay and
backstay as necessary to get the mast vertical. Use a level (if you have
one) placed against the back of the mast to see if the mast is vertical. If
you don’t have a level, stand back 100 -150 feet and “eyeball” the mast to
see if it is vertical.
NOTE: To adjust the forestay with a CDI roller furler, see the CDI manual.

14
(e) Tighten the forestay and back stay alternately, keeping the mast vertical in
the fore and aft direction until you can pull the backstay about 2 inches
with two fingers (placed about 5 feet above the deck) before the resistance
increases noticeably. Refer again to Figure 2-5.
(f) Using the main halyard to measure, get the mast vertical from side to side
as follows: Lower the sail-end of the halyard until it reaches the chainplate
on the side of the boat. Pull the halyard tight and bring it to one
chainplate. Put a finger on the halyard where it meets the base of the
chainplate. Keep your finger there and pull the halyard to the opposite
chainplate. If the mast is vertical, your finger should be at the base of the
chainplate on the second side. Refer to Figure 2-6.
Figure 2-6
(g) If the halyard measurement shows difference in length from one side to
the other, then adjust the two upper shrouds until the measurement is
equal. This will put the top of the mast in its correct vertical position.
(h) Once the upper shrouds are the same length, tighten the shrouds equally
alternating from one side to the other. Adjust the shrouds until they are
tight enough so that you can pull them sideways about 2 -3 inches with
two fingers before you notice it gets significantly harder to pull them.
Place your two fingers (measure about 5 feet above the chainplate). Refer
to Figure 2-5.
(i) Get the mast straight from side to side, with no sideways curve as follows:
Pull the main halyard tight along the back of the mast with one hand.
Place your cheek against the aft surface of the mast and sight up the mast
track. Refer to Fig 2-7. Adjust the lower shrouds until the mast is straight
from side to side. Also, tighten the lower shrouds until you can pull them
about 2 -3 inches with two fingers placed 5 feet above the chainplate.

15
Figure 2-7
(j) The side shrouds should be just tight enough to make a very low pitched
"musical tone" when you strike the bare wire with a small wrench or
pliers. That's about 10% of breaking strength, or a little tighter. If the
shrouds don’t “ring”, then tighten them a little more. Always tighten both
sides equally.
(k) That's the basic starting place for tuning the mast. Go out and sail in
moderate winds to stretch the new wires and then re-tune the mast.
(l) The fine tune of the mast is done while sailing on the water. You may
have to adjust the forward and aft tilt of the mast to get the right amount of
weather helm. If your boat wants to turn into the wind, then it has
“weather helm”. If it wants to turn away from the wind, then it has “lee
helm”. When sailing close hauled, your boat should have a little weather
helm. If you boat has lee helm, then you should adjust the forestay and
backstay to move the top of the mast aft. If you boat has too much
weather helm, then you can adjust the top of the mast forward. Refer to a
book on rigging for more detail.
(m)Make sure you secure all the turnbuckles with cotter pins and rigging tape
before you go sailing. Also safety-wire the turnbuckles. Don't forget the
turnbuckle under the CDI roller furling drum.

16
3. Setup Before Launching
E. Raising the Mast:
Note: There are two basic ways to raise the mast: 1. Physically lift it directly, or 2.
Use a mast raising system. This manual has instructions for both methods. The
mast can be raised by one person, but if this is your first time raising the mast,
then find a second person to help. Things can happen as you raise the mast, like
caught shrouds, and a second person might be necessary to avoid unexpected
problems.
WARNING: If you are not experienced at raising the mast, then only do it on
level ground and in light winds. Winds or an angle (either side-to-side, or for-and-
aft) will make it more likely that you could lose control of the mast.
(1) Do these steps to position the mast for raising:
(a) Remove all straps, etc., that you have holding the mast down and holding
stuff to the mast.
(b) Install the wind vane, radio antenna, etc. on the top of the mast.
(c) Remove the pin that attaches the mast to the bow pulpit and gently set the
end of the mast down.
(d) Go back to the cockpit and pick up the mast and move it back. We find
standing on the front of the cockpit seat and reaching forward a bit with
one had allows you to move the mast most easily. Continue to move the
mast back until it is aligned with the mast step (see Fig 3-1). Be careful
not to trip over the stays that are dangling off the mast.
Figure 3-1
(e) Go to the mast step and install the aft pivot pin and its cotter ring (see Fig
3-1). You can use the same pin that held the mast to the bow pulpit.

17
(f) Connect the electrical connector at the base of the mast (see Fig 3-1).
(2) Arrange all the stays and shrouds as follows:
(a) Bring the bottom end of the forestay forward and make sure it is on top of
all the other wires and not tangled with other things.
(b) Put the backstay (if you have one) on the ground behind the boat. Make
sure it is not tangled.
(c) Loosely arrange the shrouds on either side of the boat. Make sure the
turnbuckles are not terribly twisted.
(d) Note: If you haven’t raised the mast before and don’t know if the shrouds
are the correct length, then loosen the turnbuckles on the four shrouds to
make sure the mast will go all the way up.
(e) Make sure there are no lines that will get pinched in the mast step (see Fig
3-1).
(f) JUST BEFORE RAISING THE MAST, make sure the top of each of the
four shrouds is not twisted around its tang (see Fig 3-2). This is a common
problem, and if you don’t catch it the mast tuning will be out-of-whack.
Figure 3-2
(3) Do the following steps to lift the mast without using the mast raising system:

18
WARNING: Look up! Make sure there is nothing up there that the mast will
hit as you lift it. Especially, make sure there is a lot of distance between you
and any power lines. If the mast hits or even comes near a power line, it can
kill you. With some high-voltage lines, the electricity can jump a foot or more
from the wire to your mast. We recommend that you keep the mast a
minimum of 10 feet from any power line. While you are looking up, also look
for power lines, trees, etc. between you and the water where you will launch.
NOTE: If you have the CDI roller furler, then a second person is required to
carry the bottom of the furler forward as you lift the mast.
(a) If you are NOT using the mast raising system, then we find this works:
Stand on the cabin top to one side of the mast. Place one foot next to the
cabin hatch, right at aft edge of the cabin top. Place the other foot just
forward of the (closed) cabin hatch. Squat down, grab the mast, and lift
with your legs. Once the mast is half way up, things get a lot easier, so try
to do the initial lift with a quick jerk. Refer to Figure 3-3. REMEMBER,
YOU MUST CONTROL THE SIDE-TO-SIDE MOTION OF THE
MAST. A second person can make this easier. Have the second person
stand in the cockpit and help lift the mast. The second person can stand on
a cockpit seat so they can lift higher
Figure 3-3
(b) Once the mast is vertical, the shrouds should keep it from going too far
forward, or from going sideways. At this point, grab the forestay and hold
it tightly. While pulling on the forestay, walk forward to the bow.

19
(c) Attach the forestay to its chain-plate with its pin (See Fig 3-4). It attaches
to the forward hole in the chain-plate (the tack of the jip attaches to the aft
hole). When the mast is properly tuned, it will be difficult to pull the
forestay hard enough to install the quick-release pin. You might need help
form another person, or the installation of a shroud lever, to get it tight
enough.
Figure 3-4
Note: If you have not tuned the mast, then do NOT install the forward pin in
the mast step. If you have already tuned the mast, then you can install the
forward pin in mast base BEFORE you connect the forestay. The second pin
is never necessary. There is some discussion about whether it is better to
install the second pin or not.
(4) Do the following steps to lift the mast with the mast raising system:
WARNING: Look up! Make sure there is nothing up there that the mast will
hit as you lift it. Especially, make sure there is a lot of distance between you
and any power lines. If the mast hits or even comes near a power line, it can
kill you. With some high-voltage lines, the electricity can jump a foot or more
from the wire to your mast. We recommend that you keep the mast a
minimum of 10 feet from any power line. While you are looking up, also look
for power lines, trees, etc. between you and the water where you will launch.
(a) Attach the sail-end of the jib halyard and the block and tackle to the top of
the gin-pole (see Fig 3-5).

20
Figure 3-5
(b) Attach other end of the block and tackle to the clip on the bow pulpit, or to
the AFT hole in the forestay’s chain-plate. See Figure 3-6.
Figure 3-6
(c) Connect the two baby stays and the gin-pole to the mast (see Fig 3-7).
Table of contents
Other West Wight Potter Boat manuals
Popular Boat manuals by other brands

Lund
Lund WT200 Owner's/operator's manual

Bonefish
Bonefish Bohemian 17 Owner's and operator's manual

Hunter
Hunter e33 Operator's manual

KL Industries
KL Industries Bass Hound 9.4 owner's manual

Cobalt Digital Inc
Cobalt Digital Inc 276 bowrider owner's manual

Anacortes Yacht Charters
Anacortes Yacht Charters AEROKNOT Operation manual

Excalibur
Excalibur PR11BK user guide

Glasstream Powerboats
Glasstream Powerboats 180 CC 2017 owner's manual

Stand Up Floats
Stand Up Floats Swan instruction sheet

PURSUIT
PURSUIT 2870 Walkaround owner's manual

Classic Accessories
Classic Accessories Skagit owner's manual

River Elf
River Elf C-1 Outfitting Selection Guide