Westinghouse RT901 User manual

REMOTE POWER STRIP
TELECOMMANDE
PUISSANCE BANDE
Customer Service
Service à la Clientèle
1-855-350-6868
10AM - 6PM, EST
Monday to Friday
Lundi au Vendredi
MODEL / MODÈLE #RT901

WARNING:
CHANGES OR MODIFICATIONS TO THIS UNIT NOT EXPRESSLY
APPROVED BY THE PARTY RESPONSIBLE FOR COMPLIANCE COULD
VOID THE USER AUTHORITY TO OPER ATE THE EQUIPMENT.
THIS DEVICE COMPLIES WITH PART 15 OF THE FCC RULES.
OPERATION IS SUBJECT TO THE FOLLOWING T WO CONDITIONS:
(1) THIS DE VICE MAY NOT CAUSE HARMFUL INTERFERENCE, AND
(2) THIS DEVICE MUST ACCEPT ANY INTERFERENCE RECEIVED,
INCLUDING INTERFERENCE THAT MAY CAUSE UNDESIRED
OPER AT I ON.
NOTE: THIS EQUIPMENT HAS BEEN TESTED AND FOUND TO COMPLY
WITH THE LIMITS FOR A CLASS B DIGITAL DEVICE, PURSUANT
TO PART 15 OF THE FCC RULES . THESE LIMITS ARE DESIGNED
TO PROVIDE REASONABLE PROTECTION AGAINST HARMFUL
INTERFERENCE IN A RESIDENTIAL INSTALLATION. THIS EQUIPMENT
GENERATES, USES, AND CAN RADIATE RADIO FREQUENCY ENERGY
AND, IF NOT INSTALLED AND USED IN ACCORDANCE WITH THE
INSTRUCTIONS, MAY CAUSE HARMFUL INTERFERENCE TO RADIO
COMMUNICATIONS.
HOWEVER, THERE IS NO GUARANTEE THAT INTERFERENCE WILL
NOT OCCUR IN A PARTICULAR INSTALLATION. IF THIS EQUIPMENT
DOES CAUSE HARMFUL INTERFERENCE TO RADIO OR TELEVISION
RECEPTION, WHICH CAN BE DETERMINED BY TURNING THE
EQUIPMENT OFF AND ON, THE USER IS ENCOURAGED TO TRY
TO CORRECT THE INTERFERENCE BY ONE OR MORE OF THE
FOLLOWING MEASURES:
• INCREASE THE SEPARATION BETWEEN THE EQUIPMENT AND
RECEIVER.
• CONNECT THE EQUIPMENT INTO AN OUTLET ON A CIRCUIT
DIFFERENT FROM THAT TO WHICH THE RECEIVER IS NEEDED.
• CONSULT THE DEALER OR AN EXPERIENCED RADIO/ TV
TECHNICIAN FOR HELP.
CAUTION:
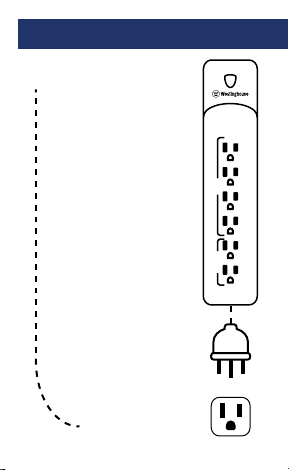
DO NOT SPLICE, REPAIR, OR MODIF Y. UNPLUG WHEN NOT IN USE.
FULLY INSERT PLUG. DO NOT USE DAMAGED REMOTE SETS. INSPECT
PERIODICALLY. USE WITHIN THE ELECTRICAL RATING MARKED
ON THE REMOTE SET. DO NOT PLUG IN MORE THAN A TOTAL OF
1000 WATTS IN THIS REMOTE SET. IF WATTS ARE NOT MARKED ON
APPLIANCE, MULTIPLY AMPERE RATING (ON NAMEPLATE) BY 125
TO DETERMINE EQUIVALENT WATTS. ADD DETERMINED WATTS
FOR EACH PLUGGED-IN APPLIANCE OR LAMP (SUM OF WATTS
ON BULBS) TO FIND TOTAL WATTS BEING USED. OPERATING
TEMPERATURE RANGE 0°C (32 °F) TO 45°C (113°F).
• ONLY USE THE BATTERIES SPECIFIED AND BE SURE TO MATCH
THE + AND - POL ARIT Y MARKINGS.
• REMOVE EXHAUSTED OR DEAD BATTERIES FROM THE PRODUCT.
• REMOVE BATTERIES IF PRODUCT IS NOT TO BE USED FOR A LONG
TIME.

AVERTISSEMENT:
LES CHANGEMENTS OU MODIFICATIONS À CET APPAREIL QUI
NE SONT PAS EXPRESSÉMENT APPROUVÉS PAR LES GENS
RESPONSABLES DE LA CONFORMITÉ PEUVENT ANNULER
L’AUTORISATION À L’UTILISATEUR D’OPÉRER CET ÉQUIPEMENT.
CET APPAREIL RENCONTRE LES NORMES DE LA SECTION 15
DES RÈGLEMENTS DE FCC. SON OPÉRATION EST SUJETTE À
DEUX CONDITIONS. (1) CET APPAREIL NE DOIT PAS CAUSER
D’INTERFENCE NUISIBLE ET (2) CET APPAREIL PEUT ACCEPTER
TOUTE INTERFÉRENCE REÇUE INCLUANT CELLE QUI POURRAIT
CAUSER UNE OPÉRATION NON VOULUE.
NOTE: CET ÉQUIPEMENT À ÉTÉ VÉRIFIÉ ET SE SITUE EN DEÇA
DES LIMITES ÉTABLIES POUR UN APPAREIL DIGITAL DE CLASSE
B, CONFORMÉMENT À LA SECTION 15 DES RÈGLEMENTS DE FCC.
CES LIMITES SONT ÉTABLIES POUR ASSURER UNE PROTECTION
RAISONNABLE CONTRE UNE INTERFÉRENCE NUISIBLE POUR UNE
INSTALLATION RÉSIDENTIELLE.
CET ÉQUIPEMENT PRODUIT, UTILISE ET PEUT ENGENDRER DES
FRÉQUENCES RADIO QUI, S’IL N’EST PAS INSTALLÉ ET UTILISÉ
SELON LES INSTRUCTIONS, POURRA CAUSER UNE INTERFÉRENCE
NUISIBLE AUX COMMUNICATIONS RADIOPHONIQUES. CEPENDANT,
IL N’Y A PAS DE GARANTIE QUE DE L’INTERFÉRENCE NE SERA PAS
PERÇUE DANS CERTAINES INSTALLATIONS. SI CET ÉQUIPEMENT
CAUSE DES INTERFÉRENCES NUISIBLES POUR LA RÉCEPTION DE
LA RADIO OU LA TÉLÉVISION, QUI SERONT PERÇUES LORS DE LA
FERMETURE OU DE L’OUVERTURE DE L’APPAREIL, L’UTILISATEUR
EST INCITÉ À TENTER DE CORRIGER L’INTERFÉRENCE PAR UNE OU
L’AUTRE DES MESURES SUIVANTES.
• AUGMENTER LA DISTANCE ENTRE L’APPAREIL ET LE RÉCEPTEUR.
• BRANCHER L’APPAREIL DANS UNE SORTIE SUR UN CIRCUIT
DIFFÉRENT DE CELUI DE SUR LEQUEL LE RÉCEPTEUR EST REQUIS.
• CONSULTER LE VENDEUR OU UN TECHNICIEN DE RADIO/TV
EXPÉRIMENTÉ.
• DO NOT DISPOSE OF BATTERIES IN FIRE. BATTERIES MAY
EXPLODE OR LEAK. AS WITH ALL SMALL ITEMS , THESE BATTERIES
SHOULD BE KEPT AWAY FROM CHILDREN. IF SWALLOWED, SEEK
MEDICAL ATTENTION IMMEDIATELY.
*THIS ITEM IS A RADIO FREQUENCY DEVICE (RF ), AND AS SUCH
THE RANGE OF THE REMOTE CONTROL IS DEPENDENT ON MANY
FACTORS. ACTUAL OPERATIONAL DISTANCE WILL VARY BASED ON
WALLS AND LINE OF SIGHT OBSTRUCTIONS, AND OTHER NEARBY
ELECTRONIC DEVICES.

ATTENTION:
NE PAS ÉPISSER, RÉPARER, OU MODIFIER. DÉBRANCHER SI NON
UTILISÉ. BIEN INSÉRER LA FICHE. NE PAS EMPLOYER UN APPAREIL
ENDOMMAGÉ. VÉRIFIER-LE PÉRIODIQUEMENT. UTILISER SELON
LES INDICATIONS ÉLECTRIQUES MARQUÉES SUR L’APPAREIL.
NE PAS BRANCHER PLUS DE 1000 WATTS DANS CET APPAREIL.
SI LE NOMBRE DE WATTS N’EST PAS INDIQUÉ SUR L’APPAREIL,
MULTIPLIER LE NOMBRE D’AMPÈRES (PLAQUE DE L’APPAREIL) PAR
125 POUR DÉTERMINER LE TOTAL DES WATTS. ADDITIONNEZ LE
TOTAL DES WATTS DE CHAQUE APPAREIL OU LAMPE (WATTS SUR
L’AMPOULE) POUR CONNAÎTRE LE TOTAL DES WATTS EMPLOYÉ.
TEMPÉRATURE D’OPÉRATION 0°C (32°F) À 45°C (113°F).
• UTILISER QUE DES PILES TEL QUE SPÉCIFIÉ ET ASSUREZ-VOUS
DE BIEN FAIRE CORRESPONDRE LES POLARITÉS + ET -.
• ENLEVEZ LES PILES USAGÉES DE L’APPAREIL.
• ENLEVEZ LES PILES SI L’APPAREIL N’EST PAS UTILISÉ POUR UNE
PÉRIODE PROLONGÉE.
• NE PAS JETER LES PILES AU FEU. LES PILES PEUVENT EXPLOSER
OU COULER. COMME TOUTES AUTRES PETITES PIECES, LES PILES
DOIVENT ÊTRE GARDÉES HORS DE PORTÉE DES ENFANTS. SI
AVALÉES UNE ATTENTION MÉDICALE EST REQUISE IMMÉDIATEMENT
*CE PRODUIT OPÈRE SUR FRÉQUENCE RADIO (RF), C’EST
POURQUOI LA PUISSANCE DU CONTRÔLE À DISTANCE DÉPEND DE
PLUSIEURS FACTEURS. LA DISTANCE D’OPÉRATION PEUT VARIER
SELON LES MURS, ET DES AUTRES OBSTRUCTIONS SUR LA LIGNE,
ET AUSSI D’AUTRES APPAREILS ÉLECTRONIQUES PRÉSENT.

1
Our Westinghouse
remote control units
include a unique
pairing feature that
allows you to control
multiple receivers
(indoor or outdoor)
from
the same transmitter.
Nos télécommandes
Westinghouse com-
prennent une fonction
unique de pairage
qui vous permet de
contrôler de
multiples récepteurs
(à l’intérieur et à l’ex-
térieur) avec le même
transmetteur.
Plug in your reciever
Branchez votre récepteur
Installation & Pairing / Installation & Pairage
REMOTE ALWAYS ON

Press and hold the power
button on the receiver for 5
seconds. The LED indicator
will begin to ash slowly indi-
cating pairing mode has been
activated.
Appuyez sur le bouton de
mise en marche du récepteur
et gardez-le enfoncé pendant
cinq secondes. L’indicateur DEL
commencera à clignoter lente-
ment, indiquant que le mode de
pairage a été activé.
2
3
POWER
Installation & Pairing / Installation & Pairage

Press the ‘UP’ button followed by the
‘DOWN’ button on your transmitter to
complete the pairing process.
Appuyez sur le bouton de mise en
marche (« UP »), puis sur le bouton d’ar-
rêt (« DOWN ») de votre transmetteur
pour terminer le pairage.
3
Installation & Pairing / Installation & Pairage

Press and hold the power
button for 5 seconds. The
LED indicator located
on the power button will
begin to ash slowly.
Appuyez sur le bouton
de mise en marche et
gardez-le enfoncé pendant
cinq secondes. L’indicateur
DEL sur le bouton de mise
en marche commencera à
clignoter lentement.
1
3
POWER
To remove all paired transmitters from your receiver /
Pour enlever tous les transmetteurs
couplés à votre récepteur

While the indicator is ashing, press and
hold the power button for an additional 5
seconds. The LED indicator will now begin
to ash rapidly.
Pendant que l’indicateur clignote, appuyez
sur le bouton de mise en marche et gar-
dez-le enfoncé pendant cinq secondes de
plus. L’indicateur DEL commencera alors à
clignoter rapidement.
2
3
POWER
To remove all paired transmitters from your receiver /
Pour enlever tous les transmetteurs
couplés à votre récepteur

While the indicator is
ashing rapidly, press
the power button once
to conrm the reset.
Pendant que l’indicateur
clignote rapidement,
appuyez sur le bouton
de mise en marche une
autre fois pour conrm-
er la réinitialisation.
3
3
POWER
3
POWER
To remove all paired transmitters from your receiver /
Pour enlever tous les transmetteurs
couplés à votre récepteur

NSTALLATION
Select a location to install the receiver base. Mount
the receiver at least 6˝ above the ground using the
built-in keyhole mount. The outlets must be pointed
downwards to prevent exposure to rain. All outdoor
devices should be plugged into a GFCI electrical
outlet to prevent electrical shock. Consult a qualied
electrician if your outdoor outlet is not of this type or
you’re not sure of its type.
OPERATING INSTRUCTIONS
MANUAL MODE: In Manual Mode, pressing the ON
button on the transmitter will turn on power to the
receiver. Power will stay on until you press the OFF
button. Pressing the OFF button will turn power
off to the receiver regardless of any other mode in
operation.
PHOTOCELL MODE: Make sure the sliding mode
switch on the transmitter is in the PHOTOCELL po-
sition. Press the ON button to turn power on to the
receiver. All connected devices will turn on instantly
and will turn off automatically at dawn.
OVERRIDE: You can override any program oper-
ating by pressing the button on the front panel of
the receiver base. Do not hold the button down for
manual override as this will cause the unit to enter
Pairing Mode. If you press the OFF button, the unit
will revert back to the last programmed setting.

INSTALLATION
Choisissez un emplacement pour installer la base
du récepteur. Montez le récepteur au moins 6 ˝
dessus du sol à l’aide de montage serrure intégrée.
Les issues doivent pointer vers le bas pour éviter
l’exposition à la pluie. Tous les appareils externes
doivent être connectés à une prise GFCI pour éviter
un choc électrique. Consultez un électricien qualié
si la prise extérieure n’est pas de ce type ou ne sont
pas sûrs de son électricien genre.
MODE D’EMPLOI
MODE MANUEL: En mode manuel, en appuyant sur
le bouton ON de l’émetteur, allumer le récepteur.
L’énergie restera jusqu’à ce que vous appuyez
sur le bouton OFF. Appuyez sur le bouton OFF, le
récepteur, indépendamment de tout autre mode de
fonctionnement est désactivé.
CELLULE PHOTOÉLECTRIQUE MODE: Assurez-vous
que le commutateur de mode sur l’émetteur est
dans la position de la PHOTOCELL. Appuyez sur
le bouton ON pour allumer le récepteur. Tous les
appareils connectés s’allument instantanément et
automatiquement hors tension à l’aube.
ANNULATION: Vous pouvez annuler une opération
du programme en appuyant sur le bouton sur le
panneau avant de la base du récepteur. Ne main-
tenez pas le bouton pour la commande manuelle,
car cela provoquerait l’appareil passe en mode
d’appairage. Appuyez sur le bouton OFF, l’appareil
revient au dernier réglage programmé.

2 Grounded Outlets and Plug
Rated:
125VAC/60Hz/15A/1875W
Resistive
15A/1875W Tungsten
1/2 HP Motor Load
2 Prises and Fils avec MIse à la
Terre
Calibré à:
125VAC/60Hz/15A/1875W
Résistive
15A/1875W Tungstène
1/2 HP Charge du Moteur
SPECIFICATIONS
CARACTÉRISTIQUES
ITEM / ARTICLE# T28087

Reset
You can reset your receiver and remove
all paired transmitters. (Note: Once this is
done you will need to refer to installation
and pairing step 1.)
Réinitialisation
Vous pouvez réinitialiser votre récepteur et
supprimer tous les transmetteurs qui y sont
couplés. (Remarque : Après avoir exécuté
ceci, vous devrez consulter l’étape 1 d’instal-
lation et de pairage.)
and WESTINGHOUSE are trademarks
of Westinghouse Electric Corporation.
Used under license by The NCC. All rights
reserved.
et WESTINGHOUSE sont des marques
de Westinghouse Electric Corporation.
Utilisée sous licence a The NCC. Tous
droits réservés.
Manufactured and distributed by /
Manufacturé et distribué par:
The NCC, Brooklyn, NY 11223
1.855.350.6868
www.thencc.com ©2019 The NCC
MADE IN CHINA /FABRIQUÉ EN CHINE
Table of contents