Wheels for Pets Walkin' Wheels Medium User manual
Walkin’ Wheels®
Medium
Owner’s Manual
With instructions for optional Fully Supportive
Front Wheel Kit
Walkin’ Wheels® is a registered trademark of Wheels for Pets, LLC
US Patent 7,549,398. Canada 2,641,092
Euro 2050418, Japan 5385584, other patents pending.
HandicappedPets.com • 105 Rt 101A – Suite 18 • Amherst, NH 03031 • (603) 577-8854

2
Walkin’ Wheels® Medium User Manual ©2015
ank you for purchasing Walkin’ Wheels® Medium dog wheelchair. Questions
or comments? Call us (603) 577-8854 or email us at:
messages@HandicappedPets.com.
Contents
Parts of the Walkin’ Wheels Medium Wheelchair .............................................................................3
Tips to Teach Your Dog to Use Walkin’ Wheels® ...............................................................................4
Seing Up the Dog Wheelchair.............................................................................................................6
Use Snap Buons to Adjust Length, Width and Height...................................................................7
Adjusting the Length................................................................................................................................9
Is the Length Correct? .............................................................................................................................9
Adjusting the Width.............................................................................................................................. 10
Aaching the Struts and Wheels ........................................................................................................ 11
Adjusting the Height ............................................................................................................................. 11
Stirrups..................................................................................................................................................... 11
Clip the Leg Rings to the Wheelchair................................................................................................ 12
Front Harness Aachment................................................................................................................... 13
Is the Wheelchair Adjusted Properly? .............................................................................................. 14
Optional Set Screws for Noise Reduction........................................................................................ 15
Belly Belt, if Needed ............................................................................................................................. 15
Wheel Options ...................................................................................................................................... 16
Foam Wheels 4”, 8”, 12” and 16” ...................................................................................................... 16
Air Tires Only Available in 12” and 16” ............................................................................................ 17
Walkin’ Wheels® Front Leg Aachment ........................................................................................... 17
In the Package......................................................................................................................................... 18
Assembling the Fully Supportive Wheelchair ................................................................................. 19
Puing the Dog Into the Fully Supportive Wheelchair................................................................. 22
Wear, Maintenance, Liability and Guarantee .................................................................................. 23
Limited Liability .................................................................................................................................... 23
Optional Items and Accessories.......................................................................................................... 24

3
Walkin’ Wheels® Medium User Manual ©2015
Parts of the Walkin’ Wheels Medium Wheelchair
Aluminum wheelchair frame
Width Connector and
Extenders installed
Knuckle (aached to frame).
One Belly Belt for mid-section
support (use if needed), small or
large.
Width Connectors.
e 6” connector is already
installed in the frame. Extra 9”
connector for wider dogs.
Tool kit with Allen wrench and cup
screws for noise reduction
(use if desired).
Stirrups to keep the feet from
dragging, (use if needed).
Length Extenders.
e 15” extenders are installed in
the frame. e 26” extenders are
used for longer dogs
Leg Rings for rear support.
Front Harness with
comfort sleeves.
e Wheels, aached to snap-in struts, are either packaged inside the box with
the frame, or packed separately.
6”
9”
15”
26”
Large
Small

4
Walkin’ Wheels® Medium User Manual ©2015
Tips to Teach Your Dog to Use Walkin’ Wheels®
We created the Walkin’ Wheels ® with the intention that you will adjust the
wheelchair, put your pet in it, and in a few moments watch him or her running
and playing again. It can happen that way, but it doesn’t always. A wheelchair
can be an adjustment for an animal. To some, there
is a strange device following him or her around
making odd noises and geing caught on furniture
and doorways. ey will adapt to these changes, but
need a lile time. We recommend you be calm, quiet,
and slow when puing on the wheelchair for the rst
time. Lots of stroking and reassurance is needed here.
Treats help, too! Let the dog get used to the harness
before aaching it to the wheelchair. It may take a few minutes or a few hours for
him or her to get used to the harnesses.
Wheels aached to Struts
(one set for each wheelchair)
Several sizes shown here. Instructional video and
just-for-fun movies.
Tote Bag and Handles to allow you to use
leg rings as a liing harness.

5
Walkin’ Wheels® Medium User Manual ©2015
1. When starting this process we suggest that you use the dog’s favorite treats
to reward your dog for walking forward. You won’t need to keep using these
treats every day, just in the beginning of the training process. A hungry dog
is a motivated dog! Work with your dog before you have fed him a meal. He
will be more eager to pay aention and earn the food reward if he is hungry.
2. Do not immediately put your dog in the wheelchair. Assemble the wheel-
chair and leave it in an area where your dog can see it, smell it and touch it.
3.Once the dog is comfortable near the wheelchair, put the front harness on
and heave him or her alone for a while. Let the dog get used to the feeling of
the straps.
4. When your dog is comfortable, try puing him in the leg ring support
system and aach the front harness to the wheelchair. Give him a treat for
positive association.
5. Aer your dog is in the wheelchair hold the food reward right at his nose
level. Feed him several pieces. en you can move one foot backwards,
again holding the food reward in front of you. He should then walk toward
you to get the treat. Before you know it, he is walking in his Walkin’ Wheels!
Again, give him a treat and positive praise.
6. Work in very short (5-10) minute sessions, several times a day. Give your
dog rest periods between each session.
Note: Keep in control of the dog’s movement at rst. Keep the dog in a clear
area and keep him on a short leash. If the dog does become ightened, then
disconnect the harness om the wheelchair and try again later.
Until your dog gets used to the Walkin’ Wheels, limit the amount of time
spent in it. e Walkin’ Wheels is designed to allow your dog to get exercise
and physical therapy. Dogs cannot lie down in the wheelchair but will be able
to urinate and defecate while in the wheelchair. Start with short periods and
increase slowly. Make sure you don’t overdo it the rst day.
6
Walkin’ Wheels® Medium User Manual ©2015
Seing Up the Dog Wheelchair
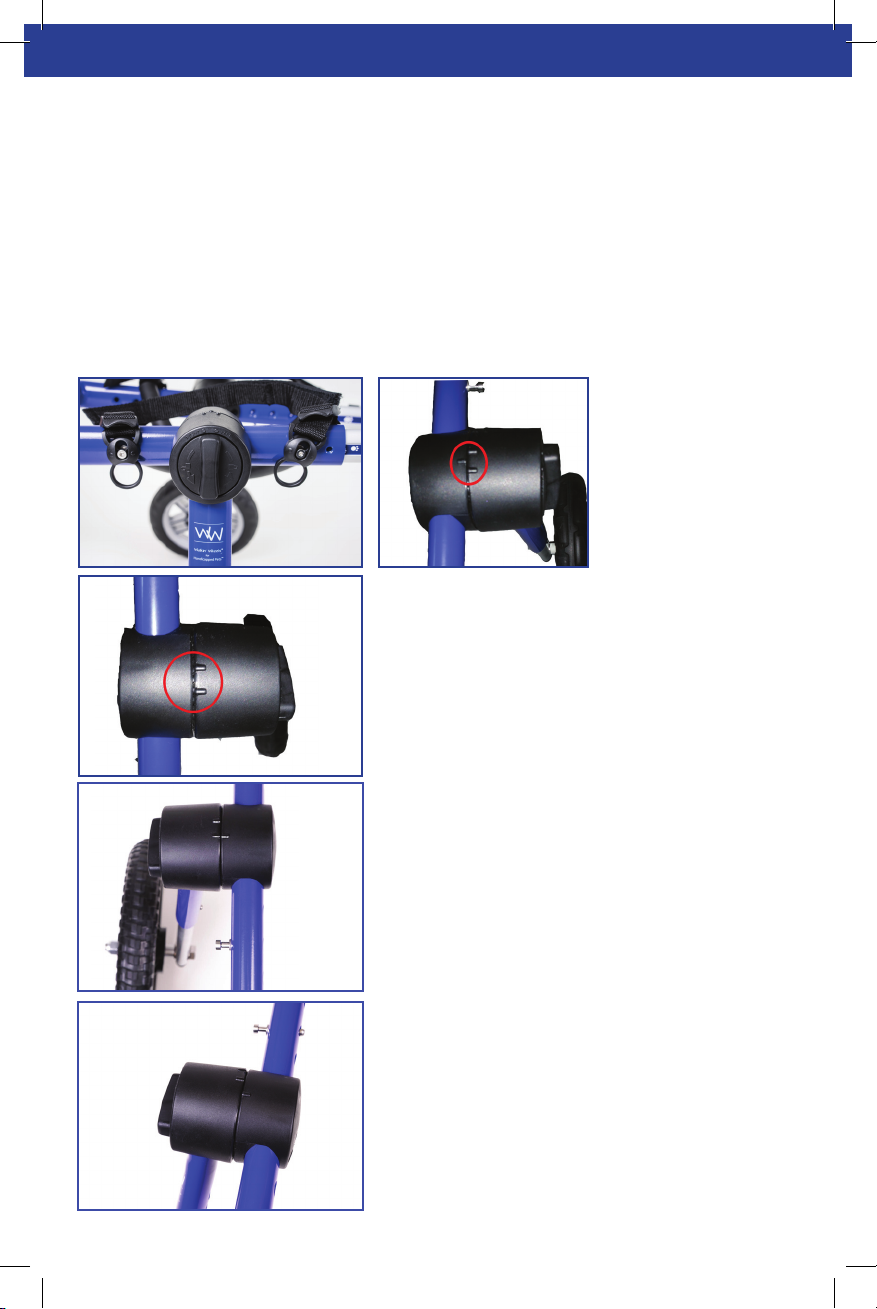
Adjusting the Knuckle
e frame is shipped at. Set the legs perpendicular to the frame by turning the
dial caps counter-clockwise to loosen the knuckle assembly. Don’t remove the
dial caps. Move the leg to the correct position using the raised indicators as your
guide. e inside indicator should be in the center of the two outside indicators
as shown in the photo below. Once the leg is in the correct position, tighten the
dial cap by turning clockwise.
Wrong If you only see two
raised indicator
marks, then the
wheelchair is upside
down. Flip the leg
180 degrees.
Correct
Straight
Leg Position
Right
For active dogs, you
can angle the wheels
back a notch.
Don’t angle the wheels
too far back as it will
put too much pressure
on their shoulders.
Wrong
Right

7
Walkin’ Wheels® Medium User Manual ©2015
Angle of the legs
Normally, the wheels are set straight up and down as shown on the brown dog.
Seing the wheels back slightly, like the white dog, will oer a bit more stability
for stronger, more active dogs, or dogs who are shiing their weight back toward
their hindquarters.
Use Snap Buons to Adjust Length, Width
and Height.
e Snap buons are an easy way to adjust the length, width, and height of the
Walkin’ Wheels dog wheelchair. Use a pen to push the Snap Buon when it is
inside the knuckle.
8
Walkin’ Wheels® Medium User Manual ©2015
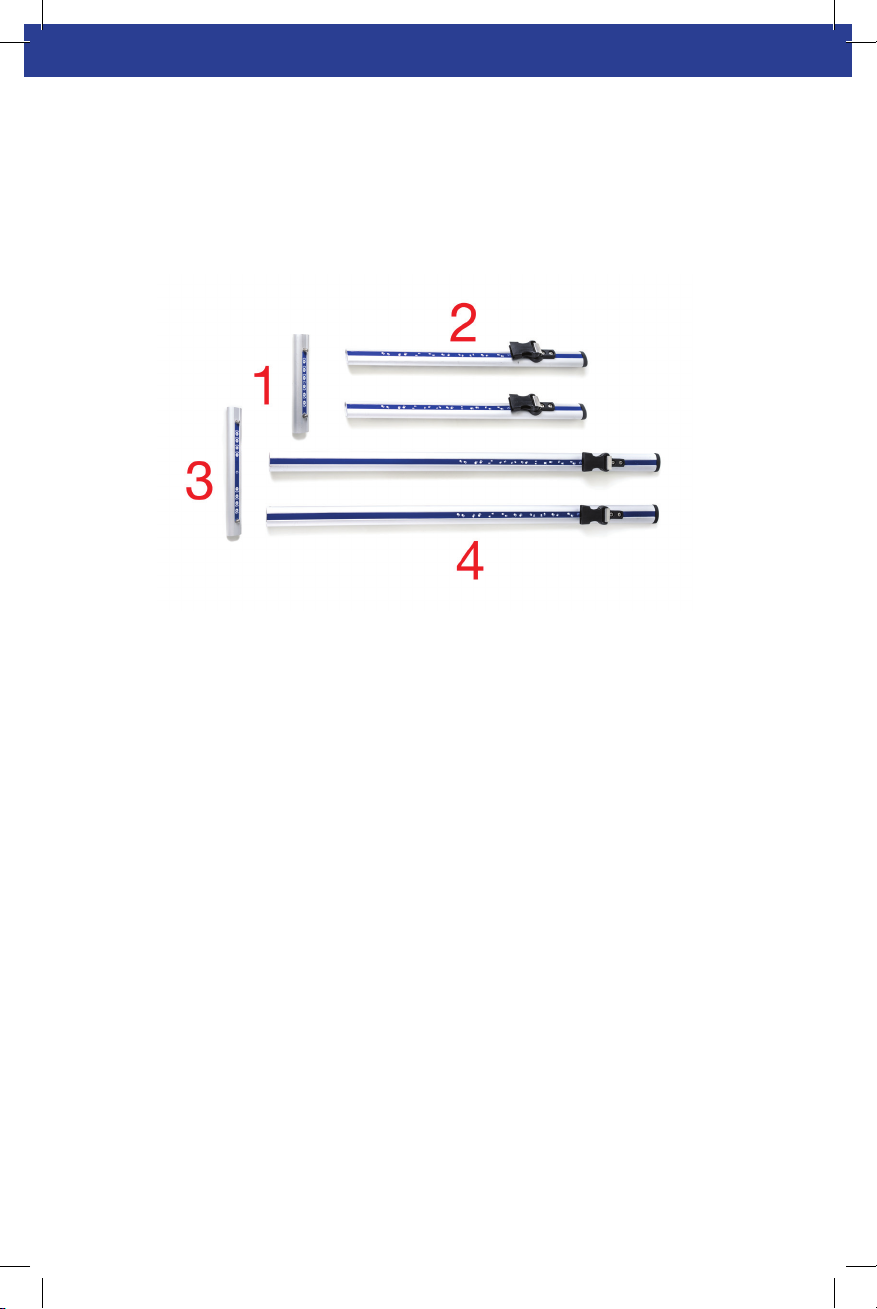
Replacing the Length Extenders and width connectors.
e Walkin’ Wheels comes with two sizes of width connectors and length
extenders. For larger or smaller dogs you may need to switch them. To remove
an extender or connector, depress the snap buon until extender or connector
slides out of the wheelchair tube. Use the guidelines below to choose the right
one.
1) Short (6 inch) Width Connector snaps into the back of the wheelchair
for dogs less than 9 ½” wide (measured at the widest point of the dog).
is is already installed in the frame.
2) Short (15 inch) Length Extenders snap in to the sides of the
wheelchair for dogs less than 19” in length (measured from the back of
the front leg to back of the rear leg). ese come installed in the frame.
3) Long (9 inch) Width Connector snaps into the back of the wheelchair
for dogs greater than 9 ½ inches wide (measured at the widest point of
the dog). is is included in the box.
4) Long (26 inch) Length Extenders snap into the sides of the wheelchair
for dogs greater than 18” long (measured from the back of the front leg
to back of the rear leg). ese are included in the box.

9
Walkin’ Wheels® Medium User Manual ©2015
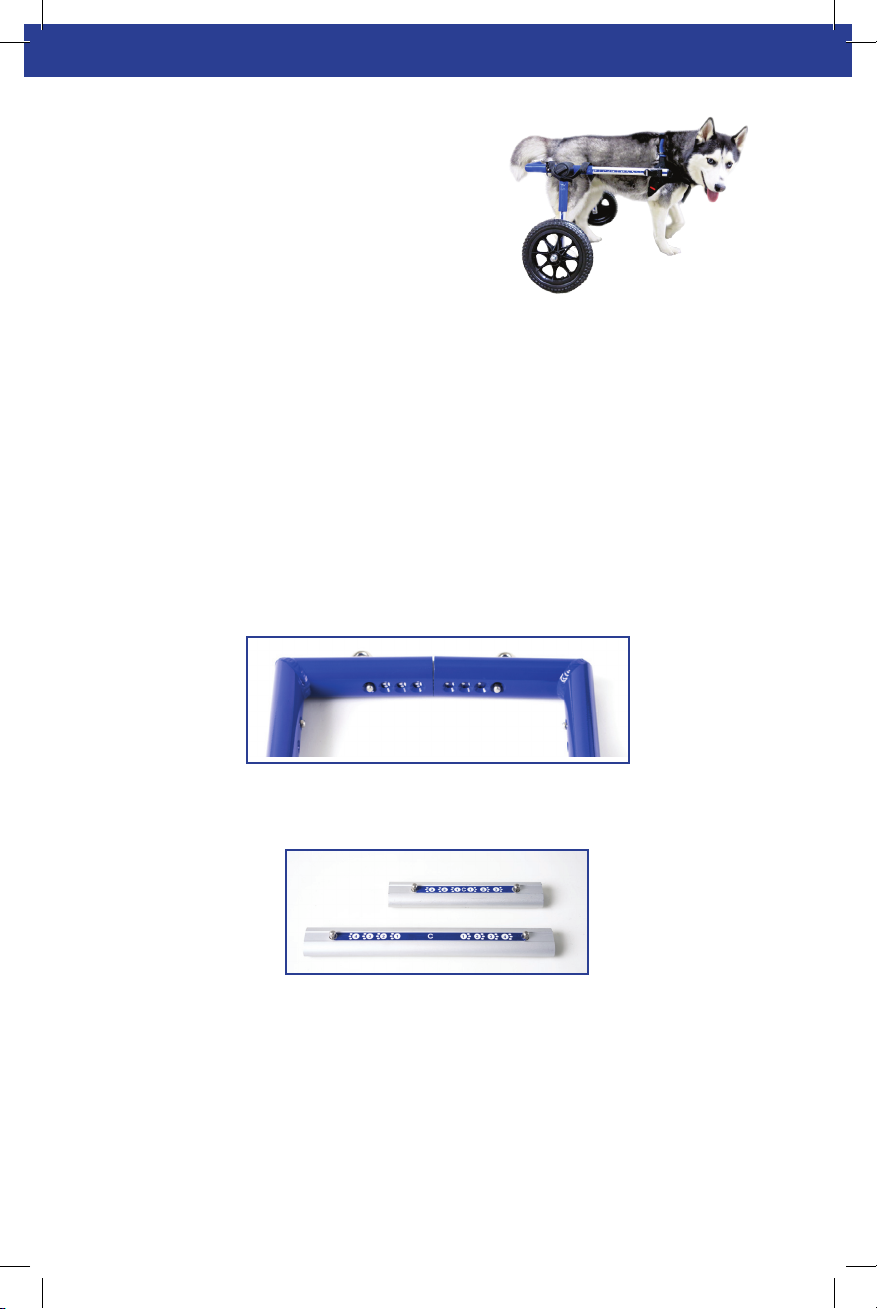
Adjusting the Length
e extenders are for length adjustments. e kit comes with two sets, one set is
15” and the other set is 26” long. Start by using the set that is already installed in
your wheelchair.
Is the Length Correct?
e end of the extenders (black cap) should be positioned at the center of the
dog’s shoulder blades. e extenders should be touching the neoprene pads on
the front harness and not pulling outward.
If the sides tilt up, then loosen the blue strap on
the front harness over the dog’s back and tighten
up the red boom strap.
If the extenders tilt down, loosen the red boom
strap and tighten the blue strap over the dog’s back.
INCORRECT
INCORRECT
10
Walkin’ Wheels® Medium User Manual ©2015
e side extenders should be parallel
to the ground and in the middle of the
dog’s body.
Adjusting the Width
Use the snap buons on the width connector to adjust the wheelchair to the
proper width. ere should be at least ½” on each side of the hips. e width
adjustment will be determined by the widest part of the dog which is usually
the chest. e width connector that is aached to the frame is 6” long and
will extend to 9.5”. If you need additional width, we have also included a 9”
connector that adjusts to 13”.
CORRECT
Table of contents


