Whistler WS1080 User manual

EZ Scan Digital
OWNER’S MANUAL
WS1080
Handheld Radio Scanner

2
Introduction ..................................................... 4
What is Object Oriented Scanning?.......................... 4
Features ......................................................................... 5
Package Contents ........................................................ 5
Scanning Legally .......................................................... 6
FCC Statement .............................................................. 7
Setup.................................................................. 8
Antenna ......................................................................... 8
Headphones and Speakers ........................................ 9
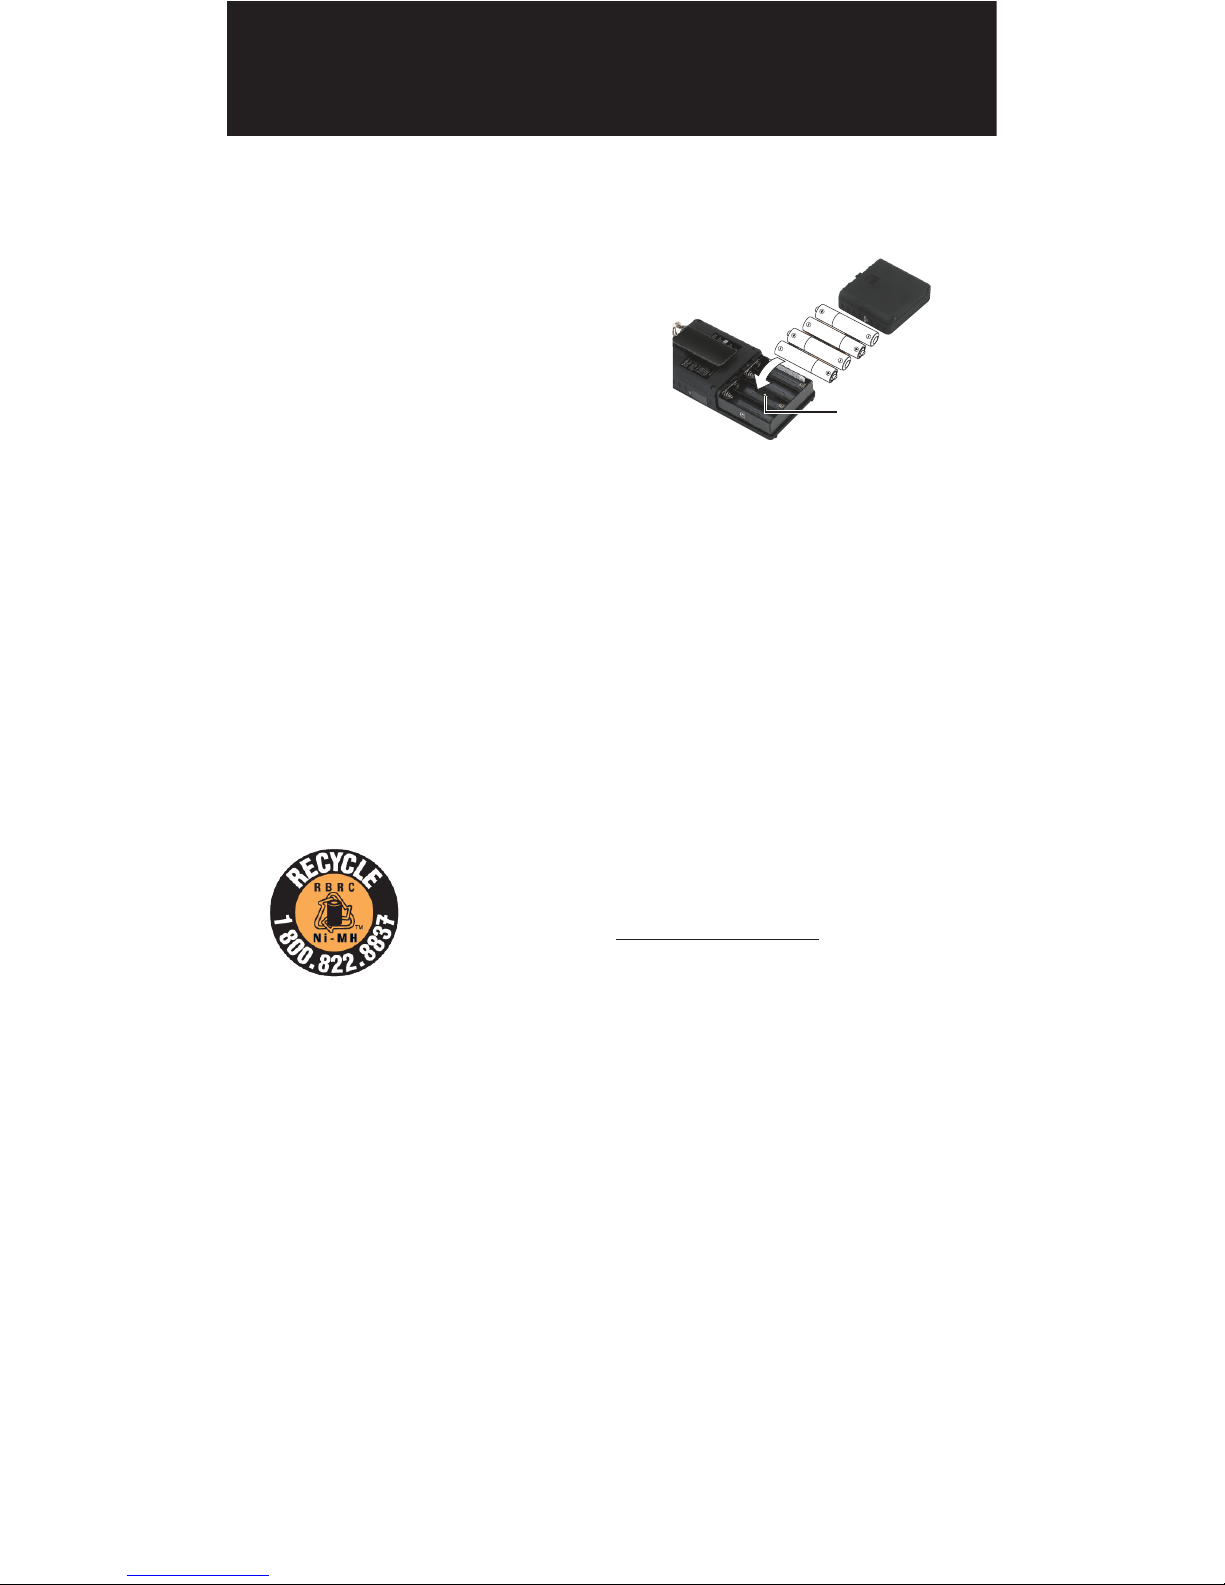
Batteries .......................................................................10
External Power ............................................................11
Swivel Belt Clip ............................................................11
Understanding the Keypad .......................................12
Turn on Scanner and Set Squelch ............................12
Set Bandplan and Clock ............................................13
Program Methods .......................................................14
Setting Location ..........................................................15
Power Up Password.....................................................18
Understanding the Display Icons ............................19
EZ Scan Library ............................................................20
Installing EZ Scan Software ......................................22
Library Updates ..........................................................22
Manual Programming ................................................23
EZ Scan Library Notes ................................................24
Library Structure .........................................................24
Editing Objects Manually ..........................................25
Alert LED .......................................................................27
Recording/Playback ...................................................32
IF Output ......................................................................34
Internal Clock/Calendar ............................................34
Scanning ......................................................... 35
Monitoring and Scanning .........................................35
Frequency or Talkgroups ...........................................35
Active Scanlists ...........................................................35
Enable/Disable Scanlists ...........................................35
TABLE OF CONTENTS

3
Lock Out Objects .........................................................35
Skip Transmission........................................................36
Rename Scanlists ........................................................36
Set Priority Objects ....................................................36
Scanlists and Scan Sets ................................ 37
Searching ....................................................... 39
Using Spectrum Sweeper ..........................................39
Perform a Service Search ......................................... 39
Perform a Limit Search ..............................................40
To Save Found Frequencies ......................................40
Search Settings ............................................. 41
Spectrum Sweeper ......................................................41
Service Search .............................................................41
Limit Search .................................................................41
CTSS/DCS Codes .........................................................42
Weather Monitoring ..................................... 43
FIPS Codes ....................................................................43
SAME Standby Modes ................................................44
Weather Priority ..........................................................44
SKYWARN™ ..................................................................44
Conguring .................................................... 45
Using V-Scanner Storage ...........................................45
Conguration Settings (EZ Scan)............................. 46
Using EZ Scan Software .............................................49
DSP Firmware Update ................................................49
Updating the Library (PC) .........................................50
Updating the Library (EZ Scan) ................................50
Troubleshooting/Error Messages ........................... 50
Maintenance .................................................. 51
Birdie Frequencies .....................................................51
Library Copyright Notice ..........................................52
Specications ................................................ 53
Frequency Coverage...................................................54
Consumer Warranty ...................................................55
TABLE OF CONTENTS

4
Introduction
Scanning technology has changed dramatically over
the years. The WS1080 scanner with Object Oriented
User Interface is designed to help the hobbyist build a
collection of channels to scan:
• Start small and expand
• Organize channels and talkgroups
• Remove unwanted channels and talkgroups
What is Object Oriented Scanning?
Programming scanning receivers can be challenging,
but object-oriented programming simplifies the
process by using common conventions for scanning
concepts that have common characteristics.
A Scannable Object is any defined item that can be
scanned or monitored, including:
• Conventional, non-trunked radio frequencies
• Talkgroups used on a trunked radio system
• Radio services
• Defined searches
Because scannable objects are defined by the same
basic elements, the Object Oriented User Interface
(OOUI) is designed to simplify scanning by managing
all scannable objects similarly. When you learn how to
program one type of object, you can program other
types of scannable objects as well.
INTRODUCTION

5
Features
• Simple keypad and display
• USA/Canada RadioReference database on SD Card
• Quick Location based Programming (City, Zip, County)
• Detects and masks encrypted voice audio
• Decodes RadioID/TalkgroupID data
• Upgradeable CPU Firmware, DSP Firmware and Library
• USB Interface
• Improved P25 Functionality (Phase II, X2-TDMA)
• PC Software to customize your WS1080 settings
• Signal Strength Meter
• 200 Scanlists
• Weather Radio Functions
• Multi–system Trunking
• Spectrum Sweeper
• Headphone/speaker jack
• Programmable Alert LED
• Programmable Audio Alarms
• Built-in Discriminator Output
• V-Scanner II Storage System
• Audio Recording
• Built-in Clock/Calendar
• Built-in Services Searches
Package Contents
• Handheld Scanner
• Antenna
• USB Cable
• MicroSD Card
• Swivel Belt Clip
• User’s Guide
• PC Software included on SD
FEATURES

6
Scanning Legally
Your scanner covers frequencies used by many
different groups including police and fire departments,
ambulance services, government agencies, private
companies, amateur radio services, military operations,
pager services, and wireline (telephone and telegraph)
service providers. It is legal to listen to almost every
transmission your scanner can receive. However, there
are some transmissions you should never intentionally
listen to.
These include:
• Telephone conversations (cellular, cordless, or other
means of private telephone signal transmission)
• Paging transmissions
• Any intentionally decoded scrambled or encrypted
transmissions
According to the Electronic Communications Privacy
Act (ECPA), you are subject to fines and possible
imprisonment for intentionally listening to, using, or
divulging the contents of such a transmission unless
you have the consent of a party to the communication
(unless such activity is otherwise illegal). This scanner
has been designed to prevent reception of illegal
transmissions. This is done to comply with the legal
requirement that scanners be manufactured so as to not
be easily modifiable to pick up those transmissions.
Do not open your scanner’s case to make any
modifications that could allow it to pick up transmissions
that are illegal to monitor. Doing so could subject you to
legal penalties. We encourage responsible, legal scanner
use. In some areas, mobile use of this scanner is unlawful
or requires a permit. Check the laws in your area. It is also
illegal in many areas to interfere with the duties of public
safety officials by traveling to the scene of an incident
without authorization.
SCANNING LEGALLY

7
FCC Statement
This equipment has been tested and found to
comply with the limits for a scanning receiver,
pursuant to Part 15 of the FCC Rules. These limits are
designed to provide reasonable protection against
harmful interference in a residential installation. This
equipment generates, uses and can radiate radio
frequency energy and, if not installed and used in
accordance with the instructions, may cause harmful
interference to radio communications. However, there
is no guarantee that interference will not occur in a
particular installation. If this equipment does cause
harmful interference to radio or television reception,
which can be determined by turning the equipment
off and on, the user is encouraged to try to correct
the interference by one or more of the following
measures:
• Reorient or relocate the receiving antenna.
• Increase the separation between the equipment
and receiver.
• Connect the equipment into an outlet on a
circuit different from that to which the receiver is
connected.
This device complies with Part 15 of the FCC Rules.
Operation is subject to the following two conditions:
(1)This device may not cause harmful interference.
(2)This device must accept any interference received,
including interference that may cause undesired
operation.
WARNING: Changes or modifications to this unit
not expressly approved by the party responsible for
compliance could void the user’s authority to operate
the equipment.
Shielded cables must be used with this unit to ensure
compliance with the Class B FCC limits.
FCC STATEMENT

8
Setup
Antenna
To connect the included antenna:
1. Align the slots around the
antenna’s connector with the
tabs on the antenna jack.
2. Press the antenna down over the
jack and turn the antenna’s base
clockwise until it locks into place.
You can use a variety of antennas. To
connect and external antenna, follow
the installation instructions supplied
with the antenna. Always use 50-ohm coaxial cable, such
as RG-58 or RG-8 low-loss dielectric coaxial cable. You may
also need a BNC adapter.
WARNING: Use extreme caution when installing or
removing an outdoor antenna. If the antenna starts
to fall, let it go! It could contact overhead power
lines. If the antenna touches a power line, touching
the antenna, mast, cable, or guy wires can cause
electrocution and death. Call the power company
to remove the antenna. DO NOT attempt to do so
yourself.
CONNECTING ANTENNA

9
WARNING: Outdoor antennas must be properly
grounded to prevent static buildup and lightning
damage. Article 810 of the National Electrical Code,
ANSI/NFPA 70, provides information about proper
grounding of the antenna mast, connection of coaxial
cable to an lightning arrestor, size of grounding
conductors, location of the lightning arrestor and
connection of grounding conductors to grounding
electrodes.
Disconnect your radio from the outdoor antenna
during electrical storm activity to prevent damage.
Headphones and Speakers
You can plug headphones (not supplied) or an
amplified speaker (not supplied) with a 1/8 inch
(3.5mm) stereo mini-plug in the headphone jack on
top of your scanner. This automatically disconnects
the internal speaker.
NOTE: Use an amplified speaker; a non-amplified
speakers may not provide sufficient volume for
comfortable listening.
Listening Safely
To protect your hearing, follow these guidelines when
you use headphones:
Set the volume to zero before putting on headphones.
With the headphones on, adjust the volume to a
comfortable level.
Avoid increasing the volume after you set it. Over time,
your sensitivity to a volume level decreases, so volume
levels that do not cause discomfort might damage your
hearing. Avoid or limit listening at high-volume levels.
Prolonged exposure to high-volume levels can cause
permanent hearing loss.
Wearing headphones while operating a motor vehicle or
riding a bicycle can create a traffic hazard and is illegal in
most areas. Even though some headphones let you hear
some outside sounds when listening at normal volume
levels, they still can present a traffic hazard. Exercise
extreme caution!
ACCESSORIES

10
Batteries
A low battery warning sounds every 30 seconds
(default setting) when the batteries are low.
1. Slide open the battery
compartment cover.
2. Set the Battery Type
Selector:
• ALKA − Alkaline
• NI-MH − Rechargeable Ni-MH
3. Install four AA batteries, matching the polarity
symbols (+ and –).
4. Replace the cover.
WARNING: Never install alkaline batteries with the
Battery Type Selector switch set to NI-MH. Alkaline
batteries can get hot or explode if you try to recharge
them.
Recycle Rechargeable Batteries
Recycle your old rechargeable batteries at one of the
many collection sites in the U.S. and Canada. To find the
site nearest you, visit www.call2recycle.org or call toll-
free 1-877-2-RECYCLE.
Battery Notes:
• Use only fresh batteries of the required size and
type. Do not mix old and new batteries, different
battery types (alkaline or rechargeable), or
rechargeable batteries of different capacities.
• Dispose of batteries promptly and properly; do not
burn or bury them.
• For long-term storage (a month or longer), remove
the batteries. Batteries can leak chemicals that can
damage electronic parts.
• Do not overcharge rechargeable batteries.
Overcharging shortens battery life.
Battery Type
Selector
AA
AA
AA
AA
BATTERIES

11
External Power
Always turn the scanner off before
connecting or disconnecting power
sources. Use the supplied USB cable to
connect the scanner to a USB power
source (not included).
Some USB power adapters can interfere
with the scanner's reception. Using an
incompatible USB cable may damage
your scanner.
NOTE: If your vehicle’s engine is
running, you might hear electrical noise from the
engine while scanning. This is normal.
Swivel Belt Clip
Swivel clip allows the scanner to move
with you and easily move it out of the
way without unclipping it from your
belt. To attach the Swivel clip to the
scanner; align the belt clip grooves to
the slots on the back of the scanner.
Slide the clip down until it clicks in
place. To remove the belt clip, pull
back on the small tab and slide the clip
upward.
EXTERNAL POWER

12
Understanding the Keypad
Your WS1080 features an easy-to understand backlit
keypad.
KEYPAD
Turn on Scanner and Set Squelch
Preset squelch between 10 and 12 o’clock position.
While scanning, turn the knob down (counterclockwise)
until you hear noise then up (clockwise) a little past
where the noise stops. The higher the squelch is set, the
stronger the signal required to break the squelch.
Power
Press and hold to
turn ON/OFF.
Press briefly
to toggle the
backlight.
Squelch

13
Setting Bandplan and Clock
When you rst power up your WS1080 it will prompt you
to set the bandplan, date and time.
Press the or key to select the USA or Canada
bandplan, then press /II/SEL.
-Bandplan- -Bandplan-
USA Canada
Press SEL to Set Press SEL to Set
The WS1080 will then prompt you to enter the
current date and time. Press the or key to select
the desired digit, then press the key. Press the the
or key to change the value, then press /II/SEL.
You can skip this process by pressing the SKIP key.
You can set the clock at any time using the EZ Scan
Software.
-Set Clock-
2014-06-03 Sat
11:00:25
Press SEL to Set
or SKIP to Exit
The Bandplan and Date/Time prompts appear only
once on initial power-up. You can change the Date and
Time from the Main Menu and the Bandplan from the
Setting menu.
SETTING BANDPLAN AND CLOCK

14
Program Methods
There are two methods to program your scanner. To
get started quickly, you can use “Set Location.” The set
location method stores objects in your area automatically
and puts them in Scanlists 151 and higher. These
Scanlists are already named, “Multi Dispatch,” “Law
Tac,” “Interop” “Fire Talk,” and so forth. This method
gets you scanning in minutes, but you cannot monitor
a single police or a single fire department – they will all
be together in the same Scanlist. Also, if you use set
location, and wish to add a new location, be sure to “Clear
Channels” to erase old objects before storing the new
location. If you store more than one ZIP code, the scanner
will spend a great deal of time searching for objects that
are out of range. That will cause the scanner to miss some
local transmissions you want to hear.
Although it takes longer, experienced users will want to
program Scanlists on their own using the “Step by Step”
method. Use “Browse Library” to select your state and
county and look for agencies of interest. Check the boxes
of objects you wish to import, select the Scanlist you
want to put them in and perform the import (see Manual
Programming pg. 23). Once you save objects to a
Scanlist, rename the Scanlist so you don’t forget what you
stored there. Then import more objects into a different
Scanlist and rename that one. In this way, you can create
Scanlists such as Bethel Police, Hurst Police, Bethel Fire,
Shenango EMS, etc. Individual scanlists allow you to
decide exactly what you want to scan.
PROGRAM METHODS

15
Setting Location
Your WS1080 can select services to scan based on your
location. Press MENU and scroll to “Set Location” and
press the key.
You can specify your location by City, County or ZIP
Code. Scroll to the desired method and press the
key. If you select City or County, the WS1080 will
prompt you for your State. Use the orkey to select
the rst letter of your State, then press the /II/
SEL key. Scroll to your state and press the key. Use
the orkey to select the rst letter of your City or
county, then press the /II/SEL key. Scroll to your City
or County, then press the key.
Select County:
First letter: A
SEL = Done
If you select ZIP Code, the WS1080 will prompt you
to enter your five-digit ZIP Code. Use the orkey
to adjust each digit, then use the or key to select
each digit. When you are done, press the
/II/SEL key.
ZIP Code
00000
moves cursor
SEL=OK MENU=BACK
NOTE: Although you can program multiple locations,
to get maximum scanner performance its best to
program only 1 location or ZIP code. Scanning
multiple locations will cause missed transmissions due
to the scanner searching for out of range frequencies.
SETTING LOCATION

16
You can accept a preselected set of Default Types for
your location, or you can specify Custom Types (see
next section). To select the Default Service Types, press
the key, then the /II/SEL key to import the Default
Set of Service Types for that City or County. Wait for the
Import process to end, then press the /II/SEL.
-Confirmation-
Really do import
operation?
SEL=Yes SKIP=No
To perform additional imports, press the /II/SEL key
and proceed as before. Press the SKIP key to return to
the Main Menu.
To select Custom Types, press the key. Scroll through
the list of Services and press the /II/SEL
key to select Services you wish to import. A checkmark
appears next to each selected Service.
Services:
SEL = Toggle
Multi Dispatch
Law Dispatch
Fire Dispatch
EMS Dispatch
When you are done, press the key, then the /
II/SEL key to import the selected services. Press
the SKIP key to return to the Service list without
importing. To perform additional imports, press the
/II/SEL key and wait for import process to end.
Press the SKIP key to return to the Main Menu.
Services selected through Set Location are
automatically assigned to Scanlists beginning at
number 151; each selected Service is assigned to
a separate Scanlist, which is given the name of the
service.
SETTING LOCATION

17
These Scanlists are automatically selected for Scanning.
You can select or deselect Scanlists as desired through
the Scanlist item on the Main Menu.
NOTE: Press or MENU to return to main menu.
Objects can be backed up to the rst available
V-Scanner folder from the Set Location menu (See
V-Scanner II section for a discussion of Folders). We
recommend you back up your data to guard against
accidental changes or deletions. From the Set Location
menu scroll to Backup Data and press the key.
-Set Location-
By City
By County
By ZIP Code
Backup Data
Clear Channels
Press the /II/SEL key to back up your data, or press
the SKIP key to return to the Set Location menu
without backing up.
-Confirmation-
Really backup to
first available
VScanner folder?
SEL=Yes, SKIP=No
To clear all data from the current Folder on the Set
Location menu scroll to Clear Channels and press the
key. On the Confirmation screen press the
/II/SEL key to clear the data, or press the SKIP key to
return to the Set Location menu without clearing.
-Confirmation-
Really clear ALL
programmed data
from the current
folder?
SEL=Yes, SKIP=No
NOTE: The Clear Channels function erases all of your
current scanning data; all Scanlists in this Folder will be
empty. Use this function carefully, as it cannot be undone.
Does not affect V-Scanner folders content.
SETTING LOCATION

18
Power up Password
Set a user defined power-on password to restrict
access to the radio.
1. Press MENU.
2. Scroll to Set Password and press .
3. Use the arrows to set the password.
4. Use the /II/SEL key to accept the updated
settings, or the MENU key to exit without saving
changes.
NOTE: Power-on password can be reset by anyone
using the EZ Scan software. Password provides only
limited protection from immediate unauthorized use.
POWER UP PASSWORD

19
Understanding the Display Icons
A row of icons at the top of the display provides
status information about the scanner. These icons are
defined as follows:
TThe scanner is currently receiving trunking
control channel data.
GThe attenuator is set for Global mode.
A When present, the attenuator is active.
GA When present, Global attenuator is on, and the
attenuator is active.
SThe radio’s squelch circuit is open.
AM AM mode is active.
FM FM mode is active.
NF Narrow FM mode is active.
DG The radio is receiving P25 digital audio with AGC.
Dg The radio is receiving P25 digital audio without
AGC.
IF The radio’s IF (discriminator) output mode is
active.
EEncrypted digital traffic detected.
F
Audio recording is enabled but recording is
suspended. The MicroSD card is almost out
of space. Delete or archive older audio files to
make room for new recordings.
Scanning
Audio is being recorded on the active or
selected Object.
Signal meter indicating signal strength.
Scanner is in Pause mode (monitoring a single
Object).
DISPLAY

20
Battery status indicator
External power connected
P/p Priority On/Priority Off
S/s Skip On/Skip Off
D/d Delay On/Delay Off
L/- Lock Out On/Lock Out Off
EZ Scan Library
Your scanner comes with an installed MicroSD card
that contains the entire USA/Canadian RadioReference
database as well as the EZ Scan software. Note: Make a
copy of the EZ Scan software files in case the SD card is
lost or damaged.
To remove the MicroSD card from the scanner:
WARNING: To prevent corrupted data on the SD
Card, always turn the scanner off using the front panel
power key before opening the battery compartment
cover.
1. Turn off scanner, unplug external power, and
remove the batteries.
2. Press and release the MicroSD card.
3. To reinsert the MicroSD card, with the label
facing the front of the radio press it in until it clicks
in place.
NOTE: Always use the EZ Scan software “Prepare
Scanner Memory/SD Card For Use” option under the
“Scanner/ SD Card” menu to format the SD Card if the
card is not performing as expected or if the scanner
does not power up with the SD Card.
The MicroSD card comes formatted for the standard
FAT file system with a cluster size of 32k.
To format additional cards (2GB or smaller), use only the
EZ Scan software to format the SD card.
• Format using the FAT file system with 32k clusters.
DISPLAY
Other manuals for WS1080
1
Table of contents
Other Whistler Radio manuals
Popular Radio manuals by other brands

LORAL TERRACOM
LORAL TERRACOM AN / PRC- 1 04(A) Technical manual

Motorola
Motorola ASTRO W4 user guide

Cambridge Audio
Cambridge Audio Azur 640T Technical specifications

Regent
Regent DAB+151 user manual

Vertex Standard
Vertex Standard VX-5500 Specifications

Boston Acoustics
Boston Acoustics Horizon Solo XT owner's manual