White-Westinghouse WGQ332HS1 User manual

White-Westinghous
Use & Care Guide
Guide de L'Utilisateur
Manual de Uso y Cuidado
P/N 137130000 (0808)

Table of Contents
Product registration ...................................................................................................................................... 2
Important Safety Instructions ............................................................................................................................ 2-4
Drying Procedures................................................................................................................................................ 4
Features................................................................................................................................................................. 5
Care and Cleaning ............................................................................................................................................. 5-6
Common Drying Problems.................................................................................................................................. 6
Avoid Service Checklist ........................................................................................................................................ 7
Warranty ................................................................................................................................................................ 8
Framcais ........................................................................................................................................................... 9-15
Espaho{ ........................................................................................................................................................... 16-22
Product Record
The symbo{ _.., on the product or on its packaging indicates that this product may not be treated as househo{d waste. Instead
it shall be handed over to the applicable collection point for the recycling of electrical and electronic equipment. Byensuring this
product isdisposed of correctly, you will help prevent potential negative consequences for the environment and human health,
which could otherwise be caused by inappropriate waste handling of this product. For more detailed information about recycling
of this product, please contact your local city office, your household waste disposal serviceor the shop where you purchased the
product.
This Useand CareGuide provides general operating instructions
for your dryer. It also contains information about features for
several other models. Your dryer may not have every feature
included.
Usethe dryer only asinstructed inthis Use& Care Guide and the
Operating Instructions included with your dryer.
Note: The instructions appearing in this Owner's Guide are not
meant to cover every possible condition and situation that may
occur. Common sense and caution must be practiced when
installing, operating and maintaining any appliance.
Read and Save These Instructions
Record Your Model and Serial Numbers
The mode{ and sofia{ numbers of your dryer are found on the
dryer serial plate located of the left side of the door opening.
Record and retain these numbers.
Noter les num_ros de module et de s_rie
Model
Number
Serial
Number
Purchase
Date
Important Safety Instructions
Your safety and the safety of others is very important,
We have provided many important safety messagesin the Useand Care Guide, Operating Instructions, Installation Instructions
and on your appliance. Always read and obey all safety messages.
_This isthe safety alert symbol. This symbol alerts you to hazards that can kill or hurt you or others. All safety messages will
be preceded by the safety alert symbol and the word "DANGER" or "WARNING ". These words mean:
You will be killed or seriously injured if you don't follow instructions.
You can be killed or seriously injured if you don't follow instructions.
AII safety messages will identify the hazard, tell you how to reduce the chance of injury, and tell you what can happen
if the instructions are not followed.
Foryour safety, the information in this manual must befollowed to minimize the riskof fire or explosion or to prevent
property damage, personal injury or loss of life.
Do not store or use gasoline or other flammable vapors and liquids in the vicinity of this or any other appliance.
WHAT TO DO IF YOU SMELL GAS:
• Do not try to light any appliance.
Do not touch any electrical switch; do not useany phone in your building.
Clear the room, building or area of all occupants.
Immediately call your gassupplier from a neighbor's phone. Follow the gas suppiier's instructions.
If you cannot reach your gas supplier, call the fire department.
Installation and service must be performed by a qualified installer, service agency or the gas supplier.

ELECTR/C DRYERS:
14-30R
FUSED 30 AMP
120/240 V OR
120/208 V WALL
RECEPTACLE
DRYER
DRYER
SER VI CE
CORD
CORRECT
Use this way ONLY
Important Safety Instructions Con 't
_Avoid fire hazard or electrical shock. Do not use
an adaptor plug or extension cord or remove grounding prong
from electrical power cord. Failure to follow this warning can
cause serious injury, fire or death.
Note: Theinstructions appearing in this Useand Care Guide are
not meant to cover every possible condition and situation that
may occur. Common senseand caution must be practiced when
installing, operating and maintaining any appliance.
You can be killed or seriously injured if you
don't follow these Important Safety Instructions:
• To reduce the risk of fire, electrical shock, or injury to persons
when using this dryer, comply with the basic warnings listed
below.
Failure to comply with these warnings could result in serious
personal injuries.
Grounding type
wallrece
GAS DRYERS:
Do not under any
circumstances cut,
remove or bypass the
grounding prong
from this plug
Power supply cord with 3-prong
grounding plug
CORRECT Use this way ONL Y
SAVE THESE INSTRUCTIONS
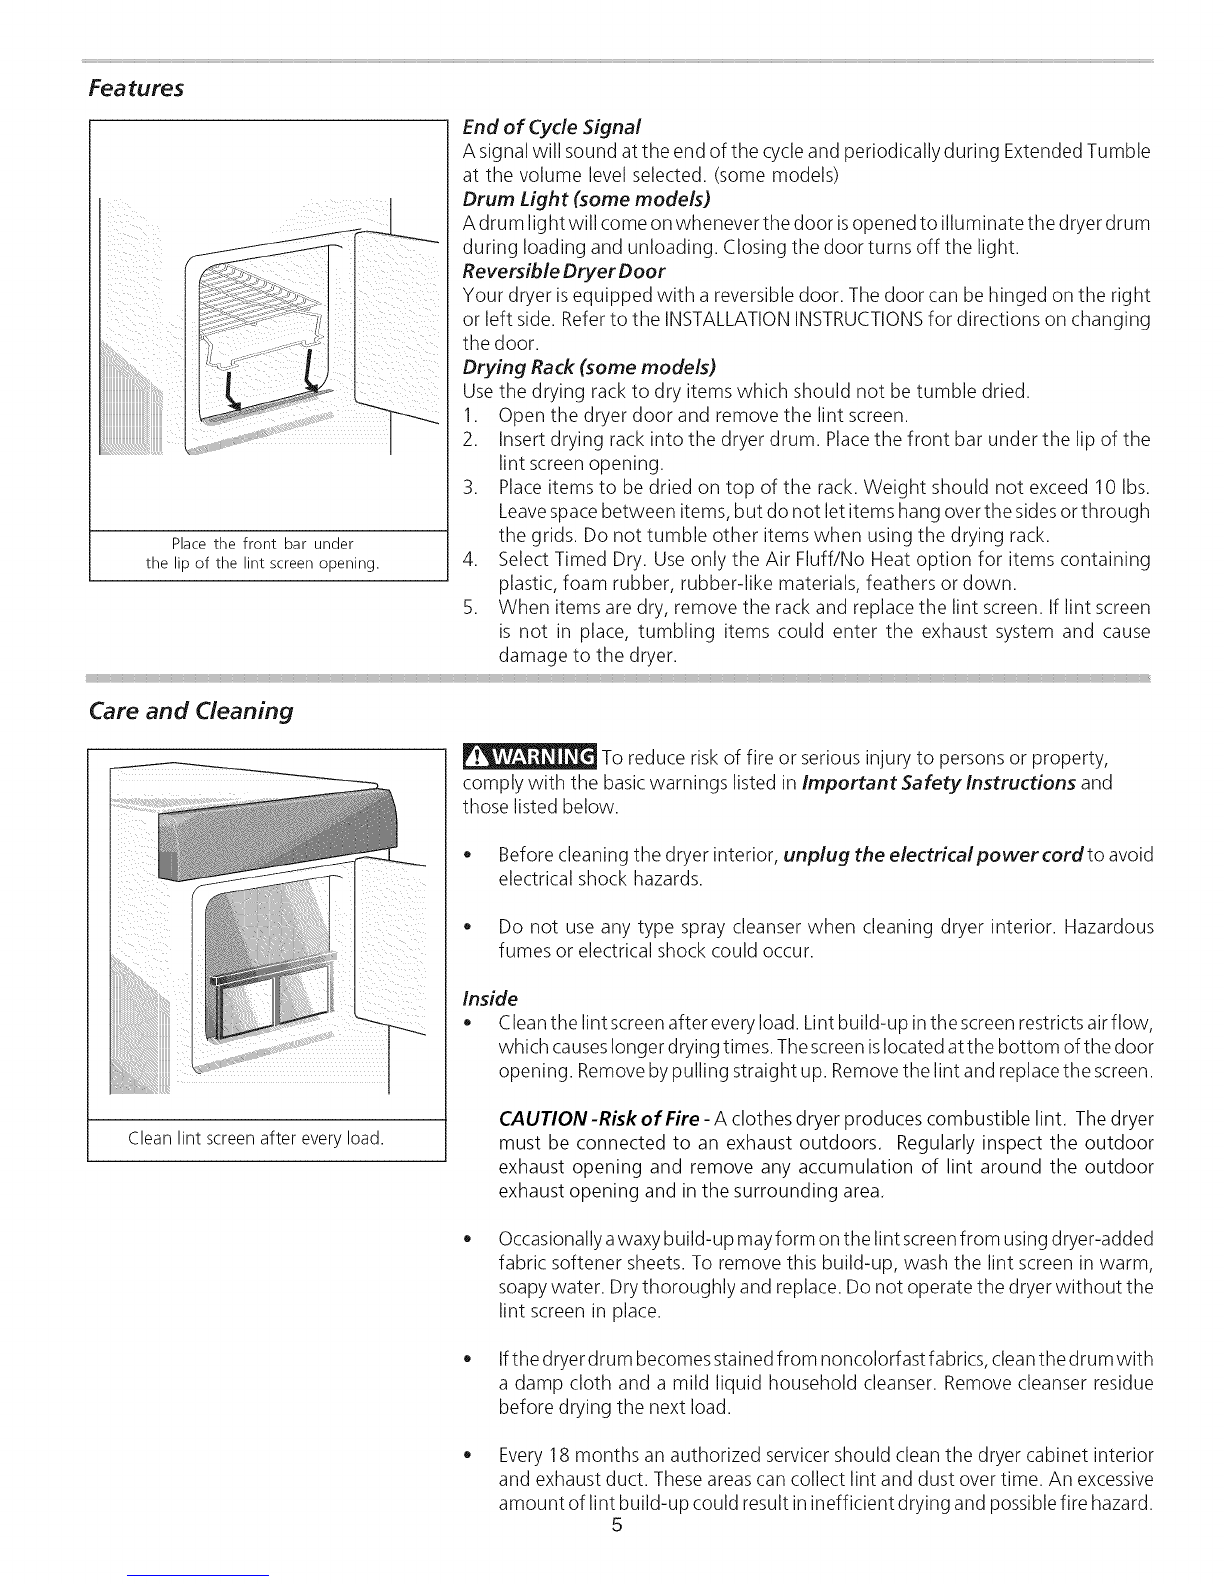
-Risk of Fire - A clothes dryer produces combustible lint.
The dryer must be connected to an exhaust outdoors.
Regularly inspect the outdoor exhaust opening and remove
any accumulation of lint around the outdoor exhaust opening
and in the surrounding area.
Do not obstruct the flow of ventilating air. Do not stack or
place laundry or throw rugs against the front or back of the
dryer.
Do not spray any type of aerosol into, on or near dryer at any
time.
Do not use fabric softeners or products to eliminate static
unless recommended by the manufacturer of the fabric
softener or product.
Failure to comply with these warnings could result in fire,
explosion, serious bodily injury and/or damage to the rubber
or plastic parts of the dryer.
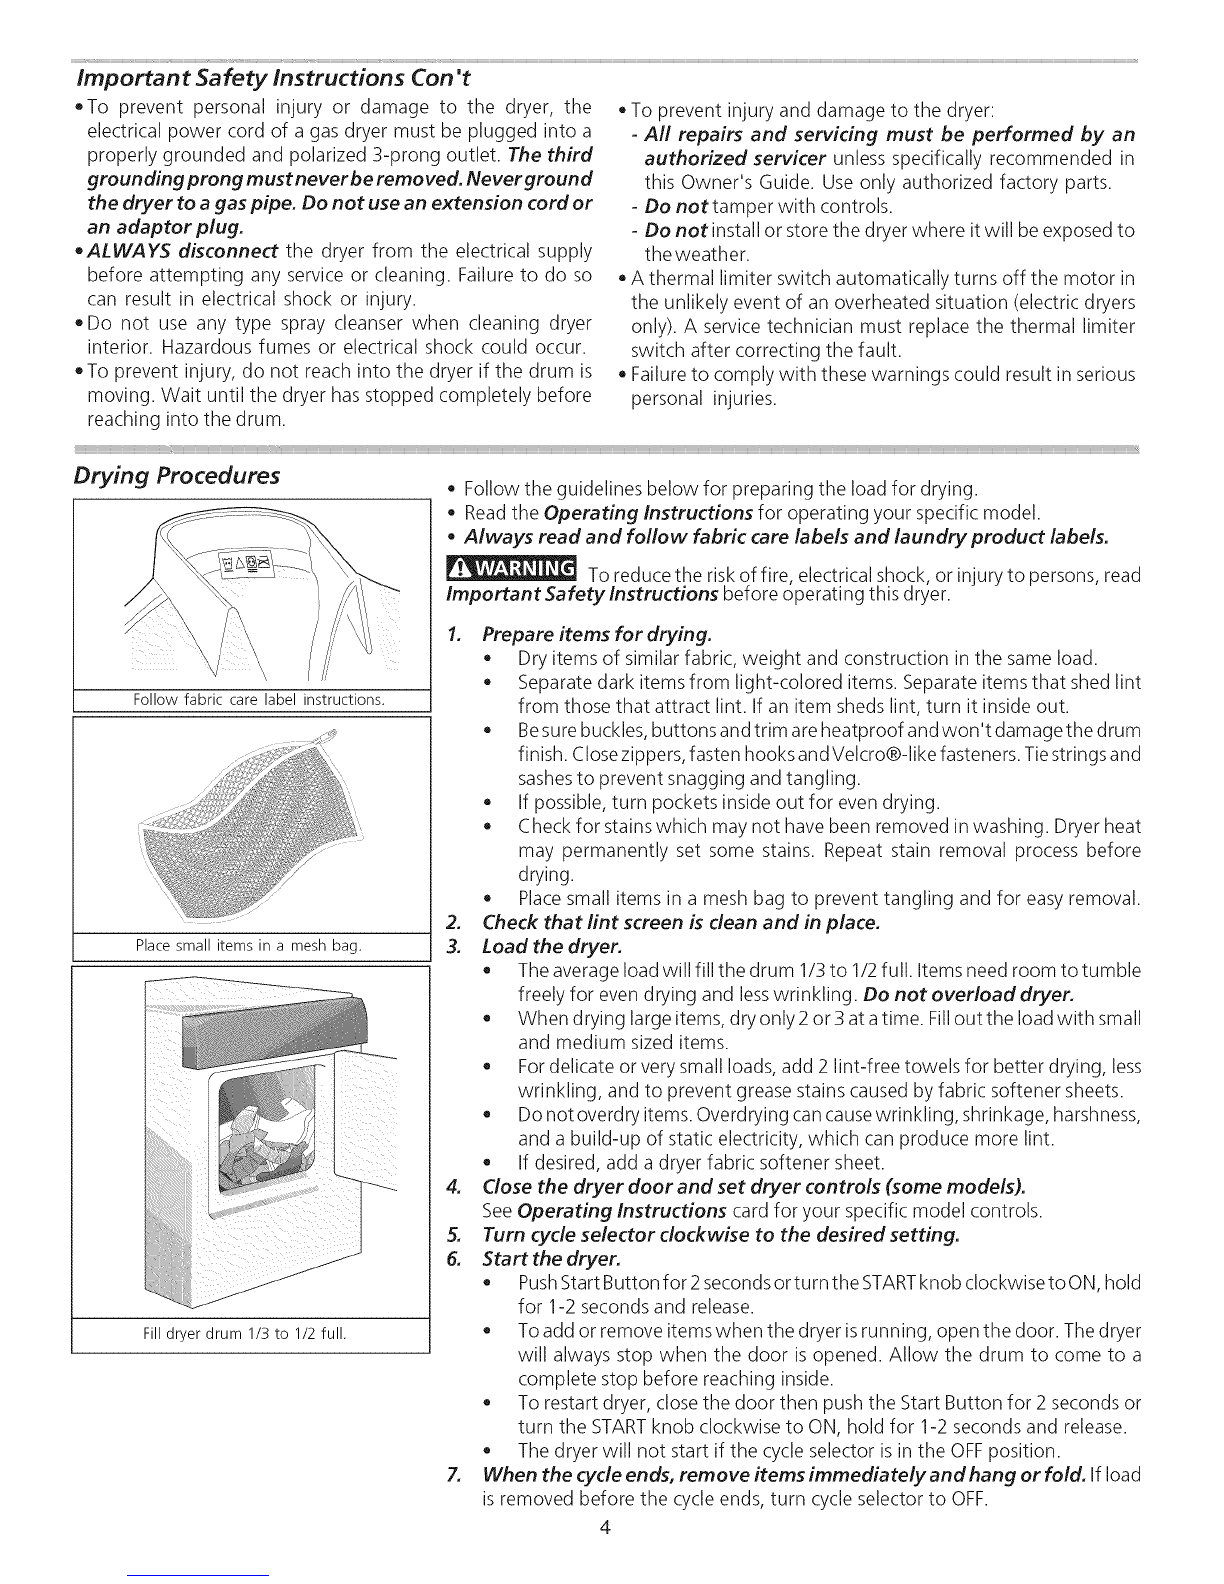
Prevent Fire
Do not dry items that havebeen previously cleaned in, soaked
in, or spotted with gasoline, cleaning solvents, kerosene,
waxes, etc. Do not store these items on or near the dryer.
Thesesubstances give off vapors that could ignite or explode.
Do not place items exposed to cooking oils in your dryer.
Items contaminated with cooking oils may contribute to a
chemical reaction that could cause a load to catch fire.
Do not dry articles containing rubber, plastic or similar
materials such as bras, galoshes, bath mats, rugs, bibs,
baby pants, plastic bags and pillows that may melt or burn.
Some rubber materials, when heated, can under certain
circumstances produce fire by spontaneous combustion.
Clean the lint screen before or after each load. The interior of
the dryer, lint screen housing and exhaust duct should be
cleaned approximately every 18 months by qualified service
personnel. An excessive amount of lint build-up in these
areas could result in inefficient drying and possible fire. See
Care and Cleaning.
Do not operate the dryer ifthe lint screen isblocked, damaged
or missing. Fire hazard, overheating and damage to fabrics
can occur. If your dryer hasa drying rack, always replace the
lint screen when finished using the drying rack.
Protect Children
Do not allow children to play on or in the dryer. Close
supervision of children is necessary when the dryer is used
near children. As children grow, teach them the proper, safe
use of all appliances.
Destroy the carton, plastic bag and other packing materials
after the dryer isunpacked. Children might usethem for play.
Cartons covered with rugs, bedspreads or plastic sheets can
become airtight chambers.
Keep laundry products out of children's reach. To prevent
personal injury, observe all warnings on product labels.
Beforethe dryer isremoved from serviceor discarded, remove
the dryer door to prevent accidental entrapment.
Failureto comply with these warnings could result in serious
personal injuries.
Prevent Injury
To prevent shock hazard and assurestability during operation,
the dryer must be installed and electrically grounded by a
qualified service person in accordance with local codes.
Installation instructions are packed in the dryer for the
installer's reference. Refer to INSTALLATIONINSTRUCTIONS
for detailed grounding procedures. If the dryer is moved to a
new location, have it checked and reinstalled by a qualified
service person. Printedin U.S.A.

Important Safety Instructions Con 't
oTo prevent personal injury or damage to the dryer, the oTo prevent injury and damage to the dryer:
electrical power cord of a gas dryer must be plugged into a
properly grounded and polarized 3-prong outlet. The third
grounding prong must never be removed. Never ground
the dryer to a gas pipe. Do not use an extension cord or
an adaptor plug.
•ALWAYS disconnect the dryer from the electrical supply
before attempting any service or cleaning. Failure to do so
can result in electrical shock or injury.
Do not use any type spray cleanser when cleaning dryer
interior. Hazardous fumes or electrical shock could occur.
To prevent injury, do not reach into the dryer if the drum is
moving. Wait until the dryer has stopped completely before
reaching into the drum.
-All repairs and servicing must be performed by an
authorized servicer unless specifically recommended in
this Owner's Guide. Use only authorized factory parts.
-Do not tamper with controls.
-Do not install or store the dryer where it will be exposed to
the weather.
A thermal limiter switch automatically turns off the motor in
the unlikely event of an overheated situation (electric dryers
only). A service technician must replace the thermal limiter
switch after correcting the fault.
Failure to comply with these warnings could result in serious
personal injuries.
\,
Follow fabric care label instructions.
, _¢tZ?7,
_/!;i:
_;gt
Place small items in a mesh bag.
Fill dryer drum 1/3 to 1/2 full.
1, Prepare items for drying.
Dry items of similar fabric, weight and construction in the same load.
Separate dark items from light-colored items. Separate items that shed lint
from those that attract lint. If an item sheds lint, turn it inside out.
Besure buckles, buttons and trim are heatproof and won't damagethe drum
finish. Closezippers, fasten hooks and Velcro®-Iike fasteners. Tie strings and
sashesto prevent snagging and tangling.
If possible, turn pockets inside out for even drying.
Check for stainswhich may not have been removed in washing. Dryer heat
may permanently set some stains. Repeat stain removal process before
drying.
Placesmall items in a mesh bag to prevent tangling and for easy removal.
2. Check that lint screen is dean and in place.
3. Load the dryer.
The average load will fill the drum 1/3to 1/2full. Items need room totumble
freely for even drying and lesswrinkling. Do not overload dryer.
When drying large items, dry only 2 or 3 at atime. Fillout the load with small
and medium sized items.
Fordelicate or very small loads, add 2 lint-free towels for better drying, less
wrinkling, and to prevent grease stains caused by fabric softener sheets.
Do not overdryitems. Overdrying cancausewrinkling, shrinkage, harshness,
and a build-up of static electricity, which can produce more lint.
If desired, add a dryer fabric softener sheet.
4. Close the dryer door and set dryer controls (some models).
SeeOperating Instructions card for your specific model controls.
5. Turn cycle selector clockwise to the desired setting.
6. Start the dryer.
PushStart Button for 2secondsor turn the STARTknob clockwisetoON, hold
for 1-2 seconds and release.
T° add °r rem°ve itemswhen the dryer isrunning' °pen the d°°r The dryer
will always stop when the door is opened. Allow the drum to come to a
complete stop before reaching inside.
To restart dryer, close the door then push the Start Button for 2 seconds or
turn the STARTknob clockwise to ON, hold for 1-2 seconds and release.
The dryer will not start if the cycle selector isin the OFFposition.
7. When the cycle ends, remove items immediately and hang or fold. If load
is removed before the cycle ends, turn cycle selector to OFF.
4

Features
Place the front bar under
the lip of the lint screen opening.
End of Cycle Signal
A signal will sound at the end of the cycleand periodically during Extended Tumble
at the volume level selected. (some models)
Drum Light (some models)
A drum light will come on whenever the door isopened to illuminate the dryer drum
during loading and unloading. Closing the door turns off the light.
Reversible Dryer Door
Your dryer isequipped with a reversible door. The door can be hinged on the right
or left side. Referto the INSTALLATIONINSTRUCTIONSfor directions on changing
the door.
Drying Rack (some models)
Use the drying rack to dry items which should not be tumble dried.
1. Open the dryer door and remove the lint screen.
2. Insert drying rack into the dryer drum. Placethe front bar under the lip of the
lint screen opening.
3. Place items to be dried on top of the rack. Weight should not exceed 10 Ibs.
Leavespacebetween items, but do not let items hang overthe sidesor through
the grids. Do not tumble other items when using the drying rack.
4. Select Timed Dry. Use only the Air Fluff/No Heat option for items containing
plastic, foam rubber, rubber-like materials, feathers or down.
5. When items are dry, remove the rack and replace the lint screen. If lint screen
is not in place, tumbling items could enter the exhaust system and cause
damage to the dryer.
Care and Cleaning
Clean lint screen after every load.
To reduce risk of fire or serious injury to persons or property,
comply with the basic warnings listed in ImportantSafetylnstructions and
those listed below.
• Before cleaning the dryer interior, unplug the electrical power cord to avoid
electrical shock hazards.
Do not use any type spray cleanser when cleaning dryer interior. Hazardous
fumes or electrical shock could occur.
Inside
Clean the lint screen after every load. Lint build-up inthe screen restricts air flow,
which causeslonger drying times. Thescreen islocated atthe bottom of the door
opening. Removeby pulling straight up. Removethe lint and replace the screen.
CAUTlON-Risk of Fire - A clothes dryer produces combustible lint, The dryer
must be connected to an exhaust outdoors, Regularly inspect the outdoor
exhaust opening and remove any accumulation of lint around the outdoor
exhaust opening and in the surrounding area,
Occasionally awaxy build-up may form on the lint screenfrom using dryer-added
fabric softener sheets. To remove this build-up, wash the lint screen in warm,
soapy water. Drythoroughly and replace. Do not operate the dryer without the
lint screen in place.
Ifthe dryer drum becomesstained from noncolorfast fabrics, cleanthe drum with
a damp cloth and a mild liquid household cleanser. Remove cleanser residue
before drying the next load.
Every 18 months an authorized servicer should clean the dryer cabinet interior
and exhaust duct. These areas can collect lint and dust over time. An excessive
amount of lint build-up could result in inefficient drying and possible fire hazard.
5

Care and Cleaning con 't
\
Do not store or place laundry products on
top of dryer at any time. They can damage
the finish or controls.
Outside
• Clean the cabinet with mild soap and water. Never use harsh, gritty or
abrasive cleansers.
Ifthe cabinet becomes stained, cleanwith diluted chlorine bleach [1/2 cup (120
ml) in 1 quart (.95 liter) water]. Rinse several times with clear water.
Removeglue residue from tape or labelswith a mixture of warm water and mild
detergent. Or, touch residue with the sticky side of the tape or label.
When cleaning chrome parts useWindex with ammonia or any of the cleaning
items mentioned for cleaning the cabinet.
Before moving the dryer, placea strip of cardboard or thin fiberboard under
the front leveling legs to prevent damage to floor.
Common Drying Problems
Many drying problems involve poor cleaning results, poor soil and stain removal, residues of lint and scum, and fabric
damage, Forsatisfactory drying results, followthese suggestions provided byThe Soap and Detergent Association.
PROBLEM
Greasy, oily
stains
POSSIBLECAUSES
, Fabricsoftener sheet. SOLUTIONS PREVENTIVE MEASURES
, Add a few bath towels to small loads for
proper tumbling.
, Some "silk-like" fabrics should be air dried.
, Use proper drying temperature.
, Place fabric softener sheet on top of load
before starting the dryer.
, Rub fabric softener stains with bar
soap. Rinseand rewash.
Lint , Overloading.
, Overdrying causes static
electricity.
, Lint screen not clean
when cycle began.
, Lint is attached to "pills."
, Reduce load size and rewash using
liquid fabric softener in the final rinse.
, Or, add afabric softener sheet and
tumble without heat.
, Use lint brush or roller to remove lint.
, Do not overload dryer.
, Use fabric softener in washer or dryer to
reduce static electricity.
, Remove items when they are slightly damp
to avoid overdrying.
, Check that lint screen isclean and in place.
Pilling
(Fibers break
off, ball up and
cling to fabric.)
Pilling is normal with
synthetic and permanent
press fabrics. This is due
to abrasion from normal
wear.
, Use a lint brush or shaver to remove
pills. , Use fabric softener to lubricate fibers.
, When ironing, use spray starch or fabric
finish on collars and cuffs.
, Turn items inside out to reduce abrasion.
Shrinking Overdrying. , Irreversible condition. , Follow fabric care label directions.
, If shrinking is a concern, check load often.
, Remove items while slightly damp and
hang or lay flat to complete drying.
, Block knits into shape.
Wrinkling , Overloading.
, Leaving items in dryer
after cycle ends.
, Reduce load size and tumble at
medium or low heat for 5-10 minutes.
, Remove items immediately. Hang or
fold.
, Do not overload dryer.
, Remove items assoon as cycle ends.

Avoid Service Before calling for service, review this list. It may save both time and expense. The list includes
Checklist common occurrences that are not the result of defective workmanship or materials in this dryer.
0 CCURREN CE
Dryer does not start.
POSSIBLE CAUSE
Electrical power cord is not securely
plugged in or plug may be loose.
House fuse blown or circuit breaker
tripped.
SOLUTION
Make sure the plug fits tightly in wall outlet
Reset circuit breaker or replace fuse.
Make sure electrical line is not overloaded and the dryer is
on a separate circuit.
Thermal limiter tripped. Call authorized service person for replacement.
Dryer runs but won't heat. There are 2 house fuses in the dryer circuit. Replace fuse.
If 1of the 2 fuses is blown, the drum may
turn but the heater will not operate.
Gas supply valve is not open (gas models). Check to make sure supply valve is open. See
INSTALLATION INSTRUCTIONSfor procedure.
support the burner flame (gas models). See INSTALLATION INSTRUCTIONS.
LPgas supply tank is empty or there has
been a utility interruption of natural gas
(gas models).
Refill or replace tank.
Dryer should heat when utility service is restored.
Drying cycle takes too long, Lint screen is clogged with lint. Make sure all lint has been removed from the dryer lint
outside ofthedryerfeels too screen before starting each cycle.
hot or smells hot. Exhaust duct requirements have not been
met. Exhaust duct must be at least 4 inches in diameter and
made of rigid or flexible metal.
When in place, the duct must have no more than two 90°
bends and must not exceed length listed in
INSTALLATION INSTRUCTIONS.
Electric dryer is connected to a 208 volt Drying time will be 20% longer than drying on a 240 volt
circuit, circuit.
Drying procedures have not been SeeDrying Procedures.
followed.
Outside exhaust hood or exhaust duct may Clean out any obstruction.
be clogged or restricted.
High humidity. Use a dehumidifier near the dryer.
Excessive wrinkling. Dryer is overloaded. Do not overload. See Drying Procedures.
Items left in dryer too long. Remove items as soon ascycle ends.
Insufficient sorting of items. SeeDrying Procedures.
Drying temperature too high. Follow fabric care label instructions.
Scratching or chipping of the
drum finish. Foreign objects such as coins, pins, clips or
buttons are inside the dryer.
Permanently attached items such as belt
buckles, zippers and fasteners may be
hitting the inside of the drum.
Always remove foreign objects from pockets before
laundering. Remove objects from drum and restart dryer.
It may be necessary to baste a scrap of material securely
around ornaments before drying to prevent scratching
and damage to the dryer.
Drum damage caused by foreign objects or permanently
attached items is not covered by the warranty.

White Westinghouse Appliance Warranty Information
Your appliance is covered by a 90 day limited warranty. For 90 days from your original date of
purchase, Electrolux will pay costs, except as set forth below, associated with replacing any parts
of this appliance that prove to be defective in materials or workmanship when such appliance is
installed, used, and maintained in accordance with the provided instructions.
Exclusions This warranty does not cover the following:
1. Products with original serial numbers that have been removed, altered or cannot be readily
determined.
2. Product that has been transferred from its original owner to another party or removed outside
the USA or Canada.
3. Rust on the interior or exterior of the unit.
4. Products purchased "as-is" are not covered by this warranty.
5. Food loss due to any refrigerator or freezer failures.
6. Products used in a commercial setting.
7. Service calls which do not involve malfunction or defects in materials or workmanship, or for
appliances not in ordinary household use or used other than in accordance with the provided
instructions.
8. Service calls to correct the installation of your appliance or to instruct you how to use your
appliance.
9. Expenses for making the appliance accessible for servicing, such as removal of trim,
cupboards, shelves, etc., which are not a part of the appliance when it is shipped from the
factory.
10. Service calls to repair or replace appliance light bulbs, air filters, water filters, other
consumables, or knobs, handles, or other cosmetic parts.
11. Surcharges including, but not limited to, any after hour, weekend, or holiday service calls,
tolls, ferry trip charges, or mileage expense for service calls to remote areas, including the state
of Alaska.
12. Damages to the finish of appliance or home incurred during installation, including but not
limited to floors, cabinets, walls, etc.
13. Damages caused by: services performed by unauthorized service companies; use of parts
other than genuine Electrolux parts or parts obtained from persons other than authorized
service companies; or external causes such as abuse, misuse, inadequate power supply,
accidents, fires, or acts of God.
DISCLAIMER OF IMPLIED WARRANTIES; LIMITATION OF REMEDIES
CUSTOMER'S SOLE AND EXCLUSIVE REMEDY UNDER THIS LIMITED WARRANTY SHALL BE PRODUCT
REPAIR AS PROVIDED HEREIN. CLAIMS BASED ON IMPLIED WARRANTIES, INCLUDING WARRANTIES OF
MERCHANTABILITY OR FITNESS FOR A PARTICULAR PURPOSE, ARE LIMITED TO THE DURATION OF
THE EXPRESS LIMITED WARRANTY STATED ABOVE. ELECTROLUX SHALL NOT BE LIABLE FOR
CONSEQUENTIAL OR INCIDENTAL DAMAGES SUCH AS PROPERTY DAMAGE AND INCIDENTAL
EXPENSES RESULTING FROM ANY BREACH OF THIS WRITTEN LIMITED WARRANTY OR ANY IMPLIED
WARRANTY. SOME STATES AND PROVINCES DO NOT ALLOW THE EXCLUSION OR LIMITATION OF
INCIDENTAL OR CONSEQUENTIAL DAMAGES, OR LIMITATIONS ON THE DURATION OF IMPLIED
WARRANTIES, SO THESE LIMITATIONS OR EXCLUSIONS MAY NOT APPLY TO YOU. THIS WRITTEN
WARRANTY GIVES YOU SPECIFIC LEGAL RIGHTS. YOU MAY ALSO HAVE OTHER RIGHTS THAT VARY
FROM STATE TO STATE.
If You Need Service
Keep your receipt, delivery slip, or some other appropriate payment record to establish the warranty period should
service be required. If service is performed, it is in your best interest to obtain and keep all receipts. Service under
this warranty must be obtained by contacting Electrolux at the addresses or phone numbers below.
This warranty only applies in the USA and Canada. In the USA, your appliance is warranted by Electrolux Major
Appliances North America, a division of Electrolux Home Products, Inc. In Canada, your appliance is warranted by
Electrolux Canada Corp. Electrolux authorizes no person to change or add to any obligations under this warranty.
Obligations for service and parts under this warranty must be performed by Electrolux or an authorized service
company. Product features or specifications as described or illustrated are subject to change without notice.
USA
1.866.312.2117
Electrolux Major Appliances
North America
P.O. Box 212378
Augusta, GA 30907
Canada
1.800.668.4606
Electrolux Canada Corp.
5855 Terry Fox Way
Mississauga, Ontario, Canada
L5V 3E4
Table of contents
Other White-Westinghouse Dryer manuals

White-Westinghouse
White-Westinghouse WKFM06FGMW3 Quick guide

White-Westinghouse
White-Westinghouse WDE216RB User manual

White-Westinghouse
White-Westinghouse WEQ332HS0 User manual

White-Westinghouse
White-Westinghouse SGR351HQ1 User manual

White-Westinghouse
White-Westinghouse XED User manual

White-Westinghouse
White-Westinghouse SpaceMates LE600A User manual

White-Westinghouse
White-Westinghouse DE 500J User manual

White-Westinghouse
White-Westinghouse LFD301GW1 User manual

White-Westinghouse
White-Westinghouse SGR641HS1 User manual

White-Westinghouse
White-Westinghouse DE400K User manual