Wido WD011810822 User manual

900W
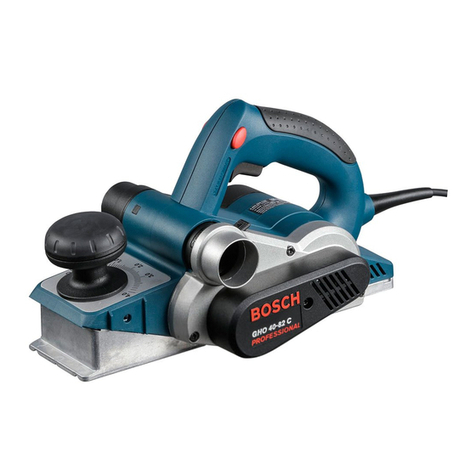
Planer WD011810822

WD011810822
Thanks for you purchasing a WIDO product. We are confident that you will appreciate the
quality of the product and you will be entirely satisfied with your purchase. Please read
carefully the user safety and operating instruction on how to operate this product correctly
within safety norms and regulations.

WD011810822
3
1 2 3
4 5 6
7 8 9
1 2 3 54 6
789
10
11
12
13
14
5
4

WD011810822
4
10 11 12
13

900W PLANER ENG
COMPONENT LIST
1) Cutting depth adjuster
2) Dust exhaust outlet
3) Planing depth scale
4) On/off switch
5) Lock-off button
6) Hand grip areas
7) Rear base plate
8) Belt cover
9) Front base plate
10) V-groove
11) Base plate stander (See Fig 3)
12) Blade drum (See Fig 9)
13) Blade clamp (See Fig 9)
14) Cutter blade (See Fig 9)
NORMAL ACCESSORIES
1) Spanner: 1pc
2) Parallel guide: 1pc
3) Sliding support: 1pc
4) Depth gauge: 1pc
5) Knob: 3pcs
6) Belt: 1pc
7) Cutter blade: 2pcs
8) Carbon brushes: 2pcs
We recommend that you purchase your accessories from the same store that sold you the tool.
Use good quality accessories marked with a well-known brand name. Choose the type according to
the work you intend to undertake. Refer to the accessory packaging for further details. Store
personnel can assist you and offer advice.
5

900W PLANER ENG
GENERAL POWER TOOL SAFETY WARNINGS:
Warning: Read all safety warnings and all instructions. Failure to follow the warnings and
instructions may result in electric shock, fire and/or serious injury.
Save all warnings and instructions for future reference.
The term "power tool" in the warnings refers to your mains-operated (corded) power tool or
battery-operated (cordless) power tool.
1) Work area safety
a) Keep work area clean and well lit. Cluttered or dark areas invite accidents.
b) Do not operate power tools in explosive atmospheres, such as in the presence of
flammable liquids, gases or dust. Power tools create sparks which may ignite the dust or fumes.
c) Keep children and bystanders away while operating a power tool. Distractions can cause
you to lose control.
2) Electrical safety
a) Power tool plugs must match the outlet. Never modify the plug in any way. Do not use
any adapter plugs with earthed (grounded) power tools. Unmodified plugs and matching outlets
will reduce risk of electric shock.
b) Avoid body contact with earthed or grounded surfaces, such as pipes, radiators, ranges
and refrigerators. There is an increased risk of electric shock if your body is earthed or grounded.
c) Do not expose power tools to rain or wet conditions. Water entering a power tool will
increase the risk of electric shock.
d) Do not abuse the cord. Never use the cord for carrying, pulling or unplugging the power
tool. Keep cord away from heat, oil, sharp edges or moving parts. Damaged or entangled
cords increase the risk of electric shock.
e) When operating a power tool outdoors, use an extension cord suitable for outdoor use.
Use of a cord suitable for outdoor use reduces the risk of electric shock.
f) If operating a power tool in a damp location is unavoidable, use a residual current device
(RCD) protected supply. Use of an RCD reduces the risk of electric shock.
3) Personal safety
a) Stay alert, watch what you are doing and use common sense when operating a power
tool. Do not use a power tool while you are tired or under the influence of drugs, alcohol or
medication. A moment of inattention while operating power tools may result in serious personal
injury.
b) Use personal protective equipment. Always wear eye protection. Protective equipment
such as dust mask, non-skid safety shoes, hard hat, or hearing protection used for appropriate
conditions will reduce personal injuries.
c) Prevent unintentional starting. Ensure the switch is in the off-position before connecting
to power source and/or battery pack, picking up or carrying the tool. Carrying power tools with
your finger on the switch or energising power tools that have the switch on invites accidents.
d) Remove any adjusting key or wrench before turning the power tool on. Awrench or a key
left attached to a rotating part of the power tool may result in personal injury.
e) Do not overreach. Keep proper footing and balance at all times. This enables better control
6

900W PLANER ENG
of the power tool in unexpected situations.
f) Dress properly. Do not wear loose clothing or jewellery. Keep your hair, clothing and
gloves away from moving parts. Loose clothes, jewellery or long hair can be caught in moving
parts.
g) If devices are provided for the connection of dust extraction and collection facilities,
ensure these are connected and properly used. Use of dust collection can reduce dust-related
hazards.
4) Power tool use and care
a) Do not force the power tool. Use the correct power tool for your application. The correct
power tool will do the job better and safer at the rate for which it was designed.
b) Do not use the power tool if the switch does not turn it on and off. Any power tool that
cannot be controlled with the switch is dangerous and must be repaired.
c) Disconnect the plug from the power source and/or the battery pack from the power tool
before making any adjustments, changing accessories, or storing power tools. Such
preventive safety measures reduce the risk of starting the power tool accidentally.
d) Store idle power tools out of the reach of children and do not allow persons unfamiliar
with the power tool or these instructions to operate the power tool. Power tools are dangerous
in the hands of untrained users.
e) Maintain power tools. Check for misalignment or binding of moving parts, breakage of
parts and any other condition that may affect the power tool’s operation. If damaged, have
the power tool repaired before use. Many accidents are caused by poorly maintained power
tools.
f) Keep cutting tools sharp and clean. Properly maintained cutting tools with sharp cutting
edges are less likely to bind and are easier to control.
g) Use the power tool, accessories and tool bits etc. in accordance with these instructions,
taking into account the working conditions and the work to be performed. Use of the power
tool for operations different from those intended could result in a hazardous situation.
5) Service
a) Have your power tool serviced by a qualified repair person using only identical
replacement parts. This will ensure that the safety of the power tool is maintained.
ADDITIONAL SAFETY INSTRUCTIONS FOR YOUR TOOL:
1) Always wear a dust mask. Wear hearing protection.
2) Wear safety glasses, protective gloves and sturdy shoes. If you have long hair, wear a protective
hairnet. Work only with close-fitting clothes.
3) If possible, ensure the workpiece is firmly clamped to prevent movement.
4) Your planer is a hand held tools, do not use the planer with the blades facing upward (as
stationary type planer).
5) Avoid cutting nails. Inspect for and remove all nails from the workpiece before operation.
6) Be sure the blade installation bolts are securely tightened before operation.
7) Apply the tool to the workpiece only when switched on. Use only sharp blades.
8) Wait until the blade attains full speed before cutting.
9) Always hold the tool firmly when working and ensure a secure stance. When working, the plane
7

900W PLANER ENG
rear base must lie flat on the surface.
10) Do not put your fingers into the dust exhaust outlet. Use a wooden stick to unblock any material.
11) Wait for the cutter to stop before setting the tool down. An exposed cutter may engage the
surface leading to possible loss of control and serious injury.
12) Never stop the cutting blade by applying pressure tothe blade.
13) When an extension cord is required you must ensure it has the correct ampere rating for your
power tool and that it is in a safe electrical condition.
DOUBLE INSULATION
The tool is double insulated. This means that all the external metal parts are electrically insulated
from the main power supply. This is done by placing insulation barriers between the electrical and
mechanical components making it unnecessary for the tool to be earthed.
IMPORTANT NOTE
Be sure the supply is the same as the voltage given on the rating plate. The tool is fitted with a
two-core cable and plug.
Remove the main plug from socket before carrying out any adjustment or servicing.
SYMBOLE
To reduce the risk ofinjury, user
must read instruction manual
Warning
WEEE
Wear ear protection
Wear eye protection
Wear dust mask
8

900W PLANER ENG
TECHNICAL DATA:
OPERATING INSTRUCTIONS
NOTE: Before using the tool, read the instruction manual carefully.
1. INTENDED USE
This tool is intended for the planning of firmly supported wooden materials, such as beams and
boards. With the appropriate blades it is also suitable for beveling edges.
2. ADJUSTING THE CUTTER DEPTH
1) Turn the cutting depth adjuster to select the required cutting depth on the scale (See Fig 1).
The front base plate will move up and down accordingly. The cutting depth can be adjusted within a
range of 0-2mm.
2) Rough cutting should be accomplished at large cutting depths and at a suitable speed so that
shavings are smoothly ejected from the tool. To ensure a smoothly finished surface, finish cutting
should be accomplished at small cutting depths and at low feeding speed.
3. OPERATING THE ON/OFF SWITCH
1) Your switch is locked off to prevent accidental starting. Depress lock off button then on/off
switch and release lock off button. Your switch is now on (See Fig 2).
2) To switch off just release the on/off switch.
4. BASEPLATE STANDER
Whenever you place your planer onto a surface the rear of the base plate will sit on this stander to
protect the cutting blades from any damage and the blades from damaging the surface. When
planing, the stander will be pushed away by the end of the wood. Always check the stander is free
to move on the base plate (See Fig 3).
5. BEGINNING AND ENDING THE CUTTING OPERATION
Place the front base of the planer on the material and support the planer horizontally (See Fig 4).
Turn on the power switch, and slowly operate the planer toward the leading edge of the material.
Firmly depress the front half of the planer at the first stage of cutting, depress the rear half of the
planer at the end of the cutting operation (See Fig 5). The planer must always be kept flat
Model
WD011810822
Voltage
110-120V AC
220-240V AC
Frequency
50-60Hz
50-60Hz
Power input
900W
900W
No load speed
16000/min
16000/min
Planing width
82 mm
82 mm
Cutting depth
2mm
2mm
Double insulation
Machine weight
2.5Kg
2.5Kg
9

900W PLANER ENG
throughout the entire cutting operation.
CAUTIONS: When the planer is suspended with one hand after finishing the planning operation,
ensure that the cutting blades of the planer do not contact or come too near your body. Failure to do
so could result in serious injury.
6. BEVELING EDGES
The V-grooves in the front base allow a quick and easy beveling of work piece edges. To do this,
place the base with the V-groove on the edge of the workpiece and guide it along the edge. During
the beveling procedure, make sure you maintain a steady angle position (45°) and uniform feed
(See Fig 6).
7. REPLACING THE PLANER BLADE
1) Your blades have two cutting sides and are reversible. Dull and worn plane blades cannot be
reground and must be replaced. To reverse or replace the planer blades, using the spanner
provided loosen the 3 bolts approximately 1/2 turn clockwise (See Fig 7). Hold the blade clamp and
using a piece of wood slides the blade out of the blade clamp (See Fig 8).
NOTE: there is no need to remove the blade clamp as this can change the factory settings for
cutting blade height control. Do not adjust the height adjusting screws.
2) Use a new blade or reverse the existing blade, then slide the blade into the blade clamp in the
connecting orientation (See Fig 9). Check the blade is equal in the clamp and the blade edge is
level with the base plate side.
3) Tighten the 3 bolts equally, then rotate the blade drum by a further 180°and repeat the
procedure assembling the second plane blade. Always replace both blades at the same time.
Otherwise, imbalance can cause vibrations and reduce the useful service life of the tool. Before
connecting the power cord, rotate by hand to check the blade drum is free to rotate.
WARNING: Remove power cord from mains before making adjustments or changing blades.
CAUTIONS: We recommend wearing safety gloves when replacing the plane blade, in order
to protect against injury from the sharp cutting edges of the plane blade.
8. REPLACING CARBON BRUSHES
When the carbon brushes need be replaced, use a screwdriver to remove the motor rear cover (See
Fig 10 & 11). Then take out the worn carbon brushes (See Fig 12 & 13), insert new ones into the brush
holder. Both carbon brushes should be replaced at the same time. Use only identical carbon
brushes.
MAINTENANCE
WARNING: Remove the plug from the socket before carrying out any adjustment, servicing
or maintenance.
1. Use of dull or damaged blades will result in reduced cutting efficiency and may cause overloading
of the motor. Replace the cutter blades as often as necessary. Always change the blades in pairs,
otherwise the resulting imbalance will cause vibration and shorten tool life.
2. Regularly inspect all mounting screws and ensure that they are properly tightened. Should any
of the screws be loose, retighten them immediately. Failure to do so could result in serious hazard.
3. Never use water or chemical cleaners to clean your power tool. Wipe clean with a dry cloth.
10

900W PLANER ENG
4. Always store your power tool in a dry place.
5. Keep the motor ventilation slots clean.
6. If the supply cord is damaged, it must be replaced by the manufacturer, its service agent or
similarly qualified persons in order to avoid a hazard.
ENVIRONMENT PROTECTION
Waste electrical products should not be disposed of with household waste. Please recycle
where facilities exist. Check with your Local Authority or retailer for recycling advice.
11

900W PLANER ENG
EXPLOSIVE VIEW
12

900W PLANER ENG
PART LIST
NO
DESCRIPTION
Q’TY
NO
DESCRIPTION
Q’TY
1
Screw
1
30
Housing
1
2
Belt cover
1
31
Cord clamp
1
3
Screw
2
32
Screw
2
4
Belt
1
33
Switch
1
5
Big wheel
1
34
Handle Cover
1
6
Circlip
1
35
Screw
5
7
Bearing
1
36
Screw
3
8
Screw
2
37
Motor rear cover
1
9
Bearing holder
1
38
Screw
3
10
Blade drum
1
39
Flange
1
11
Blade clamp
2
40
Bearing
1
12
Blade
2
41
Carbon brush
2
13
Blade holder
2
42
Brush holder
2
14
Screw
4
43
Screw
4
15
Bolt
6
44
Nut
2
16
Baffle
1
45
Cutting depth adjuster
1
17
Support
1
46
Spring Cap
2
18
Screw
3
47
Spring
2
19
Bearings
1
48
Connector
1
20
Circlip
1
49
Front base plate
1
21
Small wheel
1
50
Screw
4
22
Rotor
1
51
Rear base plate
1
23
Screw
2
52
Screw
4
24
Stator
1
53
Parallel guide
1
25
Bearings
1
54
Sliding support
1
26
Sleeve of bearing
1
55
Spanner
1
27
Stander
1
56
Knob
3
28
Cord and plug
1
57
Depth gauge
1
29
Cord protector
1
13


www.widopt.com
MADE IN CHINA
Copyright @ WIDO Machinery Co., Ltd. All rights reserved.
Table of contents